-
Christmas Airfix!
-
JonEdwardsFree MemberPosted 4 years ago
Bugger. Shows here fine.
Trying to link from Dropbox as Flickr isn’t playing ball any more. Any ideas how…? So far just right clicked on the image, properties, copied the link.
spursn17Free MemberPosted 4 years agoTrying to link from Dropbox as Flickr isn’t playing ball any more. Any ideas how…?
I use Postimage, it’s not that great but it is reliable.
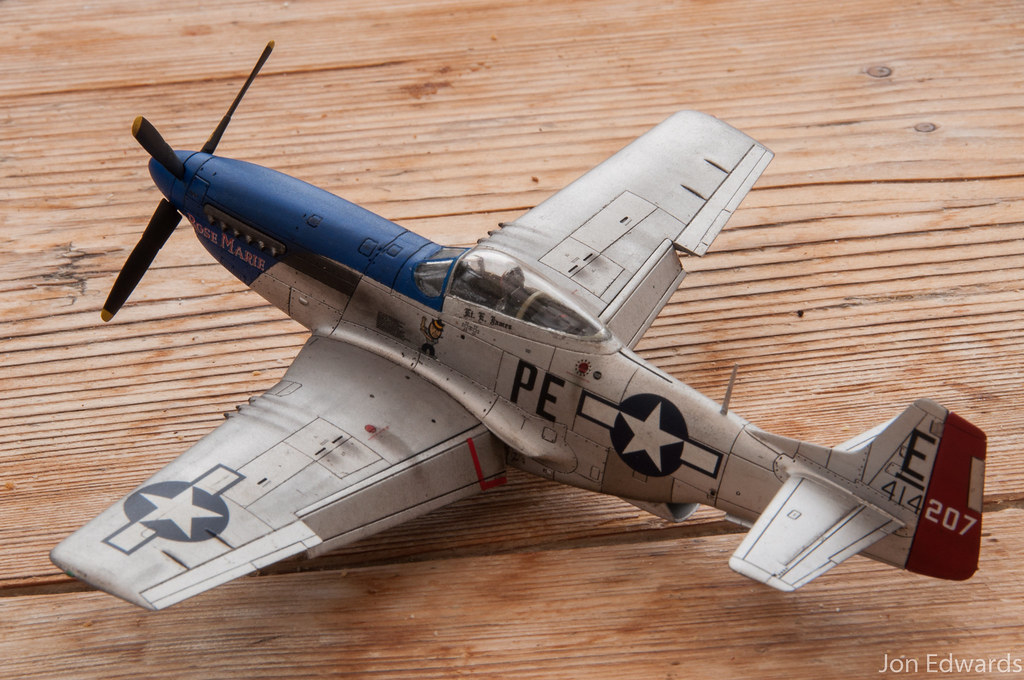
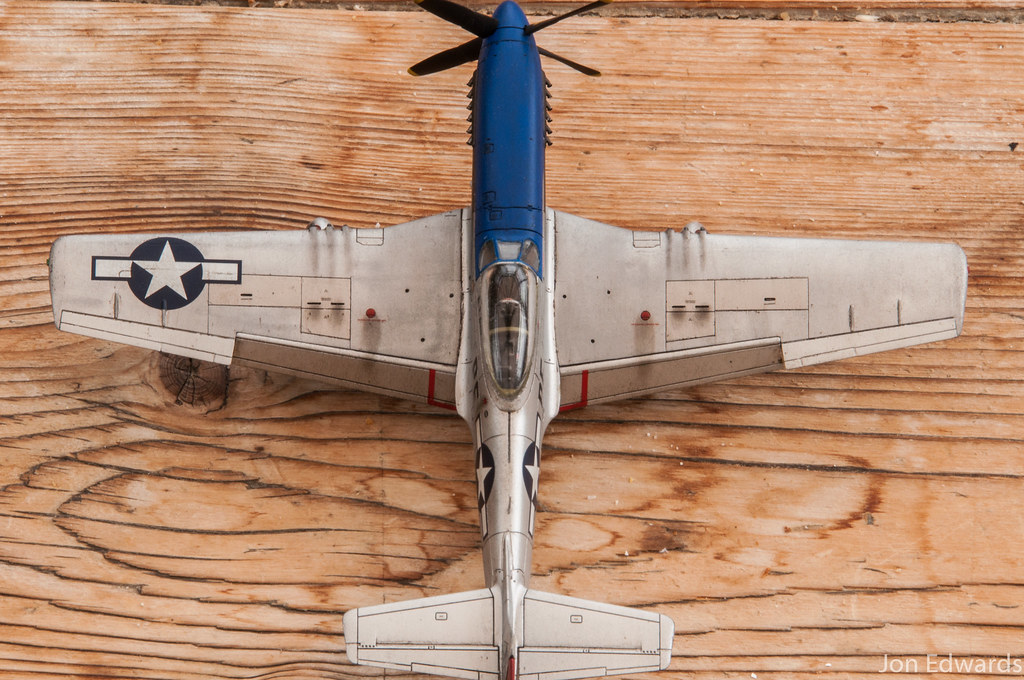
spursn17Free MemberPosted 4 years agoFinally finished the P51D. It’s the first time I’ve done a mixed camo/natural metal finish and tried a different technique on it as regular washes wouldn’t work for both. To break up the flatness of the metal I weathered it with a few different grades of clear coat, it worked really well but doesn’t show up in the pics. One pain in the bum was that this aircraft had two rear view mirrors on it, I made these out of bits of clear sprue but it was hard to get them to sit at the same angle. Any criticism or comments are welcome, the next one is always better!
 JonEdwardsFree MemberPosted 4 years ago
Well Flickr are still a bunch of pox-ridden appendages, but hopefully I can now do some pics the old way…
Mustang
[url=https://flic.kr/p/2h1Jrff][/url]
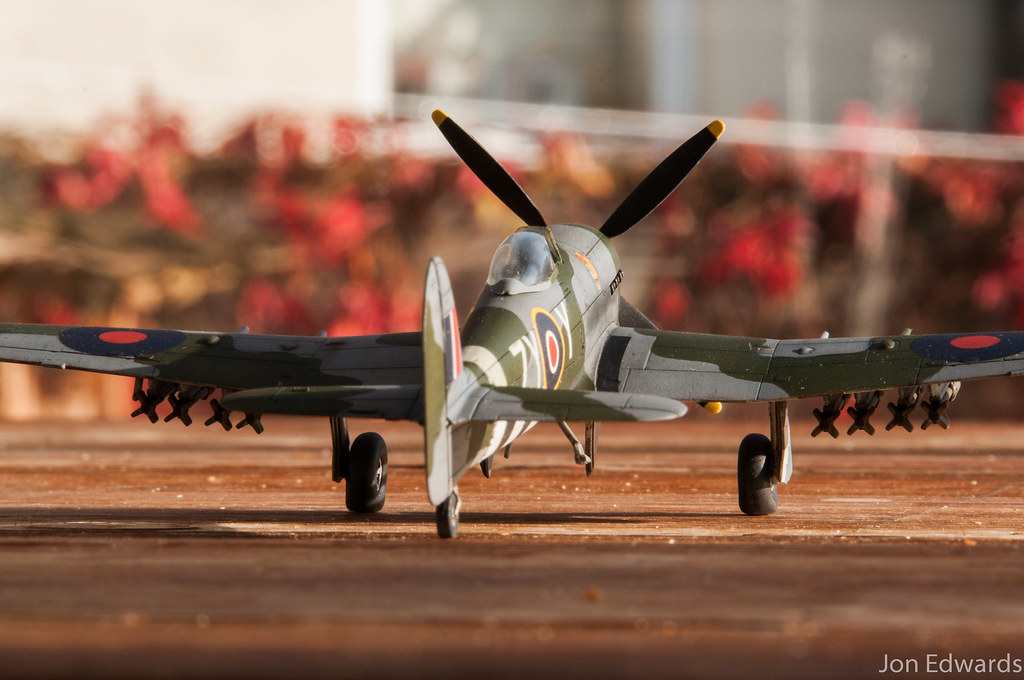
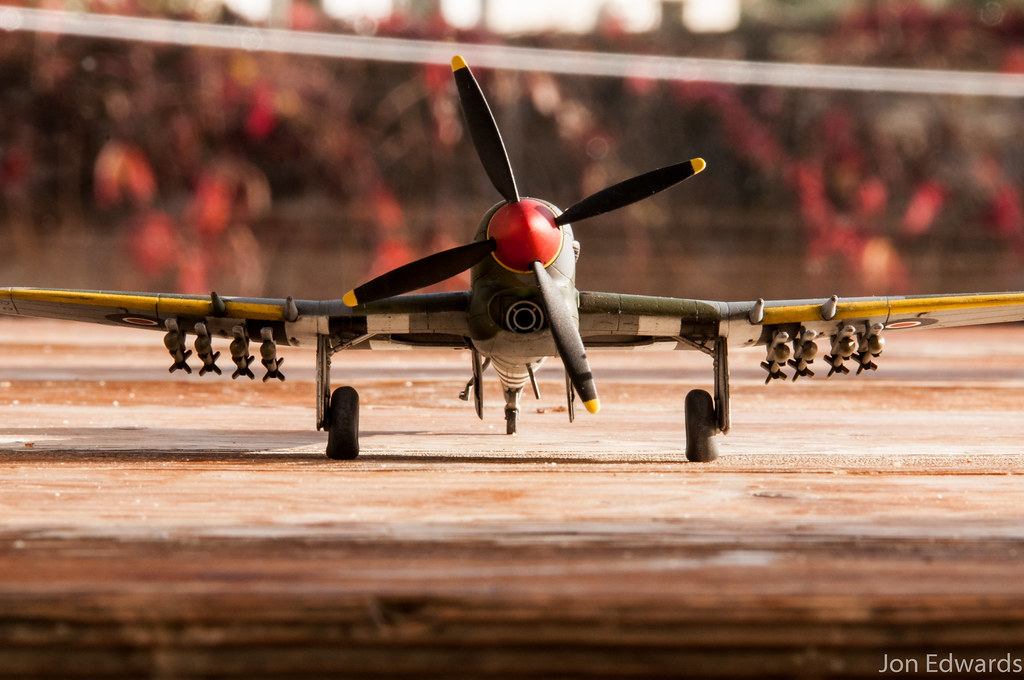
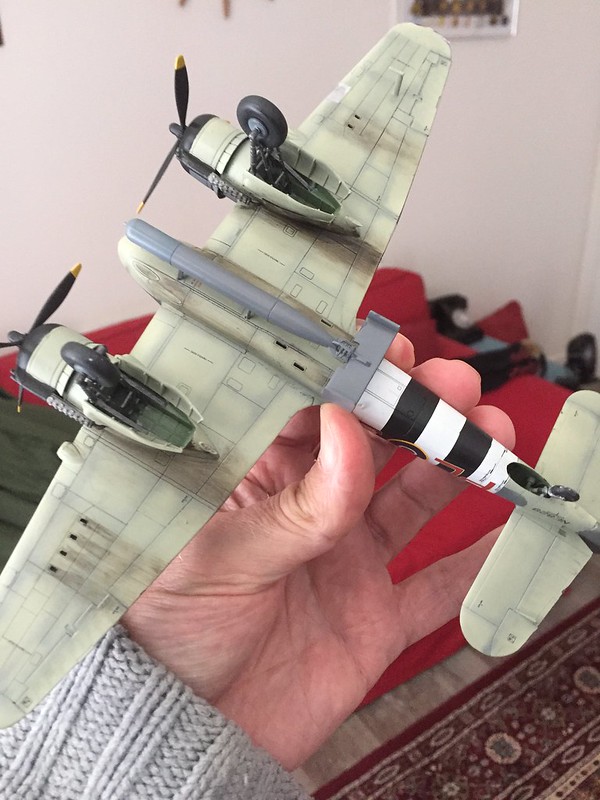
Martlet
[url=https://flic.kr/p/2h1HDaD][/url]
CountZeroFull MemberPosted 4 years ago@JonEdwards – those are two lovely models, great weathering and paint. Well done sir! 👏🏻
spursn17Free MemberPosted 4 years ago@JonEdwards – those are two lovely models, great weathering and paint. Well done sir! 👏🏻
Agreed. Top job on the Martlet, especially the underside, and I wish I’d done a more colourful paint job on my P51 now 😭
nostrilsFree MemberPosted 4 years agoWow good job spursn17 and JonEdwards! Is this thread going to get busier now that the nights are drawing in I wonder?
Harry_the_SpiderFull MemberPosted 4 years agoI think so. I’ve only completed one kit this year with two WIPs.
spursn17Free MemberPosted 4 years agoI think so. I’ve only completed one kit this year with two WIPs.
The Mustang was the first kit I’ve started and finished within a year for a long while! Probably going to do a vehicle next, I’ve got a Bronco Stug III or a Russian SU85 that are contenders for the next build. Or it could be a Tiger, another Tiger, a Panther, a Wespe, a T72, an LRDG Chevy truck, a PzIII, or a Möbelwagon 😂
TrailriderJimFree MemberPosted 4 years agoJon, please tell us about paint techniques and materials used.
JonEdwardsFree MemberPosted 4 years agoBlimey, errm – thanks for all the compliments! We are not worthy etc…
First thing I’d say is that natural light, a decent camera and a wee bit of knowledge of how to use it, plus a copy of Lightroom can make things look a damn sight better than they are in the plastic!
Paints – Alclad primer and varnishes, Vallejo Model Air and Metal Colour. Wash with Flory Grime and Dark Dirt. The Martlet exhaust and gun stains are oil dot, the stuff on the Mustang an experiment with pastels, which seem a lot more controllable than the oil dot technique.
The Mustang was my first attempt at a naked metal finish and I’m not entirely happy with it as it’s quite orangepeely – think I sprayed at too high a pressure, but it’s all a learning experience, eh…? There’s all some quite shite masking round the tail end of the canopy.
JonEdwardsFree MemberPosted 4 years ago…and another one… Airfix Typhoon 1b 1/72
Invasion stripes, wing yellow leading edges and the mint band round the tail are all airbrushed, which I’m pretty chuffed with. Ballsed up the main canopy though – tried dipping it in Future, and it dried with a big sag in it and I struggled to clean it off. Sprayed it with Alclad gloss varnish and its not too bad now, but I might well get a vacform one at some point and redo it.
timbog160Full MemberPosted 4 years agoSome fabulous work here…well done. I have finally finished my 1/32 Heinkel 219 (Revell not ZM!) so will try to get some pics – it’s only taken 4 years!!!
Harry_the_SpiderFull MemberPosted 4 years agoThat Typhoon is very nice. I’ve got a couple of them and a Tempest in the stash. Was going to ask about whether you had painted the stripes (bit you mentioned it) as I did one a few years back and the decals weren’t great.
RockhopperFree MemberPosted 4 years agoMy Airfix Beaufighter. It’s a really nice kit, good fit and no filler needed anywhere.
 esselgruntfuttockFree MemberPosted 4 years ago
Mt Dad worked on Beau’s during the war. ( & Libs)
Nice build Rockhopper.timbog160Full MemberPosted 4 years agoHeinkel 219. This thing is big – no idea where I’m going to put it!
Harry_the_SpiderFull MemberPosted 4 years agoI like that a lot. What scale is it?
The stress of the aerials on the front would put me right off attempting it.
timbog160Full MemberPosted 4 years agoIt’s 1/32 – Revell. Very good VFM at £50 for such a big kit. If you read some of the more detailed reviews it has some accuracy problems but didn’t bother me. I also have one of their 1/32 Ju88’s in the stash.
Tamiya do a 1/48 version of the Heinkel which is a lot more manageable.!
PJM1974Free MemberPosted 4 years agoWas about to compliment JonEdwards on the 1/48 Hasegawa Typhoon.
But that’s 1/72…Awesome effort!
CountZeroFull MemberPosted 4 years agoLoving the Typhoon and the Beaufighter, two of my favourite aircraft, and that Heinkel 219 is awesome! Fabulous kit, and an amazing looking plane.
stumpy01Full MemberPosted 4 years agoI was shopping at the weekend for birthday presents; my Wife’s birthday today and my daughter’s next week.
I saw some of the Airfix Starter kit models reduced from £13.50 to £6 and some of them came with a decent selection of paints.
I ended up buying the Boulton Paul Defiant 1:72 model.I haven’t done a model for probably 30 years & I couldn’t believe how small some of the parts are once I got it out of the box.
I think i will need some kind of magnifier & some tweezers!
While I have no doubt in my mind that this will be an amateur job (and probably take me all winter) does anyone have any beginner tips of things to do, or not to do?
From the vague depths of my mind, things I remember struggling with were:
– getting glue on the parts, which would then result in the paint not going on properly, or causing fingerprints on the surface of the model
– glue on the canopy making it go milky – I’ve seen a tip to use PVA glue on the canopy.
– painting things carefully – I know that there are all the ‘realistic’ features like weathering, exhaust marks etc. but I’m just talking about the boundary between colours being straight etc. Is it just a matter of being careful, or should I use masking tape etc?
– Getting the panel lines added – I don’t want these to look too obvious, but think they do add a great degree of realism. How are they generally achieved.
– Decals – I always used to end up tearing larger decals or they’d get folded on themselves. Any tips?PJM1974Free MemberPosted 4 years ago…getting glue on the parts, which would then result in the paint not going on properly, or causing fingerprints on the surface of the model
Tamiya extra-thin cement is brilliant. It is extremely effective and can be used to glue clear parts too. A little goes a very long way.
– glue on the canopy making it go milky – I’ve seen a tip to use PVA glue on the canopy.
This works to a degree, however PVA glue will weaken over time.
– painting things carefully – I know that there are all the ‘realistic’ features like weathering, exhaust marks etc. but I’m just talking about the boundary between colours being straight etc. Is it just a matter of being careful, or should I use masking tape etc?
You can buy pre-die cut masks to help with camouflage, or you can use sausages of blu-tac arranged in a pattern. The best way forwards is to use very thin coats of paint if you’re using a brush. Personally, I prefer using acrylic paint as it’s not as messy and can be cleaned up with soapy water. If you’re going to use tape then try Tamiya masking tape. It’s tacky as opposed to sticky and won’t lift paint when you remove it.
Painting canopy frames can be difficult at first. I mask canopies with Tamiya tape and use a brand new scalpel blade to gently cut out the excess tape so that frame parts can be painted. Again, there are pre-cut canopy masks which can be used if you’re not feeling confident, but these can be fiddly to apply.
– Getting the panel lines added – I don’t want these to look too obvious, but think they do add a great degree of realism. How are they generally achieved.
When you’ve finished painting your model, you need to add a gloss coat. I use Pledge floor polish, it’ll add a protective coat to seal in the matt paint underneath.
If you want to add panel lines, you’ll need a couple of tins of enamel paint (dark brown and black) and some enamel thinner. Pour a small amount of thinner into a container and add a couple of drops of the enamel paint so that you end up with a very thin oil based tint.
You then need to use a small brush to add the tinned enamel over the panel lines on top of the glossed surface, the pigment will pool in the lines & rivet holes. Simply wipe off any excess with a cotton bud or kitchen towel and leave to dry.
– Decals – I always used to end up tearing larger decals or they’d get folded on themselves. Any tips?
First of all, you need to make sure that you’re not trying to stick decals to a matt surface. You need to add the gloss coat first for the decals to bond without lots of air bubbles underneath.
Large decals are difficult to apply, so it makes sense to cut them into smaller pieces. If the water you’re using to soak the decals in is slightly soapy then this will help you manoeuvre the decals on a glossy surface with a cotton bud or small paint brush.
Oh and finally, you need to add another gloss coat of Pledge on top of the decals, allow to dry and finish off with a satin or matt acrylic varnish. Et voila!
stumpy01Full MemberPosted 4 years agoCool! Some great tips there, thanks.
I did wonder how much extra stuff I’d end up buying to actually make the model. I’ve not looked at the supplied brushes yet – hopefully they won’t be complete rubbish!
:o)PJM1974Free MemberPosted 4 years agoYou’re welcome!
Granted, it’s not always a cheap hobby. TBH, I never use Airfix/Humbrol acrylics as they’re of very patchy quality so I end up with Tamiya instead – I realise that my post reads like I’m a Tamiya fanboi!
To start off with, you’ll need a selection of decent brushes, a few pots of Tamiya paint (available from Hobby Craft), a little bit of research about mixing paint can be found online, Tamiya tape, a large container of Pledge, matt varnish, decent tweezers, a scalpel and replacement blades, Extra Thin Cement, sprue cutters, a selection of emery boards, Perfect Plastic Putty (again, water based so can be thinned easily), a free-standing magnifying glass, a couple of tins of enamel for panel line washing together with some enamel thinner, cotton buds and kitchen towel.
Harry_the_SpiderFull MemberPosted 4 years agoAll of the above.
The stuff supplied with the kit isn’t the best, but for £6 you can’t grumble. The paint will be horrible an the cement like, errr, cement!
If it was me I’d just build it, and if the bug bites I’d get another one and buy better paints, cement, tape and so on. The first one can become your “test pig” when you get your first airbrush 😉
For a tip that is free, I’d wash everything in warm soapy water before you start as any grease or residual release agent from the moulding process will compromise paint adhesion.
The good thing about this hobby (apart from the solitude and satisfaction) is that once you have all of the kit, which on the MTB scale is really very cheap, you don’t have to buy it again. I spent £40 on Tamiya paints 2 years ago and still haven’t run out. Decent cement will do 10+ kits, paint thinner too. Paint brushes from eBay in packs of 10 work out at about 20p each etc…
PJM1974Free MemberPosted 4 years agoOh and don’t forget Tamiya thinner and a couple of small pipettes too. It’s not just a thinning agent for airbrushing, you should use it to thin down paint prior to application.
It seems expensive at £7 for a small container, but it lasts bloody ages.
Harry_the_SpiderFull MemberPosted 4 years agoPipettes off ebay. I got a bag of 100 for a couple of quid.
stumpy01Full MemberPosted 4 years agoHarry_the_Spider
If it was me I’d just build it, and if the bug bites I’d get another one and buy better paints, cement, tape and so on.
I did think that this might be the way forward. I’ll try to apply some of the tips along the way & dig around the house to see what stuff we might already have that I can use.
I spent £40 on Tamiya paints 2 years ago and still haven’t run out.
My memory of this was buying a load of paints for a model, using them & then the next time I needed to use them, they were dried up & I could barely even get the lids off. Is that because they were probably enamel paints (at a guess) and the Tamiya ones are water-based?
I think I probably should take this as a learning exercise, keep things simple & see where it ends up….
😉
Harry_the_SpiderFull MemberPosted 4 years agoTamiya are screw topped acrylics thinned with alcohol. As long as you keep the thread on the pot clean you are OK.
PJM1974Free MemberPosted 4 years agoTop Tip: If you can’t open your Tamiya paint, simply tap the base of the pot against a hard, flat (preferably wooden) surface. This is enough to break the seal if the thread binds.
Harry_the_SpiderFull MemberPosted 4 years agoGot to spend the day in my Happy Place.
Tried Alclad varnishes for the first time. Quite pleased.
Harry_the_SpiderFull MemberPosted 4 years agoYep. Italeri 1:72.
Fit is a bit suspect in places, but the decals more than make up for it.
johndrummerFree MemberPosted 4 years agoThat’s Italeri for you. They end up being a decent model but can be a pig while you’re working on them
I’ve done one of their 1:24 trucks – big beast – and am working on their 1:24 Renault 5 Alpine. Waiting on some aftermarket decal stripes so I can (kind of) replicate my first ever car, which was a 1982 R5 TL. I’m going to seal the bonnet in the down position, the engine bay isn’t the best


 [/url]

 [/url]


You must be logged in to reply to this topic.