Home › Forums › Chat Forum › Cheap 3d printer kits – Experiences?
- This topic has 690 replies, 36 voices, and was last updated 4 years ago by zilog6128.
-
Cheap 3d printer kits – Experiences?
-
stumpy01Full MemberPosted 4 years ago
I’m looking at doing shields for local gp surgeries, care homes etc. I have sent out emails explaining what I can provide but not had any response yet.
There’s a school in Stamford I’ve had some contact with who are supplying Peterborough City hospital direct, so I could supply them to, if I get no response from the local places.I’ve printed the Prusa shield, one from a Swedish website (Precuris) and the 3dVerkstan one that is doing the rounds.
I have to say, I don’t really rate the Prusa one. It uses a ton of filament compared to some of the others and takes much longer. It also seems to be larger than required.The Precuris one is an impressive design IMO, but I can only get one at a time on the bed of my CR10-Mini.
The 3dVerkstan one uses a tiny amount of filament, prints fast and hold itself on without elastic.Currently working from home means I can have the printer running almost all day and I’ve probably got 4to5kg of PLA to print with.
papamountainFree MemberPosted 4 years agoAh, didn’t realise the 3dcrowd thing was just this weekend. I’m sure they will go again so probably worth it to keep printing. They are crowdfunding too so talk about paying for a percentage of peoples petg purchases if required.
I think they tell you to use the Prusa designed ones rc-3.
Stumpy01, I agree about there being better designs out there. The prusa rc3 one takes 3-4 hours when i slice it. A long time. Although there are stacked ones to do 6 at a time. I saw the 3dverkstan one too.
So not sure which one to make really. As mentioned before, it was handy to be able to just make the frames and send them in to be finished by someone else. I too have about 4-5kg of pla in stock.
zilog6128Full MemberPosted 4 years agoAgree that the Prusa version takes an age to print vs 3dVerkstan, but it’s got to be more robust in terms of not being accidentally knocked off, etc, as well as more comfortable? I am happy to make whichever version is requested tho.
turboferretFull MemberPosted 4 years agoDespite having requested and received an Ender 3 for Christmas 2018 I’ve only just got around to using it! I think a combination of a 2nd offspring and thinking that it would be more difficult than it is was putting me off, but it’s been much simpler than I had expected.
First job was to get an old monitor which I had acquired from work into service. I wanted to mount it above my laptop screen

I needed to repair it first, which I diagnosed as a blown surface mount fuse for the backlight circuit

Wilfred helped design the fuse holder and was very excited to watch it print

Soldered this in and the monitor was back to life

Next step was to modify the stand, which handily splits into 2 parts


I printed a quick test to verify the dimensions for the fit, which I was glad I did as I’d accidentally mirrored it and the large and small lobe were swapped over

Going from a 10 minute 2g print to 25 hours was slightly daunting, but I didn’t want to skimp on fill to give it lots of strength


A good bit heavier than what preceded it

Assembled fine, although removing the support from the centre for the stud which runs inside did require drilling

All sorted with the new monitor mounted

Of course the monitor died a few days later, going all fuzzy, so maybe there was more than 1 reason it was being discarded…. A replacement however uses the same fixing at the back and is much slimmer and lighter for an identical screen size
I then decided that to fully utilise the screens I needed to use a docking station for my laptop, which took away the space the screen stand stood, hence a riser was conceived

The top has little recesses which correlate with the rubber feet of the monitor stand, so it sits very securely, and cants back by a few degrees to sit almost flush with the wall

Very happy with how it turned out


Desk isn’t looking quite as tidy as a few months ago!

We have a food waste bin under our sink which I had rigged up to open with the cupboard door a while ago with bits of wire etc, and the string didn’t last long before fraying horribly and stopping working

A bit of printing later and I had some parts to fit
Works much better than the original, and shouldn’t wear out so quickly

I needed a mask, and to work well with safety glasses, the fit onto the bridge of the nose and cheekbones is important to prevent steaming up. I also wanted to try and keep the fabric off my mouth to make breathing easier. A basic 3D scan of my head gave a simple model to start designing from.


Up until this point I’d been very cautious about using support in overhanging areas, the first version of the mask cage had more material in the supports than the actual finished item, for the 2nd version I thought I’d try and be a bit more ambitious. I suppose this was the equivalent of a bridging test, I’d also ramped the speed up a bit too, still using basic PLA. Loose filament fibres in areas to be expected, unsupported lower surfaces, but it had recovered by 2.5mm later for the top surface. A bit more experimentation to get the right trade-off between speed and quality for these sorts of shapes.
turboferretFull MemberPosted 4 years agoI wanted a little handle for my GoPro, the various ones I already had weren’t quite right, so designed my own.

I mistakenly used an incorrect dimension for the hex nut from just using an online drawing of a mount, 9.5mm instead of 8mm across the flats, but a 1 minute print for a spacer later and it’s all good

Another successful print from the cheap and trusty Ender 3 🙂
zilog6128Full MemberPosted 4 years agoNice one! Especially satisfying when you use them to make something genuinely useful 😃
stumpy01Full MemberPosted 4 years agoAwesome! Some great prints there! I really should upload some of my recent stuff to Flickr & post an update…
I still love the ability to solve a problem within a very short space of time & achieve something that previously would have been impossible or would have required several other very expensive tools.stumpy01Full MemberPosted 4 years agoSo, I’ve just trawled round the house. I’ve done some self-designed bits & one large thing from Thingiverse that took a bit of time to do right.
I’ll do that one first. It’s a wind-up boat with fully printed geartrain & spring mechanism.
It took a while to get my settings dialled-in so it would print OK. I think the main problem was my nozzle needed replacing – that solved loads of problems!I printed this for my daughter to play with in the bath. It works OK, but the spring unwinds too quickly, so the propeller spins like mad at the start & slips through the water (similar to car wheelspin). By the time the boat is moving, the spring has almost completely unwound. It would work better with a harder gear ratio (think big-ring small cassette sprocket) to provide more resistance to the spring unwinding.
Good fun though.
I printed it in Ziro translucent purple PLA & Technology Outlet Silver PLA. IMG_20200610_152132 by STW stumpy01[/url], on Flickr
 IMG_20200610_151939 by STW stumpy01[/url], on Flickr
 IMG_20200610_151911 by STW stumpy01[/url], on Flickrstumpy01Full MemberPosted 4 years ago
This next lot is to solve various problems around the house.
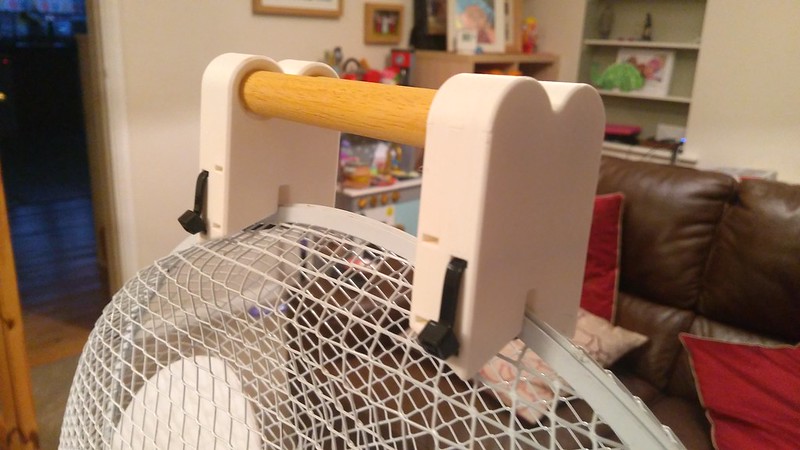
First up is my turbo trainer fan handle. If I need to move it while riding, I used to grab the mesh which squashed it & every now & again I’d have to pull it all back into shape.
So, I made a handle which came out really well. Modelling the profile of the fan shroud (in X-section) and the circular shape as well was an interesting challenge. IMG_20200524_173704 by STW stumpy01[/url], on Flickr
 IMG_20200524_213116 by STW stumpy01[/url], on Flickr
I also made some new feet as the previous ones kept popping off -these consist of an inner plug to stop the legs crushing & an outer clamp:
 IMG_20200524_204812 by STW stumpy01[/url], on Flickr
 IMG_20200524_205847 by STW stumpy01[/url], on Flickr
We collect recycling that can’t go into the council bin but can be taken to a Terracycle recycling place. It used to pile up on the kitchen side before i would transfer it to the garage. So I made a toast-rack style tidy for it. I ran out of filament doing this with just the top layers to go (annoying) but that side is at the back so no one can see it:
 IMG_20200618_144222 by STW stumpy01[/url], on Flickr
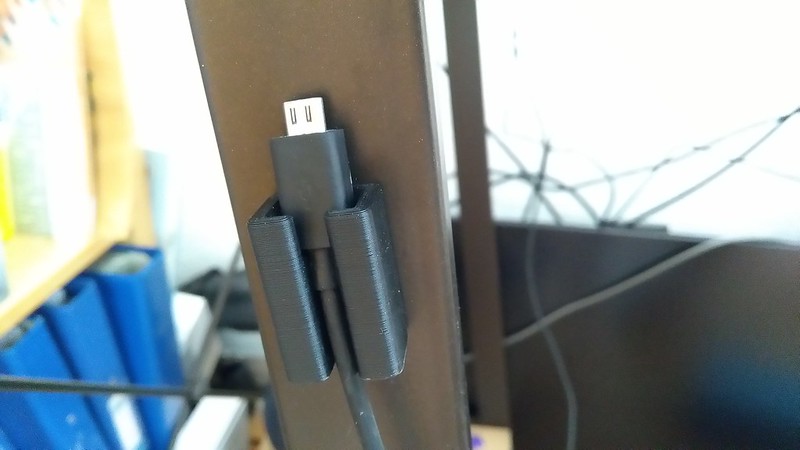
My micro-usb cable runs from the monitor, under the desk to the front but I had no where to stash it so it was either dragging on the floor or I had to stick it under the edge of a book. So i made this holder for it. It’s not a great fit for this particular cable as I tried to make it universal for different brands of connector.
 IMG_20200618_144130 by STW stumpy01[/url], on Flickr
Finally, when we re-did our downstairs loo I bought a new lock (with knob-turn lock) to replace the sliding latch lock. When I fitted it, I found that the gap between the door and frame was so large that although the door just about closed the lock did not work; a small press on the handle allowed enough movement in the knob-lock mechanism for the lock to release.
I designed & printed this little stand-off plate to bridge the gap between the door & the keeper plate. It works perfectly & although looks quite noticeable in this photo, it’s barely noticeable unless you really look for it. I was very pleased with this one as it means I don’t have to fiddle about finding a lock that would work or replacing the door. IMG_20200618_144309 by STW stumpy01[/url], on Flickr
Got loads more ideas on the go as well! Next up is a tidy for my Anker 6-way charging block to stash the cables away under a little platform.
turboferretFull MemberPosted 4 years agoMy first experience of inserting a pause during a print yesterday to make a zip toggle thing

Glued in a bit of string partway though

Works a treat 🙂
zilog6128Full MemberPosted 4 years agoNice job! What slicer are you using? PrusaSlicer has a neat feature that adds the code for you, makes jobs like this and colour swapping (some nice effects can be done with that!) a bit easier

The topic ‘Cheap 3d printer kits – Experiences?’ is closed to new replies.
