UPDATE: Reviews section refreshed, redesigned, searchable: Go take a look
We have a standard, but reasonably large, wooden garden shed where we keep our bikes. It's probably about 15 years old and starting to show its age, so we're planning to get a second shed/workshop (probably in the 10'x8' or 10'x12' range).
The current one is propped up on breeze blocks and we had lots of help getting it put together as we're absolute DIY muppets. If we get a new one we'd need it built. There are a number of companies that do this but these require a decent base, if they turn up with the shed & the base/location isn't suitable they just dump it & go.
The garden's not particularly level but we have an area that's not bad. Clearly the best option would be to have builders in to lay a concrete base but we're a low income household & this is expensive on top of the shed purchase.
I notice that there are a number of heavy duty plastic 'grid' systems that claim to be easy to install. Once down they're filled with pea shingle. I may watch some of the online videos, but how doable are these for a complete DIY muppet with a spade & a spirit level?
Currently I haven't found a company that would come & view the area before we purchase to advise (we're in Somerset if anyone know a decent company that would be this).
i instaled a plastic and gravel shed base - seems ok. my only caveat is that i probably wouldnt do it on a clay soil. or if i did i`d make sure the plastic is raised up (not dug down into teh ground) and doesnt hold water.
it was easy to install but i`m not a complete DIY muppet. Getting the ground flat before you install is the hard part.
raising sheds on blocks is also good but you need to know where the supports need to go so i`d probaby want the base on site to make sure i got teh blocks in teh rigt place.
Your breeze block solution isn't actually a bad one as it allows plenty of air to circulate to underneath and no chance of the wood sitting in puddles or damp earth. You could use your spirit level and spade method to concrete some into the ground.
Get a wooden sub-base with the shed because they add strength over just sitting it on the shed floor.
Breeze blocks and a wooden sub base is a good idea. We did something similar, but there is decking on it too, but the shed just sits on the decking framework.
I replaced my shed a couple of years back and when for a larger size so moved the paving slabs around to the larger size with small gaps between the slabs. I then used a plastic grid based on the slabs to spread the load and then built the shed on top of the grid.
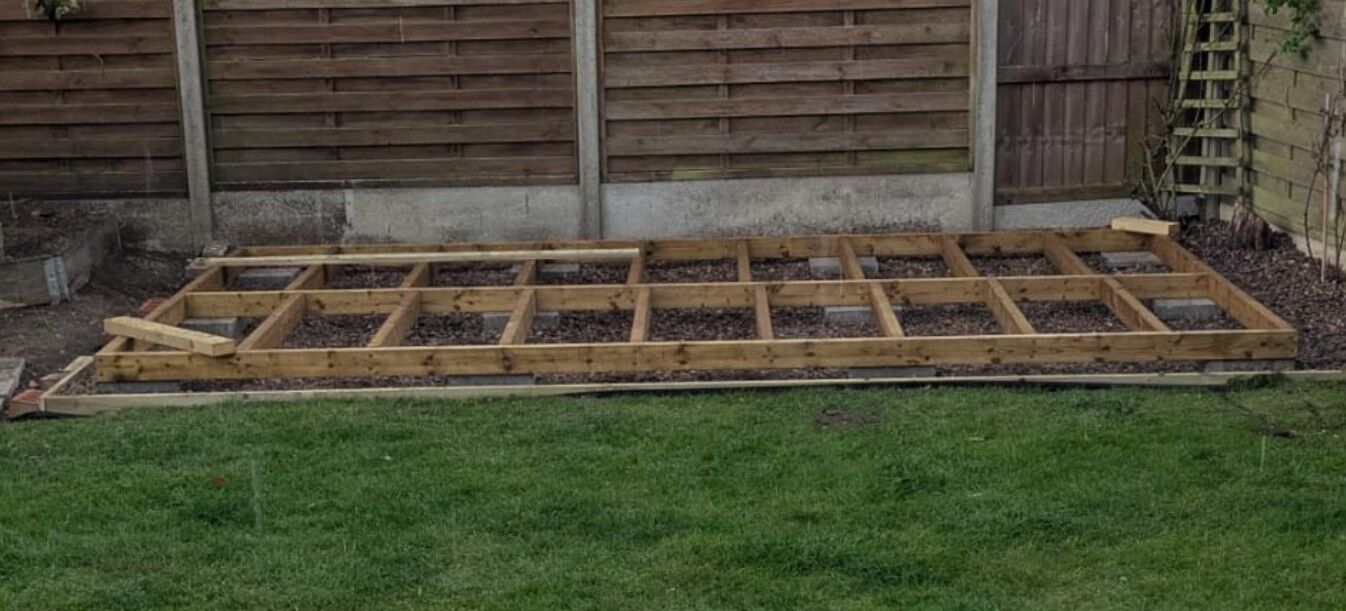
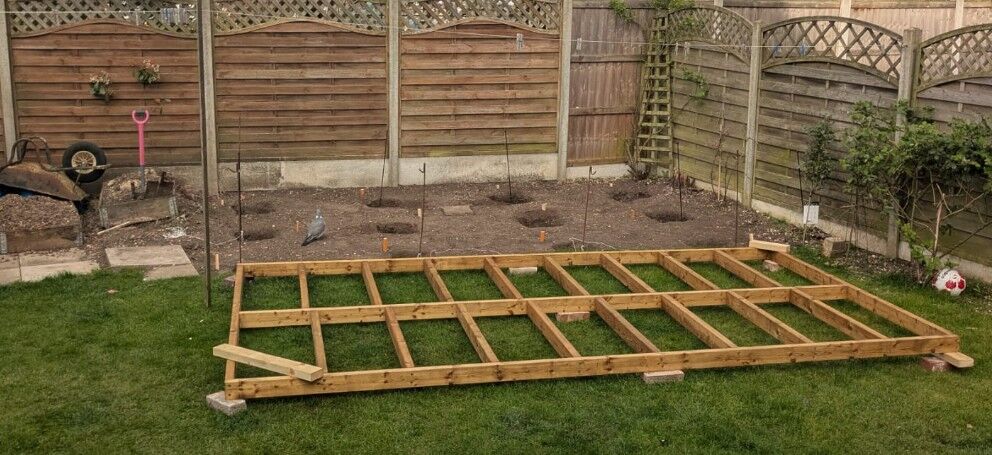
Recent experience here. Just had a 14x8 summerhouse installed last week. The installers were very complimentary of my prepared base. Best base they've ever seen (Trump impression optional). It was done on a relative budget but also probably over-engineered. I wanted to be confident it would last at least 20 years, preferably a lot longer. Cost about £350 in total. All the little extras soon add up.
- 4x2 treated timber for the frame, about 2cm smaller length and width than the size of the summerhouse base to prevent water pooling. Additional 2 coats of creosolve oily treatment and dipped ends before assembly.
- 12x Concrete foundation blocks sat on about 150mm of concrete foot under each block. Dug down so that the highest point of ground was about 50mm below the top of the blocks. ( https://mkm.com/product/dense-concrete-foundation-block-natural-300-x-275-x-140-mm-b004146)
- Gravel - free off Facebook. Luckily a lady just down the road from us so me and the boy spent and evening going up and down the street with a wheelbarrow and a couple of spades. Free gravel for us, easy garden clearance for her.
- Then all the little bits... weed membrane, joist hangers for the joints that aren't sat on blocks, screws, damp proof membrane between the blocks and timber, little shims because noone's perfect.
- Oh and some strips of timber for the edges of the gravel to keep it all neat.
If you have an MKM within range then they're very handy as free delivery and you can get the 4.8m long timbers.
A couple of photos of during (forgot to get one of it fully finished)...

Thanks for the advice folks. I'll do some research & get some quotes & see what's my best option.
I'm starting to realise that this is likely to be an expensive endeavour 😕
it’s just effort vs cost really. If you’re cash poor, just get on YouTube and find a guide for a method that suits the tools and materials you have. None of them are technically difficult, but digging a hole can be hard work.
top tip, start now before the ground drys out - it’s harder in the summer.
I have a similar need.
I was planning on a block an timber approach like above but sans gravel.
9 or 12 concrete blocks cut into the earth with a gravel base leaving ~ 75mm proud - I have some super heavy precast rectangular figure of eight blocks that I would also fill the voids with gravel.
Then a pinned down weed barrier, cut around the blocks.
Then timber frame as above but with an added mesh on the edges to bridge to the ground to help keep the critters (rabbits/mice /rats etc) out.
Hoping it doesn't cost £350 though!
Weed membrane, gravel grids and gravel is easy and cheap.
You still need to level the area. You don’t technically need gravel over most of it, just the grids sticking out around the edges. Actually helps airflow.
Provides full support across the floor rather than point loading it on blocks and having to reinforce it. No hidey holes for rodents either
We build a wooden base like pocpoc, which sits on these https://www.tuin.co.uk/timber-frame-base-pads/
Which each stand on a cheap concrete paving stone laid and leveled on some stable core
Good airflow this way and the base should last lomger than me.
The garden's not particularly level but we have an area that's not bad. Clearly the best option would be to have builders in to lay a concrete base but we're a low income household & this is expensive on top of the shed purchase.
We have a concrete base, in retrospect it was the wrong choice because it's impermeable so any water that get's onto it, sit's there and will be slowly rotting the shed. It would probably be fine if it was sized exactly to the shed so there wasn't a bit around the edge to catch the rain.
If I did it again I'd probably dig out the area, lay the MOT2 sub-base to make sure it was permeable, then put something on top of that lie the plastic grids and gravel, council slabs (without grout so any water drains off them) or breezeblocks and a wooden base.
What I'll possibly end up doing (if the treated timber does rot) is having to jack up the shed in the corners and probably replace the outer part of the base that takes the weight of the walls (the shed weighs ~2.5t) with bricks and leave a gap every n'th one for airflow.
Why a weed membrane out of interest? A couple of you have suggested it. Barring the perimeter, which you can pull quite easily, nothing will really grow under the shed because it's pitch black and should be really quite dry.
Hoping it doesn't cost £350 though!
So was I! About £100 of that was sand/cement/gravel for the concrete pads. I could have gotten away with one less bag of cement but that would only have saved £7.
The timber alone was about £150.
Sheds *are* flipping expensive endeavours.
Can you not paint / do up existing shed and 'stick'?
Weed membrane is often supplied with the grids, stops weeds around the edges but you’re right, probably not needed in the middle.
I did this recently to make a small platform for a 3 x wheelie bin shed for the front garden which is on a slope. I have zero experience in this stuff and am OK at DIY stuff in general but really not an expert at all and I managed completely fine.
I went for gravel grid system because it had the best balance of lowest cost and easiest for a beginner to attempt. My area is much smaller only 1m x 2 m but it's the same system just more of it for you.
Steps are:
1) Dig down ~150-200mm and create a flatish area
2) cerated a retaining wall out of fence posts to contain everything. I was on a slope, you may not need this.
3) Fill 100-150mm deep with MOT type 1 (rough stones). Lay it in 50mm layers using a rake to get it roughly flat and compact it down with a plate compactor.
4) lay down your gravel grids (optional add weed membrane) then fill with gravel ~50mm deep.
5) take a long hot bath because you will be full of aches and pains.
I rented the plate compactor from local hire place for ~£50. Otherwise it was just basic tools, a mattock to break up the soil and a spade to dig it up. Saw and screws to cut and fix the fence posts to make a retaining wall.
The MOT type 1 and gravel will cost more than you think. A bulk bag of MOT type 1 costs about £70 and is ~800kg of stones and does about 4-5 meter squared at 100mm depth. Google AI can do all the calculations for you and advice on amounts.
You may also need to find a place to get rid of the soil you dig out, so factor in a skip hire or trips to the tip. I managed to redistribute it around the rest of the garden do saved on that!
Technically not difficult but physically hard work as I have a desk job and am a weekend warrior on the bike.
I am in the middle of doing this. The area I have to build on had trees on it where the stumps were ground down below ground level.
I have roughly levelled it, and I am now in the process of installing 100mm x 100mm solid plastic posts, essentially on 1000mm centres. These will hold solid plastic 50mm x 120mm bearers. Across this will lie 50mm x 100mm pressure treated timber joists at 400mm centres, and then a wooden deck surface. My shed is 2200mm x 3460mm, and my structure will have a 3500mm x 3500mm decked area in front of it. All ground contact will be plastic, and there will be decent airflow underneath.
I have dug 23 500mm holes. 2 were right through tree stumps. I am knackered from smashing through with a pry-bar.
I am going to lay a membrane too.
Plastic posts (2500mm) were £20 each. (6)
Plastic bearers were £22 each. (7)
Treated timber and decking was £600 for 4.8m timber joists (20), and 3.6m deck boards (50), including 12 bags of postcrete and the membrane.
I need 3 more bags of postcrete. I am getting about 3 posts from 2 bags.
Fixings have been about another £100.
Total is about £1000, plus the shed.
