Thanks for the photo my wife has an interest in gore not too much nerve damage I hope. Ribs are a sod to heal take it easy dude.
WCA - Even with your username, how on gods green earth did you manage that?
Sending you some virtual Tea & Sympathy WCA, heal well....
Ouch! Hope you heal fast WCA.
Liking the box DrP. Reminding me that I need to get on and make some for my tools.
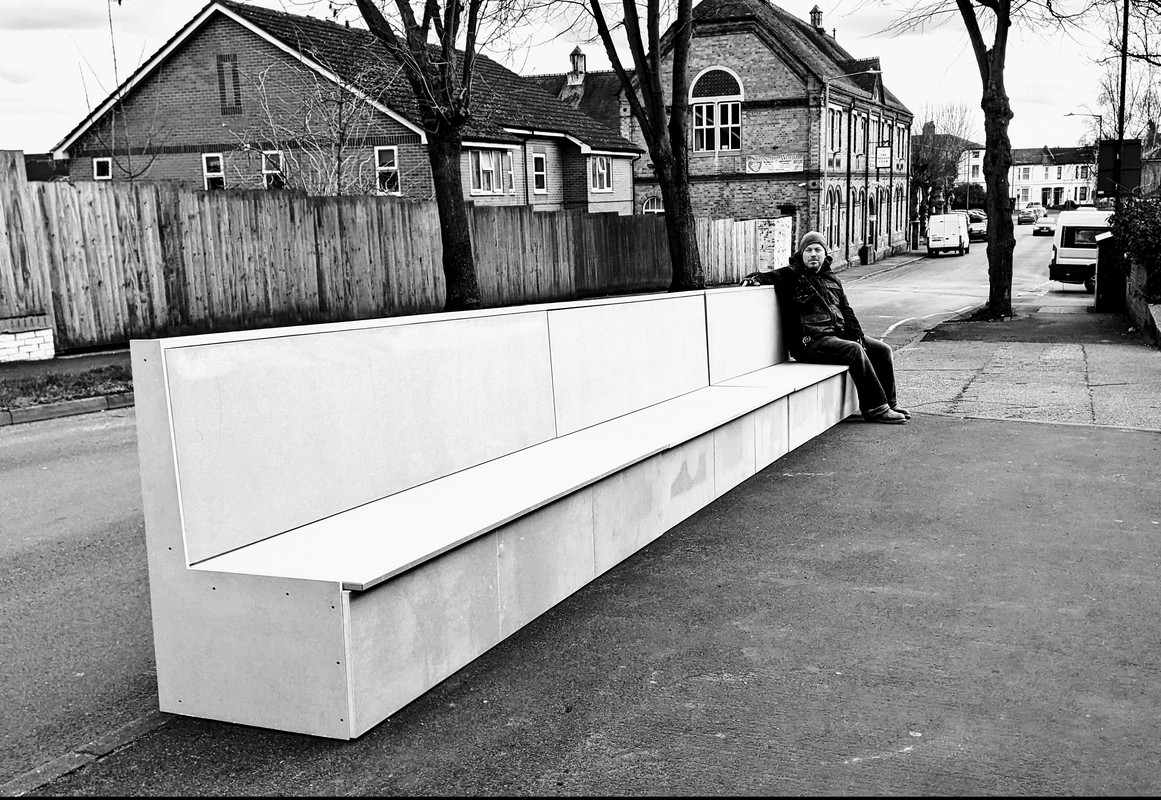
I did a thing, close enough for the girls i go out with.
Its getting painted some time soon (her decision, not mine), and then oiled/treated slats added on the shelves side (on the right), and a one piece worktop needs doing wrapped around the pillar, though not fully decided on yet.
Probably just give the measurements to our local timber supplier and get them to do it in Ash or Oak. The Quantity of wood would be too expensive for me to risk making a hash of, and i dont know how one would go about it.
[url= https://i.postimg.cc/tZQk3rSL/20220114-093441.jp g" target="_blank">https://i.postimg.cc/tZQk3rSL/20220114-093441.jp g"/> [/img][/url]
(not glued up here)
[url= https://i.postimg.cc/cvzXH1Q1/20220115-140510.jp g" target="_blank">https://i.postimg.cc/cvzXH1Q1/20220115-140510.jp g"/> [/img][/url]
[url= https://i.postimg.cc/crXFpBCn/20220123-174532.jp g" target="_blank">https://i.postimg.cc/crXFpBCn/20220123-174532.jp g"/> [/img][/url]
WCA,in case it's not been said already (possibly by your long suffering partner 😉 ) "How about you just stick to painting" 🙂
Oh,and there really was no need for any of us to see that photo😜🙃
Get well soon ya daft old bugger.👍
Okay - sorry for the slight derail, there is now a separate thread to mock / console me.
Back on track (sort of)
Before
After
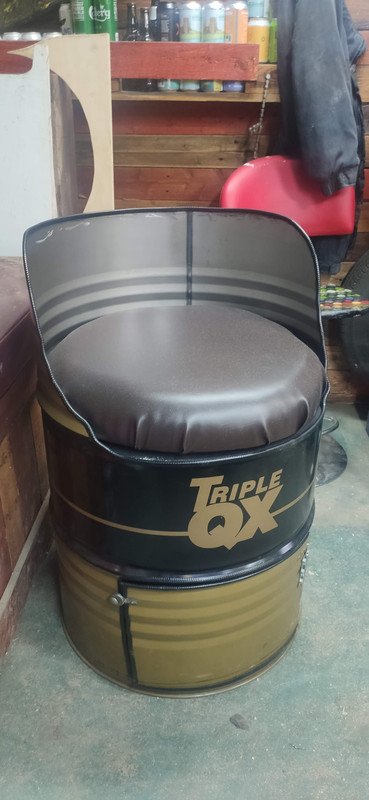
Which just leaves me with this as a proper contribution. Oil Drum Chair with hatchway to beer store.
Bit confused about all the various types of router and bases – any pointers?
A wee 1/4" Trend would do the job, be accurate for the most part and be easy to use.
Obviously you need cutters too, and again a simple starter set by Trend will fulfill all the needs you have and cover about every job.
Ignore 1/2". Those are more professional and pretty heavy at about 6kg.A serious amount of power and you need your wits about you in using one. There are also plenty of books on the subject, you can usually get something 2nd hand on ebay.
Something like Routing for beginners by Anthony Bailey or Trend book of routing, etc etc. Some will be more in depth, but you can work that out from the cover who its aimed at.
Get well soon WCA i know how debilitating hand injuries are. They take a while and the physio is a pain.
What have I done recently? I recently finished this Wildcat in pastel on art spectrum paper.
The wild cat was from RZSS Highland wildlife park. I did it over a few nights while binging person of interest.
Nice cat! Always love to see work like that - something I've never tried but think it's out of reach.
Routers - I have Makita LXT gubbins, so would the equivalent be this? (And no, I'm not paying as this is aiming to be my birthday pressie)
https://www.powertoolworld.co.uk/makita-drt50zj-18v-lxt-1-4-brushless-cordless-router-body-only-in-makpac-case?gclid=CjwKCAiA3L6PBhBvEiwAINlJ9L_rk6quUMsn1GzlOQG0PTMAPlnmQD0REASKibylXJMBpyLX--g5vxoC33cQAvD_BwE
And would that Trust set fit it? I'm guessing so given the sizes etc.
I have that model too- the powered version, and tbh im not keen on it for a number of reasons.
Those being it sits too high up on the trimmer base and is prone to tilting, and you need to recenter it each time you swop a base(I also have all the bases, inc the corner one)
I've used the standard trimmer base once and since then its lived on its plunge base.
The offset base is a handy addition to give a better footprint. It means it doesnt tilt and gives you a better hand position.
Ive set mine up like this.(Ignore the mess)
That looks cool that @Olly
Interesting looking jointing and very crisp!
👌
jamiemcf - Impressed with the picture but more impressed that you managed to get the wild cat to sit and pose for you across several nights.
Thanks WCA.
A firm and assertive "sit, now stay" was all that was needed
I think "Sit, now stay" was more appropriate for WCA.
Olly - if that's your standard of work I don't think you should have any problem with the worktop.
6mm MDF for templating is your friend.
RichS, yes sure I just have to find my photobucket account details to upload a photo to the forum, wish you could just attach a photo!
So this was leftover, missus’ dad let me borrow his chisels so worked out the angle I wanted the iPad and then just started chiselling the wood out to that angle, it held in place as it was but then I screwed in a small baton as such behind it, that has the same angle chiselled out of it, so the iPad’s solid as a rock. Then used a drill with a wide end to drill out holes big enough to knock it all through and create a cupholdwr for her, it’s not fully finished tbh but it’s useable now with some worktop oil on it to keep it waterproof for the timebeing.
Still got a tealight holder to drill in and make the grooves underneath deeper so it grips the bath top as such. So rewarding making one yourself 👍👍

Made a pot stand for the Dining room table too, which I’m almost more pleased with, v easy to make!!
RichS, yes sure I just have to find my photobucket account details to upload a photo to the forum,
Use Postimage.
No account needed. It's pimpsy.
Or imgur. Then just view the image, view permalink and paste the link here (no img tag needed).
Edit
Like dat
https://imgur.com/a/zXFBSL4
So, led on by kayak23 and his plywood a few pages back, I remade my echo stand in ply.
Quite an experience! Cutting and glueing sheets of 18mm together, then cutting the sub-components to alignment, then sticking the lot together and sanding it all down before varnish.
Then drilling the final few holes, which didn't go well, but that's what you get for using hand drills I guess.
Also accidentally made it a bit thick, but once it was glued I couldn't work out how to cut a 180mm slab accurately, so I'll pretend it was meant to be like that.
really like that Rich
I had a rough buck cut out when playing with the new bandsaw but I thought I would see if I can carve/ whittle / Dremel with one hand while not breathing to pass the time.
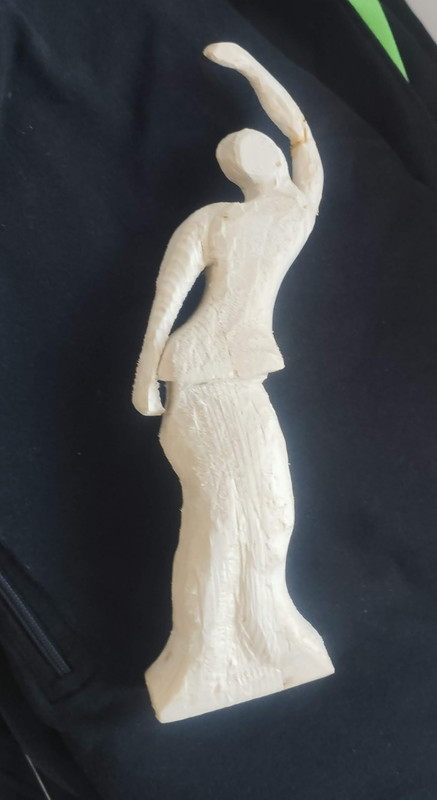
She clearly needs some detail work, sanding and finishing but fairly pleased with where I have got given my current restrictions.
Took longer to work out how to post than it did makes these...
Hand carved bowls from green oak lumps. Adze, axe and sander.
Bed frame from a drawing that my daughter did. I'm very chuffed with it. Comes apart for moving purposes.
https://i.postimg.cc/CLg8nmgx/IMG-20181106-195905934.jp g" target="_blank">
https://i.postimg.cc/CLg8nmgx/IMG-20181106-195905934.jp g"/> [/img][/url]" alt="" />
[url= https://i.postimg.cc/H8nYpKnf/IMG-20181107-191955815.jp g" target="_blank">https://i.postimg.cc/H8nYpKnf/IMG-20181107-191955815.jp g"/> [/img][/url]
[url= https://i.postimg.cc/xJLQ9zvV/IMG-20181107-192002646.jp g" target="_blank">https://i.postimg.cc/xJLQ9zvV/IMG-20181107-192002646.jp g"/> [/img][/url]
[url= https://i.postimg.cc/1g05MwbY/IMG-20181214-151817520.jp g" target="_blank">https://i.postimg.cc/1g05MwbY/IMG-20181214-151817520.jp g"/> [/img][/url]
[url= https://i.postimg.cc/zyfqT3rT/IMG-20190106-115418506.jp g" target="_blank">https://i.postimg.cc/zyfqT3rT/IMG-20190106-115418506.jp g"/> [/img][/url]
Good job the bed comes apart, sleeping in the kitchen would be really inconvenient.
🤣🤣🤣🤣🤣🤣🤣
https://i.postimg.cc/VkNgnq87/4-CC228-D4-B9-A5-4713-B394-F0562-F1-C9757.jp g" target="_blank">
https://i.postimg.cc/VkNgnq87/4-CC228-D4-B9-A5-4713-B394-F0562-F1-C9757.jp g"/> [/img][/url]" alt="B1" />
[url= https://i.postimg.cc/DwtG0Ly4/33-EBD4-FE-6053-4349-8898-0804-CD86-AA23.jp g" target="_blank">https://i.postimg.cc/DwtG0Ly4/33-EBD4-FE-6053-4349-8898-0804-CD86-AA23.jp g"/> [/img][/url]
I did the board, not the bits on top, they’re mouseman and far better than I could do 🤣
I've got hundreds of slides that I want to scan - the cost is somewhat prohibitive.
So I've made a slide copier attachment to fit on the front of my digital camera (Canon S5iS in this case). The results are pretty good - well good enough for me!
It consists of two aluminium pieces turned in my lathe and a bit of plastic downpipe. The camera end is a snug fit on the lens and the outer piece has a rectangular hole in it to suit 35mm slides.The internals are painted matt black.
In use I set the camera to Super Macro and Aperture Priority. Illimination is from a daylight LED bulb in a desk lamp, bouncing off a white wall.
The pictures come out slightly distorted (not rectangular) but are easily cropped.
First picture is a sample, second picture is the unit attached to the camera :


That's brilliant fruitbat 👏
Love the lacky band routing 😊
No one will ever, ever, own a user name like he does.
Don’t think anyone would want it!
GWS
It's almost a shame WCA got the end of his finger stuck back on. We could have been treated to it being turned into something - a thimble maybe, in the style of Hannibal Lecter? 😜
That example looks very cold fruitbat, is the lamp you are using full spectrum daylight? I've still got a couple of the old Ohnar slide copiers from the 1980's lying around somewhere, your home made unit seems to do just as good a job as they did.
That example looks very cold fruitbat
More than that, it looks lacking in the green, which is exactly what you’ll get from an LED light (unless it’s a very good one with high CRI). Looks like that camera has got on camera flash, try it with the flash/camera pointed at the white wall. You may get better results.
[i]It’s almost a shame WCA got the end of his finger stuck back on. We could have been treated to it being turned into something – a thimble maybe, in the style of Hannibal Lecter? [/i]
Finger not being fixed until next Friday so plenty of time to submit your alternatives
Thanks for the comments. For info I'm using a 6500K LED bulb that I randomly selected from Amazon Linky. I had previously tried Tungsten light and Fluorescent light and used the White Balance settings on the camera but the results were not great.
The Alfa GTV6 sample above was done using the Auto white balance setting on the camera. However, I think the original, shot on Barfen 100ASA film, was a bit bluish to start with. I have not done any post processing other than cropping.
I did try to use the camera flash but got a big shadow from the adapter along the bottom of the frame.
Here's another couple of samples from Kodachrome 64 film. Happy to receive comments again 😊


The issue isn't the nominal colour of the lamp it's whether the spectrum of the lamp is close to daylight. Many lights while looking like daylight to your eyes will have whole sections of the spectrum missing. This was always a big problem with flourescant tubes back when using film, very hard to filter for them without test shots. As goldfish24 suggestsif you can get hold of a separate flash to bounce off the wall you should get better results as far as colour goes.
Not posted in this thread before, but here we go!
A couple of years ago, pre-pandemic, I was after a nice axe, for splitting kindling and bits of pruning around the garden. Was looking at the usual fancy suspects, Gransfors or Hults, when my other half threw in a different offer as a birthday/Christmas present - an axe-making course at a local forge.
Obviously global Lurghi you in the way, but I finally got it booked and headed down there today, to Highfield Forge, just outside of Wakefield. Won't comment on the course too much aside from 'it was really good', thought I'd knackered things at a couple of intervals but the instructor was ace and at the end of the day I walked out with a big grin and a slightly rustic but very much functional axe!


Very nice, come the zombie apocalypse you'll be fine
That has my name all over it! A few of us have a big birthday this year, I'm tempted to get a group booking.
Very rustic in comparison to some of the lovely things other people have made but hopefully useful.
Getting our ground floor bathroom refurbed next week, so putting up a gazebo on the patio near our back door. So made some with bits to help them do more work outside near an external socket, disposable scrap wood job site table and boards to bolt the gazebo feet onto then load down with bricks.
https://flic.kr/p/2n2cWcm
https://flic.kr/p/2n26k6Q
https://flic.kr/p/2n2eCV9
Made a long banquette/bench. It's got to be upholstered, painted and fluted sections added yet but I got it together for a look.
Whisky barrels staves (cleaned with angle grinder) crudely fixed together at rear. Lettering printed on then chiseled out and painted. Osmo to finish (thanks Dr P!). It's a wedding gift - lyrics from a song, apparently. Main thing I learned? I will never do lettering again... Way to difficult for my skills!!!
[url= https://i.postimg.cc/TYn0p4CN/signal-2022-02-12-10-31-18-372.jp g" target="_blank">https://i.postimg.cc/TYn0p4CN/signal-2022-02-12-10-31-18-372.jp g"/> [/img][/url]
Finaly got round to making a knife again.
Yew handle
https://flic.kr/p/2n3dA94
A mess…
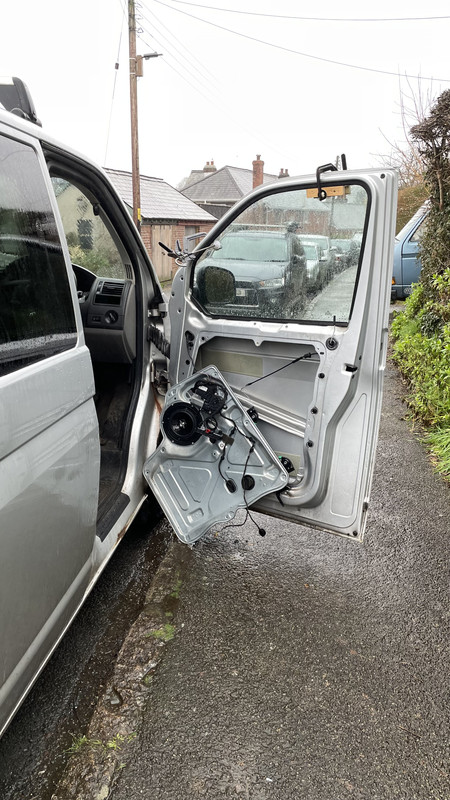
Now there’s a surprise. A VW window regulator replacement!
I broke my Skoda drivers door one a few weeks ago, stupidly tried to lower the window whilst the glass was frozen to the rubbers.
🙄
I was replacing the lock (two weeks after I replaced the passenger side) as it’s been on the fritz. One of the regulator clips broke as I was doing it. Window now wedged up with piece of wood while I wait for a replacement to show up..
Are you doing the upholstery yourself ?
Always good when you have an excuse to buy an air stapler 😉
Not on this one thankfully! Take me six months! 😂
I was upholstering a blanket box though which I very nearly 'needed' an air stapler for. Got away with a hand one though.
More rough wood working from me. A general purpose bench for the shed made from big lumps of found wood and semi-coated in cement. Sit on it. Exercise on it. Stand on it. Decided to chisel out a pair of channels for the legs to sit in to give it extra strength. It's also screwed. Fit was a little too tight one one leg resulting in needing to shave some material off to stop the wobble. Pleased though as it feels very solid.

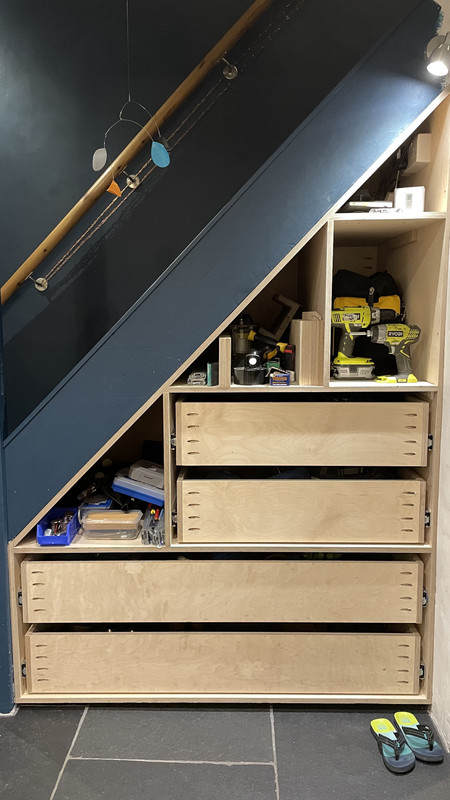
While I’m waiting for more parts to show up to fix the van, made some good progress with understairs drawers.
That's nice work Jam-bo. Are you putting doors on or just drawer fronts?
Mrs BigJohn had a window winder snap on her Golf. Only took me 3 days to fix.
Fronts. Just getting all the drawers in/built and then I’ll fit the fronts.
in theory they’ll sit flush inside the carcass with 5mm shadow gaps.
3mm for me.
Decided that would be a bit tight on this one. It’s been challenging.
1880’s house, not a straight edge in sight…managed to get the carcass to within +-2mm of where I wanted it to be but with a lot of persuasion.
Drawers do full 800mm extension as well.
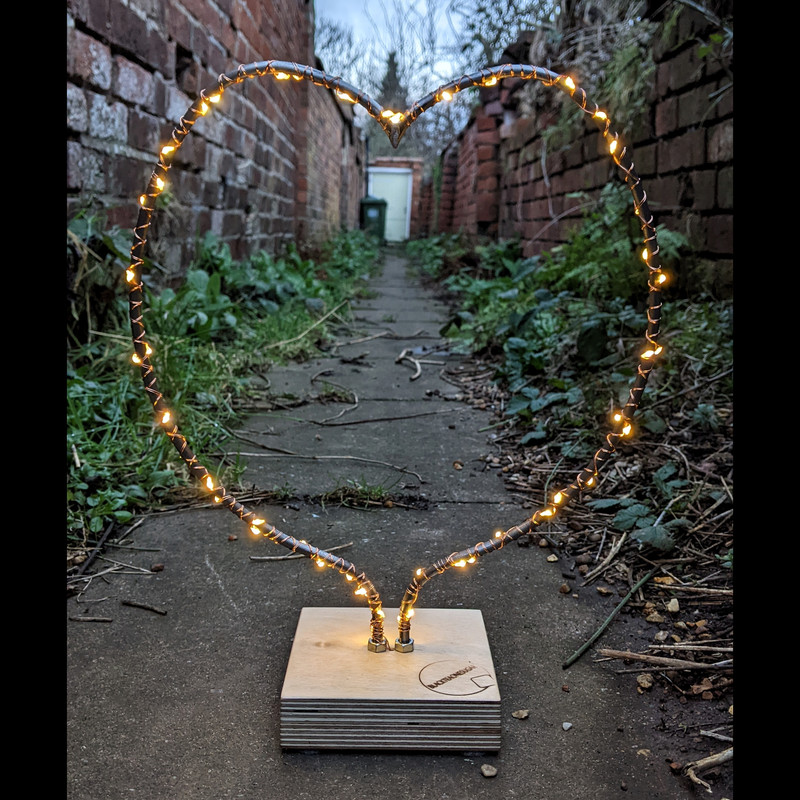
This one goes out to all you lovers out there...


While I’m waiting for more parts to show up to fix the van, made some good progress with understairs drawers.
That’s excellent, really good use of the space and a level of finish I can only dream of.
This one goes out to all you lovers out there
I really like that, how did you shape the bar like that ?
I really like that, how did you shape the bar like that ?
I taped the two lengths of 6mm bar together for symmetry, then bent them around a plywood disc, and then the tighter bend on a bending jig I have.
I'd really like to make a roller bender thingy at some point to get nice shallow curves.
That’s excellent, really good use of the space and a level of finish I can only dream of.
Yeah that's great Jam-bo
You can get these roller/bender machines quite cheaply, about a hundred quid from my last interest in getting one. Or 2nd hand you'd probably get a better quality on for less.
Theres a lot of strain put onto it, and to get something that performs consistently you might struggle to make one. Especially when you add together the cost of all the parts you'd need, buying might be cheaper or about the same. Then will it work sufficiently 😕
Yeah good point. I thought about trying something with skateboard wheels mounted onto some sort of steel plate, but as you say, probably cheaper to buy, by the time you've messed about.
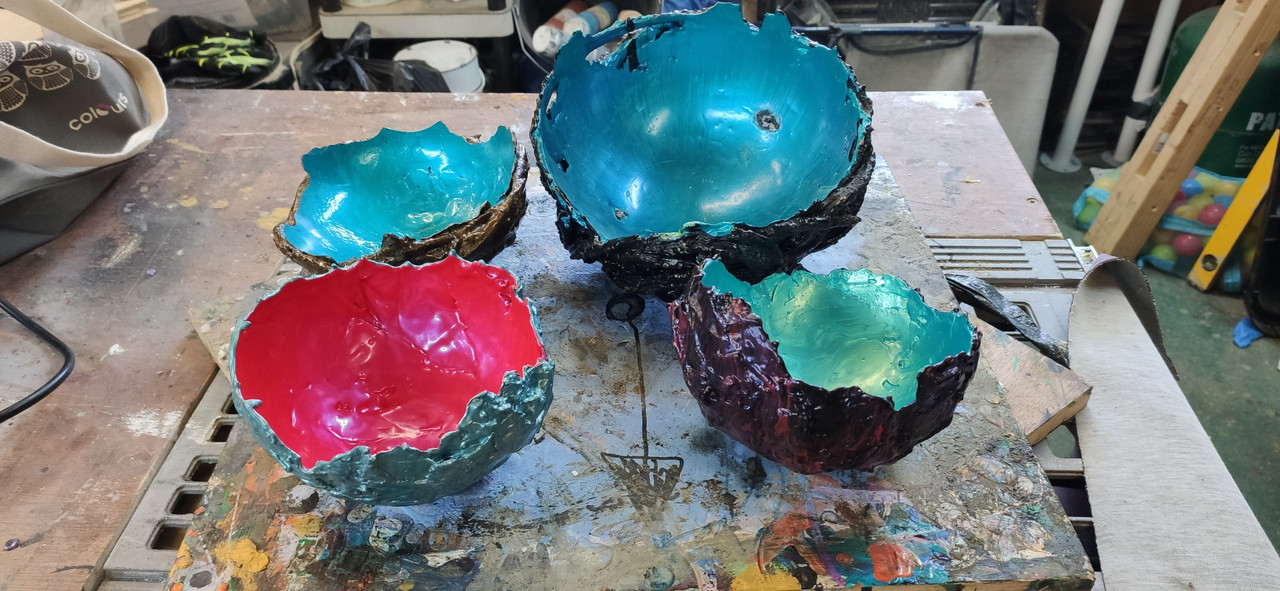
Not exactly made, more repurposed.
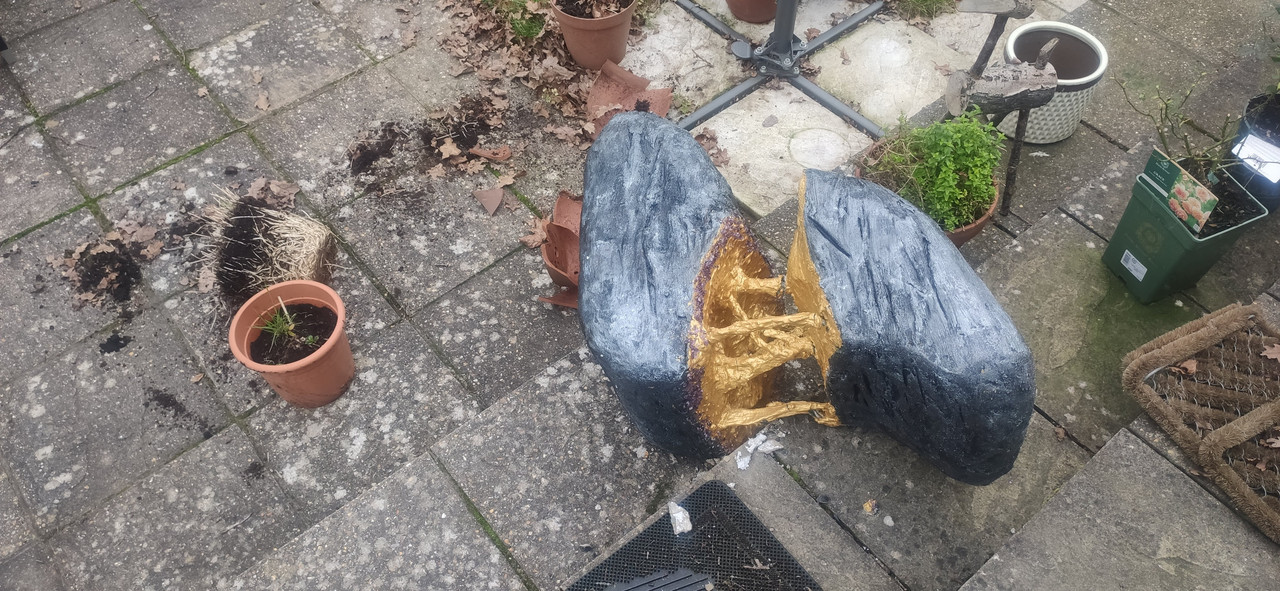
The 'Jewellery Bowls' that were left over from the Christmas market are now going into my garden as ornamental bird baths once properly lacquered.
Yup, another bit of kit to add to the versatility of the workshop, another box to open with excitement and wonder. Then of course the hunt for a bit of metal to try out in it 😀
‘Jewellery Bowls’
Very nice WCA. Certainly seen similar in the arty shops going for a fair few quid.
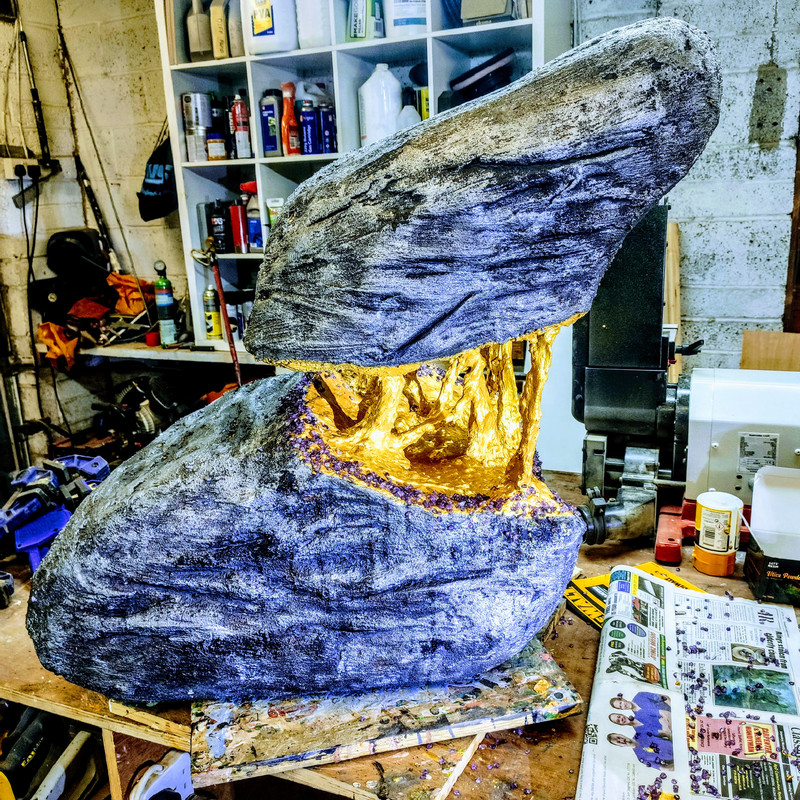
WCA patent 'clothecrete' inspired by the last medical cast. Basically quick drying cement impregnated cloth over a former and then painted. £30 a pop on the peddlers cart. These were what was left over and have a few chips and broken edges where they were stored within reach of children over the Christmas period, hence the repurposing for my garden.

Felt sorry for the hens, incarcerated again due to avian flu. So I built them a bigger hen palace. Had several goes at a design, settled on this and ordered all the steel cut to length from Metal Store along with all the brackets. Now wondering what else I can make using this stuff....
That’s excellent, really good use of the space and a level of finish I can only dream of.
don't look too close. planer, sander, and kreg pocket jig have been my friends on this one..
don’t look too close. planer, sander, and kreg pocket jig have been my friends on this one..
Very handy use of space. Are you intending on putting false fronts on the drawers ?. Just to tidy it up like 🙂
Yep. That’s why all the drawers are set back 18mm
Mind and leave a few mil of a gap between the bottom of the drawer front and the one below it,so as it doesnt catch. When you load the drawer it can drop a tiny bit and they can catch.
Real pain in the arse, you've got to take it all off, plane a bit off and hope it goes back on exactly as before.
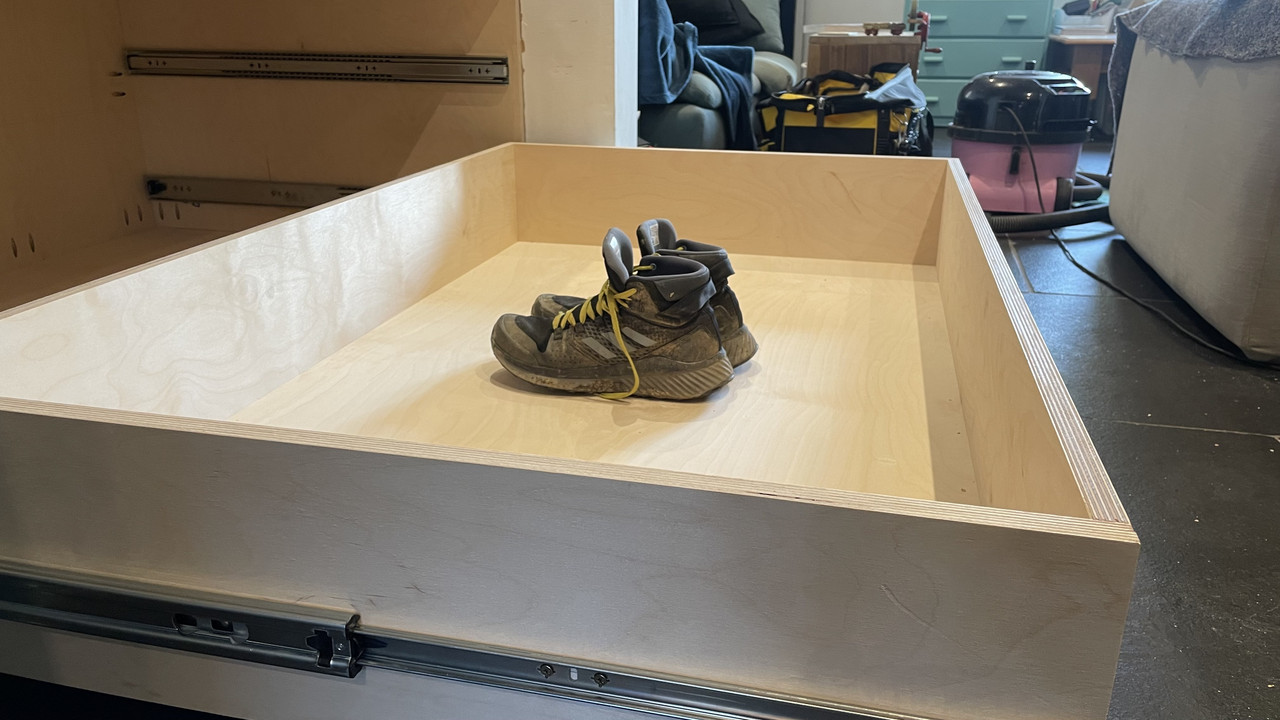
5mm shadow gaps and really bloody expensive drawer runners. load capacity of 120kg. I can stand in the drawer and they barely move.
need to find some false front fittings that let me fit and adjust up/down/left/right a bit. any suggestions welcome.
Rare Earth magnets?
Will you be fitting handles? If so, align the fronts using playing cards as shims and drill the holes for the handles through the front, then temporarily screw the fronts on using those holes. Pull the drawer out and screw from the inside. Remove the temporary screw and mount the handles.
I think I got that from Bourbon Moth on YouTube.
Thought I'd share this on here in case any folks on here were interested in entering.
A researcher from Channel 4 messaged me to share it.


A friend of mine got asked if he fancied trying out to be one of the judges.
Quite miffed they didn't ask me too! 😂
Will you be fitting handles?
no handles, probably routing out some cutouts on the top edge. I've found some suitable blum fittings that look like they'll do the job.
Drawer Front Adjuster (trade-hinges.co.uk)
in other news, I've finally fixed the bloody van. don't be fooled by the regulator repair kits on ebay. they have all the right bits, the regulators are just impossible to repair without some magic tools. now bought a fitted a pre-assembled door panel with the regulator already assembled. lesson learnt for when the other side goes.
Kayak if you wish to dress like that and post pictures on this forum we can happily laugh at you. Does that help?
I was going to suggest the Blum adjusters. If they're the captive nut inside a nylon housing they work fine. I usually just go off initial design measurements though but if I have to do it in situ I load the drawers and then measure. Playing card shims and double sided tape also works.
Made a little tool/parts tray for my workstand from a bit of beech worktop someone left by their bins. Got a bit carried away in the end and added a metal plate to hold a magnetic parts tray and a magnetic strip on the front, both of which I picked up in Lidl having gone in for milk or something, and a couple of hooks for rags, etc. which are old downtube shifters.
[url= https://i.ibb.co/WghxGS4/2022-02-18-15-39-24.jp g" target="_blank">https://i.ibb.co/WghxGS4/2022-02-18-15-39-24.jp g"/> [/img][/url]
It sits on the top of my stand using a block with a 38mm hole drilled in it - conveniently, I had a spade bit the same size as the upright.
[url= https://i.ibb.co/4jdwvnQ/2022-02-18-15-56-20.jp g" target="_blank">https://i.ibb.co/4jdwvnQ/2022-02-18-15-56-20.jp g"/> [/img][/url]
So nice to have tools at hand and somewhere to put parts.
Also made a tool rack out of my old Speedplay Drillium pedals. The needle bearings were great, but you can't buy them, and I don't think you can actually replace them if you could, so once they're gone, the pedals are toast.
[url= https://i.ibb.co/BZ4tTrt/2022-02-18-15-56-33.jp g" target="_blank">https://i.ibb.co/BZ4tTrt/2022-02-18-15-56-33.jp g"/> [/img][/url]
Edit: I'm sure this forum used to have a preview function so you could check you're embedding the right images
Handmade was pure gash.
I hae made a new workbench, reuphosltered and restored an antique foot stool and made a router plane wincuding actual metal work and silver brazing.
But i have no camera at the moment. Picture perfection and outstanding design and you'll be in the right ball park.
That's brilliant, I wish I hadn't thrown my old Azonic pedals away, that would have been a great way to use them.
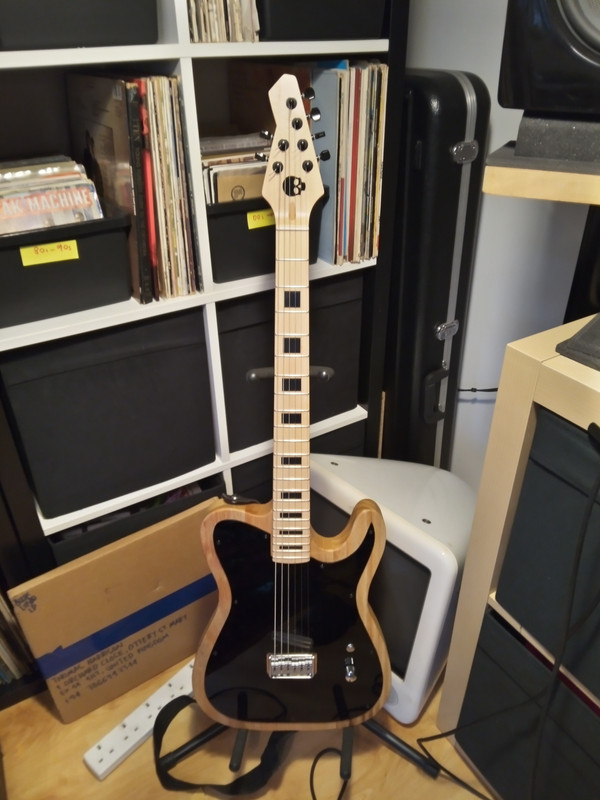
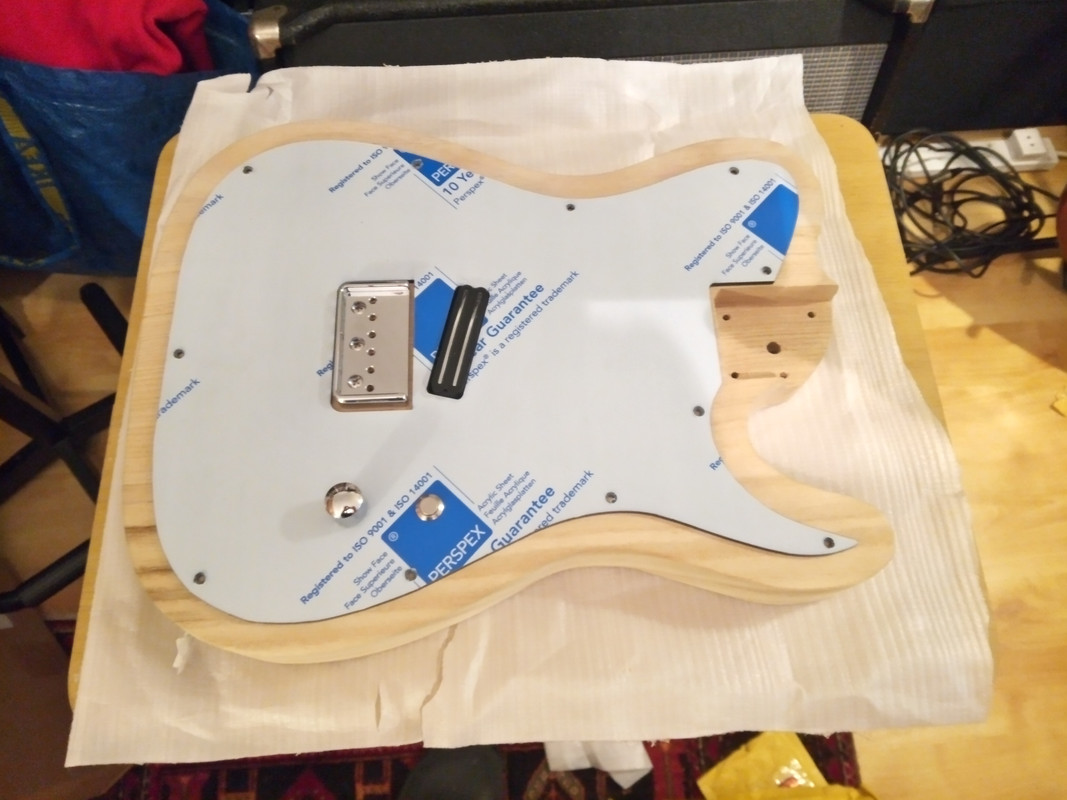
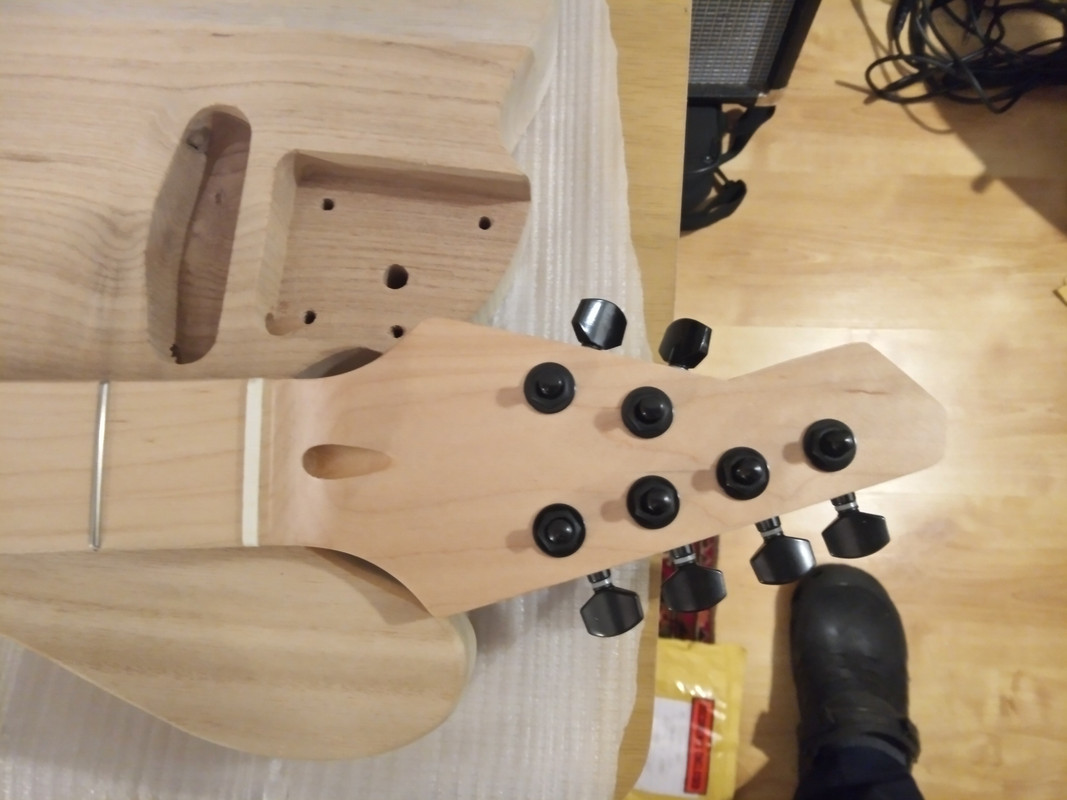
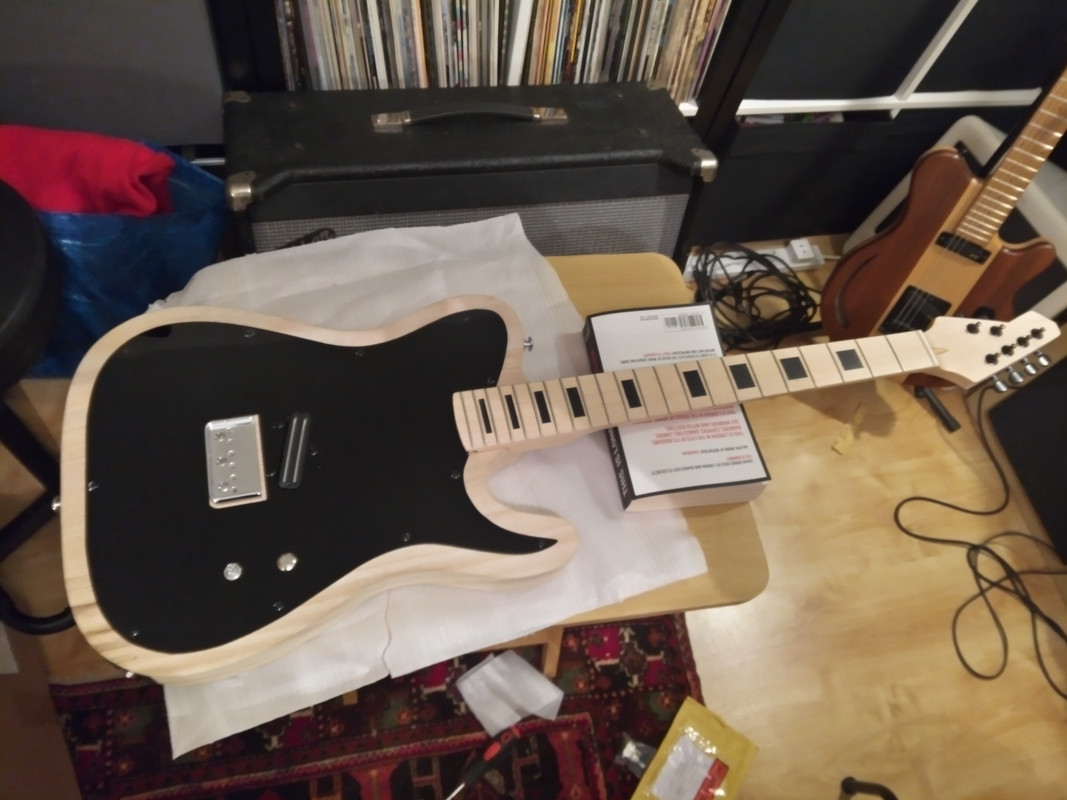
A new guitar.
Bit like a Fender Esquire (single pickup telecaster) but more rock 🤘
Hot-rails humbucker, kill-switch, reverse headstock, maple body finished with Osmo Polyx-oil, Laser cut scratch plate (useful tool to have at work!)
Plays lovely, will have its first outing at a gig next week.