Home › Forums › Bike Forum › Lumicycle Halogen > LED Kit Vote
- This topic has 154 replies, 34 voices, and was last updated 13 years ago by jond.
-
Lumicycle Halogen > LED Kit Vote
-
foxyriderFree MemberPosted 14 years ago
Following on from the post from Vortex and Blackcattech a few on that post were asking for a full kit in LEDs etc. So IF BlackcatTech wouldn’t mind supplying the whole kit who would be interested? I would happily pay a bit more of the convienece of buying it all together but I understand the heatsink is the hardest part?
The intention is to supply driver, heatsink, switch and DC power socket all wired up as a kit so you just need to supply LEDs and optic. At the moment I’m looking at an ‘ebay price’ of £12 per kit but that depends on supply of heatsinks, if I have to get them made out it may end up being more expensive.
If people can supply their own heatsinks and just want the driver then that would be £6 or £8 with switch and socket.
Off-ebay prices by negotiation, typically 10% off for singles. P&P £1 per order.
However I guess putting up a link of the additonal LEDs and Lenses that can be bought might suffice?
16stonepigFree MemberPosted 14 years agoThat sounds like a good idea to me. I’m very lazy, you see, and if someone else could put all the effort in it would be grand.
CraigWFree MemberPosted 14 years agoI’m also interested in a kit.
Not too bothered whether it includes the LEDs / optics or not, so long as someone gives a link for where to order them from.
I presume there’s a range of different LEDs it will work with (ie different bins/brightness/cost), so buying them separately would give a choice of that.stumpy01Full MemberPosted 14 years agoYeah, I’d be up for a kit. Not really fussed whether it includes the LED/optics to be honest, but the driver, switch, heatsink, power socket would be welcome.
I wouldn’t mind converting another can the same way as I did the first but it was all a bit of a squeeze in the can so something that comes with a pretty much integrated heatsink/driver with an LED board that would fit on the front would make things a lot easier, especially if it has the off/low/high option of the original driver that I stuck in a Lumi can.
The first can i converted used the 675mA driver & the can seems to handle the heat fine (and allows stupid long run time of 14hrs+ on high), so I was intending to convert the second one using the 975mA driver to get more light out of it. Should still allow a run time with both lights on high of 5hrs or so and if heat build-up does become an issue I’d just swap the driver out for the lower current one.
Oh god, I’m rambling again. To summarise, yes I would be interested but it depends on the output of the driver. I’d rather go for something a fair bit higher than the 675mA one I’ve already converted to get some more oomph from my lights. It would also give me the option of using the one I’ve already done with the narrow optic and fitting the more powerful one with a medium optic for a spot/flood combo.
BCT did hint at an 830mA driver, which I’d probably go for. Not sure about the 770mA mentioned a bit further down the thread though.Will see what he comes up with!
foxyriderFree MemberPosted 14 years agoMy feeling at the moment is that the halogen can doesn’t have enough metal to support cooling three LEDs at 1A. I’m thinking either 780mA or 830mA as the standard option for this with a 1A driver for the HID can which has more meat to it.
Yup – Just wanted to convince BCT that it is worth doing 🙂
foxyriderFree MemberPosted 14 years agoBTW, if BCT reads this I am happy to make some heatsinks in my workshop if someone gives me a link as the one in the original article is broken 🙁
Ahh here we go:
HPI72234 HPI Traction Control Gear Hub
TECH NOTES
This is the Replacement Traction Control Gear Hub for the HPI RS4 MT Racer.
This can also be referred to as the slipper plate. It is located on
the outside of the 52 tooth spur gear.FEATURES: Machined aluminum construction.
Natural color.INCLUDES: One gear hub (72234a).
Two spur gear retainer clips (72234b).REQUIRES: Nothing. This is a direct replacement part.
SPECS: Outer diameter: 33mm (1.30″)
Thickness of hub: 4.8mm (0.19″)
Total height: 8.7mm (0.34″)stumpy01Full MemberPosted 14 years agofoxyrider – Member
My feeling at the moment is that the halogen can doesn’t have enough metal to support cooling three LEDs at 1A. I’m thinking either 780mA or 830mA as the standard option for this with a 1A driver for the HID can which has more meat to it.
Yup – Just wanted to convince BCT that it is worth doingBCT’s updated post below that one though, says this:
‘m currently building a batch of the lumicycle-specific drivers. I’m aiming to standardise at 770mA output but I could increase this up to 1A as the circuit is basically the same as my standard driver.
stumpy01Full MemberPosted 14 years agofoxyrider – Member
BTW, if BCT reads this I am happy to make some heatsinks in my workshop if someone gives me a link as the one in the original article is brokenAhh here we go:
HPI72234 HPI Traction Control Gear Hub
TECH NOTES
This is the Replacement Traction Control Gear Hub for the HPI RS4 MT Racer.
This can also be referred to as the slipper plate. It is located on
the outside of the 52 tooth spur gear.FEATURES: Machined aluminum construction.
Natural color.INCLUDES: One gear hub (72234a).
Two spur gear retainer clips (72234b).REQUIRES: Nothing. This is a direct replacement part.
SPECS: Outer diameter: 33mm (1.30″)
Thickness of hub: 4.8mm (0.19″)
Total height: 8.7mm (0.34″)FR – pretty sure that BCT had come up with his own heatsink design that held the driver on the back and the LED on the front. I don’t think it was that standard flywheel heatsink….
See here, I think: http://www.flickr.com/photos/50439158@N02/4631185669/in/photostream/
EDIT – I’d be interested to know how tight a fit this heatsink is in the can. The heatsinks I sorted out for my first conversion were slightly oversize and I sanded them down until they just fitted into the cans. This was in an effort to get maximum contact with the can to get the heat away.
foxyriderFree MemberPosted 14 years agoAwesome – sorry the post was so long I got lost 🙂 Sorry 😳
Ahh – I dont have a lathe so cant make those – I could easily file down the ones above though 🙂 But the BCT heatsink looks spot on 🙂
stumpy01Full MemberPosted 14 years agoFR – this is the heatsink that I came up with:
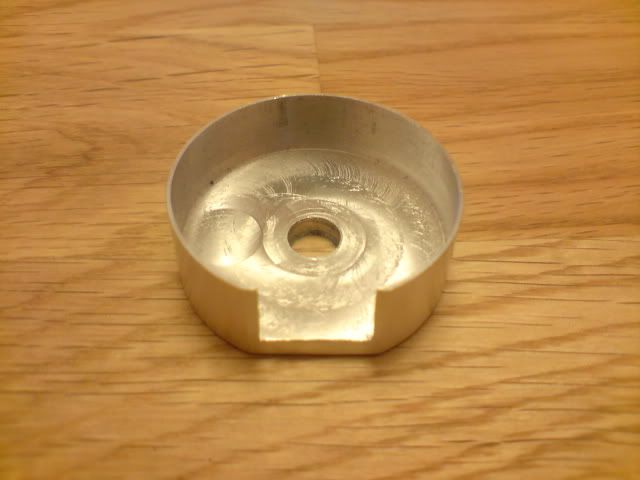
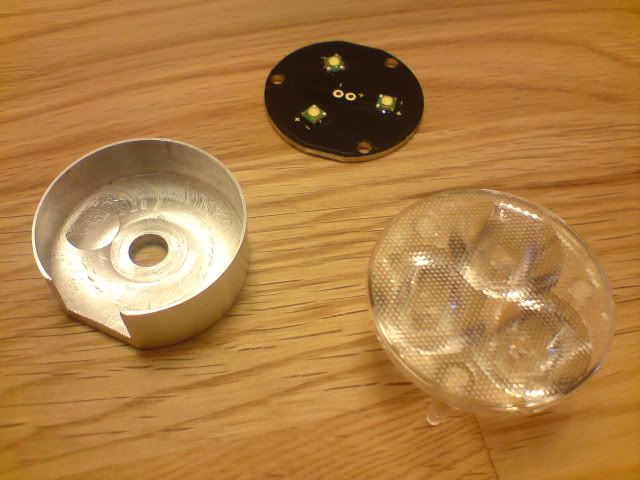
with the LED board fitting in the pocket and sitting against the back. I thought the sleeve would allow max contact to the surrounding can and is ‘free’ space that is otherwise taken up by the depth of the optic.
I made the backing plate quite thin (can’t remember exactly, but perhaps 4mm) as I was worried about the depth of can available for placing all the other gubbins.I wonder if it would be possible to combine the two designs to end up with a thicker backplate that would incorporate a cut-out for the driver, plus a sleeve reaching forwards to enable good heat transfer. With the driver placed into the heatsink there should be plenty of depth left for mounting the whole thing, especially if the resistor is now part of the driver board.
If BCT could provide me with a drawing of his heatsink, I could probably get my model updated. There is a chance i can get some made, but won’t be able to make any promises on that front at the moment.
This design might enable more heat to be extracted from the LED board and allow them to be run harder, safely…..?!foxyriderFree MemberPosted 14 years agoCool – nice one Stumpy – IIRC he’s on hols this week so we might not get areply till next week but we should keep it up 🙂 I’ll have a think too 🙂
pdwFree MemberPosted 14 years agoWith the driver placed into the heatsink there should be plenty of depth left for mounting the whole thing, especially if the resistor is now part of the driver board.
Actually, this doesn’t save you as much as you might think.
The can is 40.7mm deep. The optic + LED board is 13.4mm, so that gives you 27.3mm to play with.
The short side of the driver board, wrapped in heatsink is 21.5mm, giving 5.8mm for the heatsink. The heatsinks I had made up recently were 4.5mm thick, leaving a small amount to play with.
Even if you locate the driver PCB in the heatsink, the switch and power connector are only slightly lower in the can – the switch is 19.7mm deep and the power connector is 18.1mm – and that’s assuming that you solder it so that the wires don’t protrude any further. Allow a little bit for some insulation and you gain well under 2mm. The other thing to watch out for is the bolt for the mount on the bottom of the can, which is 19.7mm from the front of the can, meaning if the heatsink is thicker than 6.3mm, you need to work around that too.
You could get potentially more surface area contact with a more elaborate design that goes right to the back of the can at the top.
The above is all based on the Cutter XRE LEDs + optic. I think Cutter also sell some optics from another manufacturer that are a different depth.
Here’s what I’ve got stuffed inside mine:
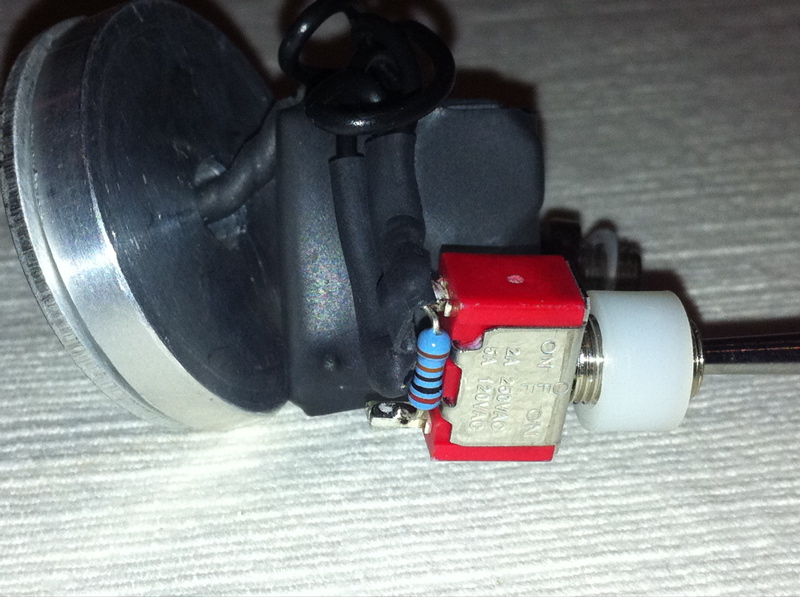
As you can see, the depth of the switch (including the white spacer) is very similar to the driver board. Also note that the resistor doesn’t need to take up any useful space.
BlackCat’s design does look very neat, and even if it only gets you an extra mm or so it’s probably worth it and should certainly make assembly easier.
troutFree MemberPosted 14 years agoHere is one I have just done today
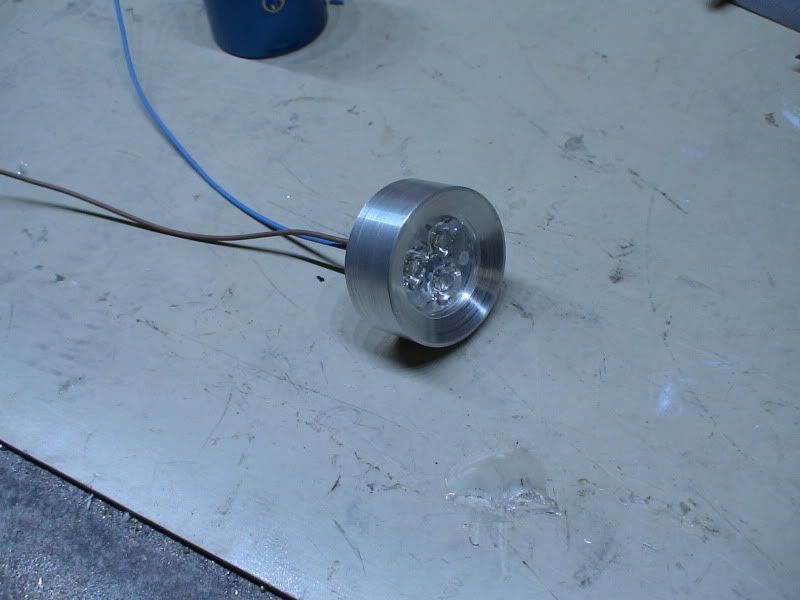
using a triple XPG and 20 mm triple optic .
a very tight fit in the can and only 15 mm deep so plenty of room in the can for the gubbins.I have a few of he led boards with XPGs and a few with XPEs on with optics if any one is interested .
forgot to take pics and have packed it up for mailing
stumpy01Full MemberPosted 14 years agopdw, yeah it will still be tight. I’d probably add only a mm or so to the back plate.
I’ll have a bit more of a fiddle around with this one tbh. Tempted to take the can apart, measure all the bits up & model them. Just finding the time to do it.trout, that looks pretty nice. Presumably that slides in & the cap screws in as normal to secure it in place?
Is there any method of affixing the driver, or would it be a case of wiring in a normal driver and squidging it in?
I think I’ll wait for BCT’s heatsink integrated driver and give that a try – I have a couple of heatsinks waiting to be installed at home as well, so probably best that someone without the opportunity to get some made up snaps them up, trout…..sam42Free MemberPosted 14 years agoHey Trout, do you still have those boards with LEDs and lenses knocking about?
If you do i’m interested, I’ve been looking at sourcing some for a uni project i’ve got on going on at the moment..foxyriderFree MemberPosted 14 years agoNice one Trout – maybe an amalgamation with BCT and your heatsink and BCT’s driver would be spot on? I feel a kit coming on 🙂 [Awaits BCT input from holiday] 🙂
unklebuckFree MemberPosted 14 years agoI’d also be very interested in a kit, but knowing what to buy (and from who) is confusing.
If anyone wants beer tokens in exchange for LEDs/optics/drivers/heatsinks, my email is in profile 🙂
BrainflexFull MemberPosted 14 years agoI would be in for upgrade kits for lumis as long as idiot instructions are available.
petrieboyFull MemberPosted 14 years agoI’d be interested in a kit. Old lumi halogens have been taking up space in the garage ever since I got my p7 torch. Would need an idiots guide tho!
nbtFull MemberPosted 14 years agome too, maybe more than one kit as I have two lamps each for me and mrs nbt
hungrymonkeyFree MemberPosted 14 years agoi might be keen too (with idiots guide), assuming it would be as bright, and increase burn time.
i don’t really understand lights though, tbh…troutFree MemberPosted 14 years agoBeen a bit busy with decorating the dining room to keep Ms T happy .
Lumi upgrade for spot it can have XPE leds and for flood XPGs .
comes as a sealed unit which is a press fit in the halogen can and by press fit I mean tight so the metal to metal contact is good .will need a driver from BCT and I will do some instructions on how to do it all .
dead easy really
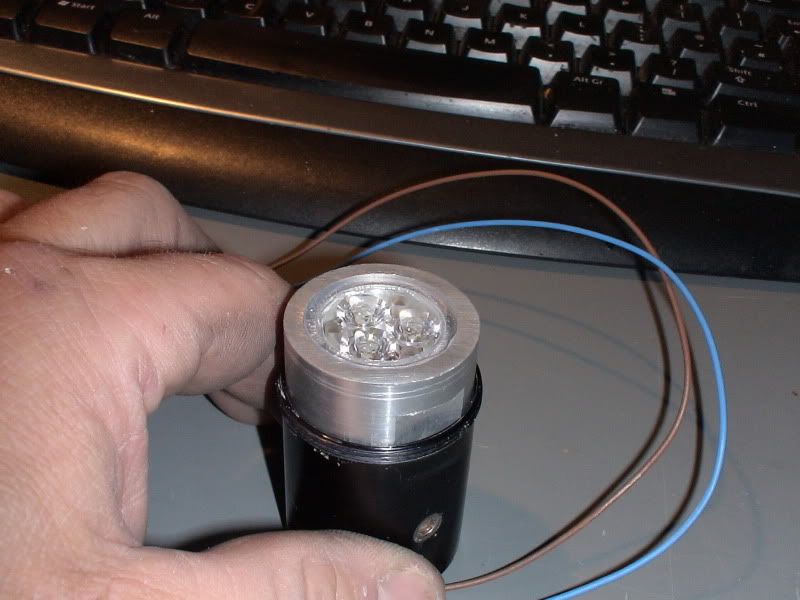
will be a diy or send to me for fitting
unklebuckFree MemberPosted 14 years agoHi Trout,
How much would I be looking at for a spot and a flood? I’ve got two old lumi cans that would benefit from just this upgrade 😮
SpeshpaulFull MemberPosted 14 years agoHi Trout
I’f br interested in a spot flood combo as well.
One question would these be ok with the Lumi nimh battery?
Cheers
paultroutFree MemberPosted 14 years ago£27 for the drop in ( press in ) per can posted
You will of course need the driver from BCT .or mail me for a price for me to do it .
Not sure about the Nihm battery but as long as it is over 12 volts then it should be OK
Curly68Free MemberPosted 14 years agoI’ll have a drop in please for the lumi can. Should be ok wiring the driver by the time I get around to doing the DIY CK light!
PaulBFree MemberPosted 14 years agoTrout,
Sounds brilliant. Roughly what is the output of these individual cans please? Compared to the twin halogen of around 1000 lumen (?? fresh battery or 10 minutes before it drops) (according to lumi website for 12 and 20 w combined)
I am in for a few of these when we have BCT’s driver availability and price.Paul
speaker2animalsFull MemberPosted 14 years agoI’d definitely be interested in buying a drop in spot to start with and maybe a flood later on. Might be a couple weeks before I have the cash though. e-mail – bikeandy61@gmail.com when they are available please. Ta fella you’re a busy man and very generous with your time.
Will I need the 970 or 670mA driver from BCT, I have a Li-ion 14.8v/4.8mA Lumi battery?
Ta
troutFree MemberPosted 14 years agoa triple XPG running one of BCTs drivers on full will be on paper lumens of 1050 lumens.per can.
there will of course be losses so real out the front lumens will be more like 800 per can.I have never had a working Lumi halogen in to compare as they are bust when I get them.
the XPE will be down about 150 lumens but will have a tighter beam
incognitoFree MemberPosted 14 years agocurrent nimh batteries are 13.2 v, mine is about 6 or 7 years old though.
stevioFull MemberPosted 14 years agogot 2 working spot halogen lumi cans that would benefit – will email you about doing one – got a Lumi 3 to replace my halogens so this would be more to use as a loan light for other riders
marcFree MemberPosted 14 years agoI’ve also got two working examples for you. 20w flood and 12w spot. I’d be looking to change both for more light and increased run time.
I’d have to get you to do everything tho if you’re able; how much would that be?
unklebuckFree MemberPosted 14 years agoa triple XPG running one of BCTs drivers on full will be on paper lumens of 1050 lumens.per can.
there will of course be losses so real out the front lumens will be more like 800 per can.I have never had a working Lumi halogen in to compare as they are bust when I get them.
the XPE will be down about 150 lumens but will have a tighter beam
Trout,
Which bct driver are those figures based around? With the ones already available on ebay and the talk of custom ones above, what would be a safe max output given the lack of material in the can.
How floody and spotty are the LEDs? I’m using a Lumi HID as my main light at the moment and was thinking of getting one of each, but am wondering if two floods would be better.
pdw,
I see you’ve used a resistor to give a low power mode, what rating is it? I can’t quite make out the colours of the two dark bands.
It’s been a while since I last did anything with a soldering iron and this is wetting my appetite nicely 🙂
The topic ‘Lumicycle Halogen > LED Kit Vote’ is closed to new replies.
