I don't normally have any problems setting up tubeless. My SS has been ghetto tubeless for 5 years, no problems.
I took the Panaracer Fire XC off today, the world shortage of Stans sealant is partly due to the amount still sloshing about my tyres. The BMX inner tube / rim strip was "glued" to the tyre, it came off whole and looks like a tubular. So, new BMX tube on, cut it open, clean it up, new Continental Trail King on, soapy spray, inflate, hissssssss.
Long story short, the valve area on the tube was just too lumpy and I couldn't get the tyre to inflate. The tyres were really loose on the rim without the inner tube / rim strip. So I tried even-more-ghetto. 6 wraps of insulation tape, round the centre and up on to both shoulders of the rim bed. Cut an old valve out of an inner tube, cut a cross in the tape at the valve hole, pushed it through and remounted the tyre. Ended up having to pull the tyre bead up on to the shoulders by the valve. Eventually got in to pop on to the rim and seat the bead. Big dose of sealant and it's now stopped up. Only leakage was around the valve. 3 hours!
Second tyre, tape and valve as the first. Tyre seated first time. A little more leakage from the valve this time.
I'll see if they're still up in the morning, presently on buckets in the shed. I'm knackered from having to refill the inflator with the track pump.
I'm sitting here pouring with sweat after just going wild on the track pump in the garage. Thread title made me laugh.
This is the first time I've had proper tubeless tyres and the first time I can't seat them on the rim.
I was always very cocky about managing to do tubeless with the track pump but tried to inflate an ardent on a rim the other day without success. It was a proper super loose fit though, almost didn't need to press the bead to the rim channel to take the tyre off by hand.
Anyway, I fired together a ghetto inflator and second try at 50psi it blew up right away.
One thing I'll say is that rim strips or ghetto tubeless makes the job MUCH easier as the tyres rubber bead is pressing up against a soft rubber cushion rather than a hard metal rim and it therefore becomes air tight much more easily.
I've always just used a track pump. Now that I have official tubeless gear it's not having it.
I made a pop bottle inflator and it works perfectly. But, the tyre won't seat. It inflates from the bottle without the valve core in but when the pipe is removed the tyre pops off the rim. With the valve in place it won't inflate fast enough.
I'm absolutely worn out from pumping a 2 litre bottle up to 100psi about 20 times.
Are the tyres that you guys are fitting folding tyres and new ?
I'm absolutely worn out from pumping a 2 litre bottle up to 100psi about 20 times.
I'm the same, except I'm pumping up a fire extinguisher! I think the cause is the tyre was just not tight enough to "seal" on the rim strip prior to adding air. It's just getting the right sized tyre and rim combination.
Many years ago I fitted car tyres one summer. The difference in bike tyre sizes between brands is the same with car tyres. Some budget brands were notoriously tight or loose on certain wheels. We didn't have the luxury of Stans sealant.
My tyres are brand new and were folded in the box but they'be been sitting with tubes in at 60psi since they arrived. I'll tackle it tomorrow I'm done for the night.
Lol at the fire extinguisher! I was thinking how much better it would be if I had one but I don't have the upper body strength for it.
You can never have too many photos of THE FRANKENFLATOR!
[IMG] 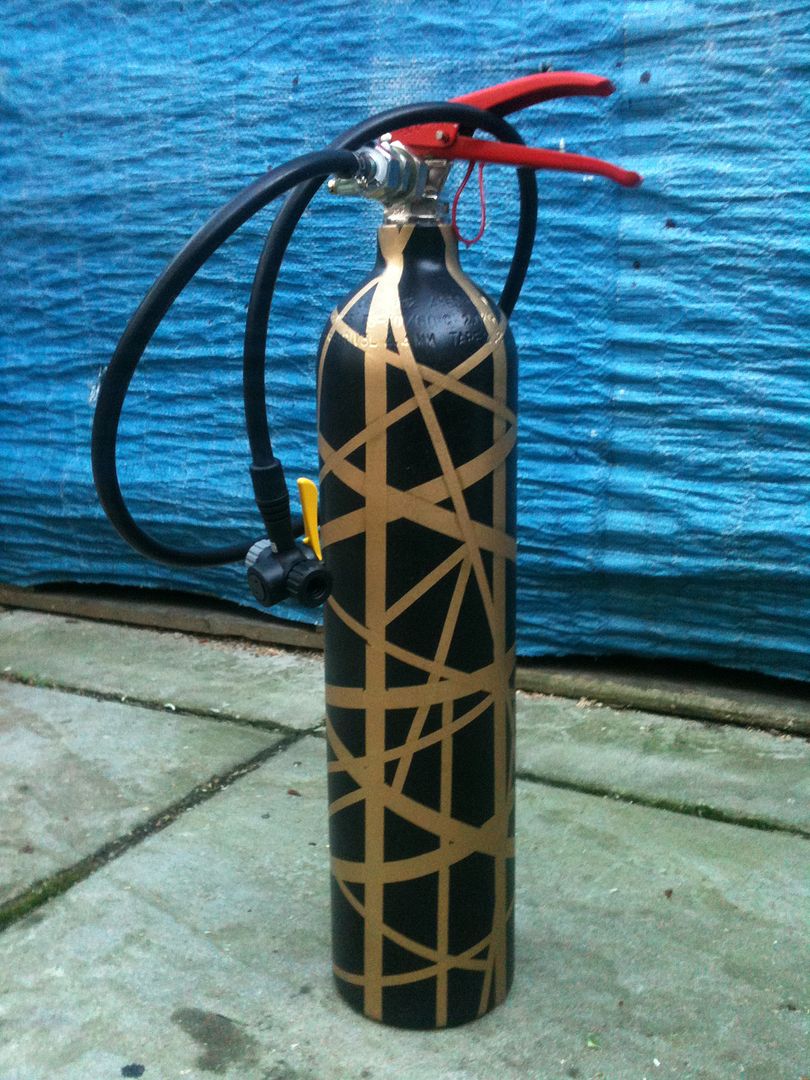 [/IMG]
Frankenflator... 😯
Two HR 2 today. New on front no problem. Old one on back wouldn't go up without cleaning the tyres edge with sandpaper. Went up second time. Stans rims seems to go up with track pump. SRAM rims needs the compressor. £100 on compressor, money well spent
Have always managed with track pump and lots of effort, until one tyre and rim just refused to work. Gave up in a pool of sweat and latex. Used the airline at work next day which was sooooo easy.
Made a mental note to buy a compressor when a good deal appeared (Lidl came up trumps last summer). I love my compressor 🙂
Road tubeless...
Bontrager r3, used an old valve from an inner tube, got the tyre on and got it inflated without sealant. Job done, just remove the valve core, fire some sealant in and its all good. But no, I'd used a cheap valve. Cue 45 mins of trying to get the tyre off the rim again to put some sealant in.
Found some ice toolz levers after breaking the one I was using and they're awesome
Wow. I need a Frankenflator!
Where is the input valve? Any build instructions?
Finally got around to putting an old pair of minions on earlier this evening ready for a trip to BPW tomorrow. Valve cores out, flash charger pumped to 120psi, job done. It was expensive but has payed for itself through my maintained sanity alone!
sharkattack - Member
Wow. I need a Frankenflator!Where is the input valve? Any build instructions?
Ha! I've dropped it into a couple of threads because I'm so pleased with how it came out. I'll take some more photos tomorrow in the light.
Input via a schrader valve of the front of the handle assembly.
[IMG]  [/IMG]
That looks familiar 😉
[url= http://singletrackworld.com/forum/topic/ghetto-tubeless-inflator-mk-vii ]http://singletrackworld.com/forum/topic/ghetto-tubeless-inflator-mk-vii[/url]
Doffs cap at Nobby.
Really should get round to painting it though... 🙂
Smiling at this thread.
I've never had any issues with a track pump but I've just rebuilt my Stans Arch EX rims onto new hubs and re-fitted the Crossmark/Ardent pair. The Crossmark went fine but when I was fitting the Ardent I noticed there was a Stanimal in it. Removed the Stanimal and got the Ardent done OK. Then I rattled the wheel with the Crossmark and could here one in there too. Broke the seal, removed the Stanimal and do you think I can get the bloody thing to inflate now?
Grrrr!
My old Conti Mountain Kings had me sweating like a beast trying to get the seated....I had a tantrum and went to Screwfix for a compressor! The side walls were leaked loads too.
My Schwable tyres on UST rims were super easy to set up with a track pump.
New Minon DHRII's were really easy to get running tubeless on my DT wheels.
Never had a problem with ghetto tubless, except for some really old featherweight SmallBlock8's onto cheap Vbrake rims the lads bike.
But trying to tubeless some Minion DHF's onto Mavic XM319's...hopeless.
Had to inflate them at work in the end, with the airline.
Have held pressure fine, but no way will they go up with a track pump.
Next time I can "obtain" an old 4.5kg gas bottle I will be lashing up a [i]device[/i].
bigblackshed...what pressure do you get the Frankenflator to ?
I've managed 160psi with my track pump. Lots of sweating and I nearly died.
110psi is more than enough if the tyres are a good fit, if they're not then no matter how much pressure you have it won't work. It's all about the volume.
The fire extinguisher has a max pressure stamped on it at 315bar = approx 4568.69psi
😯
My favourite trick* is to get those super flimsy zip ties that are like maybe a millimeter thick and tie them either side of the valve to pull/push the tyre into shape over the rim. Then pump like hell, it usually seats and as the tyre goes up the zipties ping of because they're weak/rubbish.
*I've only ever done one set of tubeless tyres this way, but it worked.
I HAVE ACHIEVED FULL INFLATION.
But, lost the use of my arms.
Never had a problem before so I'm not a numpty. Just been talking to two mates who had exactly the same problem with their Shorty's and they ended up tag teaming it in a sweaty garage for a few hours.
If it helps, just installed a Race King onto a Stan's rim in less than a minute. A few non strenuous pumps and up it went. And unusually for a Continental is has stayed up for the last few hours too.
If it helps, just installed a Race King onto a Stan's rim in less than a minute. A few non strenuous pumps and up it went.
This is my normal experience. Never had anything like these Shorty's.
WRT the ghetto tubeless inflator mentioned above, I made a plastic bottle version a while ago which works great.
However, I was in Sports Direct yesterday and saw these for £3.99 in store, which are the same size as the airshot bottles;
http://www.karrimor.com/karrimor-aluminium-drink-bottle-1-litre-787151
Ghetto V2 will be made at the weekend 😀
There is no way I'd pump one of those up to 100psi 😯
I made myself a Frakenflator last week. Slightly different to bigblackshed's and cost a grand total of about £14.50! I decided to take some photos of the build and do a little guide for those of you who are interested:
Please note that fire extinguishers are pressurised and therefore this could be considered dangerous but you all know that. If proper care and attention is taken then this can be done safely however I take no responsibility for any damage or injuries that may result from following my instructions.
Here is what you need:
A 1 Kg powder fire extinguisher. I bought mine for just under £12 from eurocarparts.com as they were the cheapest at the time.
6mm ID hose. Cost me about £2 from ebay.
Various drill bits
A zip tie.
Firstly you need to discharge the fire extinguisher. How you do this is up to you. I emptied mine into a dustbin as the powder can make quite a mess. Be careful not to breathe in the powder as it's probably not going to be good for you.
[img]  [/img]
Once you have fully discharged the extinguisher you can remove the head. I managed this fairly easily by hand. Once removed from your bottle you should be left with this:
[img]  [/img]
On one side of the head you have a pressure gauge and on the other you have a pressure release valve. This valve will allow the gas to escape at a pre-set pressure so the extinguisher won't explode in the event of a fire. We are going to remove this and modify it to fit a presta valve.
[img]  [/img]
Start by unthreading the nut as shown:
[img]  [/img]
You can ditch the spring and seal. Now you need to open out the hole to 6-6.5mm. I used a 6mm drill bit but it was a bit tight getting the valve through. In hindsight the 6.5mm bit would have been easier.
[img]  [/img]
[img]  [/img]
I needed to modify an old presta valve to fit. Trim the outside of the rubber until it fits inside the thread as shown.
[img]  [/img]
Now assemble the valve into the nut you opened out to 6.5mm. I used a tiny bit of tubeless sealant to ensure a good seal however this isn't really that necessary.
[img]  [/img]
Now when I first made this it was hard to pump up as the air was too restricted. I opened out the internal holes in the head itself with a 4.5mm drill bit. Firstly you need to further disassemble the plastic internal parts. You can ditch the central tube as this is isn't needed. Be careful not to drill too deep as you may damage the pressure gauge and / or break through the head meaning you'll never manage to seal it. This was fairly easy as that material was quite soft. It should look something like this once done:
[img]  [/img]
[img]  [/img]
Now it's time to put everything back together. On the nozzle on the head I managed to squeeze on some 6mm ID tubing. You'll need to use your zip tie here to ensure it doesn't fly off under pressure and maybe some araldite or similar would help to ensure that this doesn't happen in use.
[img]  [/img]
I used a hand pump for the initial testing. 14 bar (the working pressure of the extinguisher) equates to roughly 200psi so if your gauge is half way there you should be at around 100psi. Obviously using a track pump with a gauge will let you now exactly how much pressure you have. In practice around 70psi seems to seat my tyres no problem however you could go higher if desired. I wouldn't however recommend going up to 14 bar!
And there you go! One tubeless inflator that took me about half an hour to make that is robust and durable. Mine even came with a wall mount so it'll be going up in the shed shortly.
One thing to note is that this still looks like a fire extinguisher. For safety reasons I would recommend painting it or modifying it in some way that clearly makes it distinguishable from a real extinguisher. You can do this however you please. I'll probably wrap mine in some funky gaffer tape or something like that.
Nice work 😀
I bought an Airshot after many swearing tubeless incidents and soon felt smug. Confidently offered to do a mate's tyres, went round blasted two wheels in short order, mate impressed. Went home to put an identical tyre on my wheel - no chance! It took a tube to get it into shape before it would even think about it and even after it finally went up , it still loses more than an acceptable amount of air overnight.
Was it the valve? was it the individual tyre? I have no idea!
It could be that the rims were different? I've never had an issue seating tyres with a track pump until I started using WTB rims. It seems almost impossible to seat Maxxis tyres with a track pump or even a compressor. I think they need a much bigger rush of air to get them to seat. I think that when I get new tyres I might try to add an extra wrap of rim tape to raise the rim bed a little to see if this helps. Or not bother now I have a fire extinguisher inflator! 😆
I've a Bonty flash charger after one particularly epic tyre seating failure mantrum last year. Lovely bit of kit.
[URL= http://i1276.photobucket.com/albums/y477/BigBlackShed/Holy%20Thread%20Resurrection%20Batman_zpsk4eqyem9.jp g" target="_blank"> http://i1276.photobucket.com/albums/y477/BigBlackShed/Holy%20Thread%20Resurrection%20Batman_zpsk4eqyem9.jp g"/> [/IMG][/URL]
Rather than start a new thread, the latest installment of choice Anglo-Saxonisms in The Shed.
After a summer of constantly topping up the Stans spaff and pumping up tyres I finally decided to re-tubeless my wheels. The final straw was flat tyres in The Shed, pump up tyres, put the bike in the car, drive to the FOD, pump up tyres, ride 3 miles, stop, pump up tyres, ride 6 miles, stop, pump up tyres, finish ride on the rims, pump up tyres to put the bike on the roof, drive home, put bike in The Shed with flat tyres. Grrrrrrr.
I took the tryes off and saved the Stans fluid. Roughly 300mls per tyre!!!! The insulation tape I used last time had un-stuck from the rim and allowed sealant underneath and out of the nipple eyelets.
I've gone with Gorilla tape this time with proper Schrader tubeless valves. 2 wraps of tape and the tyres seated first time with the inflator. A bit of leakage around the rim, but knowhere near as much as last time. Went for a quick spin and all looks OK, for now.
Couple of questions please.
How well has Gorilla tape held up for you?
Are the Stans rim strips any good?
The problems I had with the ghetto BMX inner tube was the area around the valve was too "lumpy" and was holding the tyre bead off the tube, causing the air to piss out when trying to inflate. The images I have seen of the Stans rim strips seem to be pre-cut inner tubes.
I've read that painting the inside of the tyre with liquid latex helps with sealing porous sidewalls. It's also the main ingredient in homemade spaff.
Which leads me on to:
I've had a search for home made spaff, a few recipes have come up from here. So I may have a go at cooking some up. Any pointers?
Gorilla tape and a tubeless valve has been fine for me, both on the CX and MTB. I had to build up one of the rims to get a tighter tyre fit and some tyres are more porous than others.
As above - proper tubeless valves do make things easier, as the tyre sits flusher around the valve section of the rim bed.
I've used Gorilla tape for years and found it works well. It is quite thick though, so you might find tight tyres become very hard to get on the rim (esp Stans rims)
Gorilla tape can be a bit slidey until the adhesive has fully stuck, so best to tape rims and leave overnight, rather than fit the tyres straight away. Although you'll probably get away with it.
I keep looking at buying an Airshot but my 7p ghetto tubeless inflator is still going strong after 5 years!
Home made spaff has always seemed a lot of work to save a few quid imo.
Porous sidewalls will always be porous (Specialized 2Bliss are notorious). I've used pritt-stick in the past.
