-
What is the last thing you made? (pics pls)
-
kayak23Full MemberPosted 4 months ago
Kayak – Are all the individual pieces for those stars the same?
Do you just set up a jig to cut our a large batch and then pin them together as required?Yes, all exactly the same. The sizes I used give you a star of around 250mm diameter.
I copied the star from a picture someone sent me, working out the sizes in sketchup.
Not my design at all.
Not sure if you’ve got a table saw, but the way I did it was to clamp a false table to the Crosscut carriage(just a rectangular piece of 18mm mdf)
Then slide forwards and cut the false table so you know where the blade is.
Set up a bevel and pin an offcut to the false table to give you a cut angle of 36 degrees.Cut a gazillion pieces.
Then pin another false fence down at 72 degrees, slide your piece in to cut the other end at the correct length and set up a stop so you can repeat it.
Cut a gazillion pieces.I then cut a tiny chamfer all round both sides on a palm router table.
I then pinned two strips to a board at 36 degrees for my assembly jig.
Take one piece and lay it in, take the next piece, glue it and pin it to the first at the angle.
Repeat 5 times.
Using the jig again, glue and pin all 5 pairs.I used nice fine 23 gauge pins so fairly discrete and on the back only.
dyna-tiFull MemberPosted 4 months agoif you don’t mind me pinching your design.
SOP.
Had a chap in looking at a new dust extractor Im selling(large 1.5kw type with fine filter drum if anyone’s interested)
He was a turner and was showing me some pics of his work. In there was a fantastic design for bird houses, all done on the lathe.
And im going to plagiarize the **** out of them 😆 Not for sale, but a few for family. Great idea and design, and I’ve some logs off a fir tree we had to cut down in Mumsies garden I’ll use to make them with.
WorldClassAccidentFree MemberPosted 4 months agoPerfect instructions. I assume the size of wood is less important – within reason. I would chamfer the edges of the lengths of wood before cutting them into little bits and then just buzz the ends on a belt to match the chamfer – but that is because I am me and not you and I can live with near enough 🙂
Dyna-ti – PM me with details of the dust extractor. Mine broke when the angle grinder jumped and bounced off it. Are you anywhere near Southampton?
dyna-tiFull MemberPosted 4 months agoAre you anywhere near Southampton?
Just up the road a bit. Glasgow.
I’d pop it on the back of the bike and ride it down to you, but at 50kg im pushing the limits of the ebike.
I need to get it sold and get one not as big. TBH it’s just sat there gathering dust.
kayak23Full MemberPosted 4 months agoI assume the size of wood is less important
Mine is 26mm wide and 15mm thick.
Fairly nice proportions I thought.squirrelkingFree MemberPosted 4 months agoI need to get it sold and get one not as big. TBH it’s just sat there gathering dust.
I’m failing to see the problem here 🤔
CountZeroFull MemberPosted 4 months ago@kayak23 – you make it all look so easy… 🤣
My next project, once Christmas is out of the way is a pentatonic wind chime using 1” diameter copper tube, and after that I’m going to try a range of different craft projects at different places, like silver work, stone carving, flint knapping – a mate does them all over the place, some are quite local, so now I’ve got time to spare and enough money to pay for the classes, it’s something fun to do, and have something nice to have at the end.
He’s having a go at making a longbow, which I might do during the year; at least I’ll have the opportunity to use afterwards!
dyna-tiFull MemberPosted 4 months agoHe’s having a go at making a longbow, which I might do during the year; at least I’ll have the opportunity to use afterwards!
That would be interesting to make, though I reckon if you are new at it theres going to be a lot of trial and error, and then theres the skill and experience needed to choose the piece of timber you’re going to use.
Of the little I’ve researched into this, it has to be long enough, plus be riven from a single piece, probably a long log split into long wedge shapes, then worked down with a spokeshave. Grain orientation going to critical, very clean with not even a pin knot.
Something like this, and while not that cheap, split is maybe going to give you 8 sections to work with.
DrPFull MemberPosted 4 months agoI turned this from a scrappy MOT failure, with a roof that didn’t work and locks that didn’t work and moss and mold all over…into the shiny working thing you see before you!
DrP
WorldClassAccidentFree MemberPosted 4 months ago
DrP
Full Member
I turned this from a scrappy MOT failure, with a roof that didn’t work and locks that didn’t work and moss and mold all over…into the shiny working thing you see before you!DrP
Yeah, but the drive needs cleaning
DrPFull MemberPosted 4 months agoit’s my parent’s drive!! hiding the car there until Xmas
DrP
(My drive is worse…!)
SkippyFull MemberPosted 4 months agoDrP do you have a before picture? Someone is going to have a nice surprise on Christmas Day as I assume it’s a present
relapsed_mandalorianFull MemberPosted 4 months agoThis one tested my patience, my hands are to big for small things.
Seemed like a good idea at the time, making a jumper for a friend’s sausage, it won’t be happening again!
She does look very pleased though.
kayak23Full MemberPosted 4 months agoDrP do you have a before picture? Someone is going to have a nice surprise on Christmas Day as I assume it’s a present
Before
😉
LAP13Free MemberPosted 4 months agoShameless post. I was encouraged to put as it is still something I (collectively) made and as chief cat herder am very proud of…
Get your tab ‘oles round this 😁
fruitbatFull MemberPosted 4 months agoAnother bit of garden wall art from my haul of rescued 5mm galvanised fencing wire. This one’s for my grandson.
Sorry about the clutter in the bacground 😃
fasthaggisFull MemberPosted 4 months agoGood work 👍
As far as clutter goes,you sir,are an amateur 😆 🤣WorldClassAccidentFree MemberPosted 4 months agoI like it but the lamp(?) behind it makes it look like you have given it really long front legs.
FB-ATBFull MemberPosted 4 months agoNah- it’s one of those litter pickers, as his short arms mean he can’t get things that are on the ground
fruitbatFull MemberPosted 4 months ago^^😁 guilty as charged – absolutely no thought given to photographic composition. I’ll resubmit when I install it 😊
StuartCFree MemberPosted 4 months agoI’ll join in (and see if my Flickr skills are any good either):

Starting to sort things out in new shed. Nice simple shoe and helmet racks. Did the shoes first, should’ve done other way round as now helmets are a bit too high.
e…Full MemberPosted 4 months agoI have been off work with a bad back, so that’s meant no riding too. But I have been baking, and have been enjoying baking Scottish Morning Rolls.
These are fresh out the oven for lunch time.
I also recently made a spring loaded bolt for the old gates I got off my sister. They will need painted, but that’s a job for the spring.
thenorthwindFull MemberPosted 4 months agoI was lucky enough to get a pair of Park Tool beam torque wrenches for a recent birthday (thanks whoever pointed out the great deal on one of them on another thread, which also informed me of their existence).
For easy access (so I actually use them) but to keep them safe, I thought a wall mount would be good, and since I have access to 3D printing now, I quickly drew up a wall-mounted (i.e. its got a couple of screw holes in it) 3/8″ square drive receiver. Then thought I’d better do some clips for the bars too.
Hardest part was finding a free bit of garage wall to put them on!
thenorthwindFull MemberPosted 4 months agoThey will need painted, but that’s a job for the spring.
Looks like a great job, but I think expecting it paint the gate for you is ambitious.
Sorry, IGMC
NorthwindFull MemberPosted 4 months agoThought a wreath would add a bit of class to my front door
Didn’t want to spend £0 on one so instead I spent £12 on filament
nostrilsFree MemberPosted 4 months agoI made a festive fireplace for my daughter from scraps of styrofoam.
 squirrelkingFree MemberPosted 4 months ago
Didn’t want to spend £0 on one so instead I spent £12 on filament
Good investment, you’d probably have paid about the same for the real thing!
joshvegasFree MemberPosted 4 months agoThought a wreath would add a bit of class to my front door
Didn’t want to spend £0 on one so instead I spent £12 on filamentIt’s times like these I wish I had a 3d printer.
welshfarmerFull MemberPosted 4 months agoHaving smacked the useless motor guard on my Rise on a rock the other night and then losing it on the next one i thought it was prudent to make a more robust model. I found a bit of 40 yeay old aluminium from my old land rover and using a CAD model (cardboard aided design) i cut out and bent up a guard that did the job. I welded together 2 angle brackets and riveted them on tomount to the rear motor bolts. For tje front i drilled and tapped 2 small M4 bolts into the thick ally that the motor also bolts to. Then tigged up the slots and job jobbed. Quite pleased with the result. Could use a little fettling but will do for now.
relapsed_mandalorianFull MemberPosted 3 months agoNothing as good as that guard, but finally sorted a cupboard as a temporary fix to hide terrible boiler placement and the space left by an pointless little cupboard.
Have since levelled the doors. 😉😂
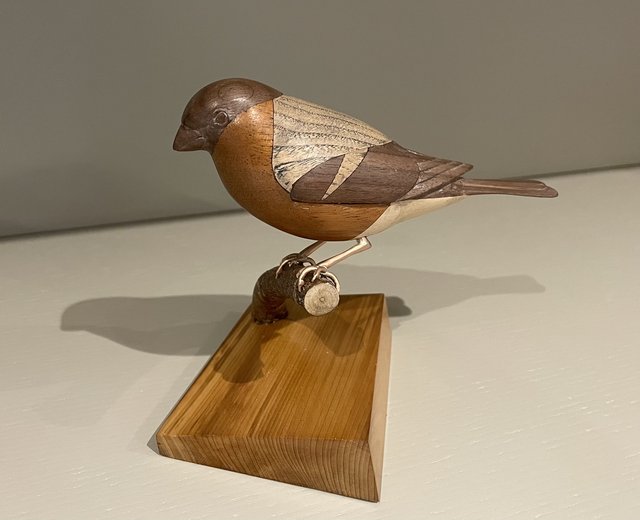
jimwFree MemberPosted 3 months agoThanks Kayak23
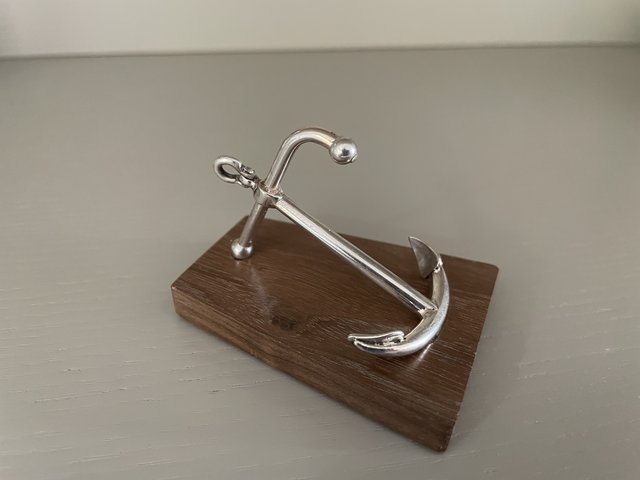
Previous to that I made a silver anchor for my father’s birthday


 Having smacked the useless motor guard on my Rise on a rock the other night and then losing it on the next one i thought it was prudent to make a more robust model. I found a bit of 40 yeay old aluminium from my old land rover and using a CAD model (cardboard aided design) i cut out and bent up a guard that did the job. I welded together 2 angle brackets and riveted them on tomount to the rear motor bolts. For tje front i drilled and tapped 2 small M4 bolts into the thick ally that the motor also bolts to. Then tigged up the slots and job jobbed. Quite pleased with the result. Could use a little fettling but will do for now.


You must be logged in to reply to this topic.