- This topic has 2,329 replies, 145 voices, and was last updated 10 hours ago by Harry_the_Spider.
-
Christmas Airfix!
-
Harry_the_SpiderFull MemberPosted 2 years ago
The Revell Lancaster is a good kit. I posted some pictures of mine earlier in the thread.
Needs a lot of gloss to prevent the big aircraft code decals silvering on the Matt black.
FreesterFull MemberPosted 2 years agoThe Revell Lancaster is a good kit. I posted some pictures of mine earlier in the thread.
Needs a lot of gloss to prevent the big aircraft code decals silvering on the Matt black.
Thanks! Good advice I’ll go find the pics.
Harry_the_SpiderFull MemberPosted 2 years agoIf you are doing exhaust stains the smoke from the outer exhausts went under the wing, the inner three went over the wing. Something to do with the airflow and the wing dihedral.
nostrilsFree MemberPosted 2 years ago@Freester – This past week I have been building the same Revell Corsair kit as you – I feel the part count is too high for a small kit that doesn’t fit together particularly well. Not really enjoying it to be honest.
FreesterFull MemberPosted 2 years ago@Freester – This past week I have been building the same Revell Corsair kit as you – I feel the part count is too high for a small kit that doesn’t fit together particularly well. Not really enjoying it to be honest.
This was my first build in many many years and Freester JR’s first. Looking at it now I can see a few things that are obviously fitted very badly but I don’t know if it was rustiness or lack of skill or the kit.
We’ve currently got a 1/48 Hobby Boss Corsair F4U-5 and a 1/72 Revell P47 Thunderbolt in progress. I guess we’ll be a bit more aware of what is / isn’t so good about these kits this time round.
It’s gotta be fun right?
johndrummerFree MemberPosted 2 years agoAs long as you don’t have to make tank tracks link by sodding link!
FreesterFull MemberPosted 2 years agoWe’ve have had a productive day.
Win #1. Realised the crappy Revell ‘Painta’brushes were crap – not stiff enough and no real point. Spent marginally more on a different set that had a couple of flat and some really fine stiff pointed brushes and noticed the win with the detail. This was Freester Jr who did a great job of the detail on the thingummujobbies inside the cockpit on the 1/72 Thunderbolt.

Cracked on and got the Thunderbolt fuselage welded together. Undercarriage up was the decision on this one…
On our other project – the 1/48 Hobby Boss Corsair good mix of Blue and Grey (after asking advice on Britmodeller) that makes for a nice USN Sea Blue so been cracking on slapping that on various bits in readiness for some assembly…
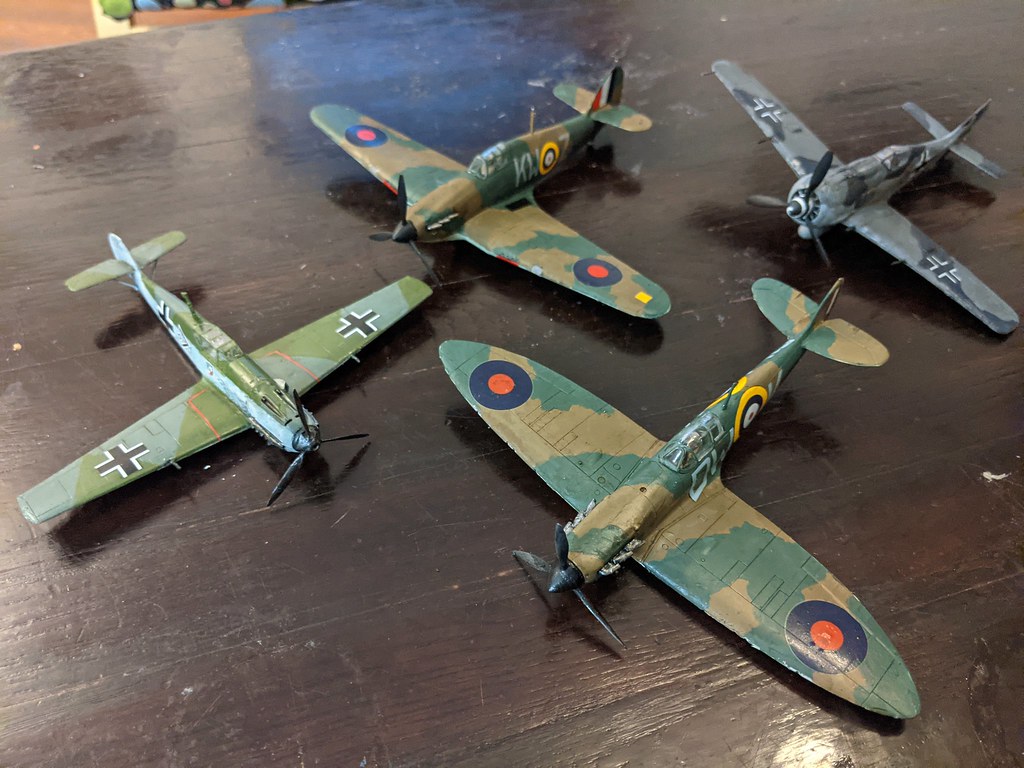
kimbersFull MemberPosted 2 years agoSo almost a year since I bought them finally got round to building these with the kids
Being honest I finished up the details on all, reasonably happy considering it my first model planes in 30? Years
Aldi have these in again at the moment and can’t recommend them enough (come with paints & brush)

https://www.aldi.co.uk/airfix-spitfire-starter-set/p/062318187957511
nickcFull MemberPosted 2 years agoand a 1/72 Revell P47 Thunderbolt in progress.
Airplane jokes: What’s the procedure for evading enemy fire in a P47? A: Undo the seat harness and run around the cockpit….I thank you, I thank you, I’m here all week, have the fish…
timbog160Full MemberPosted 2 years agoGood work everybody. Finally finished my Tamiya Storch. Brother in laws brother in law (!) passed away last year with a large stash of unbuilt kits, from which I bought this and sort of did it in his honour – cheers Stephen!
A nice kit but tricky in places, lots of fiddly canopy etc…
FreesterFull MemberPosted 2 years agoLooks like someone is mentally scarred by those tracks you keep bringing it up 🤣
Lovely work on that Storch @timbog160 not sure I fancy painting that canopy…
timbog160Full MemberPosted 2 years agoCheers Freester – it does come with masks but you have to cut them out yourself – pretty intricate!
timbog160Full MemberPosted 2 years agoFunnily enough my next in line is a 1/32 Thunderbolt – inspired by this chaps work:
I have no idea where I’ll put the finished thing though, and there’s also no way I’m doing the bare metal finish.
Harry_the_SpiderFull MemberPosted 2 years ago^ Planning on doing some plastic surgery?
Taking shape… https://photos.app.goo.gl/wRp5eVUmHkJPrRT87
FreesterFull MemberPosted 2 years agoOnly popped out for a couple of paint pots…
I think you forgot the paint
nostrilsFree MemberPosted 2 years ago@Harry_the_Spider – Needed for some remedial work on my Corsair build! Razor saw is awesome, not sure I’ve got the hang of the scribing tool yet – still have a tendency to wander like when using a craft knife.
Harrier looks great, what scheme are you doing? Also what ever became of your Victor build(s)?
@Freester – Managed to get one colour but the other one was out of stock, think I can mix the right colour though so all good🙂timbog160Full MemberPosted 2 years agoNostrils best way to use the scribing tool is with some old style thick plastic Dymo label tape as a guide – still tricky though!
Harry_the_SpiderFull MemberPosted 2 years agoThe Harrier will be in Falklands colours.
The Victor lies half painted and ignored. It needs finishing, but I’ll probably re-paint it in camouflage rather than the hemp scheme.
FreesterFull MemberPosted 2 years agoI did tha Tamiya 1/48 Sea Harrier a few years ago. Not their finest offering…
I just spotted this for 12.95 on Jadlam and was wondering why a Tamiya 1/48 was so cheap. I’m cheap. Is it worth a punt?
nickcFull MemberPosted 2 years agoThe Storch is a thing of beauty.
The Tamiya SHAR gets slated because it has raised panel lines, and the intake shape isn’t quite right (they’re too fat) it goes together well enough though, and it’s cheap. If you’re not massively fussed by total accuracy, it builds into an a OK model.
FreesterFull MemberPosted 2 years agoA full evening last night chipping away at the 1/48 Corsair.
It took me the whole evening to dry fit then glue the centre part of the wing that fits under the fuselage. There was a part that took me about 45 mins to work out exactly how / where to fit. Glued and fitted together well once I worked it out the instructions were useless.
Then I took on a job I’ve been dreading. The tail landing gear. It’s fiddly loads of little bits and quite critical placements to do with the landing hook when the fuselage is stuck together. It just kept falling apart when dry fitted. I tried masking tape to temporarily hold it all together but that didn’t really work. Then I tried gluing some parts and not others which seemed to work. The critical part that might need a little movement when I bring the fuselage together is still moving, I’ll glue that up when I bring the fuselage together. A picture is probably easier than words I’ll get a couple tonight.
Jr has decided he’d like the wings ‘up’ / ‘folded’. That makes things even more fiddly as there are some parts of the folding mechanism on view in the wing join. Dry fitted all of that just to see how it looks.
I think at the moment it’s the fiddly stuff and he gets a little frustrated with these bits. So I’m trying to press on, get the fuselage joined so he can be a bit more involved again. As the wings are going to be folded my plan is to paint and decal the folded wings (and probably fuselage) before the last act of joining folded wings to fuselage.
I bought some of those Model Craft peg / clamp things. Waaay better than normal pegs. Came in really useful for the undercarriage assembly after gluing. I also got some Tamiya Extra Thin cement for the really fiddly glue bits which seems to prevent a sticky mess (fnarr).
Sorry for long essay. Good to talk out loud, I seem to spend most of my bedtime reading staring at the assembly instructions planning my next steps to see if I can do some things in advance and minimise hold ups when I get to the next stage.
PS @Harry_the_Spider I took another skim through the whole thread yesterday. Your work has really come on since your first ones 4 years ago. Something to aspire to!
nickcFull MemberPosted 2 years agoliquid superglue is my go to for undercarriage. If you can’t get that, then regular superglue applied with a toothpick. You can get delayed setting superglue, that gives you 30 mins to move stuff about if you not super content using the instant bonding stuff, and have some nail-polish remover on hand to remove overspill or glued-fingers!
Harry_the_SpiderFull MemberPosted 2 years ago@Freester. Thanks. My first ones look like I painted them with a catapult.
nostrilsFree MemberPosted 2 years agoGiven the thread title, would anyone be up for a Christmas group build?
No real theme in mind although maybe keep it to kits under £10 and document the builds on this thread. For an added twist I did have an idea about gifting the completed model to another modeller taking part (recipient drawn at random) in time for Christmas – Incentive to do a good job on the model then!
Happy to organise if there is interest but we will need to start soon.
FreesterFull MemberPosted 2 years agoSome progress! Been dreading bringing the fuselage together. Need to wedge in cockpit, engine and VERY FIDDLY rear undercarriage at this point. Penalty for failure. Then a Eureka! moment. Glue the bits in one at a time on one side, dry attach the other half of the fuselage to ensure fit, let it dry then remove fuselage add the next bit etc etc.
Cockpit and rear undercarriage sorted. Just the engine to go… Cracked on doing some easy bits with my son as well – ailerons, wings, stabilisers . As this is what it should be about…
FreesterFull MemberPosted 2 years agoThis thread is turning into my Corsair ‘work in progress’.
Fuselage bits glued to one half – the engine was the final bit.
Dry assembled to let the engine dry then I’ll glue up the fuselage.
One last shot before it all gets covered up…
Wing lifting gubbins that will be on display OMFG that was fiddly.
Kind of frustrating and enjoyable in a masochistic kind of way. Should be thinking about slapping some paint on tomorrow.
timbog160Full MemberPosted 2 years agoTail wheel looks like a nightmare!
I’ve had a change of plan – the Storch came with a couple of different Rommel figures and some barrels and Jerry cans, so I’m going to have a go at a bit of a diorama. Done a few (very poor) figures in the past so been genning up on techniques..
FreesterFull MemberPosted 2 years agoTail wheel looks like a nightmare!
It was fiddly. But I cracked it in the end. Patience, don’t rush, it takes as long as it takes.
Mmmm dioramas… Makes me realise the more you dig into this
habithobby the more you have to learn.Off into town today. Need some +1 reading glasses 🤣 and gonna have a mooch in my local craft shop.
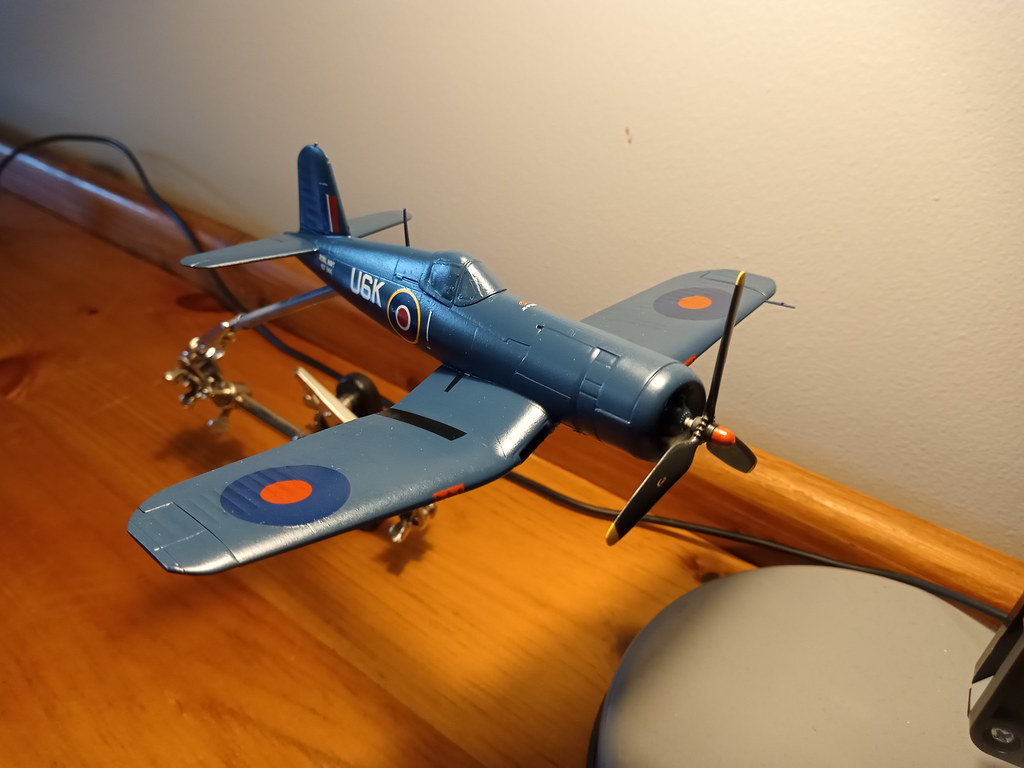
nostrilsFree MemberPosted 2 years agoThis is turning into the Corsair thread it seems – Good work @Freester
Decals applied yesterday, gloss coat looks horrible…
Landing gear and aux fuel tanks to finish next then a panel line wash before matt topcoat.
FreesterFull MemberPosted 2 years agoHey @nostrils you’ve done a good job there I think that looks really nice. It’s a subtly different kit to the one I did (I think mine was an F4U-1A your is a 1B) tho I doubt there’s any difference in the kits / detail probably just decals / paint? I know you weren’t feeling it a couple of posts up but it looks niiiiiiice. 🙂
Popped into town today to get some essentials
Went into the local art and craft shop. It’s one of those tiny old school shops but an absolute goldmine. Loads of modelling kits packed on a shelf up to the ceiling on one side of the shop. They had cars / tanks / aeroplanes I was just looking at the planes and saw they had Airfix, Tamiya, Italeri, Academy and Humbrol paint. I could have spent some money but resisted. Just a cheap little 1/72 nice easy level to keep Jr engaged.
nostrilsFree MemberPosted 2 years ago@Freester – thanks for the kind words, undercarriage fitted and painted and just need some nice weather to spray some matt top coat on. Not 100% happy with it but it is only the 3rd kit that I have finished as an adult and I’ve learnt loads.
Not sure what to build next. My airbrush runs off canned air and is very basic so I am sticking to single colour paintjobs at the moment.
I bought this from the Hobbycraft sale: https://www.hobbycraft.co.uk/revell-f_16d-tigermeet-2014-model-kit-172/656078-1000 but am a bit intimidated by the decals.
I’m following your thread on Britmodeller by the way – nice work!
johndrummerFree MemberPosted 2 years agoLovely looking Corsair there Nostrils.
Regarding the Tiger Meet F-16 – should be a nice kit, don’t forget to give it an all over coat of gloss varnish before doing the decals. For the larger decals e.g. on the tail fin, I’d also use some decal setting solution e.g. Humbrol Decalfix or equivalent. This softens them up and allows them to seat better as it dries. I paint the model first with decalfix, then apply the decal followed by more decalfix, then leave to dry naturally


You must be logged in to reply to this topic.