That floor is very nice, must have cost ££££
sorry no pics. audio only 😉
we made a record
[url= http://www.reverbnation.com/q/5ykmcr?eid=A4817071_26569066__lnk1008&utm_content=1008&utm_medium=email&utm_source=fr_layout_13 ]Chasing Glass - Take Me Under EP preview[/url]
I made this:
[URL= http://i6.photobucket.com/albums/y211/cr500dom/kadett2/BCFF0E01-A067-43CE-A648-DF72428A75B8.jp g" target="_blank"> http://i6.photobucket.com/albums/y211/cr500dom/kadett2/BCFF0E01-A067-43CE-A648-DF72428A75B8.jp g"/> [/IMG][/URL]
Which is an adaptor plate to join a FWD Ford / Yamaha engine to a RWD 6 speed gearbox from a Mazda RX8, to go in my Opel Kadett 😆
[URL= http://i6.photobucket.com/albums/y211/cr500dom/kadett2/CC912CE4-52A9-4A50-AFCE-FE20295B1A68.jp g" target="_blank"> http://i6.photobucket.com/albums/y211/cr500dom/kadett2/CC912CE4-52A9-4A50-AFCE-FE20295B1A68.jp g"/> [/IMG][/URL]
[URL= http://i6.photobucket.com/albums/y211/cr500dom/kadett2/826F619F-3A60-4FBA-80CD-4A9EC440FE14.jp g" target="_blank"> http://i6.photobucket.com/albums/y211/cr500dom/kadett2/826F619F-3A60-4FBA-80CD-4A9EC440FE14.jp g"/> [/IMG][/URL]
[URL= http://i6.photobucket.com/albums/y211/cr500dom/kadett2/716B9CBF-52AB-49CA-B8DD-A8D7A7A4CF1C.jp g" target="_blank"> http://i6.photobucket.com/albums/y211/cr500dom/kadett2/716B9CBF-52AB-49CA-B8DD-A8D7A7A4CF1C.jp g"/> [/IMG][/URL]
Re-built this old Fergie with recycled materials, stainless steel sinks etc. Full story here [url= http://www.thehuntinglife.com/forums/topic/337513-rebuilding-old-rtractor-wit-recycled-materials/ ]Link[/url]
[img][URL= http://i166.photobucket.com/albums/u81/gruffalogriff/001_zps2e7398dd.jp g" target="_blank"> http://i166.photobucket.com/albums/u81/gruffalogriff/001_zps2e7398dd.jp g"/> [/IMG][/URL][/img]
[img][URL= http://i166.photobucket.com/albums/u81/gruffalogriff/072_zpsc9762d3f.jp g" target="_blank"> http://i166.photobucket.com/albums/u81/gruffalogriff/072_zpsc9762d3f.jp g"/> [/IMG][/URL][/img]
[img][URL= http://i166.photobucket.com/albums/u81/gruffalogriff/090_zps937d7af6.jp g" target="_blank"> http://i166.photobucket.com/albums/u81/gruffalogriff/090_zps937d7af6.jp g"/> [/IMG][/URL][/img]
[img][URL= http://i166.photobucket.com/albums/u81/gruffalogriff/074_zpsac40a9e9.jp g" target="_blank"> http://i166.photobucket.com/albums/u81/gruffalogriff/074_zpsac40a9e9.jp g"/> [/IMG][/URL][/img]
[img][URL= http://i166.photobucket.com/albums/u81/gruffalogriff/DSCN6455_zps59799320.jp g" target="_blank"> http://i166.photobucket.com/albums/u81/gruffalogriff/DSCN6455_zps59799320.jp g"/> [/IMG][/URL][/img]
Bedside table made from recycled beech school table legs and planed down manky oak planks.
The wife likes mid-century wood furniture - Ercol, etc. and was looking for a bedside table in that style. Nothing second hand, and new you're talking £300+ !!!
So, a rummage in the wood store and 3 lunchtimes later....
[url= https://c1.staticflickr.com/1/425/19242726115_6ec6e9de34_c.jp g" target="_blank">https://c1.staticflickr.com/1/425/19242726115_6ec6e9de34_c.jp g"/> [/img][/url][url= https://flic.kr/p/vjq14V ]Bedside Table 1[/url] by [url= https://www.flickr.com/photos/toretz/ ]tom harrison[/url]
[url= https://c1.staticflickr.com/1/363/19056583329_b2b422b87e_c.jp g" target="_blank">https://c1.staticflickr.com/1/363/19056583329_b2b422b87e_c.jp g"/> [/img][/url][url= https://flic.kr/p/v2XYix ]Bedside Table 2[/url] by [url= https://www.flickr.com/photos/toretz/ ]tom harrison[/url]
[url= https://c1.staticflickr.com/1/310/19216626996_fa104e63e2_c.jp g" target="_blank">https://c1.staticflickr.com/1/310/19216626996_fa104e63e2_c.jp g"/> [/img][/url][url= https://flic.kr/p/vh7eH7 ]Bedside Table 3[/url] by [url= https://www.flickr.com/photos/toretz/ ]tom harrison[/url]
Great work as always in this thread!
Griffiths1000, I now have serious Tractor envy! I'd really like a Fergie, despite....
A: Not needing one in any way shape or form
B: Not having the means to buy one
C: Not having anywhere to keep one
D: Not having anywhere to use one apart from to annoy other road users
But apart from that, i do "need" to get one someday... Yours is a beauty! nice work fella!
Bought this chest of drawers cheaply from a local charity...
[URL= http://i219.photobucket.com/albums/cc310/jenga101/chestresto_zpsy54sdljj.jp g" target="_blank"> http://i219.photobucket.com/albums/cc310/jenga101/chestresto_zpsy54sdljj.jp g"/> [/IMG][/URL]
Stripped veneer from the top, raped it with a sander, painted and re-polished.....
[URL= http://i219.photobucket.com/albums/cc310/jenga101/2015-07-07%2019.18.58_zpsxoceqbfq.jp g" target="_blank"> http://i219.photobucket.com/albums/cc310/jenga101/2015-07-07%2019.18.58_zpsxoceqbfq.jp g"/> [/IMG][/URL]
Just a few little repairs left to do..
Highly jealous of the floor and the bannister.
Thought I'd post a few pics of something I've been working on for the last few months.
Two years ago, we bought a new house, and knocked this horror down.
[url= https://c1.staticflickr.com/1/537/18867117130_bfe53337b4_c.jp g" target="_blank">https://c1.staticflickr.com/1/537/18867117130_bfe53337b4_c.jp g"/> [/img][/url][url= https://flic.kr/p/uKdUAW ]DSC_7284[/url] by [url= https://www.flickr.com/photos/39729401@N08/ ]Scgwhite[/url], on Flickr
I spent a few hours with Sketchup and designed this...
[url= https://c1.staticflickr.com/1/540/18432291274_c9fbedfaab_c.jp g" target="_blank">https://c1.staticflickr.com/1/540/18432291274_c9fbedfaab_c.jp g"/> [/img][/url][url= https://flic.kr/p/u5Nj2q ]Screen Shot 2015-06-13 at 23.33.23[/url] by [url= https://www.flickr.com/photos/39729401@N08/ ]Scgwhite[/url], on Flickr
We employed a Groundworker to pour a slab and build some walls...
[url= https://c1.staticflickr.com/1/355/19057966741_bb5b13a514_c.jp g" target="_blank">https://c1.staticflickr.com/1/355/19057966741_bb5b13a514_c.jp g"/> [/img][/url][url= https://flic.kr/p/v364xt ]DSCF4507[/url] by [url= https://www.flickr.com/photos/39729401@N08/ ]Scgwhite[/url], on Flickr
I bought some oak. Lots of oak. About 4.5 tonnes of oak.
[url= https://c2.staticflickr.com/4/3838/19049218772_1fcf303183_c.jp g" target="_blank">https://c2.staticflickr.com/4/3838/19049218772_1fcf303183_c.jp g"/> [/img][/url][url= https://flic.kr/p/v2je5q ]DSCF4661[/url] by [url= https://www.flickr.com/photos/39729401@N08/ ]Scgwhite[/url], on Flickr
Chopped it about a bit...
[url= https://c1.staticflickr.com/1/461/19058019381_51ab9a5cb9_c.jp g" target="_blank">https://c1.staticflickr.com/1/461/19058019381_51ab9a5cb9_c.jp g"/> [/img][/url][url= https://flic.kr/p/v36kc4 ]IMG_0383 (1)[/url] by [url= https://www.flickr.com/photos/39729401@N08/ ]Scgwhite[/url], on Flickr
Knocked some pegs into it...
[url= https://c1.staticflickr.com/1/433/18867149440_1d16766cfb_c.jp g" target="_blank">https://c1.staticflickr.com/1/433/18867149440_1d16766cfb_c.jp g"/> [/img][/url][url= https://flic.kr/p/uKe5d1 ]IMG_0462 (1)[/url] by [url= https://www.flickr.com/photos/39729401@N08/ ]Scgwhite[/url], on Flickr
Hired a forklift to put the heavy bits on (the beam above my head weighs about 350kgs)
[url= https://c1.staticflickr.com/1/351/18867188878_76ae49e582_c.jp g" target="_blank">https://c1.staticflickr.com/1/351/18867188878_76ae49e582_c.jp g"/> [/img][/url][url= https://flic.kr/p/uKegVY ]IMG_0508 - Version 2[/url] by [url= https://www.flickr.com/photos/39729401@N08/ ]Scgwhite[/url], on Flickr
Stuck 5,500 cedar shingles on it;
[url= https://c1.staticflickr.com/1/492/19054847245_27d74bf5eb_c.jp g" target="_blank">https://c1.staticflickr.com/1/492/19054847245_27d74bf5eb_c.jp g"/> [/img][/url][url= https://flic.kr/p/v2P5e4 ]DSCF4765[/url] by [url= https://www.flickr.com/photos/39729401@N08/ ]Scgwhite[/url], on Flickr
And last weekend, we held our wedding reception in it...
[url= https://c1.staticflickr.com/1/535/19503813505_843e78cd1f_c.jp g" target="_blank">https://c1.staticflickr.com/1/535/19503813505_843e78cd1f_c.jp g"/> [/img][/url][url= https://flic.kr/p/vHu9fD ]Screen Shot 2015-07-07 at 20.54.35[/url] by [url= https://www.flickr.com/photos/39729401@N08/ ]Scgwhite[/url], on Flickr
[url= https://c1.staticflickr.com/1/396/19315912998_495daed725_c.jp g" target="_blank">https://c1.staticflickr.com/1/396/19315912998_495daed725_c.jp g"/> [/img][/url][url= https://flic.kr/p/vqT6YJ ]Screen Shot 2015-07-07 at 20.55.22[/url] by [url= https://www.flickr.com/photos/39729401@N08/ ]Scgwhite[/url], on Flickr
I'll convert it into a garden office / workshop / double garage as soon as my finger recovers from being dragged through my table saw. Total cost (excluding my time, which was about 5 months of evenings and weekends) was about £20k, of which over half was the groundworks.
I'm desperate to jack in my day job and build stuff like this full time - I just need the right nudge!
That's bloody fantastic!
That's bloody fantastic!
+1 to that. That is awesome.
Si, that is brilliant, and congrats on the wedding 🙂
[img]  [/img]
A spacer for a gearbox.
Beautiful oak work siwhite.
20k is a lot, but it's massive!
If you've got the money to start a business - do it!
Seeing some of my friends build houses and values rocketing, that would be my approach - i.e. speculative property development rather than commissions.
porter_jamie - Membercustom footrest plate for a sv650 to mount a different brake mc
Do you know why, out of curiosity? Lovely job but it's an unusual mod.
Beautiful oak work siwhite.
20k is a lot, but it's massive!If you've got the money to start a business - do it!
Seeing some of my friends build houses and values rocketing, that would be my approach - i.e. speculative property development rather than commissions.
It is a fair whack, but we effectively gain an extra bedroom, workshop and garage, so fairly inexpensive in the bigger scheme of things.
I'm very fortunate to have the money (and a few friends interested in backing the business financially) but it is a leap into the unknown. I'd be giving up a very secure public sector job that pays pretty well for a relatively untaxing role, and launching into a fairly competitive market. Startup costs would be fairly low, but I'm a bit wary of giving up my comfy safety net!
Made a Racerunner:
[url= https://farm1.staticflickr.com/524/19390225959_690f6efe87_z.jp g" target="_blank">https://farm1.staticflickr.com/524/19390225959_690f6efe87_z.jp g"/> [/img][/url]
[url= https://farm1.staticflickr.com/408/18954236874_89f9938a28_z.jp g" target="_blank">https://farm1.staticflickr.com/408/18954236874_89f9938a28_z.jp g"/> [/img][/url]
It has axle inserts so can take different types of wheels, and with or without camber, and weighs under 10kg complete.
[url= https://farm4.staticflickr.com/3682/18955877353_6402bb0c04_z.jp g" target="_blank">https://farm4.staticflickr.com/3682/18955877353_6402bb0c04_z.jp g"/> [/img][/url]
Been making lots of things but not got pictures of all of them online, I'll try to sort as soon as I can. Here are the things I have got pics of:
CNC cut plywood wine rack for Ikea expedit units. I designed it and got it cut locally
[img]  :large[/img]
CNC cut plywood filing box for hanging files for Ikea expedit units. As above, my design cut by someone else.
[img]  :large[/img]
[img] 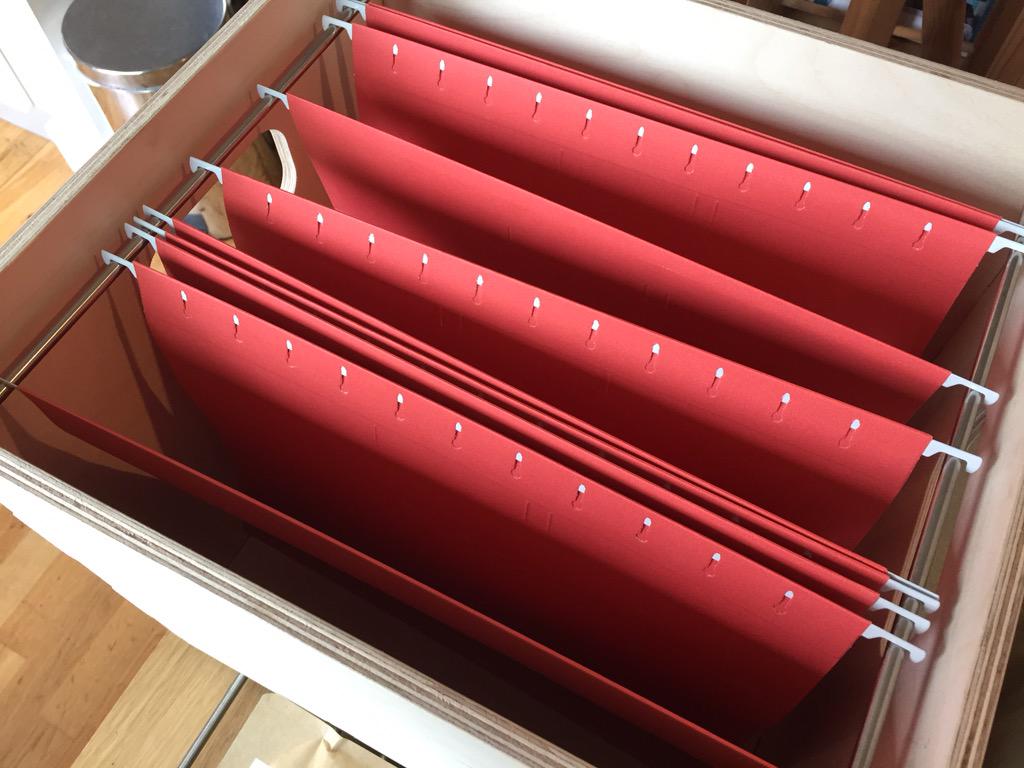 :large[/img]
Frame alignment checking 'system'. Designed from scratch to cater for all bb widths up to 100mm on a common centreline and 120/130/135 and 142 axle spacing. Quick release knob allows the frame to be removed quickly despite the long threaded bar for wider bb shells. All referenced from the bore of Park bb taps. Big stainless tower was the largest thing I've had in the lathe and I'm pretty pleased with how it came out. The plate with the v and steps for axle spacing was waterjet cut.
[img]  :large[/img]
Also finished a frame, no full pic but here is a bit of dropout detail; silver straight off the torch (after soaking the flux off)
[img]  :large[/img]
Also made a new mudguard hinge for my motorbike
[img] 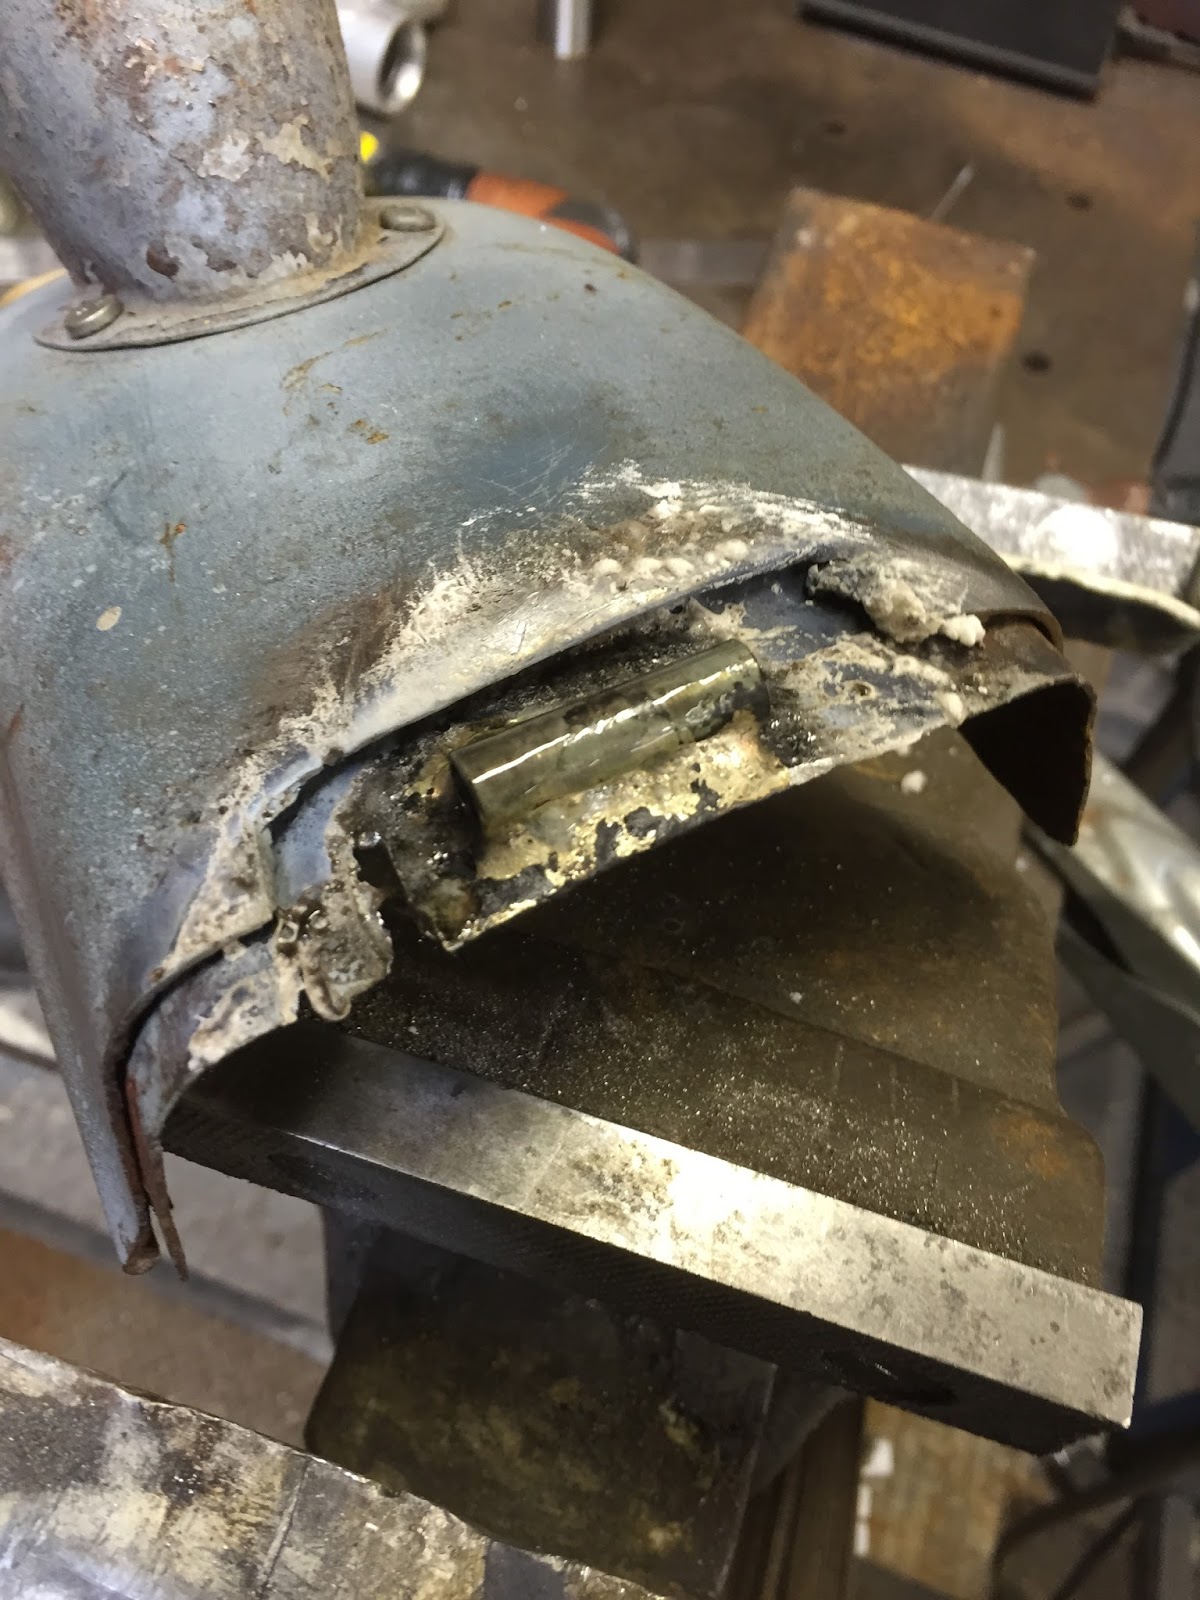 [/img]
[img] 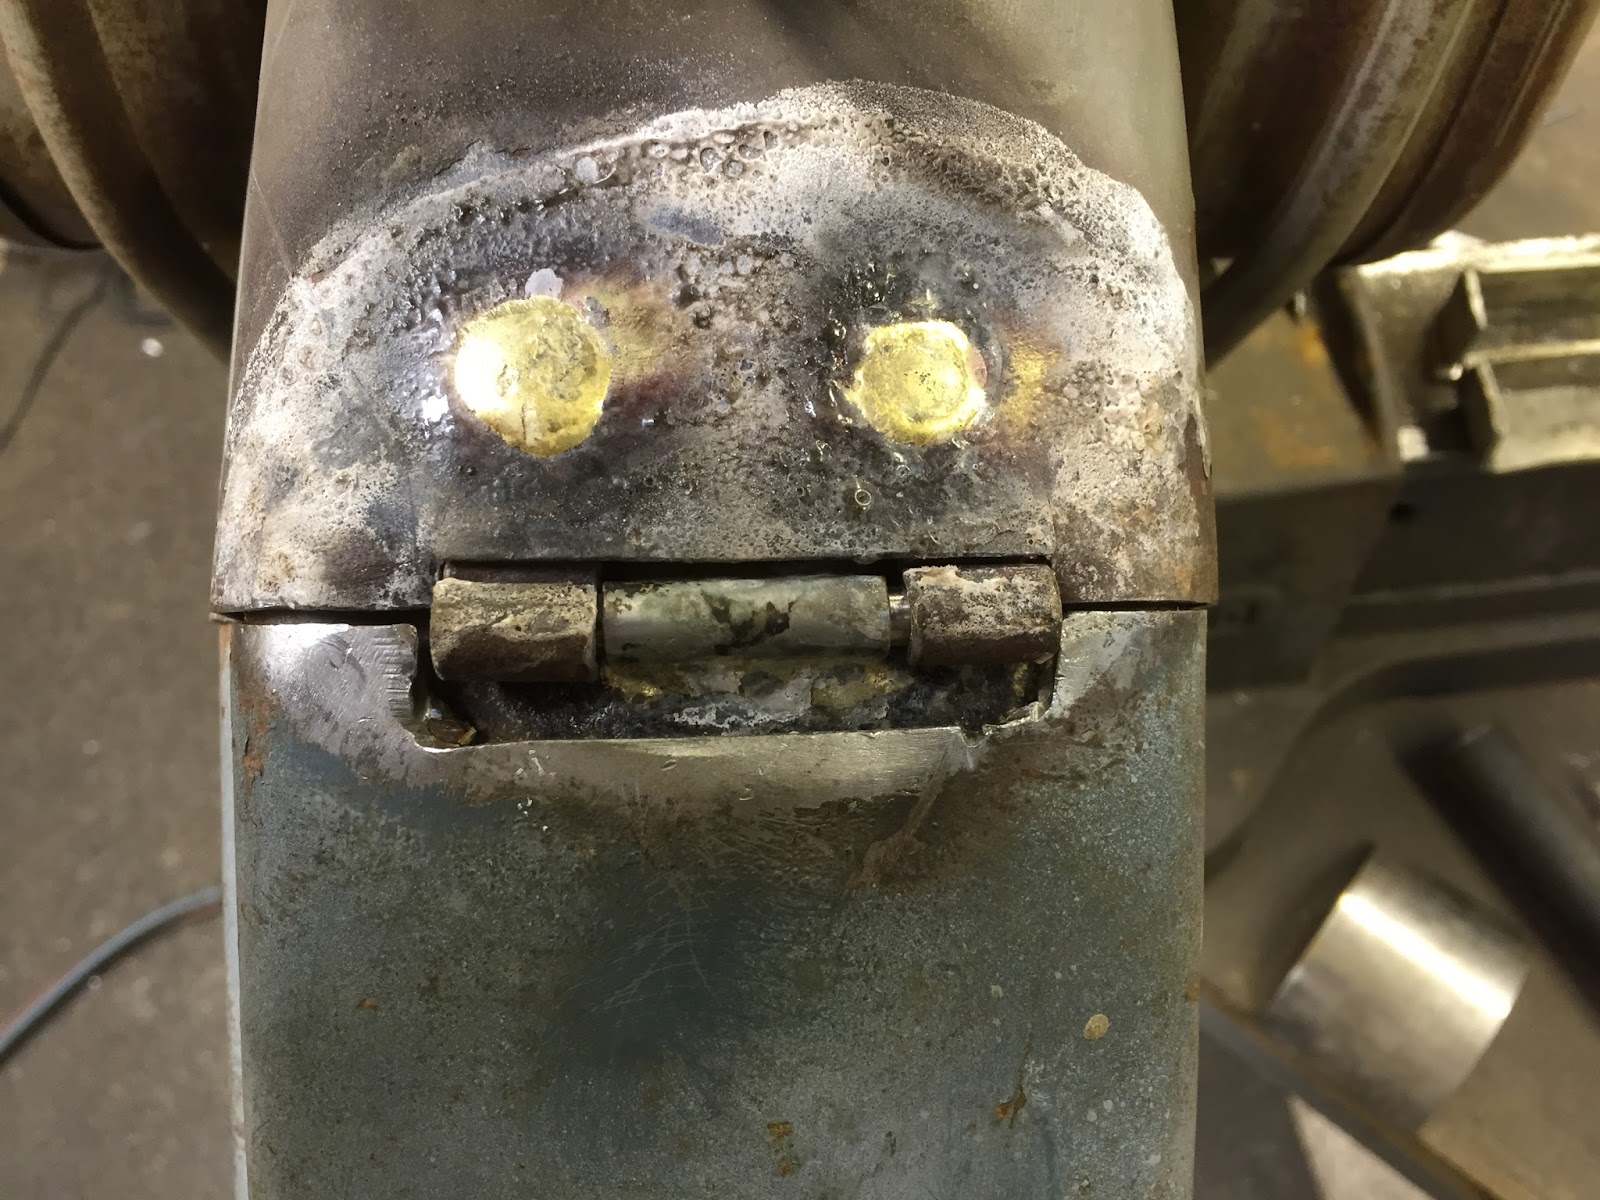 [/img]
[img]  [/img]
Matt
(Just realised I have loads of pics on [url= https://instagram.com/mattabowns/ ]instagram[/url] including more bike stuff, motorbike, food and woodwork but can't work out how to post them here)
Had a problem with tubes rotating in the tube roller, so made a thing to stop them doing that:
[url= https://farm1.staticflickr.com/481/19527857000_1977d27973_z.jp g" target="_blank">https://farm1.staticflickr.com/481/19527857000_1977d27973_z.jp g"/> [/img][/url][url= https://flic.kr/p/vKBnxE ]Untitled[/url] by [url= https://www.flickr.com/photos/cycleologist/ ]Ben Cooper[/url], on Flickr
Click to see movie...
Worked out how to post pics from instagram so here's a few more:
Bike tube storage box. This is the first prototype, hope to make a big stack of them to store tubes and upcoming builds in. Ply with brass screws
[img]  [/img]
The frame I finished recently, 29er clearances with a road chainset, it's all a bit tight
[img]  [/img]
[img]  [/img]
The starting point for the frame alignment post
[img]  [/img]
and the subsequent pile of swarf
[img]  [/img]
The filing box and wine rack in situ
[img]  [/img]
and finally a pizza from a while ago
[img]  [/img]
Like the tube storage box idea - much neater than my random pile of cardboard boxes.
Ben - that's what I've been doing and a slightly damp workshop doesn't help matters. The base sticks out by 4mm so they will interlock (once I've made some more). Luckily a customer can provide us with the off cuts of ply to make them so I'll be aiming to build quite a few
18BM has a perfect one for the Argh my eye thread...
A stainless B adjustment plate for an M952 mech, I split 2 original aluminium ones before I made it.
[img]  [/img]
As usual some truly inspiring stuff being posted here!
FWD Ford / Yamaha engine to a RWD 6 speed gearbox from a Mazda RX8, to go in my Opel Kadett
From a Puma/Fiesta Zetec S?
Northwind - Member
porter_jamie - Member
custom footrest plate for a sv650 to mount a different brake mcDo you know why, out of curiosity? Lovely job but it's an unusual mod.
its a bit if a custom job, much modified. i will find a pic later
[URL= http://i680.photobucket.com/albums/vv167/porter_jamie/Mobile%20Uploads/20150728_200722_zps10k9uuck.jp g" target="_blank"> http://i680.photobucket.com/albums/vv167/porter_jamie/Mobile%20Uploads/20150728_200722_zps10k9uuck.jp g"/> [/IMG][/URL]
an alooominum box for a pcb
[URL= http://i693.photobucket.com/albums/vv297/heds954/ScreenShot2014-08-23at123547_zps04313f94.jp g" target="_blank"> http://i693.photobucket.com/albums/vv297/heds954/ScreenShot2014-08-23at123547_zps04313f94.jp g"/> [/IMG][/URL]
Bike related; Paceti TL28 rims on Hope ProII Evo hubs -I've never had wheels seat, seal and inflate so easily!
[img]  [/img]
[URL= http://i117.photobucket.com/albums/o42/Citroenxsara/B3D37976-97CB-4C4F-9B80-C333C744CF75.jp g" target="_blank"> http://i117.photobucket.com/albums/o42/Citroenxsara/B3D37976-97CB-4C4F-9B80-C333C744CF75.jp g"/> [/IMG][/URL]
[URL= http://i117.photobucket.com/albums/o42/Citroenxsara/19A5752A-F80D-4F4F-B2EF-EFA4A8792280.jp g" target="_blank"> http://i117.photobucket.com/albums/o42/Citroenxsara/19A5752A-F80D-4F4F-B2EF-EFA4A8792280.jp g"/> [/IMG][/URL]
[URL= http://i117.photobucket.com/albums/o42/Citroenxsara/174C57B8-D151-4603-8F25-DF8B3F2181CB.jp g" target="_blank"> http://i117.photobucket.com/albums/o42/Citroenxsara/174C57B8-D151-4603-8F25-DF8B3F2181CB.jp g"/> [/IMG][/URL]
House warming (garden warming I suppose) present for DrP. Made entirely from a skip find bike and washing machine. Frugal. (Tight).
So, this happened:
[url= https://farm1.staticflickr.com/691/20548392749_e20b19691d_z.jp g" target="_blank">https://farm1.staticflickr.com/691/20548392749_e20b19691d_z.jp g"/> [/img][/url]
singlespeed too!
how long is that rear brake cable 🙂
@Porterjamie, sorry for the super-late response... That's a very nice SV! Kind of mad, also, but very nice. Did you do the cbr swingarm conversion? I nearly put a ZX9R (er, I think) arm in mine as it didn't need a lot of fabrication, but it turned out to weigh a ton more than the original 😆
how long is that rear brake cable
Two tandem cables with a splitter in the middle 😉
Disappointed in you, I was expecting you'd have built yourself a cable winding machine and made one from scratch
S&S couplings the make it fit in a van I assume. Is it built using a cannibalised On One frame, rear stays and fork look familiar.
Yup, two Inbreds, chopped up.
Oil drum ghetto grill.
It features and adjustable hight fuel tray and rotating stainless grill.
[img]  [/img]
Helmet rack:
[img]  [/img]
[img]  [/img]
[img]  [/img]
I'm quite proud of two things: Apart from a drill, I made it with hand tools, including planing the angle into it with a Stanley number 4 after discovering a skillsaw wasn't up to doing the cut (I miss having a table saw). Also, all of the fixings are hidden. The standoffs are screwed into the wall, the rack is then screwed into the standoffs, and the pegs cover the screws. The pegs have threaded inserts and M3 bolts that go through angled holes in the back of the rack. Took a bit of jig making and adjustment to get everything lined up and drilled at the correct angles and depths, especially without a pillar drill, but it worked and can be dismantled.
That is properly nice Nach
A Butsudan...
Yeah? Me neither.... Well apparently it's a special little cupboard that Buddhists put an important scroll into. It hangs in there and they open it to look upon it and do chanting and that... Made it for an old friend.
[img]  [/img]
[img]  ?oh=84db9a2387e107b07fd39ef199a1212f&oe=5680D043[/img]
[img]  ?oh=798b44a866d1b27cb56071e8cd3090a6&oe=566D78CA[/img]
Sycamore, Wenge and Fumed Oak......and screws and that...
they open it to look upon it and do chanting and that
A bit like this thread 🙂
Nice work folks.
[img] http://ep1.pinkbike.org/p5pb12597212/p5pb12597212.jpg [/img][img] http://ep1.pinkbike.org/p5pb12597191/p5pb12597191.jpg [/img][img] http://ep1.pinkbike.org/p4pb12597214/p4pb12597214.jpg [/img][img] http://ep1.pinkbike.org/p4pb12597194/p4pb12597194.jp g" target="_blank"> http://ep1.pinkbike.org/p5pb12597212/p5pb12597212.jpg [/img][img] http://ep1.pinkbike.org/p5pb12597191/p5pb12597191.jpg [/img][img] http://ep1.pinkbike.org/p4pb12597214/p4pb12597214.jpg [/img][img] http://ep1.pinkbike.org/p4pb12597194/p4pb12597194.jp g"/> [/img]
There's some amazing work here folks!
I need some advice regarding the one-off machining of a bayonet mount/bracket and this seems like as good a place as any to ask.
What I'd like is a flat version of the Hope District seatpost bracket, so that I can mount the light to my rear rack. Hope don't make one. I'm curious as to whether it's feasible, or perhaps more accurately, cost effective!
Are we talking a) [i]"it's a piece of piss these days mate, we'll have one knocked up on the CNC in 30 minutes"[/i] or b) [i]"you're 'avin' a laugh mate, that'll take someone 2 days to work out the drawings before they even go near a lathe!"[/i]?
[img]  [/img]
"I'm getting a bit f*cked off with the posts in this thread.. can some completely non talented people please dilute it with some shit offerings as I'm feeling a bit inadequate here, with my complete lack of talent at making stuff!"
I know how you feel. Just when you think 'oh, I'll post up that drinks coaster I made out of a piece of scrap wood, that took me about 3 weeks to finish', some bugger comes along with 'oh here's a tractor/house/space shuttle I knocked up this weekend, out of a few bits and pieces I had lying around'.
I can't even work out how to post up pics!
