Rusty
How about a wee alloy doughnut (seat post dia )that you could screw to the underside of the rack?
While I'm not ruling out a bodge FH, I do prefer the idea of a 'proper' bracket so I'd like to explore that first.
No bother,givusashout if you want a bodge made up 😉
need some advice regarding the one-off machining of a bayonet mount/bracket and this seems like as good a place as any to ask.
Just a short length of seatpost diameter Al rod, tapped in one end face and a hole in the rack.
ha ha...I thought you were offering advice/instructing me to go ahead and bodge 🙂No bother,givusashout if you want a bodge made up
No, no, no...definitely too bodge-like!Just a short length of seatpost diameter Al rod, tapped in one end face and a hole in the rack.
I'm set on the idea of a bespoke version of Hope's offering...until I find out the cost, of course...[i]then[/i] I'll come crawling back for bodge suggestions 😀
Take the front half of the clamp off and use the threaded holes in the back half to bolt it to your rack?
That won't work due to the bayonet fitting of the lamp. When using the mount as designed there's a plastic ring that clips to the seatpost and then the two metal halves of the mount bolt onto that. It's the plastic ring that the bayonet fitting engages against, thus clamping the lamp firmly into place.
Why not just get a simple Cateye adapter and rear light?
[img]  [/img]
£3.99.
Haven't had much time to paint since packing up studio in the move, but been thinking a lot about moving on and places I'll miss - so put some finishing touches to this little painting called 'The Black Brook'. Anyone who might have been caught late on an autumnal ride ound the Wyre Forest, Shatterford, Eymore Woods etc might recognise such a scene
[IMG]  [/IMG]
Well, I [url= http://www.telegraph.co.uk/men/the-filter/11870885/Urbexing-Its-about-preserving-places-for-history-before-theyre-demolished.html ]made the Telegraph[/url] 😀
trespassing again cooper? 🙂
It's all old stuff, really - I'm getting boring and sensible in my middle age.
But [i]"He is regarded as the most prominent and daring of his breed"[/i] makes you sound so dashing and youthful! I've been misled!
Well, he is an author of fiction 😀
That pic brings back memories Ben.
I used to work in the central hotel about 25 years ago. I was part of the maintenance team and one of my tasks on a Monday morning was checking emergency lights and relamping any that were out. I hated the walk along the 6th and 7th floors, used to really spook me out.
When was that pic taken, can't believe rooms still have stuff left in them. We had a fire on the 6th floor and all the rooms were supposed to be cleared out, hadn't happened by the time I left though.
edit: Just had a look at your site. I worked there when that bar was built in your last pick, that was all hand built and cost a fortune.
Don't know if you managed to get up the clock tower but there's some good exploring there, the old carpenters room and the water tank are both worth a look. Accessed from the 5th floor.
Almost exactly six years ago - lots more pics here:
http://catchingphotons.co.uk/blog/miscellaneous/central-hotel/
This was just before the renovation started, I think they might have left the top two floors alone in the renovations, but not sure.
I'm almost certain the bathroom with the chair in was a room we used as our lamp store, is it a 1st floor room? Our workshop was a couple of doors along. The lock from that room, a vacant/engaged one with ornate faceplate, is in the downstairs loo in my father in laws house.
Did you get into the basement?
This:
[img] 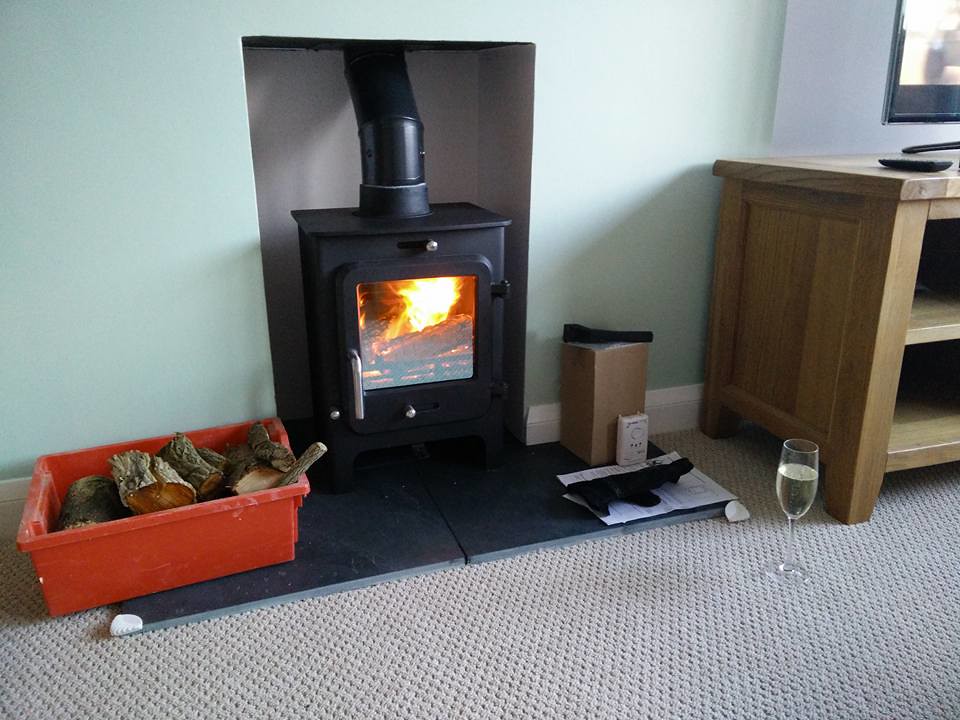 [/img]
I need to finish the write up of it, but it was something I'd never done before and and 'itch' I wanted to scratch!
Lined the fireplace, fitted the liner/twin wall flue, fitted the slate, and thankfully the burner fitted in perfectly!
Had several fires already 😀
DrP
I think it was higher up than that, but can't remember - didn't manage the basement, no.
Made a blingy Brompton:
[url= https://farm1.staticflickr.com/686/21523328791_c6ffa6b092_z.jp g" target="_blank">https://farm1.staticflickr.com/686/21523328791_c6ffa6b092_z.jp g"/> [/img][/url]
Now going home early for a beer.
Nothing particularly flash, but a very satisfying project over summer with my eldest son.
My shed's been missing a workbench since it was completed.
£30 worth of timber, a freecycled ikea worktop and a freecycled old Woden vice.
Used it to teach my son (and me) to do mortice and tenon joints with hand tools. Perhaps 10 of them was a bit much though!
[img]  ?oh=440da4bed096ce0f9ba1f3d3f239ab1d&oe=569A6ADB[/img]
[img]  ?oh=c6254e2cfe49d14729ca87c519b8b1eb&oe=56A649FD[/img]
Vise was a mess, so needed stripping, degreasing, filing, wirewooling and painting.
[img]  ?oh=facc461467ada73741d5d0c58fc74560&oe=56983054[/img]
Decided at the last minute to put a dog on the outer cheek, so now need to drill some holes in the worktop and make some more dogs!
You can also see in the background, the beginnings of my pegboard tool wall. I'll probably post that later, once I've created some more fittings for it.
BTW - for making the M&T joints, I followed advise from this guy https://www.youtube.com/user/PaulSellersWoodwork - really good stuff - especially the 'poor man's router' for honing the tenon sides.
drilled many many many holes in some plastic
[URL= http://i680.photobucket.com/albums/vv167/porter_jamie/20150918_133338_zpsizu9xken.jp g" target="_blank"> http://i680.photobucket.com/albums/vv167/porter_jamie/20150918_133338_zpsizu9xken.jp g"/> [/IMG][/URL]
7200 of them. you will be glad to learn i didnt use the battery drill. and i didnt break the drill bit either so i think i got my moneys worth out of it.
[img]  [/img]
A massive bowl of Angel Delight.Chocolate flavour. Demolished before my wife gets home. That's why I'm the kid's favourite!
Needed a nut for a shifter, Not sure I have cut an internal thread this small before.
[img]  [/img]
Siwhite- that's fantastic. I don't know where you people learn these skills, but I'm impressed and envious. I'd love to learn things like that
Ajantom - I want to make something similar. How did you join the legs and top?
Nice bench Alex Simon. Joints look great.
🙂
A CNC'd sculpture of the Malvern Hills.
[img]  [/img]
Thanks kayak!
Working with wood is time well spent.
Quite a few things recently but here's a selection:
A great big pork pie for a friends wedding (he's a big Batman fan)
[img]  [/img]
Finished this frame
[img]  [/img]
Including some brazing I'm quite proud of (this is straight off the torch)
[img]  [/img]
And after a lick of paint and some decals
[img]  [/img]
And finally a gravity bike (been working on this for quite a while and it's still not fully finished, only done a few test runs so far)
[img]  [/img]
and again, it's got some brazing I'm quite pleased with (6mm plate to 4mm wall tube)
[img]  [/img]
Whilst we're having brazing night.....
Home made CX bike for my wife - dirty (dusty!) from it's first race today. Still in one piece so that must be a good sign.
Matt - are you using gasflux or just paste (or both)?
[img]  [/img]
[img]  [/img]
[img]  [/img]
[img]  [/img]
I use cycle design lfb paste, but very diluted, looks like milk when I put it on. Both of the shots are with the flux still on, should give you an idea how little I use. No gasfluxer
I use the same stuff - I thought the residue looked familiar. I already add water but might try it runnier - thank for the tip.
Gravity bike envy.
LFB is great - I use it watered down too, it gets into all the nooks and crannies that way (though probably would anyway).
Speaking of framebuilding, I just made this:
[url= https://farm1.staticflickr.com/610/22146821149_188382a3fd_z.jp g" target="_blank">https://farm1.staticflickr.com/610/22146821149_188382a3fd_z.jp g"/> [/img][/url][url= https://flic.kr/p/zK3fkX ]Untitled[/url] by [url= https://www.flickr.com/photos/cycleologist/ ]Ben Cooper[/url], on Flickr
Go on then, I'll bite...
^^What is it?
I'm gonna guess that Ben's widgit is for holding cable bosses and or brake hose mounts to allow them to be brazed on.
Matt is that one of the bicycle manufacturing frame jigs in the back of your first pic?
It's a dummy tyre, for checking clearance between the chainstays - the base is magnetic, and it's adjustable for 1"-5" tyres. In situ:
[url= https://farm1.staticflickr.com/768/21714530293_2295d1c3a6_z.jp g" target="_blank">https://farm1.staticflickr.com/768/21714530293_2295d1c3a6_z.jp g"/> [/img][/url][url= https://flic.kr/p/z5QDkk ]Untitled[/url] by [url= https://www.flickr.com/photos/cycleologist/ ]Ben Cooper[/url], on Flickr
My home made cross frame - lugged & brass brazed (using Sif 101 and LFB flux). Frame number 3 and its amazing what a good paint job can do to hide the messy brazing!!
[img][url= https://farm1.staticflickr.com/618/22163696980_82c1a5f48d_k.jp g" target="_blank">https://farm1.staticflickr.com/618/22163696980_82c1a5f48d_k.jp g"/> [/img][/url][url= https://flic.kr/p/zLwJWy ]DSC_3527_edited-1[/url] by [url= https://www.flickr.com/photos/111375637@N03/ ]Mark Yandle[/url], on Flickr[/img]
Mayan; that's superb! You must be really chuffed! Would you care to share more thoughts and experiences on my thread here?
http://singletrackworld.com/forum/topic/frame-building-anyone-learnt-done-a-course-taught-yourself
This pales into insignificance compared to pretty much everything else on this thread, but I knocked up a house number sign using the ceramic numbers we picked up on holiday and an off cut of Oak
[url= https://farm6.staticflickr.com/5655/22256325649_a1a386cc42_b.jp g" target="_blank">https://farm6.staticflickr.com/5655/22256325649_a1a386cc42_b.jp g"/> [/img][/url][url= https://flic.kr/p/zUHudz ]24th October 2015[/url] by [url= https://www.flickr.com/photos/cheesyfeet/ ]-Cheesyfeet-[/url], on Flickr
Rusty Mac - no, ours is an Anvil Journeyman, although it's quite old now so doesn't look like the current version
If we're talking jigs, this isn't really a build, but I put mine on a heavy duty TV mount, so it can move about a lot:
[url= https://farm6.staticflickr.com/5818/21705862594_ba69fcc818_z.jp g" target="_blank">https://farm6.staticflickr.com/5818/21705862594_ba69fcc818_z.jp g"/> [/img][/url][url= https://flic.kr/p/z55dJf ]Untitled[/url] by [url= https://www.flickr.com/photos/cycleologist/ ]Ben Cooper[/url], on Flickr
Mine is an Ellis Rudd jig, which I've made various tweaks and modifications to.
Well if we're getting into 'jig support structures', I just finished a new stand for the Anvil. Here it is with the old one in front. The old one was too short, not wide enough, bent, wobbly and got in the way when I was wheeling about on my office chair. The new one is based on the Anvil design (although I made it taller and a bigger footprint) and sits on double locking castors, is high enough off the floor that the wheely chair goes under the legs. It's much more stable, easier to move, is much more out of the way, it's even got somewhere for my allen keys and a pen pot! Brazing the 0.250" wall box section was interesting, had to step up to a number 18 tip on the oxy torch, I normally use a number 3 for fillet brazing bike tubing and a number 1 for silvering braze-ons
[img]  [/img]
I'm not sure whether this counts as something I made but I also did a repair on a Transition TR250 swingarm. The main pivot bearing bore had ovalised/worn to the point that a fresh bearing pushed in and out like a seatpost. I centred everything up on the mill and opened the 44mm bore out to 46mm so I could fit a bigger bearing
[img]  [/img]
Testing the new bearing fit
[img]  [/img]
The new bearing also had a larger ID so I made a new spacer that pressed into the new bearing to reduce the ID and maintain the spacing. I replicated the slots on the other side to make bearing removal easier in the future. Here's the old bearing and spacer with the new versions
[img]  [/img]
Once it's all in place, you'd never know
[img]  [/img]
Where is the like button - Matt that is some nice work with the rear triangle.
Rusty Mac - Thanks, it was a lot of set up time followed by a few minutes of very tense cutting. Very pleased with the result, actually turned out better than I expected. The bike is all back together now and about to be collected, certainly a better situation than a few weeks ago where it looked like it was headed for the bin
