
Subscribe now and choose from over 30 free gifts worth up to £49 - Plus get £25 to spend in our shop
Victory!!
/the crowd go wild!!
I've finally learned how to bleed my brakes, to be honest it's easy once you get your head round it.
here's how (in case you don't have the avid bleed instructions to hand) I managed it:
Brakes involved: Formula K24's with Goodridge Hoses (Bled on the bike)
Kit used:
Avid Bleed kit
Stendec fully synthetic dot 5.1
Torx key
Topeak multi tool
manky old cloths
For those who don't know the enemy is air, stupid little tiny bits of air that hide, not just lurk, but hide!
so the first (and most important) step is to start with air free fluid, it doesn't come out of the bottle like that, its like a big secretly carbonated party in that bottle, its your job to turn on all the lights and kick that shit outta there, spend some time doing this, its boring, uncomfortable but if you screw this up you'll end up with a shit bleed and you'll have to start all over again, only worse because you'll have to contend with a partially pneumatic rather than hydraulic brake system 😆 (been there, done that!)
So here's step one:
First, take Syringe No.1, lets call him "Big Dave the Giver" and [u]half fill[/u] him with fluid, then close the little clippy bit.
then hold it like so:
[IMG]  [/IMG]
now you need to rid the fluid and the "Big Dave the Giver" of air, to do this you need to create a vacuum above the oil, this is where strong fingers and patience comes in.
when you pull up on the syringe as if by magic loads of little bubbles appear, all pissed up and stinking from their wild time in the bottle, they need to be exiled from their slippery love bath and forced to languish with the rest of their kind in the air at the top of the syringe.
once your sure you've got it all out do it again, and again, and again. but don't pull too hard and suck air in through the seals or get all kack handed and pull the plunger out, then its "return to GO, do not collect freshly bled brakes"
next!
Big Dave needs a leak!
let him have it, poor Dave tends to occasionally stash a lump of air in the end of his thang, this is because he HATES you, make him evacuate it over the party bottle, like so:
[IMG] 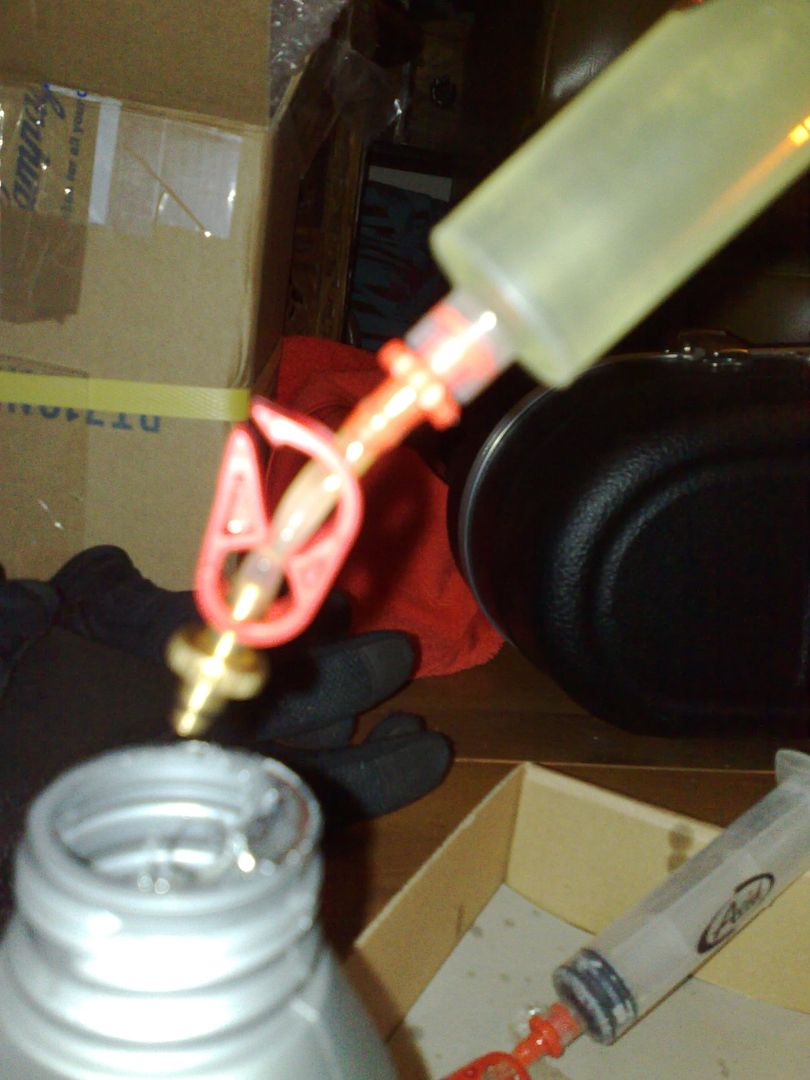 [/IMG]
If you don't do this, boring things will happen and you'll wish you were NEVER born.
next!
go and balance Dave over in a plant pot, make sure you've closed his thang or your geraniums may die.
keep him close at hand mind, the less air around here the better!
GET A MANKY CLOTH! and cover your painted bits but forget about the floor (thats what I've done)
now you need to remove Gerald the Torx screw, easy, DON'T FOR THE LOVE OF GOD LOSE HIM!!
[IMG] 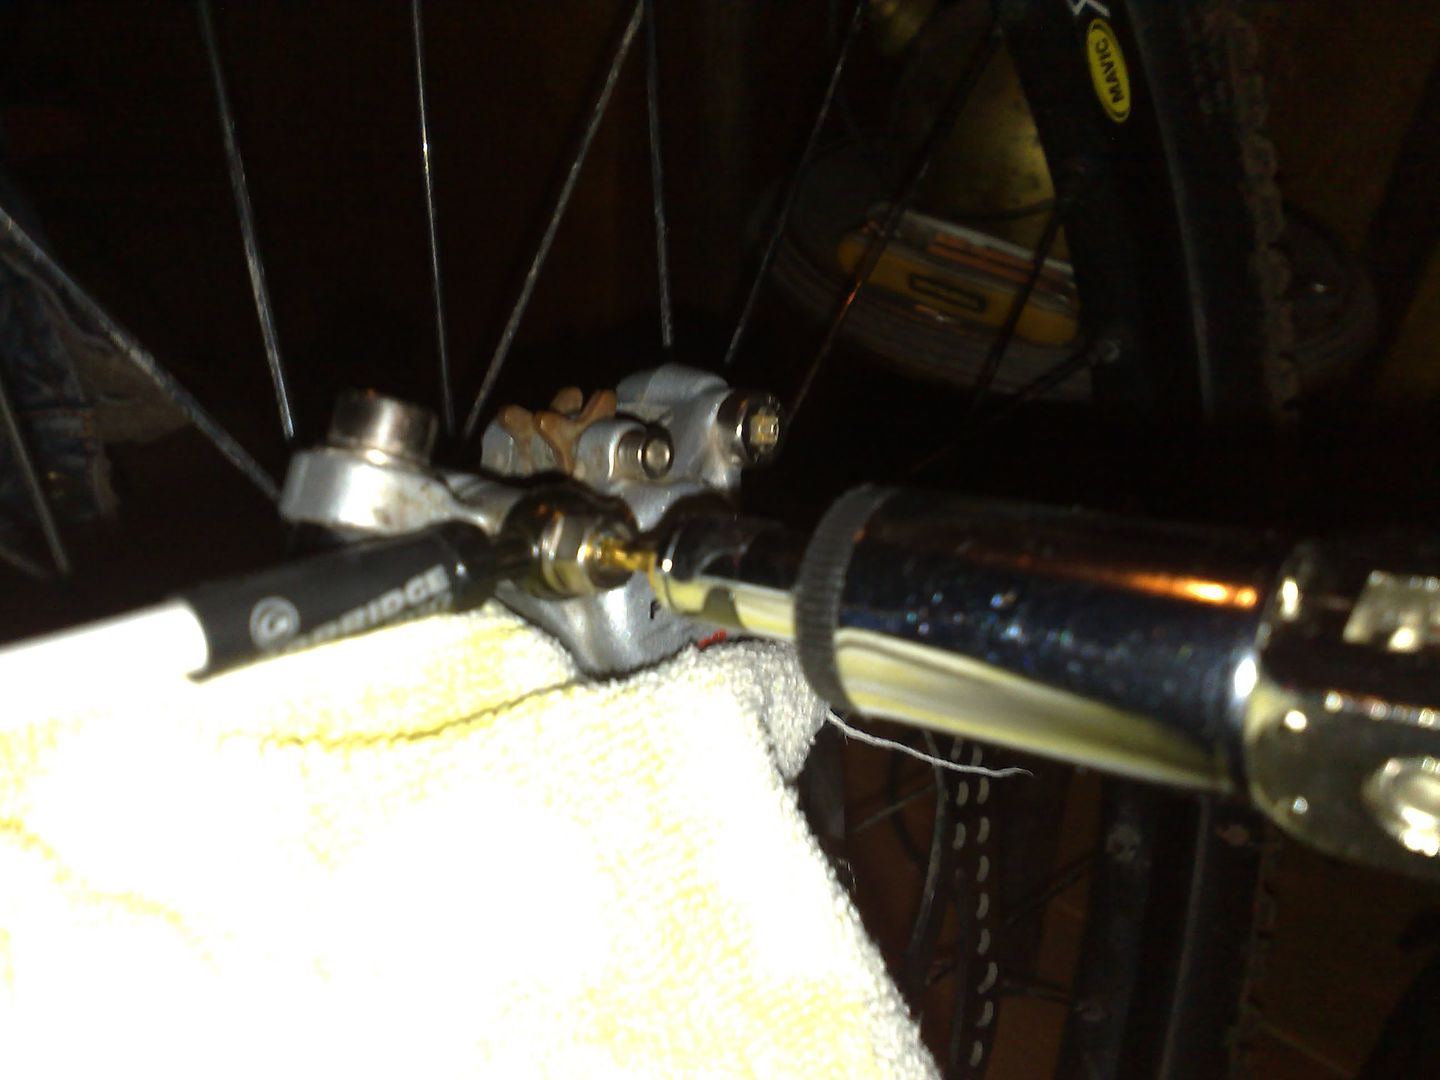 [/IMG]
thats him, being taken out.
Next!
oh, QUICK!! screw Dave the Giver into the hole vacated by Gerald the Torx screw but for the sake of humanity make sure that he remains upright (wedge the top of the syringe under a spoke and pray it doesn't fall out)
REMEMBER AIR IS THE ENEMY!!
now lets attend to Gloria, Gerald's freakish non-identical twin sister, get her out!
[IMG] 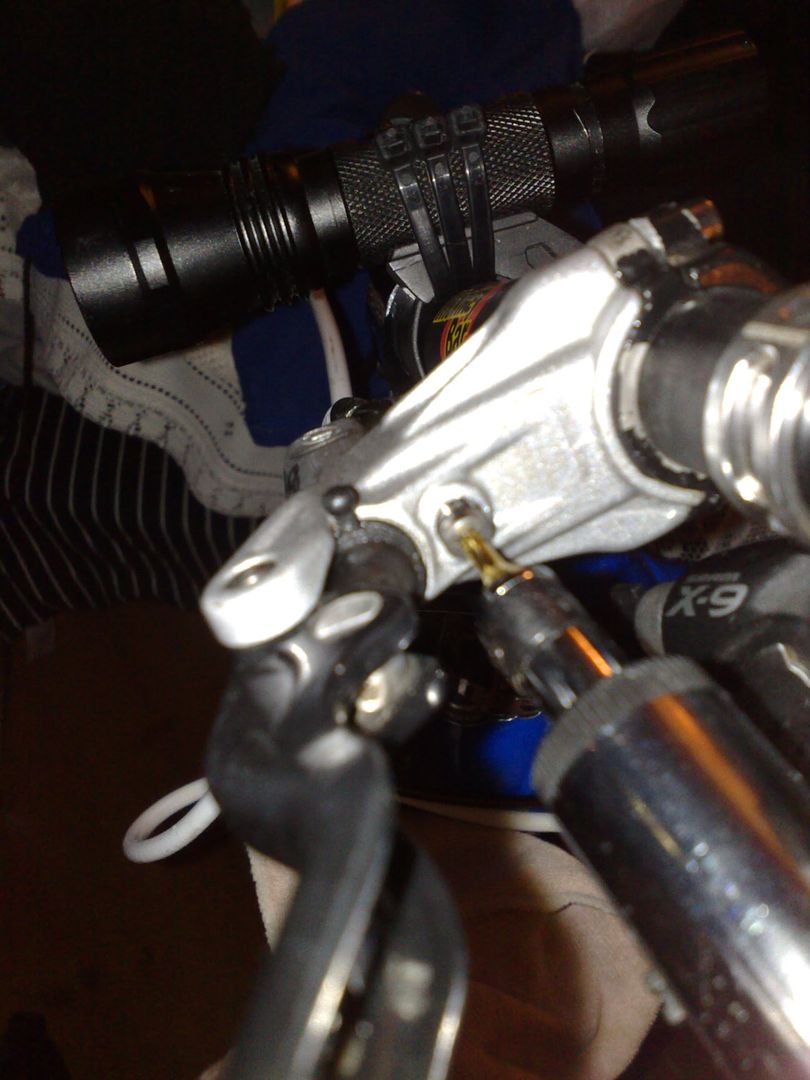 [/IMG]
and be ready to introduce...
Stephanie the Receiver!
[IMG] 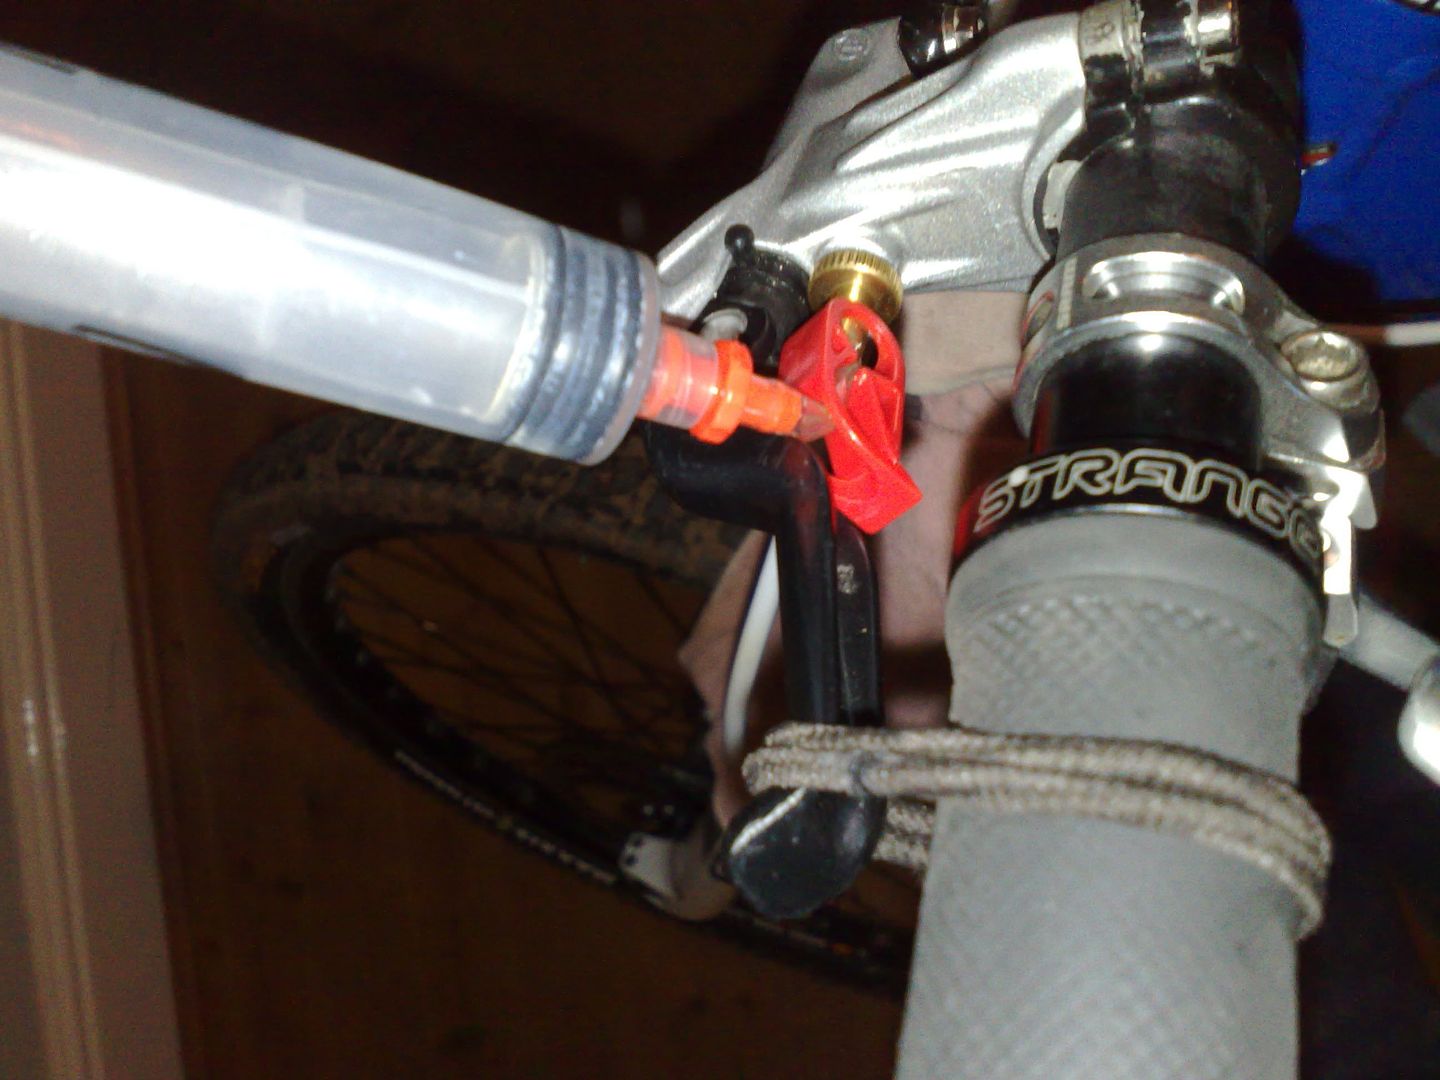 [/IMG]
Stephanie is an empty syringe, her thang is clamped and she likes puppies, kittens and to be screwed into the brake lever bleed port.
once she's in place steal on of the wifes hair bands and tie the lever back, this "closes" the brakes meaning that you won't be sucking fluid & air down the hose from the lever!
NEXT!!
now the fun begins, this is where the magic happens...
UNLEASH DAVES THANG!!
[IMG] 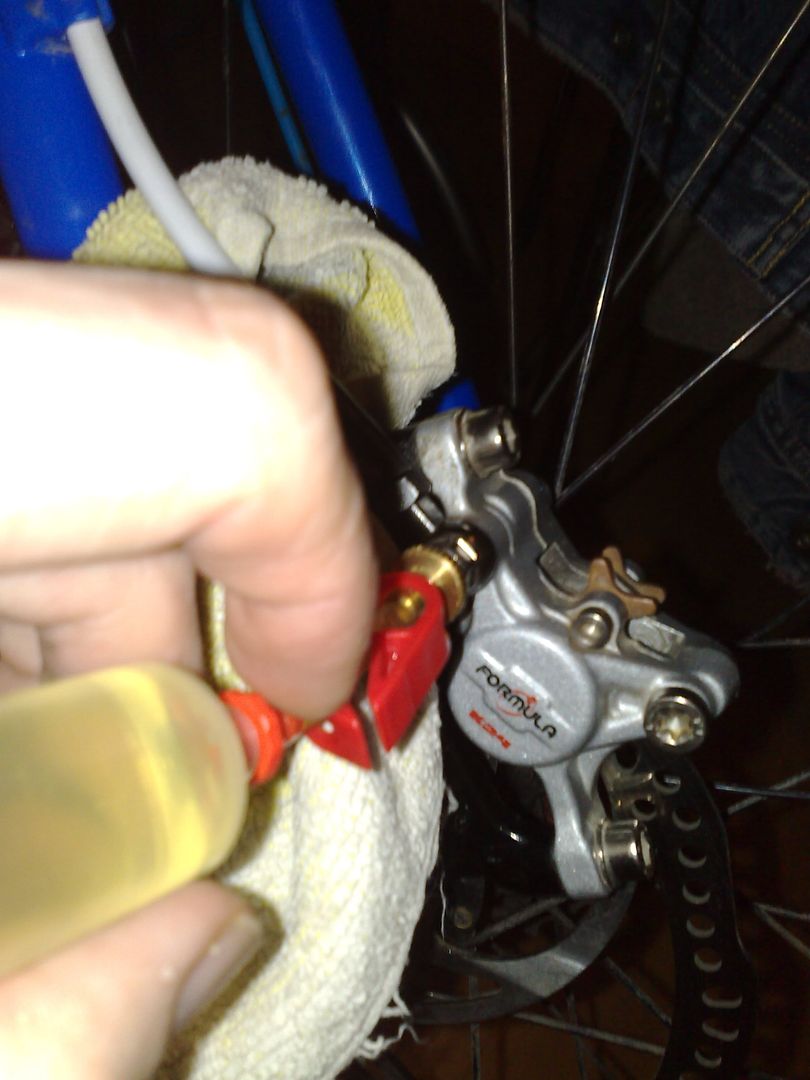 [/IMG]
with his clip released he is now ready to rid your caliper of any of that slutty good for nothing air thats been calling your failed attempts to control your speed home.
SUCK! SUCK!! SUCK!!!
[IMG] 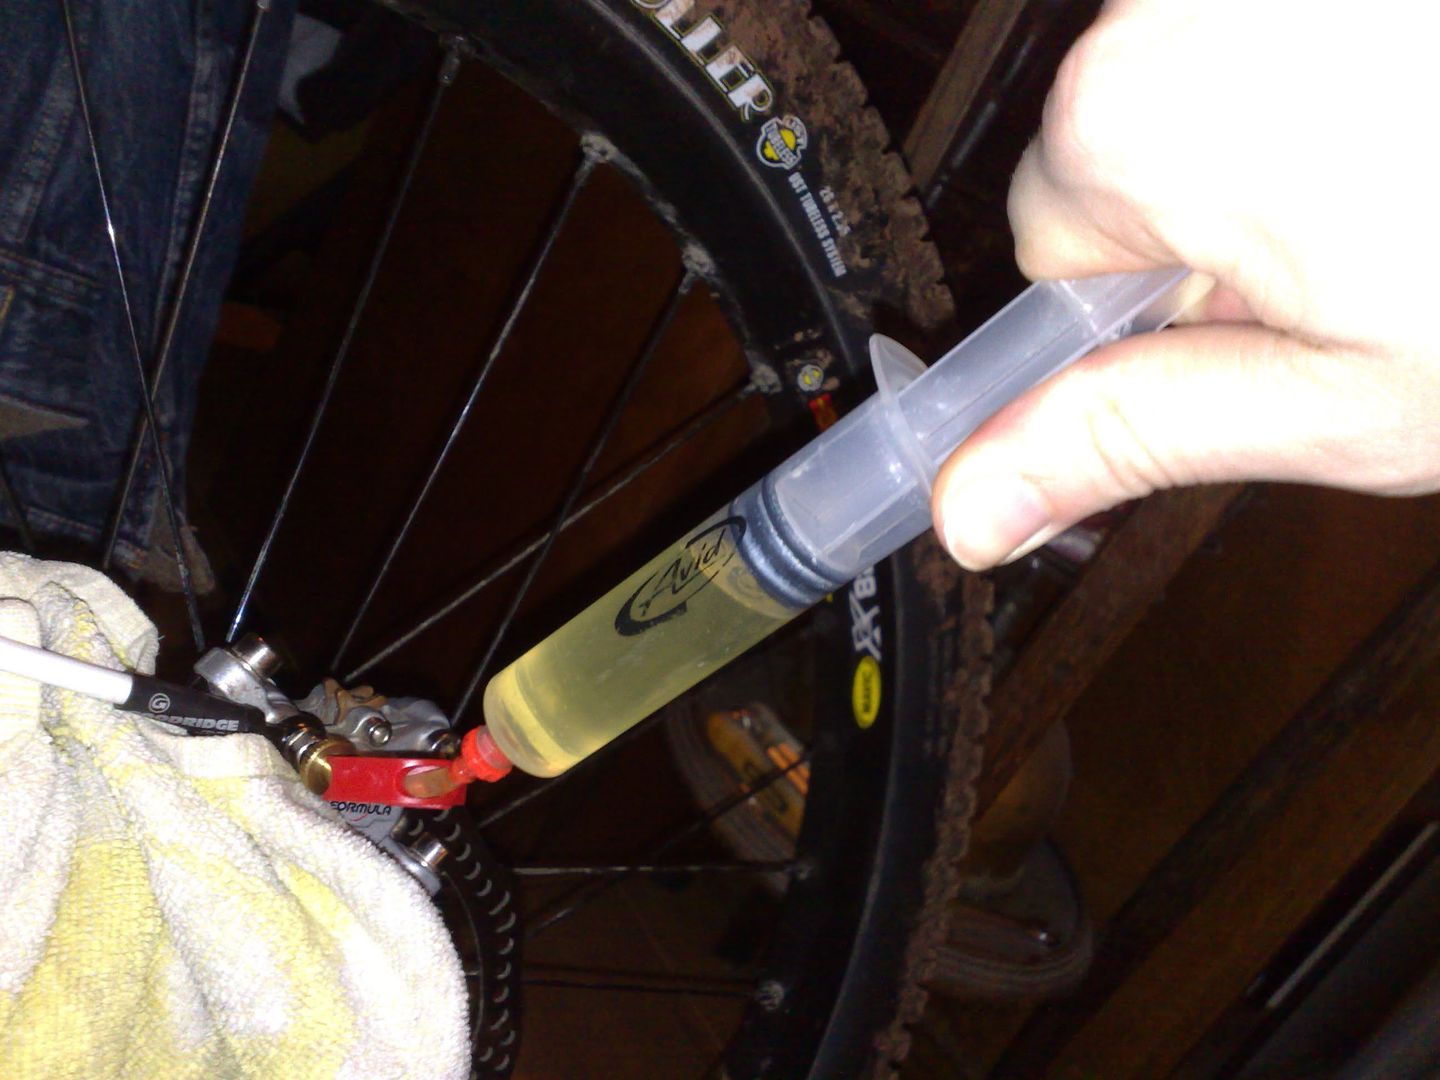 [/IMG]
not so hard that you suck ninja air in from around the seals, that is some kind of devil sent hateful gaseous invader and again is only there with the intention of pissing on your chips!
so you're now bleeding your brakes! every little bubble that you remove is one less failed attempt to stop!
keep doing it, when you think your done, do it again, tap your caliper, stamp your feet, flick the hose, whisper to it in a seductive manner, tap it again, and keep sucking those bastard tiny bubbles out.
oh and for the love of god don't pull the plunger out or you'll have to go back to when you met Gerald.
NEXT!!
ensuring that Dave remains erect its time to return to the business end of things, yes, the moment you've been waiting for, its time to bleed the hose!!
Stephanie the Receiver! your time is NOW!!
[IMG] 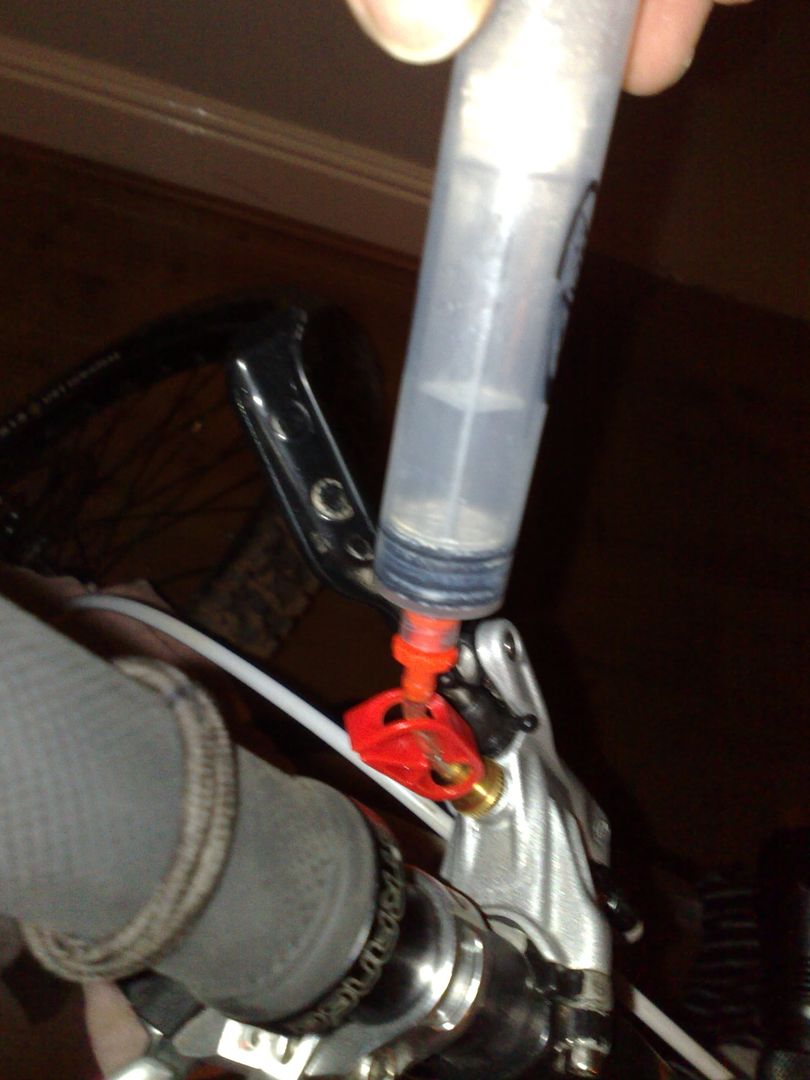 [/IMG]
Unleash the brake lever, this "opens" up the system and allows your fluid to enter Stephanie!!
NEXT!!
now admittedly I got too excited at this stage and forgot to take a photo, basically, do the following.
INJECT the fluid that Dave has and you will see that, almost by magic, Stephanie the Receiver should begin filling up, don't shoot up all of Big Daves fluid, keep about half an inch in there.
The clip everyones thangs again!
then unscrew Big Dave, get that idiot Gerald and put him back ensuring that you don't get any air in there (it should just have a pea like bead of fluid so no worries there.
Now your all finished at the caliper, the hose is also bled.
Now its time to get to work on lovely Stephanie!
NEXT!!
Treat Stephanie and the lever as you did Dave and the Caliper,
[IMG] 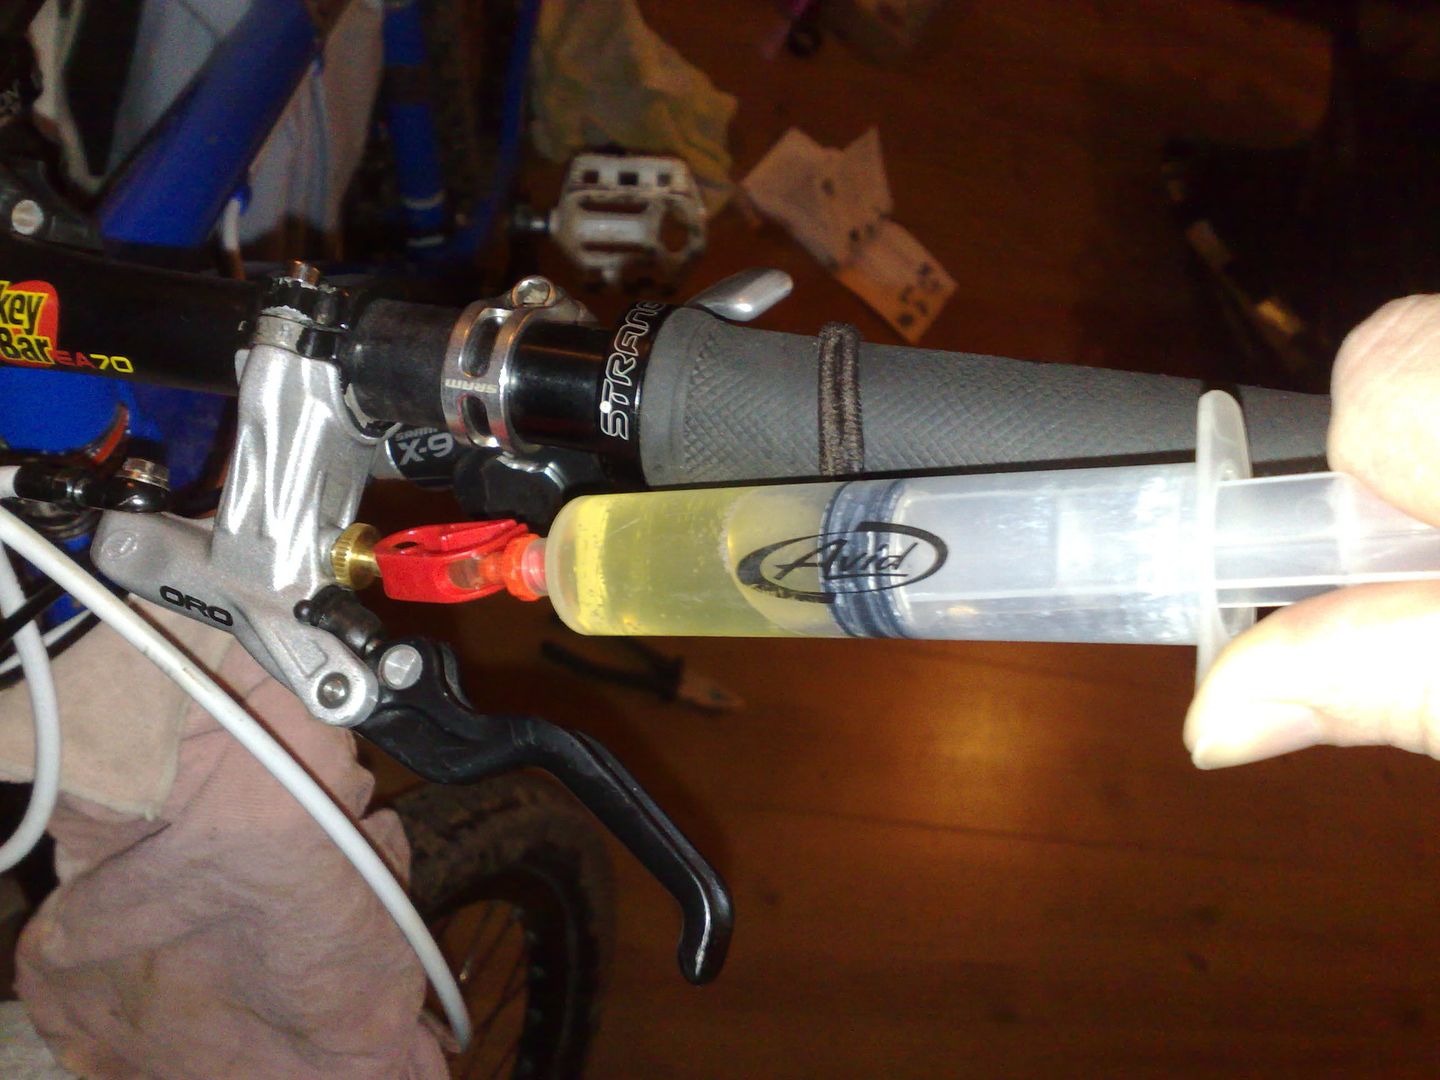 [/IMG]
all that tapping and whispering, sucking and resting, keep it up until you think you have done, then do it some more, beware that bastard ninja air and when you are finally bored with this whole procedure don't forget to inject oil back in to replace the air that you've purged!
once thats all done, screw Gloria back in, you didn't forget about Gloria did you? don't tell me she was on the end of the Torx screw driver that you've been tapping the caliper and the lever with?!? oh christ!!
CHECK everywhere, under the sofa, in the garage, under the fridge, in the back of the car!
phew!! there she was, sat on bottom bracket, all smug, the bitch.
stick her back in and then go out and find the biggest hill to plummet!
just make sure that you've got enough run out should it all go horribly wrong!! 😆
oh and FIN.
(I climbed and descended a 200ft hill three times just to be sure, and sure I am, thems brakes are now like new! I swear they'd stop a Ton!)
oh, one more tip, don't store your bleed kit with the hose clamps closed!
your instructions are waaaaay funnier than the avid instructions.
which are in turn superior to the formula instructions, which are not worth reading as they basically say: "Do not do this or your will DIE. But since you are reading this, here is how. But don't blame us if you DIE. And ffs don't sue us. You can't anyway, our lawyer wrote these instructions. That's why they are so rubbish."
Great brakes though.
Incidentally folks I also did my formulas like this^ a while back and it worked very well. Funny that it takes someone else's bleed kit and instructions to get the best out of them...
Don't lose Geralds tiny o ring.
Just spent the last few days messing with brakes...my rear Hope Mini was taking in air and had to be bled before every ride.
Changed all the seals in lever and caliper, new phenolic pistons, then bleed but the brake just wouldn't work, pistons wouldn't pump out and within a few lever pulls you could hear air squelching around in the hose 🙁 After about 6 bleeds I gave up and nicked one of my gf's brakes so I could ride.
Second attempt - Swapped brakes back, and decided the bleed screw on the caliper was letting in air so gave it a few wraps of PTFE tape. After bleeding it was fixed! Reshimmed the brake and it was perfect...until I realised that if I pulled the lever it would creep towards the bars. Spent ages trying to find the leak, in the end I restripped the lever - turned out I'd put one of the seals in backwards 🙁
All working now...I've bled four brakes, and got through about 600ml of dot 5.1, most of it on the patio!
its horrendously satisfying when you get it right aint it!
Bookmarked for future reference. Thanks a ton!
Brilliant post! JUst one question what are the red clips on the syringes? I bought the avid kit (to use with K24's) and didn't get them?
Also, You ahd any problems with the lever going spongey on the K24's after a while??? Mine constantly need attention.
this is a better picture of the clipy things:
[img]  [/img]
where did you buy the kit? it should have come with them I think?
as for the spongyness I've not had them for long enough really, do you use the bite point adjust thang?
Got it from CRC. With regards to the sponginess mine were fine for a few months then the rear went to shit. Once bled it it feels great then after a ride it goes spongey with the lever pulling all the way to the grip. A LOT of people have had this problem and given up with them. It's only the rear that it affected. You should be fine though, i suppose there are more people with good experiences of them rather that bad. I'm ready to bin my ****ers though, had enough.
that sounds like you've got air in the fluid to be honest, do you do "step one" for ages, until there's no more teeny tiny bubbles? if its not them then perhaps its your seals? also what hoses are you running?
I think you can also get Formula's properly serviced too? maybe worth a try, I'm astounded how powerful they are, managed to take me from about 25mph down to nothing in about four meters, was hanging off the back heels down, astonishing stopping though!
that said, if you're are looking for a new home 😉
actually I don't think you can't get the air out of the fluid without the red clippy things? unless you're pinching the pipe closed with something else? That could be the problem, you're bleeding it but wiht air in the fluid, the air then works up to the lever and after a few rides and you end up with spongy brakes?
Absolute genius, thank you Monsieur Nutt. My K24's are only a few weeks old and the levers are not springing back fully when pulled although they stop me Ok, and they are not fouling at the pads. I suspect some air so will give it a go.
Also what does the bite adjust thingy do coz i'm buggered if I can tell the difference!
PS. do you mind if I call Stephanie 'Christine', as that was my ex wife's name and she wouldn't suck if her life depended on it!!!
[i]Once bled it it feels great then after a ride it goes spongey with the lever pulling all the way to the grip. A LOT of people have had this problem and given up with them. It's only the rear that it affected[/i]
You might have the infamous 'dodgy master cylinder piston' problem that many, including myself, had with early batches of K24s. The seals and plastic piston body degrade and the lever goes all mushy because fluid gets past the seals instead of being pushed to the caliper.
Propel should sort it under warranty, or you can buy some new pistons from CRC. Fitting is fairly straight-forward.
[url] http://www.chainreactioncycles.com/Models.aspx?ModelID=22475 [/url]
[i]Also what does the bite adjust thingy do coz i'm buggered if I can tell the difference[/i]
It's not a bite point adjuster; the pads are always the same distance from the rotor. The FSC knob adjusts how much lever throw is required for the pads to begin to move i.e. until the timing port in the master cylinder is closed. I can tell the difference but always leave it on the shortest throw setting.
Incidentally, if your brakes are very new the pads and pistons may not have 'settled in' yet. Levers not springing back is a worry though - I'd keep an eye on that.
Looking at those pics, it looks like the bog standard ebay syringe and some fish tank tubing I use on my Hopes might not work? Is this kit needed or is it possible without? Thanks!
couldn't tell ya as to bleedin' hopes, I only know about bleedin' formulas and bleedin' avids 😀
The kit's only for Avids and Formulas - Hopes don't need the screw in bit.
I did my mate's Avids off the bike - ie. Stephanie and Dave were right next to each other, used a vice and an old handlebar.. Made it very easy (and somehow more intimate.)
MrNutt - Genius, thank-you for that 🙂 I've had K-24's for almost a year and they haven't needed to be bled yet, which is great - this thread is now bookmarked for when it needs done.
this is a superb guide, and one that is tempting me to pop my cherry in the debauched pit of slutty brake bleeding. stirring stuff! 🙂
sorry, my question was unclear as I was late for work. i meant is it possible to bleed avids without the kit? brothers b'day coming up and he wants the bleed kit for his avids but its way over budget! i was thinking of getting normal syringes and tubing like my hopes but it looks like it might not work? thanks
Must be someone thats tried bleeding Avids without the proper kit?!
No, you can't - Gloria and Gerald require the threaded insert.
I've got a kit you can borrow...
Thanks Dez, but as its a pressie I'll just tell him to think again and get something cheaper 🙂
OK after having some hassle recently trying to bleed some Hayes Strokers I figured it must be the 'air in the fluid' thing causing me grief so tried to follow these instructions (bought a tube clamp from an aquarium place on eBay). Only what I find when creating the vacuum that forces the air out of the fluid is that as soon as you release the pressure on the syringe plunger the air goes back into the fluid (rather than stay at the top). Is that right, if so how the frick do you keep the air from going back in? :p I tried releasing the clamp with pressure still on the plunger but that didn't seem overly successful.
Tap the syringe? Should send all the bubbles to the top.
wait for the air bubbles to get to the top, flick the lever to 'pop' them. then release the vacuum. And do it again and again.....
Its common practice to remove pads during bleeds for shop mechanics.
just in case you get any contamination.
worth doing.
Hmm maybe I need to be more patient, when you say release the vacuum though do you mean release the clamp or let the plunger go?
Pulling the plunger up creates a vacuum above the fluid.
The air in the fluid 'comes out' and into the vacuum.
When you release the plunger it will also 'fill' the vacuum space (i.e move back towards the fluid). Don't worry about it -all the air should be out of the fluid by now......
DrP
Well bloody hell all this time and I didn't know about the suck the air out of the fluid bit. Mind you my brakes have been OK so maybe not compulsory but belt and braces in future I think.
(I use XT and Hopes and the reverse syringe bleed is soooo much easier and quicker than traditional)
found it!! 😀
Thanks for digging it up 🙂
bump for Krag!
Whatever you do (with K24's), don't confuse Gerald and Gloria the torx screws... I tried to screw Gerald into the hole vacated by Gloria and managed to push him right through and into the lever reservoir... not happy times as I can't get him out! 🙁
Good instructions MrNutt btw 😆
Woo woo...i did it...Mr Nutt your a genius! 😀
why thank you folks! glad to be of service.
Got this bookmarked for later reference. The avid instructions should be written like this 😆