Bodged a Thule XXL fatbike strap onto my Euro Classic rack. Involved punching holes in new strap, then boiling water to help fit. 
If anyone wants more info, I replaced the straps on the nearest to the car rack, as that's where my eeb would typically sit.
Thule XXL kit. Didn't use any of the fixings. This is to fit a Euro classic 929.
First remove the upright support from the rack entirely to gain more access (5mm Allen key to remove nuts, then spin off the knobs).
Remove the old straps. They rotate until the 3 slots align. The right side was much easier than the left (i.e., the offside easier than nearside)
You need to drill the end hole out to 12mm. I used a wood drill basically by eye.
Then cut 3 slots in what remains, aligning those slots to the ones on the old slots. I used a small sharp chisel in the end after faffing with a hacksaw blade.
Pop the end of the strap in some boiling water and then push on to the fixing. It took a while and some readjustment of the slots, particularly on the nearside as the angle the strap needs to go at is horrible.
Once on, rotate the strap into position.
Refit gubbins, done. About an hour in total.
The main problem is that I can't now go out and buy a Thule Epos 3 as I've not got an excuse 😔
https://photos.app.goo.gl/nB2mTvq3BAP93Y6T8
It probably doesn't look that impressive but it is a mould for my planned carbon fibre bonnet. I first had to make the styling buck and polish it to perfection to ensure the gelcoat didn't stick. I then had to create a 90 degree step all the way around the outside for the edges of the bonnet that the flanges fixed to.
If it was more than 90 degrees to bonnet wouldn't fit between the front wings and I would have to do it all again.
If it was less than 90 degrees then there would be no way of removing the buck, or subsequent parts made from the mould. This would result in starting again from scratch as the only way to extract the buck would be destructively.
To say that I am relieved that it released easily is an understatement. I now just need to clean and polish it ready to make lay up the carbon.


Noce Jon.
I need to make some for a drummond round bed to cut metric. What stock are you using.
It's cast iron round stock from Rapid Metals. You can buy it by the mm in loads of different diameters. Pretty reasonable for cost but postage is high.
Cast iron is lovely to machine.
I have an exhibition in Winchester in September, and possibly also some pieces at Palais de Vache so had to paint something and thought I would try a slightly different style to normal. I quite enjoy the process and like the results.
Your thoughts welcome (but not about the lampshade)
https://photos.app.goo.gl/EGD3U3MqdPMoVqea8
Nice work WCA, think the henge one suits my eye best.
My contribution: a very hurriedly assembled attempt at a Lee Enfield for the youngest's school play, he was a home guard. But, alas, in vain, he wasn't allowed to use it! (Tape still on the band strips in the pic)
[url= https://i.postimg.cc/y8N48v6Y/20250714-081617.jp g" target="_blank">https://i.postimg.cc/y8N48v6Y/20250714-081617.jp g"/> [/img][/url]
That rifle reminds me. I made little Tommy a Moana fish hook - https://photos.app.goo.gl/2Cetn6zmqMtrMFzy9
Its that time again get your pitch forks ready! this is happening and i have spent the last few years working on it with many other talented people
Will it be released in beta form like all the recent versions of battlefield (jk)
Kinda looking forward to it as I haven't PC gamed for ages.
Its that time again get your pitch forks ready! this is happening and i have spent the last few years working on it with many other talented people
Watched the promo vid and it looks amazing. It’s obvious a lot of work has gone into that. Really impressive.
@doris - how cool to work on such a game. Do you and the team know that BF1 was peak BF and we all want more of that 🙂
"Do you and the team know that BF1 was peak BF and we all want more of that"
😀 if only it was that simple as there is a pie chart somewhere which shows 33.3% want bf1942 33.3% want bf1 and 33.3% want a mash up of bf3 and 4
I made a punchbag and pull up frame. It works fine but took ages and has included many ridiculous mistakes...but there it is. A few finishing touches still required. 
Stonehenge has sold before the exhibition has even started so I give you "Corfe Castle"* as a replacement.
https://photos.app.goo.gl/4wYDLbqWqcz5xU268
*It is the one at the bottom
Last one completed for the exhibition. Now I can focus on getting the bloody car finished.
https://photos.app.goo.gl/D6yscqysPmt7183H6


This is about 2 minutes after I popped it from the mould, so not cleaned or trimmed.
It is my first big resin infusion and it only bloody worked. The dry carbon cloth wasn't wide enough to do the whole bonnet in a single piece which meant a seam. I 'hid' it in the centre of the bonnet and reversed one side to give a herring bone effect and hide any minor misalignments. This meant hand cutting 2 metres of dry carbon cloth with hand scissors and not having any snags, wiggles or weave distortion. Then layering over with soric and another layer of carbon cloth.
It would take a proper fabricator somewhere between 4 - 6 hours apprently. It took me the best part of 2 days. I am so relieved it actually worked.

That looks great Nick.
This is about 2 minutes after I popped it from the mould, so not cleaned or trimmed.
It is my first big resin infusion and it only bloody worked. The dry carbon cloth wasn't wide enough to do the whole bonnet in a single piece which meant a seam. I 'hid' it in the centre of the bonnet and reversed one side to give a herring bone effect and hide any minor misalignments. This meant hand cutting 2 metres of dry carbon cloth with hand scissors and not having any snags, wiggles or weave distortion. Then layering over with soric and another layer of carbon cloth.
It would take a proper fabricator somewhere between 4 - 6 hours apprently. It took me the best part of 2 days. I am so relieved it actually worked.
Looking forward to the next video update!
Could someone give me some advice before I undertake a little project? I'm planning on making some cufflinks out of a pair .50cal casings.
What would be a good option to cut, clean and straight and would anyone suggest a good/effective bonding method to the stainless steel backs?
A Dremel cutting blade is quite good for fiddly cuts in metal and 2 part epoxy metal putty is good for sticking metal together but might show at the edges unless you are careful. Epoxy resin is clear and might work better. I would check out online jewellery or modelling stores.
Brass casings... 30nseconds with a hacksaw.
Then stick the face down to a scrap of wood, file the cut edge flat then use fine sandpaper to achieve the finished surface tonattach the back . double sided sticky tape will work.
Stainless steel to brass will silver braze quite happily which is doable with map torch. Much nicer than using an adhesive
Then polish... That i might use a dremel for...
Stainless steel to brass will silver braze quite happily which is doable with map torch.
Are there any risks to this in terms of irepairable damage? I'm a beginner with any from of metal work.
I Wasn't fully happy with the Amazon special tow rope for my boys. Approaching the end of the trail I like to reach back and pull the rope and him forward. The tape just never felt good in my hand.
So I rummaged around. Found a length of old prussic cord (tree surgery spec not climbing spec, I think it's 10mm).
I stripped the core out, threaded a new bungee cord in and put a locking brummell splice on each end. The bungee is secured with locked whipping at each end
My end got a 20cm dmm quick draw sling and I'll get some spare cord for the boys end to loop over his stem bolts.
Theres a nice bit of stretch to it.
Old Stubai crab for scale (no bananato hand) 
I Wasn't fully happy with the Amazon special tow rope for my boys. Approaching the end of the trail I like to reach back and pull the rope and him forward. The tape just never felt good in my hand.
So I rummaged around. Found a length of old prussic cord (tree surgery spec not climbing spec, I think it's 10mm).
I stripped the core out, threaded a new bungee cord in and put a locking brummell splice on each end. The bungee is secured with locked whipping at each end
My end got a 20cm dmm quick draw sling and I'll get some spare cord for the boys end to loop over his stem bolts.
Theres a nice bit of stretch to it.
Old Stubai crab for scale (no bananato hand)

That's brill, would that locking splice work in a dog lead as well? It looks like it would?
How.frustrsted am I likely to get with trying to make it?!
It would work in a dog lead. It's a super easy splice. Easiest on a loose hollowbraid like Samson tenex.
I use some swedish fids and whip locked it with sail making needles, Marlow medium whipping twine and aail makers palm.
Stainless steel to brass will silver braze quite happily which is doable with map torch.
Are there any risks to this in terms of irepairable damage? I'm a beginner with any from of metal work.
Not really. Silver brazing isn't super hot so you won't cook anything that small. You can blast it with more heat to remove.
For silver brazing, absolute cleanliness.
Correct flux.
A bit of silver brazing stick.
you want to do it on something lightweight and flame resistant to prevent the heat being absorbed faster than you can get it in.
Braze only goes where the flux is. You will probably get away with a dab of flux on the back of the casing, place the stainless back in place and cut a small piece of brazing rod next to the join. Apply the heat from the other side and keep it moving. When its all at the right temp the braze will melt and get sucked in by capillary action.
Practice on the shell off cuts.
I can send you a bit of flux and braze.
Today's wonky project, a driveway sign made from an old fence post, a piece of bridge runner (see the things fixed thread) and an offcut from a slab used to make a barbecue worktop ten years ago.

A little more filing work to do to get the base evened out nice a smooth.
Got a sweat on cutting through the casing mind.

Lets see the other side and your cufflink backs.
You could make a back from the spare casing...
Definitely practice first. Brass melts relatively easily, however, a higher silver content in the solder gives you more headroom and you'll be well below the melting point of brass when the solder melts
Lets see the other side and your cufflink backs.
You could make a back from the spare casing...
The cufflink back haven't arrived yet, but here's the other side.

Yeah they will braze lovely.
You could cut slices of the casing the split the ring.
Then bend to into a t shape with little serif at the bottom that you can use to braze onto the back.
Could look smart. Eh. If you need more detail i would have to sketch it i reckon.
If they are a gift, consider stamping your initials and the year on the side you have cut?


Still work in progress but big progress over the last week.
https://photos.app.goo.gl/mxKw1msAihs9tWRg7
Must knock out a couple of videos. Too busy doing things to edit them.
@joshvegas, I have sent the blanks back, they were very cheap looking. But in other news my mate who works at the armouries is a dab hand at this brazing lark so he's going to supervise me!
This got me to repair the dremel and give them a polish, they've come up lovely.
The cufflinks are actually for me, they're last two .50 cal rounds I fired in my career so kept them (with permission 😉)
https://imgur.com/a/GCtOpd8#wpgqE9d
This is what i mean. Brazing locations might not all be necessary but it would be cool to use more kf the casing.

Drew up and printed a 13mm insert for a tailfin mini pannier so I can use it on the pizza rack rack as a front pannier when carrying all the things required to take a child camping.
Fit is a touch tight. May redo in something sturdier than PLA if required- might be a good excuse to try out TPU


I think I have just worked out how to add pictures now.
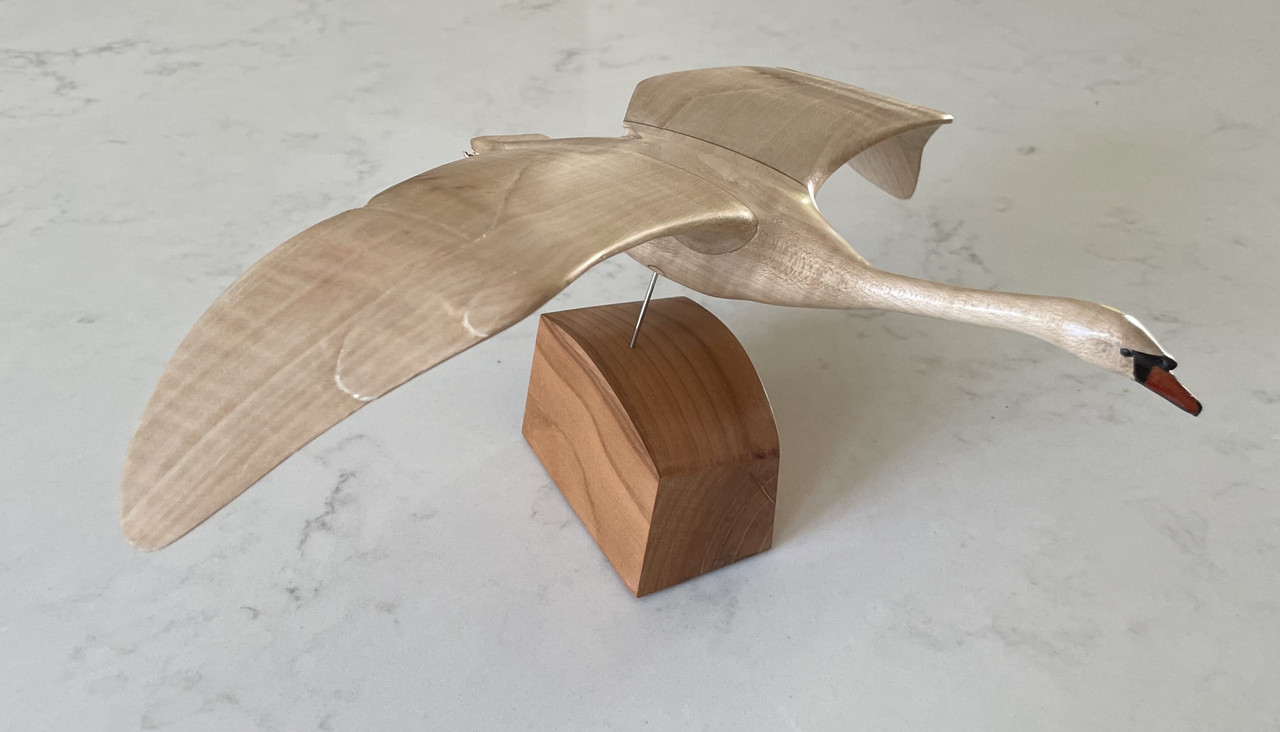
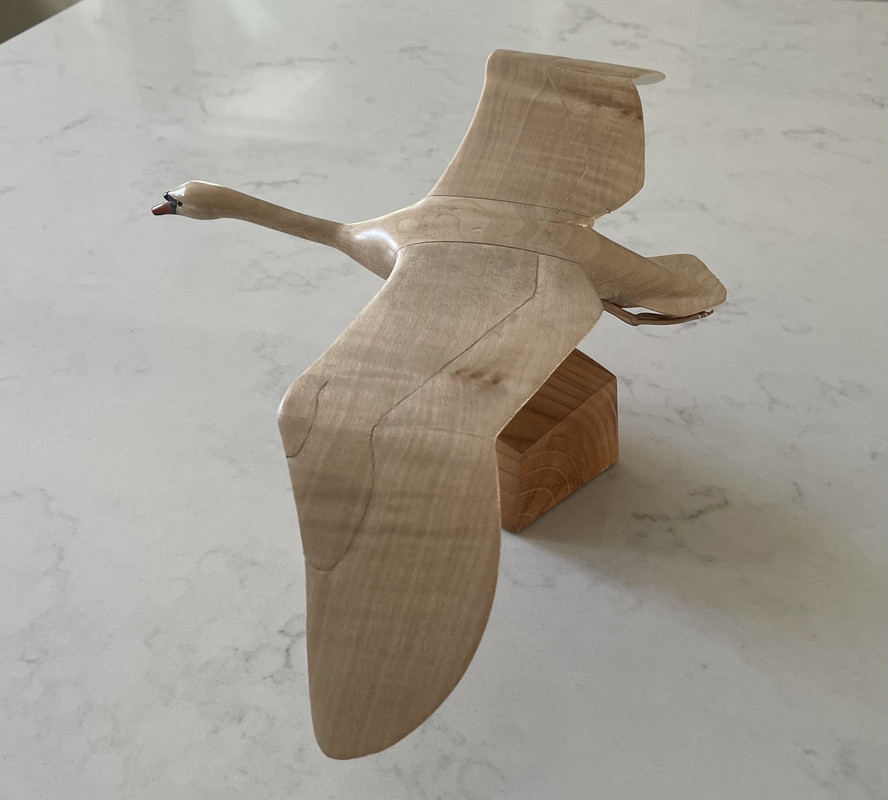
I started this swan more than 30 years ago, but finally got around to finishing it. Thanks again to Josh for supplying the ebony and padauk for the beak details