Nice build look like it going to be a quality shed .
I also have a tendency to spend more time planning than doing , the internet a dangerous thing for this . Now try to jot idears down and then get on with making it.
Have you considered felt shingles , lots of different styles and fairly easy to install . Iam thinking of using them to re do the roof on my shed and wood store near the house , get grey felt shingles to tie in with the slate roof on the house .
Chris
Re: Felt shingles. I was told that my pitch wasn't enough i.e wind would blow the rain up the shingles.
I can't remember where I read that now though. I've only got a 6-degree pitch.
Ah sorry you are correct , your roof is prob going to be a bit of a shallow pitch for shingles . Not exactly sure but I think most shingles need to be on 15 deg pitch or more . Oh well worth a suggestion !
Chris
Now I've overspent by choosing larch, I'll probably stick to the cheap torch-on felt option.
without beign too nosey how much did larch set you back?
did you consider loglap or anything like that?
and what fixings did you use (plan to use) for timber framing and cladding?
The larch is a PTGV profile finished at roughly 19mm.
It's working out at £17 a square meter. Far cheaper than anywhere else I've tried.
I'm going to match the window linings, sills and other details too, so today I'm going to get it all written down for a final quote. Should be under £600.
Re:Fixings. I'm using Concept KTX Locking Drive Professional Woodscrews - they seem to be really cheap from my local timber yard (cheaper even than online prices). Mostly 5x100mm.
For the cladding I'll be using stainless nails. Doing it by hand if I have to.
For the roof joists, I'm going to use truss clips like this:
[img] http://www.cwberry.com/ProductImageHandler.ashx?ItemNumber=03212401&Size=Display [/img]
But probably on the inside.
At the moment the walls are connected together with just the above screws (8 per corner). I can't decide whether I should use coach bolts, brackets or anything else at the moment. Ideas welcome.
[img] http://s1291.photobucket.com/user/sargey1/media/shedhouse002_zps14930be1.jpg.html ][IMG] http://i1291.photobucket.com/albums/b542/sargey1/shedhouse002_zps14930be1.jpg [/IMG][/URL][/img][img]http://[URL= http://s1291.photobucket.com/user/sargey1/media/shedhouse001_zpsfa278336.jpg.html ][IMG] http://i1291.photobucket.com/albums/b542/sargey1/shedhouse001_zpsfa278336.jp g" target="_blank">http://s1291.photobucket.com/user/sargey1/media/shedhouse002_zps14930be1.jpg.html ][IMG] http://i1291.photobucket.com/albums/b542/sargey1/shedhouse002_zps14930be1.jpg [/IMG][/URL][/img][img]http://[URL= http://s1291.photobucket.com/user/sargey1/media/shedhouse001_zpsfa278336.jpg.html ][IMG] http://i1291.photobucket.com/albums/b542/sargey1/shedhouse001_zpsfa278336.jp g"/> [/IMG][/URL][/img]Ihave more or less finished my shed just a few bits to finish off
Very nice sargey! - any tips to share?
Anyone ever charred wood?
Charred cedar is a traditional building material in Japan and it interests me a lot.
Don't know whether I would have the patience to do all the cladding, but I might be tempted to do some details (capping, window frames, etc).
Extreme charring:
[img]  [/img]
Less extreme charring:
[img] http://www.greenbuildingforum.co.uk/newforum/extensions/InlineImages/image.php?AttachmentID=1430 [/img]
They charred wood cladding on an episode of grand designs. Cant remember what wood, but it looked great+ no nees to ever coat it
Thanks superfli - found it here:
It's larch.
[b]On a bad note - the larch price may have been an error. They are checking now :([/b]
(yesterday they quoted £1.85+vat a linear meter, today (different person) is saying their normal price is £2.85+vat - showstopper if so)
They charred larch on Grand Designs, although it is pretty durable outdoors anyway.
Re: tin roof, the shed roof nearest the house, also about 3m from our bedroom window is metal and we can't hear it over rain on the windows, although the house is in the middle of a field so there is nothing to reflect the sound. Parents have a composite corrugated on some lean-to' at theirs, cheap, light and choice of colours.
Sargey - nice shed, got an "architect designed" look to it.
Alex - your build is looking great. Good progress.
Damn weather - finally got outside - managed one solitary nogging before the heavens opened 🙁
Damn weather - finally got outside - managed one solitary nogging before the heavens opened
That worried me when i saw you started floor first.
Nice shed sargey.
Yep - just a tarp over the floor 🙁
Roof joists will go in over the weekend though so roof can go on next week all being well.
Great write up Alex ! 😀
It always amazes me when people have the time to record what they are doing as well as doing it. But I do regret not recording mine better.
Cheers righog!
That explains why the photos are a bit crappy 🙂
I don't think I've taken a single one with my DSLR
Larch came in at £2.50+vat per linear meter.
Great price, but probably too much for me (I was nervous as it was). I'll sleep on it. Totals £160 more than I worked out yesterday.
Just caught up with this thread.
Well done OP, keep going! Very useful for inspiration and guidance. 🙂
Noggings all in now.
[img]  [/img]
When starting the second row, I realised I'm mis-measured. My plan was to have the top two inter-stud/nogg spaces as squares. But in the end I think I've only got the centre row squared. Doh!
I've been really careful to make all the screws hidden from the main front part of the room. Same with the printing on the timber. If you stand over in the far corner all you can see is printing and screws 🙂
Next:
Time for the roof joists (rafters?)
Trying to work out the best spacing for 6 sheets of ply. It's very tight.
It's looking great! Keep the pics coming.
What thickness ply and what size rafters?
Any chance you could finish it this weekend as I'm really excited about the finished article?
Looking at buying a new house at the minute and I'm going to try and make sure there's space in the garden for a shed of similar proportions (hopefully a bit squarer although the unusual shape is definitely going to give it character).
Not saying its wrong but i was always taught to stagger my stud joints.
Must be takin a heap o time to screw that together.
Last 2 i built i borrowed a paslode nail gun . Tis going no where now ! Infact i rode past my first build last week and its still there despite a crazy battering from wind in its location.
[b]tymbian[/b]
18mm ply on 2x4 rafters. To be honest, 2x6 rafters would be ideal, but It's a lot dearer and eat into my headroom (because I'm working back from 2.5m overall height.
[b]tommyhine[/b]
Absolutely no bloody chance - especially now it's raining again!
[b]trail_rat[/b]
Noggs depend. Nothing wrong with either method afaik. Offset is quicker (that's why I did that in the floor), but this way is neater and in theory is better for fixing sheets to.
I don't think I'm going to insulate/line it, so I wanted it to look neat and also I've got some ideas for internal storage that will require neat rectangles and squares.
I agree that nails are far quicker. I should have probably just bitten the bullet and bought an air nailer. I can't see me screwing the cladding!
Larch is back on.
From these guys - fingers crossed it's all ok!
http://www.ebay.co.uk/itm/Siberian-Larch-Exterior-Timber-Cladding-Decking-/290780143391
Look forward to the feedback on this larch, currently hunting down only 20m2 worth. Have you found many places that sell the L corners like these but cheaper? http://www.southgatetimber.co.uk/index.php?option=com_virtuemart&Itemid=185
No - I've bought some 2x5 rough sawn (£7 for 2.7m length) and will attempt to make some of my own. If I can't do it, then I'll get a local joiner to do it for me.
I have the problem that 2 of my corners aren't square however!
Edit, the original Larch supplier did corners which were about £3/m
http://www.artisantimberandflooring.co.uk/
Alexsimon – Keep up with the stage by stage updates, it’s good to see how things go together – the roof is my main interest.
Sarge – Bit of a Hijack, but your roof looks exactly like the one I have sat in my head as the best for my needs. Any more piccies or links so I can shamelessly nick how you did it?
Saccades-yes i will try and dig some photos out
On my shed the roof is made from profile sheet with alucobond fascia cladding.The floor,roof and walls are constructed using structually insulated panel system (SIPS) panels
[URL= http://i1291.photobucket.com/albums/b542/sargey1/work035_zpsf2cb0885.jp g" target="_blank"> http://i1291.photobucket.com/albums/b542/sargey1/work035_zpsf2cb0885.jp g"/> [/IMG][/URL]
The panels are 100m thick up to 2400mm high and 1200 mm wide made up of 9mm osb 82mm of insulation and 9mm osb.
Strong,watertight (double skined) and once you prepare the base you can put the walls up in a day.
😀
Strong,watertight (double skined) and once you prepare the base you can put the walls up in a day.
You've suddenly become very unwelcome in my thread 🙂 🙂 😉
Actually my walls went up in 10mins (see the timelapse), but that was after 2 half days of frame-building 🙁
[b]Update[/b]
Larch arrived today - variable quality. Some great, some very knotted. A fair few shakes. Lots of weeping resin.
Stainless nails arriving today too.
The hold-up now is a decision on the roof, so that I can space the rafters accordingly. I'd need different spacing depending on material.
Still can't quite bring myself to buy board+felt - especially if I have to do all the fancy beading/capping/etc associated with a flat roof.
but that was after 2 half days of frame-building
That's the fun bit, just buying a wall is a bit dull!
sargey, how much were the SIP sheets?
whoa, sips for a shed, you don't by any chance ride a carbon mtb do you?
Surely you should build your shed out of carbon fibre panels, all hand laminated, if you're storing carbon bikes in it......
we need more pictures... !!!
we need more pictures... !!!
+1 it's mandatory for STW shed building threads.
ok - a little bit of progress over the weekend.
Added some framing for a cat-flap:
To keep it neat, I'm going to mount the cat-flap on the inside so it can't be seen on the outside.
[img]  [/img]
Chopped out the bottom of the door-frame (that bit was to keep it all square/whole while I assembled the walls)
[img]  [/img]
This is what £600 of larch looks like:
[img]  [/img]
And £60 of nice stainless nails:
[img]  [/img]
So I made a start putting them together. I drilled clearance holes for every nail as larch is a 'lively' wood and is prone to splitting. It takes a little longer, but the nails go in lovely.
[img]  [/img]
I can't really do all the cladding until I've made a decision about the door and framed the windows which requires some machining of some rough larch I've got and potentially some charring (which is the fun bit).
Still haven't decided on roof. Still hate felt. Found some cheap insulated metal roofing, but it's in Derby and I need 4m lengths which complicates it a bit.
Bit embarrassed about the quality of the photos. No time to get proper camera out though. I thought the iPhone4 was better than these though!
Looking good.
This is what £600 of larch looks like:
Oof, that hurts! For £600 you'd be hoping for a mcmoonterish-sized heap of wood, not that small stack. And one of them has already split 🙁
I know! The stack does look small, but to be fair they are 21x145 with a 138 cover, so they are about as large as cladding gets.
The Hull Port Timber place was £250 cheaper than anywhere else.
The lorry came with a load of loglap on it - that looked great. Really consistent and is a great price.
any updates?
mangoridebike - Memberany updates?
Not really. 🙁 Busy this week and away over the weekend.
Roof is now a toss-up between 10mm box section opal polycarbonate (like a conservatory roof) with all the associated uPVC trimming (yuk).
http://www.cabp.co.uk
Price approx £280
Or driving down to Derby with a trailer and getting some insulated composite metal roofing from http://www.actionclad.co.uk/
Price approx £260
edit: The polycarbonate is a recycled product (from offcuts) which appeals slightly.
get the insulated metal roof
won't leak and will be plenty warm, price not bad at all either tbh
Quick update:
Clad 3 walls. Now need to make final decisions about windows and door to be able to clad up to them.
[img]  [/img]
[img]  [/img]
[img]  [/img]
Tried to get insulated metal roof, but the chancers at actionclad.co.uk didn't have anything for us. They said to ring back Wednesday after they've had some deliveries. I think it must be seconds/job leftovers/etc. But then they are half the price of other places.
Looking good, will you be putting any skylights in too? It would be a shame to lose that natural light.
I know. I don't really know what to do.
When I was looking at single-sheet metal roofs, we were planning on leaving a whole strip along the middle clear. But it's much trickier with composite roof.
Now that the actionclad have let me down a bit, I'm back to considering the polycarbonate roof. I've absolutely no experience though, and can't really work out if 44% light/UV transmission will just make it far too hot in summer though for the contents - bikes, tyres, tools (including oils), camping gear, two-stroke, etc.
Edit: I was hoping it would looks somthing like this:
[img]  [/img]
I suppose if it too hot, I could always mask some of it off with a sheet material. I could cut a pattern into some 6mm ply or something.
Security would be my biggest concern with the clear plastic sheeting...
Could be hot - plus security issues - plus with dead leaves, dirt, twigs, bird crap etc etc it could look a bit rubbish from the inside after a few months.
Security would be my biggest concern with the clear plastic sheeting..
[i]SPIDERS[/i] mine ...
Just think of the webs ....
😯
Security of 10mm does concern me a bit. 16mm less so.
10mm is £250, 16mm is £380 though.
Polycarbonate sheet is flippin tough stuff (they make riot shields from it) - you'd need power tools to cut through it (if it's more than a few mm thick). You could always add a metal frame inside for added security.
I'm just getting some metal grilles made up for my Veluxes:
Custom made, will be white powdercoated. £30+VAT each:
[url= http://farm9.staticflickr.com/8555/8705023844_bb80784229.jp g" target="_blank">
[url= http://www.flickr.com/photos/brf/8705023844/ ]Velux Grille[/url] by [url= http://www.flickr.com/people/brf/ ]brf[/url], on Flickr
footflaps - this isn't the solid sheet we're talking about - it's this stuff:
[img]  [/img]
Hey! Got to here and the thread/shed's not finished! Still in progress??
Reading cos I've just had an offer accepted on a house - currently has a greenhouse and shed in the garden, which I plan to remove and replace with a nice, big workshop/shed... 2 months away from moving so must not get premature excitement! 🙂
I've let you down badly Dez. Really sorry. I'll try and pick up my game.
Truth is, I've still to decide on the roofing. Also busy with work.
Next job is to take my 5x2 pieces down to a local joiner for him to machine them into window surrounds and battens/beads. Then I can burn them!
🙂 Damn impressive so far.
I'll just be buying a whole shed I think. Where from will require advice from STW...
If you can fit a rectangular one and don't fancy a new hobby, I think buying one is a great idea 🙂
Did you decide on a roof ?
pretty much. Insulated metal, with full top-to-bottom rooflights in-between the panels.
Still trying to get sense out of actionclad so that we can be sure it wont be a wasted trip.
Any weekend updates?
It's gone awfully quiet ....
You can't get the tradesmen these days 🙂
My house purchase fell through, so no shed thread from me 🙁
Unlucky, happened to us a couple of years ago, found a much nicer one fairly quickly afterwards
Think the tradesmen are on strike 💡
My green roof is now on....
[img] 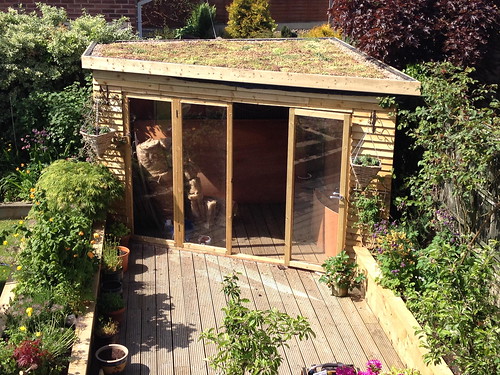 [/img]
It's a sedum and wildflower mix.
A bit of regular watering for a couple of weeks to get it established and it will look after itself 🙂
Just got to finish insulating and boarding the inside, and few other finishing off bits.
That's a nice looking abode there Mary. DIY or off-the-shelf? Will you be using it all year round given the insulation etc?
Am still looking for ideas and trying to figure out if the pros of using a chippie mate + materials (for an office build) are better than going OTS.
@Spacemonkey - Thanks :-). It's a diy creation. Was originally going to be a pergola type thing (christened the bus shelter), but the missis kept adding "wants", so it's morphed into a nice little garden room. I think the term is "scope creep"!
Got power in there, wifi signal is strong, so will be used as office, party HQ, post ride watering hole etc. Nice way of getting out of the house away from the telly even if the weather is crap.
Had a few beer sessions in there during the snow, couple of fan heaters, beer outside in 12" of the white stuff. It will be real cosy once it's insulated.
I am rather worried this shed has no roof yet,
WHAT'S HAPPENING, we need to know !
Sorry - it's so long since I posted that it didn't even appear on my list of updated threads 🙁
I'm hoping to order the roof today.
Metal - box section - drip stop lining - Olive Green - 4 pieces, alternating with GRP rooflights.
(I'll believe it when I've actually picked up the phone and ordered it)
On the other hand I've been nicely busy with work (self employed) and had a couple of great holidays! 🙂
Just read this from the start. Great thread - keep the updates coming Alex.
Cool, I am hoping to persuade the SO that I can do this, but .....
BTW - Mary Hinge - that looks fantastic. Really good.
My wife wanted a green roof, but it's actually quite an expensive route to take - would be around £550 in total for our roof.
[b]Quick update:[/b]
Ha - knew I couldn't trust myself to order the metal roof.
I have now ordered a box-section plastic roof in Opal (ish - it's recycled)
Hoping to achieve something like this:
[img] [/img]
/p>
I've also been charring some larch for the window frames - now [b]that[/b] is fun (and great looking).
I've taken videos and photos, so I'll put something up (probably in a part 2 thread).
Ok. I feel inspired by this thread. MrsHora has told me this greenhouse HAS to go due to horaJnr being a crazy fella who wont mix well with glass.
So once its gone it leaves a lovely concrete base. What could I put in its place?
I have never built ANYTHING before but I can visualise sawing wood, nailing it and levelling with a spirit level etc.
What could I make thats simple?
[img]  [/img]