Bugger. Shows here fine.
Trying to link from Dropbox as Flickr isn't playing ball any more. Any ideas how...? So far just right clicked on the image, properties, copied the link.
Trying to link from Dropbox as Flickr isn’t playing ball any more. Any ideas how…?
I use Postimage, it's not that great but it is reliable.
Imgur works for me
Finally finished the P51D. It's the first time I've done a mixed camo/natural metal finish and tried a different technique on it as regular washes wouldn't work for both. To break up the flatness of the metal I weathered it with a few different grades of clear coat, it worked really well but doesn't show up in the pics. One pain in the bum was that this aircraft had two rear view mirrors on it, I made these out of bits of clear sprue but it was hard to get them to sit at the same angle. Any criticism or comments are welcome, the next one is always better!
[url= https://i.postimg.cc/BjQm****T/IMG-20190818-225715390.jp g" target="_blank">https://i.postimg.cc/BjQm****T/IMG-20190818-225715390.jp g"/> [/img][/url]
[url= https://i.postimg.cc/bsR6dFCY/IMG-20190818-230011169.jp g" target="_blank">https://i.postimg.cc/bsR6dFCY/IMG-20190818-230011169.jp g"/> [/img][/url]
[url= https://i.postimg.cc/NyZDWhMD/IMG-20190818-230149459.jp g" target="_blank">https://i.postimg.cc/NyZDWhMD/IMG-20190818-230149459.jp g"/> [/img][/url]
[url= https://i.postimg.cc/QBFS4NXV/IMG-20190818-230343103.jp g" target="_blank">https://i.postimg.cc/QBFS4NXV/IMG-20190818-230343103.jp g"/> [/img][/url]
[url= https://i.postimg.cc/DSjBP43t/IMG-20190818-230354898.jp g" target="_blank">https://i.postimg.cc/DSjBP43t/IMG-20190818-230354898.jp g"/> [/img][/url]
[url= https://i.postimg.cc/Js12qWDB/IMG-20190818-230407275.jp g" target="_blank">https://i.postimg.cc/Js12qWDB/IMG-20190818-230407275.jp g"/> [/img][/url]
Well Flickr are still a bunch of pox-ridden appendages, but hopefully I can now do some pics the old way...
Mustang
[url= https://live.staticflickr.com/65535/48578663172_58aa3a9622_b.jp g" target="_blank">https://live.staticflickr.com/65535/48578663172_58aa3a9622_b.jp g"/> [/img][/url]
[url= https://live.staticflickr.com/65535/48578532431_88dc0d9953_b.jpg [/img][/url][url= https://flic.kr/p/2h1Jrff ][img] https://live.staticflickr.com/65535/48578680462_7c753e318e_b.jp g" target="_blank">https://live.staticflickr.com/65535/48578532431_88dc0d9953_b.jpg [/img][/url][url= https://flic.kr/p/2h1Jrff ][img] https://live.staticflickr.com/65535/48578680462_7c753e318e_b.jp g"/> [/img][/url]
[url= https://live.staticflickr.com/65535/48578535566_4870081e5b_b.jp g" target="_blank">https://live.staticflickr.com/65535/48578535566_4870081e5b_b.jp g"/> [/img][/url]
Martlet
[url= https://live.staticflickr.com/65535/48578673557_564e099e13_b.jpg [/img][/url][url= https://flic.kr/p/2h1HDaD ][img] https://live.staticflickr.com/65535/48578525451_f5eab44ae1_b.jp g" target="_blank">https://live.staticflickr.com/65535/48578673557_564e099e13_b.jpg [/img][/url][url= https://flic.kr/p/2h1HDaD ][img] https://live.staticflickr.com/65535/48578525451_f5eab44ae1_b.jp g"/> [/img][/url]
[url= https://live.staticflickr.com/65535/48578668572_4b2a06a647_b.jp g" target="_blank">https://live.staticflickr.com/65535/48578668572_4b2a06a647_b.jp g"/> [/img][/url]
[url= https://live.staticflickr.com/65535/48578670532_5645a9e254_b.jp g" target="_blank">https://live.staticflickr.com/65535/48578670532_5645a9e254_b.jp g"/> [/img][/url]
@JonEdwards - those are two lovely models, great weathering and paint. Well done sir! 👏🏻
^They are very good.
Mint!
@JonEdwards – those are two lovely models, great weathering and paint. Well done sir! 👏🏻
Agreed. Top job on the Martlet, especially the underside, and I wish I'd done a more colourful paint job on my P51 now 😭
Wow good job spursn17 and JonEdwards! Is this thread going to get busier now that the nights are drawing in I wonder?
I think so. I've only completed one kit this year with two WIPs.
I think so. I’ve only completed one kit this year with two WIPs.
The Mustang was the first kit I've started and finished within a year for a long while! Probably going to do a vehicle next, I've got a Bronco Stug III or a Russian SU85 that are contenders for the next build. Or it could be a Tiger, another Tiger, a Panther, a Wespe, a T72, an LRDG Chevy truck, a PzIII, or a Möbelwagon 😂
Jon, please tell us about paint techniques and materials used.
Blimey, errm - thanks for all the compliments! We are not worthy etc…
First thing I’d say is that natural light, a decent camera and a wee bit of knowledge of how to use it, plus a copy of Lightroom can make things look a damn sight better than they are in the plastic!
Paints - Alclad primer and varnishes, Vallejo Model Air and Metal Colour. Wash with Flory Grime and Dark Dirt. The Martlet exhaust and gun stains are oil dot, the stuff on the Mustang an experiment with pastels, which seem a lot more controllable than the oil dot technique.
The Mustang was my first attempt at a naked metal finish and I’m not entirely happy with it as it’s quite orangepeely - think I sprayed at too high a pressure, but it’s all a learning experience, eh…? There’s all some quite shite masking round the tail end of the canopy.
Do you seal the pastel in under a top clear coat?
Keighley Model Show this Sunday.
https://ipmsuk.org/calendar/keighley-plastic-model-club-edition-ii-2019/
Last year was pretty good and there were bargains to be had.
...and another one... Airfix Typhoon 1b 1/72
[url= https://live.staticflickr.com/65535/48918101863_51942818df_b.jp g" target="_blank">https://live.staticflickr.com/65535/48918101863_51942818df_b.jp g"/> [/img][/url]
[url= https://live.staticflickr.com/65535/48918110803_3ce22fa280_b.jp g" target="_blank">https://live.staticflickr.com/65535/48918110803_3ce22fa280_b.jp g"/> [/img][/url]
[url= https://live.staticflickr.com/65535/48918837702_b226590537_b.jp g" target="_blank">https://live.staticflickr.com/65535/48918837702_b226590537_b.jp g"/> [/img][/url]
[url= https://live.staticflickr.com/65535/48918635211_b2673aec04_b.jp g" target="_blank">https://live.staticflickr.com/65535/48918635211_b2673aec04_b.jp g"/> [/img][/url]
[url= https://live.staticflickr.com/65535/48918631466_11b2952610_b.jp g" target="_blank">https://live.staticflickr.com/65535/48918631466_11b2952610_b.jp g"/> [/img][/url]
[url= https://live.staticflickr.com/65535/48918834262_71770ded46_b.jp g" target="_blank">https://live.staticflickr.com/65535/48918834262_71770ded46_b.jp g"/> [/img][/url]
Invasion stripes, wing yellow leading edges and the mint band round the tail are all airbrushed, which I'm pretty chuffed with. Ballsed up the main canopy though - tried dipping it in Future, and it dried with a big sag in it and I struggled to clean it off. Sprayed it with Alclad gloss varnish and its not too bad now, but I might well get a vacform one at some point and redo it.
Some fabulous work here...well done. I have finally finished my 1/32 Heinkel 219 (Revell not ZM!) so will try to get some pics - it’s only taken 4 years!!!
That Typhoon is very nice. I've got a couple of them and a Tempest in the stash. Was going to ask about whether you had painted the stripes (bit you mentioned it) as I did one a few years back and the decals weren't great.
My Airfix Beaufighter. It’s a really nice kit, good fit and no filler needed anywhere.
Mt Dad worked on Beau's during the war. ( & Libs)
Nice build Rockhopper.
Heinkel 219. This thing is big - no idea where I’m going to put it!
[url= https://i.postimg.cc/Jz4NbPxt/0-A703003-E9-BC-4925-B684-D14-CE7-E568-A0.jp g" target="_blank">https://i.postimg.cc/Jz4NbPxt/0-A703003-E9-BC-4925-B684-D14-CE7-E568-A0.jp g"/> [/img][/url]
[url= https://i.postimg.cc/xCbyX8RR/29392-D64-3280-44-FC-9-FF8-5-A5-F68-AAE964.jp g" target="_blank">https://i.postimg.cc/xCbyX8RR/29392-D64-3280-44-FC-9-FF8-5-A5-F68-AAE964.jp g"/> [/img][/url]
[url= https://i.postimg.cc/GtwPGRg1/352-D205-A-529-C-4-E3-E-9549-6509-CE646-E37.jp g" target="_blank">https://i.postimg.cc/GtwPGRg1/352-D205-A-529-C-4-E3-E-9549-6509-CE646-E37.jp g"/> [/img][/url]
[url= https://i.postimg.cc/1zdrRwpX/401-CAF5-D-93-EF-4649-ACCD-CEF70-DBF8576.jp g" target="_blank">https://i.postimg.cc/1zdrRwpX/401-CAF5-D-93-EF-4649-ACCD-CEF70-DBF8576.jp g"/> [/img][/url]
[url= https://i.postimg.cc/y8VPLV11/5624872-B-1-B7-F-4749-8-CB9-8648889-D5-FDD.jp g" target="_blank">https://i.postimg.cc/y8VPLV11/5624872-B-1-B7-F-4749-8-CB9-8648889-D5-FDD.jp g"/> [/img][/url]
[url= https://i.postimg.cc/VkDFT3vj/80384949-9-BE9-4-F7-C-BD4-D-E14-FF4-FB6-BC9.jp g" target="_blank">https://i.postimg.cc/VkDFT3vj/80384949-9-BE9-4-F7-C-BD4-D-E14-FF4-FB6-BC9.jp g"/> [/img][/url]
I like that a lot. What scale is it?
The stress of the aerials on the front would put me right off attempting it.
It’s 1/32 - Revell. Very good VFM at £50 for such a big kit. If you read some of the more detailed reviews it has some accuracy problems but didn’t bother me. I also have one of their 1/32 Ju88’s in the stash.
Tamiya do a 1/48 version of the Heinkel which is a lot more manageable.!
Was about to compliment JonEdwards on the 1/48 Hasegawa Typhoon.
But that's 1/72...Awesome effort!
Loving the Typhoon and the Beaufighter, two of my favourite aircraft, and that Heinkel 219 is awesome! Fabulous kit, and an amazing looking plane.
I was shopping at the weekend for birthday presents; my Wife's birthday today and my daughter's next week.
I saw some of the Airfix Starter kit models reduced from £13.50 to £6 and some of them came with a decent selection of paints.
I ended up buying the Boulton Paul Defiant 1:72 model.
I haven't done a model for probably 30 years & I couldn't believe how small some of the parts are once I got it out of the box.
I think i will need some kind of magnifier & some tweezers!
While I have no doubt in my mind that this will be an amateur job (and probably take me all winter) does anyone have any beginner tips of things to do, or not to do?
From the vague depths of my mind, things I remember struggling with were:
- getting glue on the parts, which would then result in the paint not going on properly, or causing fingerprints on the surface of the model
- glue on the canopy making it go milky - I've seen a tip to use PVA glue on the canopy.
- painting things carefully - I know that there are all the 'realistic' features like weathering, exhaust marks etc. but I'm just talking about the boundary between colours being straight etc. Is it just a matter of being careful, or should I use masking tape etc?
- Getting the panel lines added - I don't want these to look too obvious, but think they do add a great degree of realism. How are they generally achieved.
- Decals - I always used to end up tearing larger decals or they'd get folded on themselves. Any tips?
...getting glue on the parts, which would then result in the paint not going on properly, or causing fingerprints on the surface of the model
Tamiya extra-thin cement is brilliant. It is extremely effective and can be used to glue clear parts too. A little goes a very long way.
– glue on the canopy making it go milky – I’ve seen a tip to use PVA glue on the canopy.
This works to a degree, however PVA glue will weaken over time.
– painting things carefully – I know that there are all the ‘realistic’ features like weathering, exhaust marks etc. but I’m just talking about the boundary between colours being straight etc. Is it just a matter of being careful, or should I use masking tape etc?
You can buy pre-die cut masks to help with camouflage, or you can use sausages of blu-tac arranged in a pattern. The best way forwards is to use very thin coats of paint if you're using a brush. Personally, I prefer using acrylic paint as it's not as messy and can be cleaned up with soapy water. If you're going to use tape then try Tamiya masking tape. It's tacky as opposed to sticky and won't lift paint when you remove it.
Painting canopy frames can be difficult at first. I mask canopies with Tamiya tape and use a brand new scalpel blade to gently cut out the excess tape so that frame parts can be painted. Again, there are pre-cut canopy masks which can be used if you're not feeling confident, but these can be fiddly to apply.
– Getting the panel lines added – I don’t want these to look too obvious, but think they do add a great degree of realism. How are they generally achieved.
When you've finished painting your model, you need to add a gloss coat. I use Pledge floor polish, it'll add a protective coat to seal in the matt paint underneath.
If you want to add panel lines, you'll need a couple of tins of enamel paint (dark brown and black) and some enamel thinner. Pour a small amount of thinner into a container and add a couple of drops of the enamel paint so that you end up with a very thin oil based tint.
You then need to use a small brush to add the tinned enamel over the panel lines on top of the glossed surface, the pigment will pool in the lines & rivet holes. Simply wipe off any excess with a cotton bud or kitchen towel and leave to dry.
– Decals – I always used to end up tearing larger decals or they’d get folded on themselves. Any tips?
First of all, you need to make sure that you're not trying to stick decals to a matt surface. You need to add the gloss coat first for the decals to bond without lots of air bubbles underneath.
Large decals are difficult to apply, so it makes sense to cut them into smaller pieces. If the water you're using to soak the decals in is slightly soapy then this will help you manoeuvre the decals on a glossy surface with a cotton bud or small paint brush.
Oh and finally, you need to add another gloss coat of Pledge on top of the decals, allow to dry and finish off with a satin or matt acrylic varnish. Et voila!
Cool! Some great tips there, thanks.
I did wonder how much extra stuff I'd end up buying to actually make the model. I've not looked at the supplied brushes yet - hopefully they won't be complete rubbish!
:o)
You're welcome!
Granted, it's not always a cheap hobby. TBH, I never use Airfix/Humbrol acrylics as they're of very patchy quality so I end up with Tamiya instead - I realise that my post reads like I'm a Tamiya fanboi!
To start off with, you'll need a selection of decent brushes, a few pots of Tamiya paint (available from Hobby Craft), a little bit of research about mixing paint can be found online, Tamiya tape, a large container of Pledge, matt varnish, decent tweezers, a scalpel and replacement blades, Extra Thin Cement, sprue cutters, a selection of emery boards, Perfect Plastic Putty (again, water based so can be thinned easily), a free-standing magnifying glass, a couple of tins of enamel for panel line washing together with some enamel thinner, cotton buds and kitchen towel.
All of the above.
The stuff supplied with the kit isn’t the best, but for £6 you can’t grumble. The paint will be horrible an the cement like, errr, cement!
If it was me I’d just build it, and if the bug bites I’d get another one and buy better paints, cement, tape and so on. The first one can become your “test pig” when you get your first airbrush 😉
For a tip that is free, I’d wash everything in warm soapy water before you start as any grease or residual release agent from the moulding process will compromise paint adhesion.
The good thing about this hobby (apart from the solitude and satisfaction) is that once you have all of the kit, which on the MTB scale is really very cheap, you don’t have to buy it again. I spent £40 on Tamiya paints 2 years ago and still haven’t run out. Decent cement will do 10+ kits, paint thinner too. Paint brushes from eBay in packs of 10 work out at about 20p each etc…
Oh and don't forget Tamiya thinner and a couple of small pipettes too. It's not just a thinning agent for airbrushing, you should use it to thin down paint prior to application.
It seems expensive at £7 for a small container, but it lasts bloody ages.
Pipettes off ebay. I got a bag of 100 for a couple of quid.
Harry_the_Spider
If it was me I’d just build it, and if the bug bites I’d get another one and buy better paints, cement, tape and so on.
I did think that this might be the way forward. I'll try to apply some of the tips along the way & dig around the house to see what stuff we might already have that I can use.
I spent £40 on Tamiya paints 2 years ago and still haven’t run out.
My memory of this was buying a load of paints for a model, using them & then the next time I needed to use them, they were dried up & I could barely even get the lids off. Is that because they were probably enamel paints (at a guess) and the Tamiya ones are water-based?
I think I probably should take this as a learning exercise, keep things simple & see where it ends up....
😉
Tamiya are screw topped acrylics thinned with alcohol. As long as you keep the thread on the pot clean you are OK.
Top Tip: If you can't open your Tamiya paint, simply tap the base of the pot against a hard, flat (preferably wooden) surface. This is enough to break the seal if the thread binds.
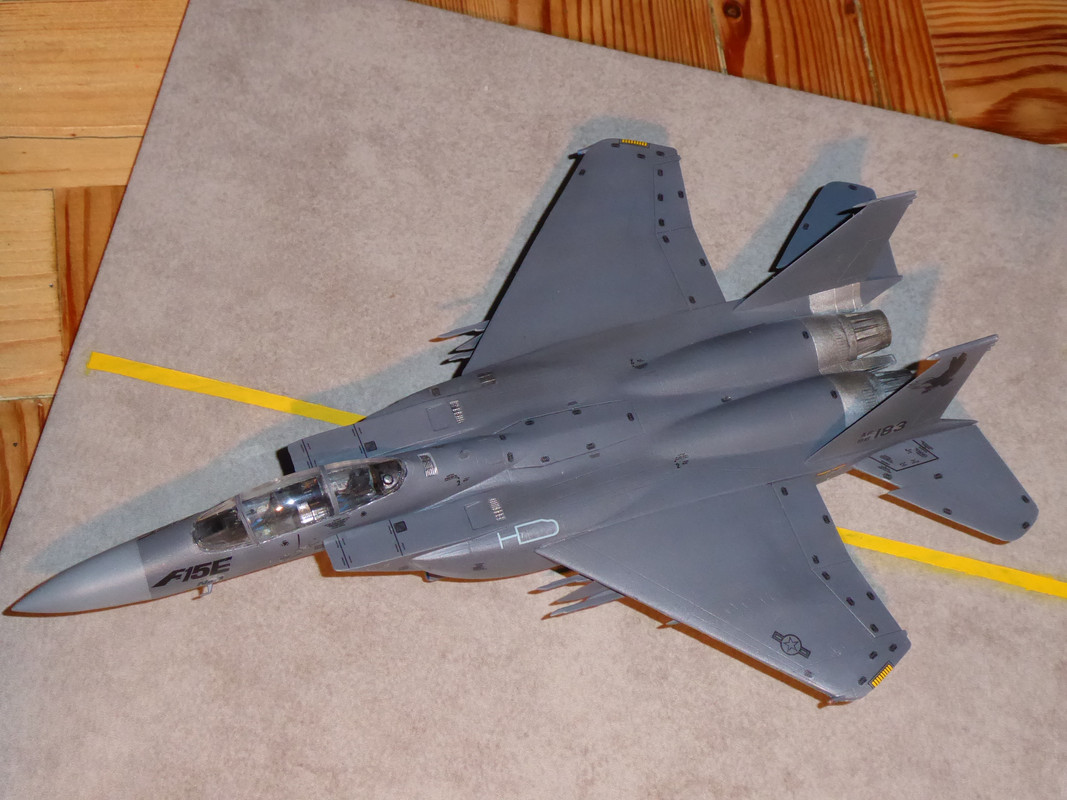
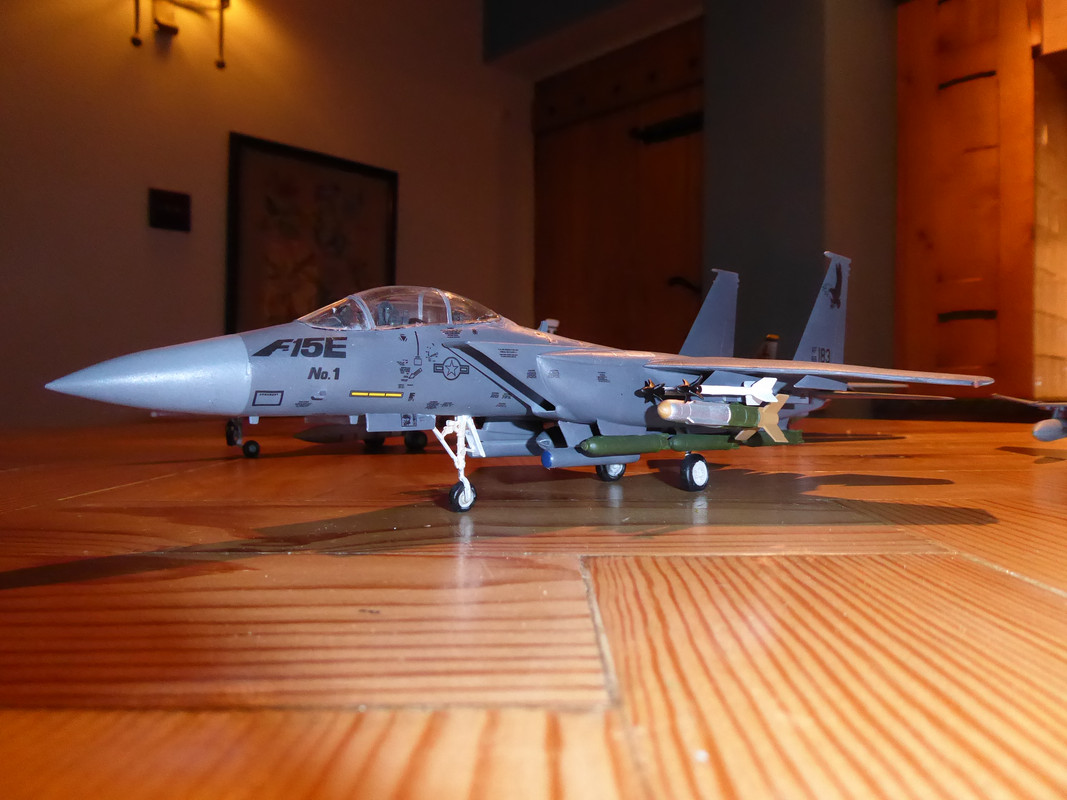
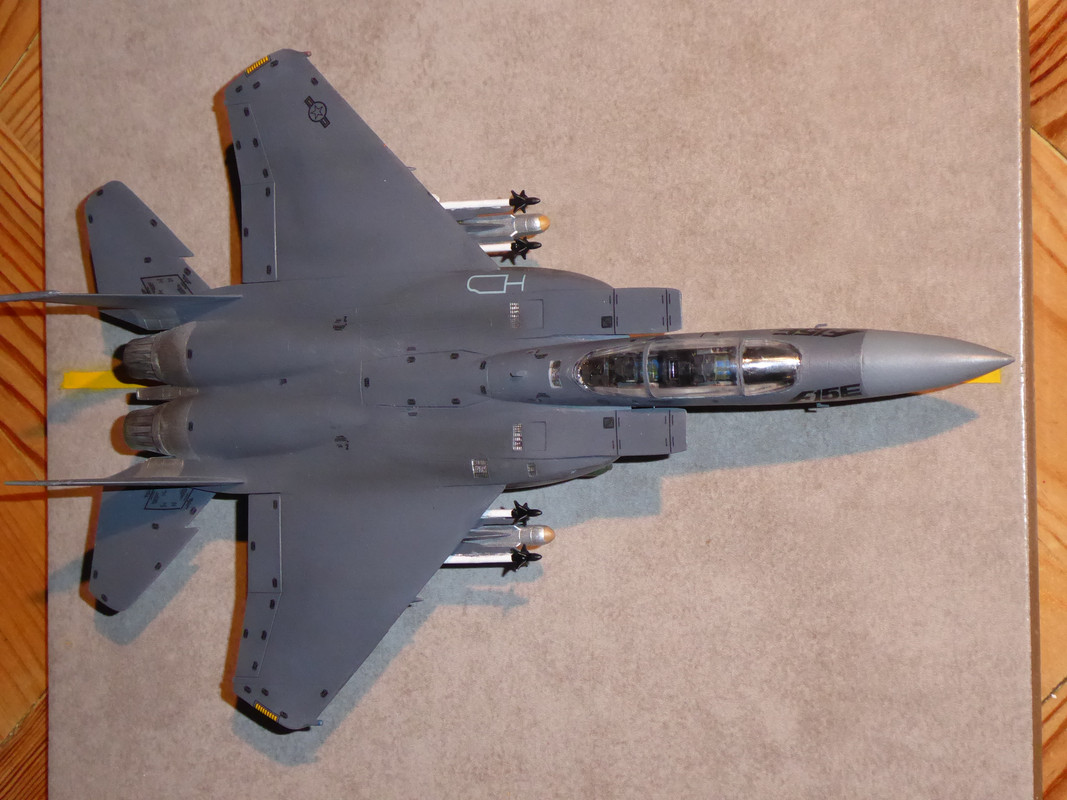
Got to spend the day in my Happy Place.
Tried Alclad varnishes for the first time. Quite pleased.

Strike Eagle?
Yep. Italeri 1:72.
Fit is a bit suspect in places, but the decals more than make up for it.
That’s Italeri for you. They end up being a decent model but can be a pig while you’re working on them
I’ve done one of their 1:24 trucks - big beast - and am working on their 1:24 Renault 5 Alpine. Waiting on some aftermarket decal stripes so I can (kind of) replicate my first ever car, which was a 1982 R5 TL. I’m going to seal the bonnet in the down position, the engine bay isn’t the best
That’s Italeri for you.
Cheap though! 😀 The F15 was about a tenner.
I've got a bit of a soft spot for them and I've probably built more Italeri than anything else. Sure, they drive you nuts at times, but that is part of the charm.
Interestingly* they are releasing a re-box of the Fuji British flavoured Phantom, which apparently is better than the new Airfix one... and slightly cheaper.
*Not really.
Treated myself to one of these half price.for.my Birthday. Joins 14 other unbuilt kits. Also lusting after the Brat RC reboot.

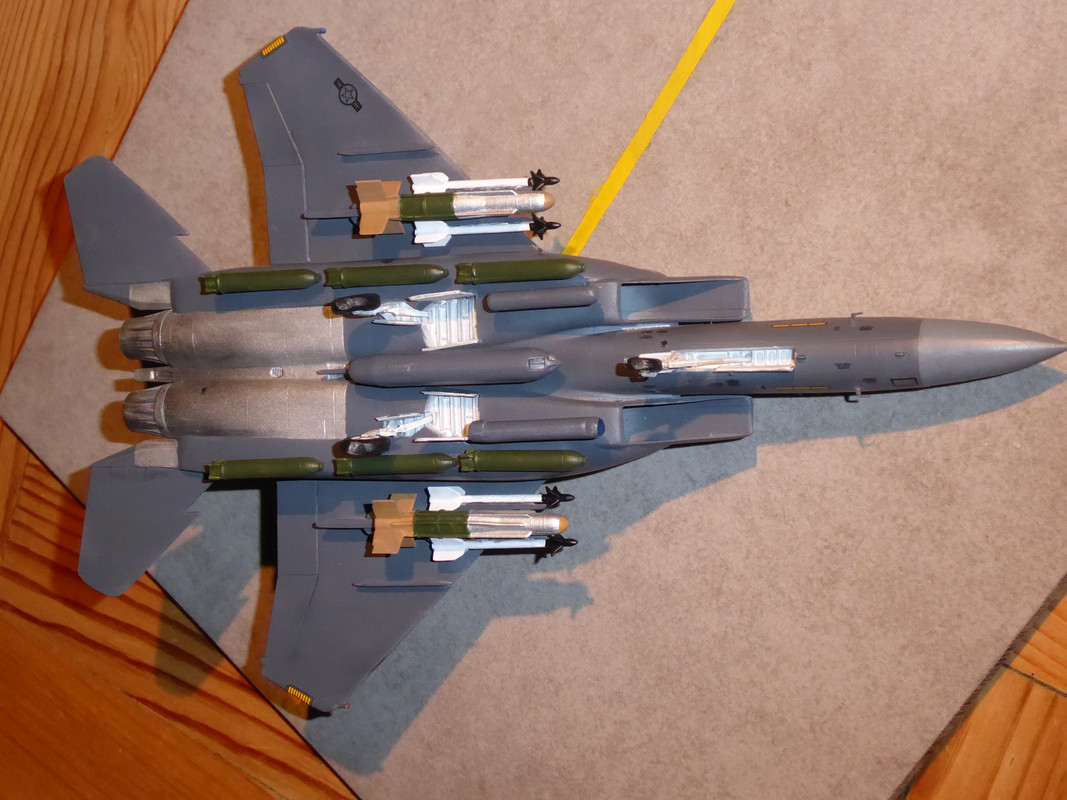
Nearly done.
Just the weapons to add.
Fine looking piece of work!
Did anyone else make it to Scale Model World in Telford today? Amongst other goodies WnW had their 1/32 Lancaster on display; that’s definitely going on my Christmas if I can ever dedicate an entire room to making it!
Cheers Rio. Nearly ruined the whole damn thing!
https://www.britmodeller.com/forums/index.php?/topic/235057858-italeri-f15e-strike-eagle/
Did they have the new Airfix Vulcan at Telford?
Damn - I believe they did have the Vulcan - people were talking about it - but when I first went past I couldn’t get near the Airfix stand because of the crowds (if I ever go again it won’t be mid-day Sat) so I meant to go back later but now you’ve reminded me that I forgot!
I did succeed in my primary goal of getting some 1/32 RFC control wire turnbuckles (niche or what!) - it’s amazing what you can get there if you know what you’re looking for.
Busy eh?
Not been to Telford, but Bolton in January gets rammed too.
Finished.
With the rest of the "Fast Jets".

Nice collection, according to my ex-RAF work colleagues the reason God made the world round was so that the Jaguar could take off.......😁
Nice work! Also makes you realise how compact the Jaguar was...
Also makes you realise how compact the Jaguar was…
And how big the others are. The Phantom is a big old lump and it is the third smallest.
Building a couple of SU34s next.
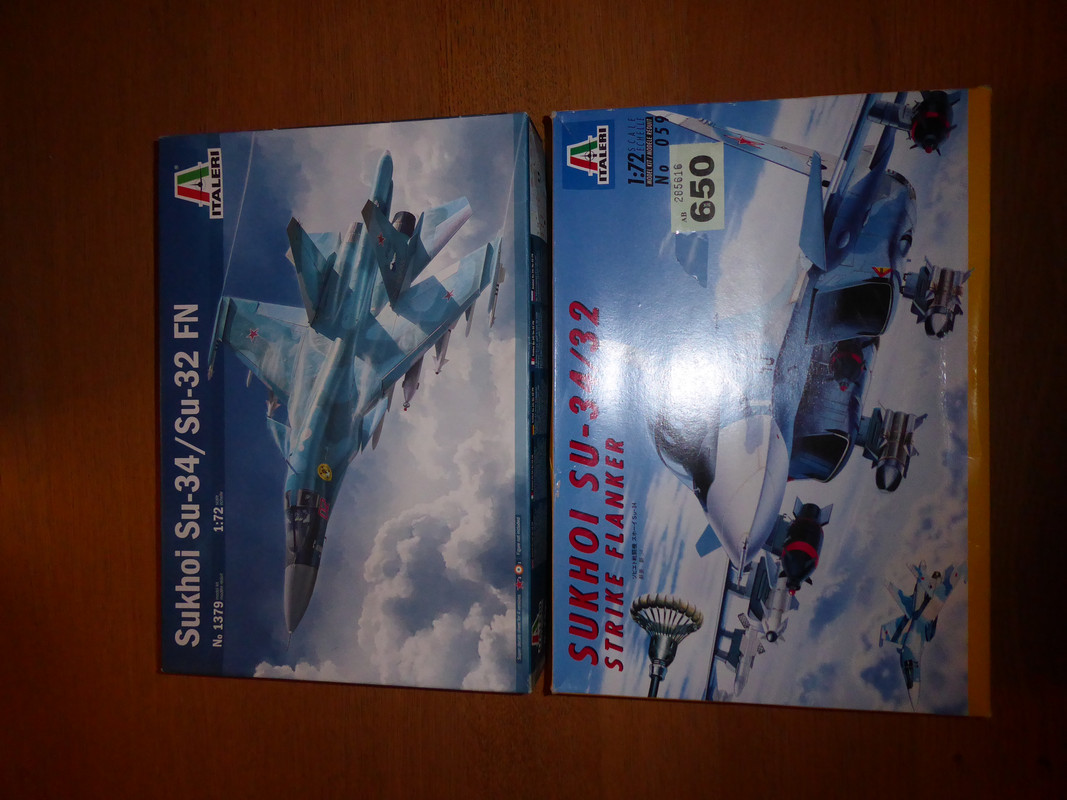
One will be in blue camouflage and the other will be a "Black Duck".
PSA - Aldi was awash with £5 Airfix today. Spitfires, Warhawks, ME109s, FW190s, Gnats and the Golden Hind (5 out of 6 'aint bad)
Well, it's that time of year again, my uncle works In a charity shop and knowing I do the occasional kit bought home this:
https://flic.kr/p/2hL9ZBj
Partly built Airfix 1:12th Bentley "Blower", quick rummage through the box suggests it's mainly there. Don't know if I dare try and finish it, never built a car before.
The first kit I ever built with my dad back in the early 1970’s was the Supermarine Walrus. It’s still available in 1/72 form but in a new box.
I think I did a rather better job on it the time than I did back then!
And for completeness I bought the kit in its original box as well. I won’t build this one though.
Nice. There's something about the old boxes, especially a mint one like that.
Thread about old kits:-
https://www.britmodeller.com/forums/index.php?/topic/235062397-airfix-nostalgia-builds/
@rockhopper - very neat build. Also your book collection looks not dissimilar to mine 😂
nostrils, you lucky bleeder!
Just build it and do your best.
Nice work Harry.
according to my ex-RAF work colleagues the reason God made the world round was so that the Jaguar could take off…….
Naa, that was the Shackleton, once described at an airshow i went to as '20,000 rivets flying in close formation' & 'The Shack does something unusual, it gets off the ground & the Earth goes round underneath'
Just had a week off work (hooray!), but also had a chest infection so no bike action (boo!), so had a bit of kit time while I've been sitting about (hooray!).
Finished assembling the Bronco Stug 3 after painting the interior, it's a nice kit with some photo etch and a metal barrel included. The tracks were a sod to make as they are 93 links each, with 2 x 0.5mm track pins per link, and are quite fragile. They fully articulate though so they should look good when I get them on.
I used Mr Surfacer primer for the first time and loved it, going to stick with that from now on and may move on to their paint as it sprays so well. After priming I used Lifecolor German Grey acrylic for the base coat which went on nice and smooth as well, I think I may move on from Vallejo paints even though I've been happy with them so far.
[url= https://i.postimg.cc/0NYs9Z6N/WIN-20191117-16-04-05-Pro.jp g" target="_blank">https://i.postimg.cc/0NYs9Z6N/WIN-20191117-16-04-05-Pro.jp g"/> [/img][/url]
[url= https://i.postimg.cc/kG43FmTV/WIN-20191117-17-06-43-Pro.jp g" target="_blank">https://i.postimg.cc/kG43FmTV/WIN-20191117-17-06-43-Pro.jp g"/> [/img][/url]
[url= https://i.postimg.cc/pTPtr88J/WIN-20191117-20-45-14-Pro.jp g" target="_blank">https://i.postimg.cc/pTPtr88J/WIN-20191117-20-45-14-Pro.jp g"/> [/img][/url]
[url= https://i.postimg.cc/W3Sck3wL/WIN-20191117-20-45-56-Pro.jp g" target="_blank">https://i.postimg.cc/W3Sck3wL/WIN-20191117-20-45-56-Pro.jp g"/> [/img][/url]
[url= https://postimages.org/ ]hosting images[/url]
Is that airbrushed or out of a can?
I use acrylic car primer, but would switch to something else if it gave an advantage.
Is that airbrushed or out of a can?
Airbrushed. I used Mr Surfacer 1000 with their Leveling thinner, goes on really smooth and dries very quick!
@spurnz is it a tough primer coat? I stopped using Vallejo because it never seemed to cure properly
is it a tough primer coat?
Seems to be so far. I was most impressed by how it didn't cover up any small details even when I applied too much and it pooled on some of the wheel hubs, I just left it to dry and it seemed to shrink on! #airbrushbuffoonery
Looking great so far - Eastern Front? Stug is always very evocative of the war in the East I think esp with the swastika flag draped over it for aircraft recognition.
Eastern Front?
That's the plan. Nice and hot summer dusty, no mud!
I'm tackling something new - luftwaffe camouflage on a Tamiya FW-190D. It looks really bloody hard to get right, what with the splotches around the tail and around the fuselage.
I've two choices - either use very well thinned paint at very low pressure in my airbrush, with the risk that it'll go pears quickly, or I could try making splotch shaped doughnuts out of blu-tack and making a mask of sorts. The worry here is that the demarcation between the RLM-75 and RLM 81/82 will be too sharp and look crap.
Any tips?
I "splotched" it with an airbrush.
https://www.britmodeller.com/forums/index.php?/topic/235048698-revell-frog-focke-wulf-ta-152h/
I’m tackling something new – luftwaffe camouflage on a Tamiya FW-190D. It looks really bloody hard to get right, what with the splotches around the tail and around the fuselage
What scale?
I did my 1/72 one (see page 18 I think of this thread) using a cotton bud. Looks OK. I think it'd be a bit too splattery with my airbrush skills. Or make a paper mask with rough edges and sit it a mm or 2 off the plastic on blutack and spray?
Looking forward to seeing some pictures of the Su-34s, I have a soft spot for their weird proportions and huge payloads. 🙂
I'm doing one as when it debuted at the Paris Air Show with blue camouflage and no weapons. The other will be an operational "Black Duck" and will look as mean as Hell.
Thanks all - it's 1/48.
I've a pot of Tamiya XF-61 which is as close to RLM-83 that I can get, the plan is to mask the demarcation with blue tac, paint and then do the same for the RLM-75. The idea of paper masks is a winner, given that there's a 1:1 scale painting guide in the box (minus mottling obviously). This evening's plan involves scanning, copying, drawing in the areas to be cut out with a scalpel and masking the model accordingly.
My shelf of doom is littered with awful attempts at Luftwaffe camouflage. At last count there's two Hobby Boss Me262s and three Bf109s.
Well, I haven't made a start on the Paul Bolton Defiant that I bought last month, but I have bought a helping hand magnifier thing, some detail brushes & a mixing palette, which have turned up today.
I have also bought some emery boards for removing sprue burrs and I meant to buy some tweezers but forgot. I might have some ferreted away in the garage if I have a dig.
Not likely to get the chance to make a start this weekend, as I've got my Sister & nephews visiting but perhaps next weekend...
I fancied a change from airplanes so I had a go at the Airfix early war Tiger 1. I thought something was wrong as I started building it - turns out it’s a reboxing of an ancient Academy kit and it shows, especially with regards to the instructions which are dire for such a complicated kit and resulted in some fit issues which don't show up till right at the end when it’s too late to correct!
Re the cammo pattern, tanks were delivered to theatre in overall yellow and the crews applied their own camouflage using standard brown and dark green colours They’d often spray over tools and towing cables as well.
Looks good though. The whole "reboxing" thing confuses me. How/why do they do it?
I got the new Airfix Mitchell for my birthday and there is the Italeri rebox of the Fujimi RAF Phantom on the way.
Cheaper & easier to buy existing moulds than to create from new , especially if it fills a hole in your product range.
From Hobbycraft 50% Revell sale I bought the PT boat, 1/32 P51-D, 1/144 Boeing 777 (or is it 787?)
Joining a Hasegawa 1/48 A7D/E, a Miniart 1/35 T55 complete with interior (I’m terrified of that, there are over 1000 parts!), an Italeri 1/24 Alfa Giulietta Spider, Revell tiny scale Boeing 747, and others still in the stash
On the workbench an Italeri Renault 5 - just waiting for its door mirrors; a Revell 1/144 F14D and a Revell Type VIIC u-boat
Update
[url= https://i.postimg.cc/Kv2vPp2L/WIN-20191221-20-37-06-Pro.jp g" target="_blank">https://i.postimg.cc/Kv2vPp2L/WIN-20191221-20-37-06-Pro.jp g"/> [/img][/url]
[url= https://i.postimg.cc/5NS9n54r/WIN-20191221-20-37-23-Pro.jp g" target="_blank">https://i.postimg.cc/5NS9n54r/WIN-20191221-20-37-23-Pro.jp g"/> [/img][/url]
[url= https://i.postimg.cc/6p6WS7Tp/WIN-20191221-20-38-10-Pro.jp g" target="_blank">https://i.postimg.cc/6p6WS7Tp/WIN-20191221-20-38-10-Pro.jp g"/> [/img][/url]
After some dark washes over the lightened base colour I applied several light grey washes of varying shades, RAF Dark Sea Grey seemed to work really well to lighten it even further. This was then followed up by more darkening of shadowed areas with washes of Lifecolor 207 Dunkelgrau, then even more washes of the lighter greys to the centre of panels and anywhere that would get faded first. I then applied some of the Lifecolor Dunkelgrau with some sponge as if I were applying chipping to show the original colour through the fading.
Where I am now is that I've just used some Phthalo blue oil paint dots to filter the panels and add back in the blue tone of the Dunkelgrau, followed by some selective filtering with black and a very small amount of burnt umber oil dots. I found this blue to be a very strong colour and used it very sparingly.
I'm finding it difficult to take pics of the Stug that show the true colour of it, every pic I take is different from the last one. Next up will be some pastels to dust it up a bit.
Cheers
Dave (spursn17)
Now this might just tempt me to reinstate the modelling bench
[url= https://i.postimg.cc/GpLsn9nS/e-Wvuc6-Uc-Pyk-Xasd-Ks7d-GGI-AAAAAAACxkw-V9r-CK-qp-Na-M0-a-Xm-VDKyp-HNLgl.jp g" target="_blank">https://i.postimg.cc/GpLsn9nS/e-Wvuc6-Uc-Pyk-Xasd-Ks7d-GGI-AAAAAAACxkw-V9r-CK-qp-Na-M0-a-Xm-VDKyp-HNLgl.jp g"/> [/img][/url]
[url= https://i.postimg.cc/k52tfG3r/uploads-news-RBun-KGs-Kr-Uz3i-HLK9-Hb-ENCWOv-Q3l0-RJJgwn146-N1.jp g" target="_blank">https://i.postimg.cc/k52tfG3r/uploads-news-RBun-KGs-Kr-Uz3i-HLK9-Hb-ENCWOv-Q3l0-RJJgwn146-N1.jp g"/> [/img][/url][url= https://postimages.org/ ]post image online[/url]
[url= https://i.postimg.cc/qvRtvq7t/laravel-filemanager-photos-8-MG-6068.jp g" target="_blank">https://i.postimg.cc/qvRtvq7t/laravel-filemanager-photos-8-MG-6068.jp g"/> [/img][/url]
That Alfa is very nice, price is a bit eye watering though!