- This topic has 42 replies, 15 voices, and was last updated 9 years ago by trail_rat.
-
DIY querys: Cladding stairs with oak flooring – how to nose.
-
trail_ratFree MemberPosted 9 years ago
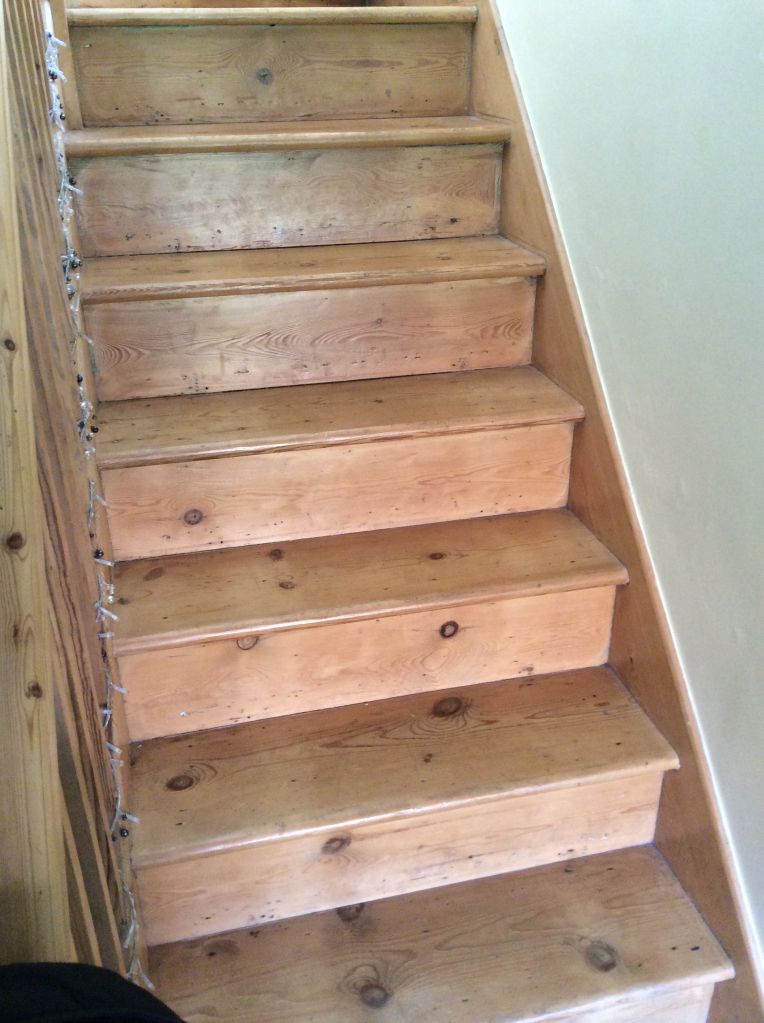
Got a horrible set of stairs which have been stained dark before painting with gloss then they gave up and carpeted.
I hate carpeted stairs , ive stripped back the paint and burnt off the stain before sanding back and they still dont look nice.
So i have bought oak faced ply for the stringers (which will be fun to cut)
and bought TP solid oak flooring as ive used else where in the house (and built a couple of bits of hallway furniture out of so i wanted it to match)
How to finish the nose – obviously i dont have a nose piece like official “stair cladding” packs would.
Can i router a profile on the edge without it exploding on me ? in the past when ive profiled it ive just used a sander to give it a nose – when i built my shelves and coat rack- but those were 1 offs – trying to get a repeatable curved nose on 20 odd stair treads….
also what to finish the nose edge with ? smooth it off with fine grit then oil it , wax it or laquer it ? –
trail_ratFree MemberPosted 9 years agoanswered part of the last question …. they are “brushed” with a laquer top coat…..
brushed with what i dont know….will have to find out – or experiment like did when doing my doors – got plenty of “products” from that.
slackaliceFree MemberPosted 9 years agoYou’ll be fine with the oak veneer ply for the stringers as you’ll be cutting along the grain and if you’re using a skill saw, make sure the face side is down. If you’re cutting across the grain, score first with a Stanley knife.
Not sure about cladding the treads and risers though, it will reduce the size of the tread and increase the rise and what about the top step where it meets the landing? Or are you laying an oak floor there too?
Cladding stairs sounds like a work up to me, lots of areas, such as the top and underside of the stringers that will be really fiddly to get right and look good. How will it match to the balustrades and handrail?
To your original question re the bullnose on the treads, router. Do in long lengths and then cut each tread length off.
Personally, I’d save up for a new set of stairs, or actually, I’d make a new set.
leffeboyFull MemberPosted 9 years agoCan i router a profile on the edge without it exploding on me ?
Why not? It seems like this is exactly the sort of thing a router is for and it will be miles faster and neater than sanding (and you get to buy a router 🙂 )
trail_ratFree MemberPosted 9 years agowe looked into that.
new stairs would involve mostly destruction of three walls and a roof in three different rooms and alot of plaster work.
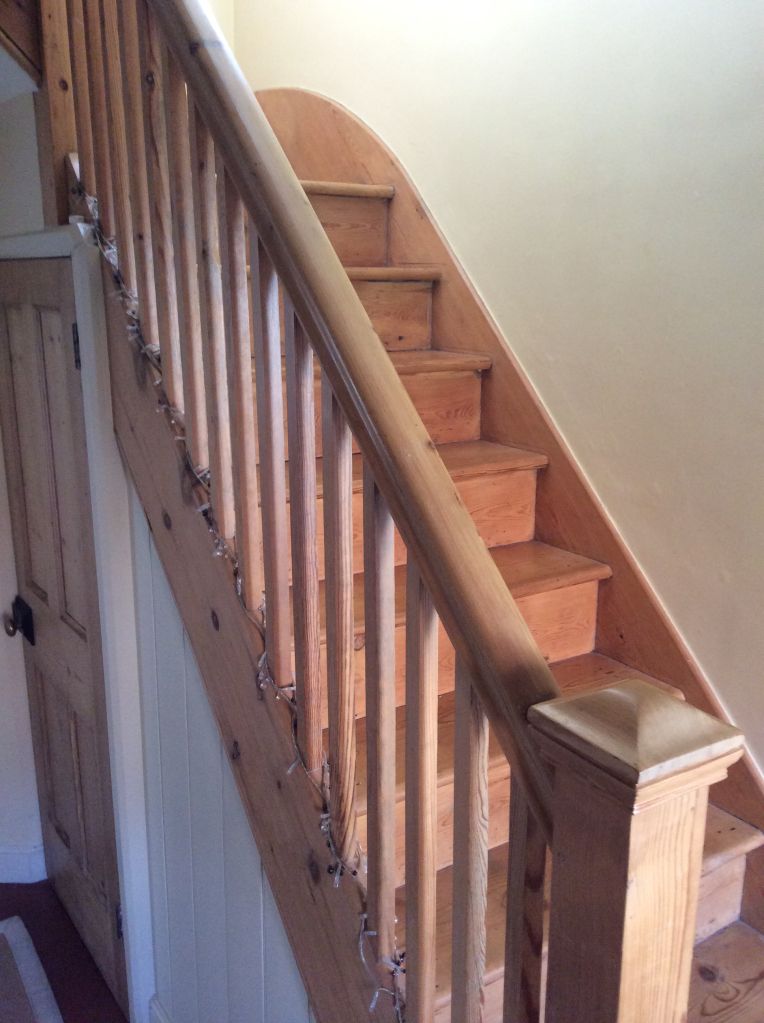
the balustrade and banisters are stained plain redwood – same as my skirtings and door frames(which actually contrasts with the oak but i like it that way.
the upper hallway is getting oak floored also. the downstairs floor is already tiled
The top of the stringers i already sorted – half of it is under the balustrade and the rest will just get a D profile fitted mated to the oakface ply.
I agree it will be alot of work and fiddly but i really hate carpet that much ! (and the flooring was cheap)
Ill see if i can dig out some photomagraphs of what i have to work with,
Leffeboy – ive never done much routering ill be honest i dont know what they are capible of. Ive been googling round and it seems the best bet is to make and glue/brad on a small 1/4 inch deep x 1 inch or so to the nose of the flooring and then router with a 1/2 round bit on both sides.
trail_ratFree MemberPosted 9 years ago
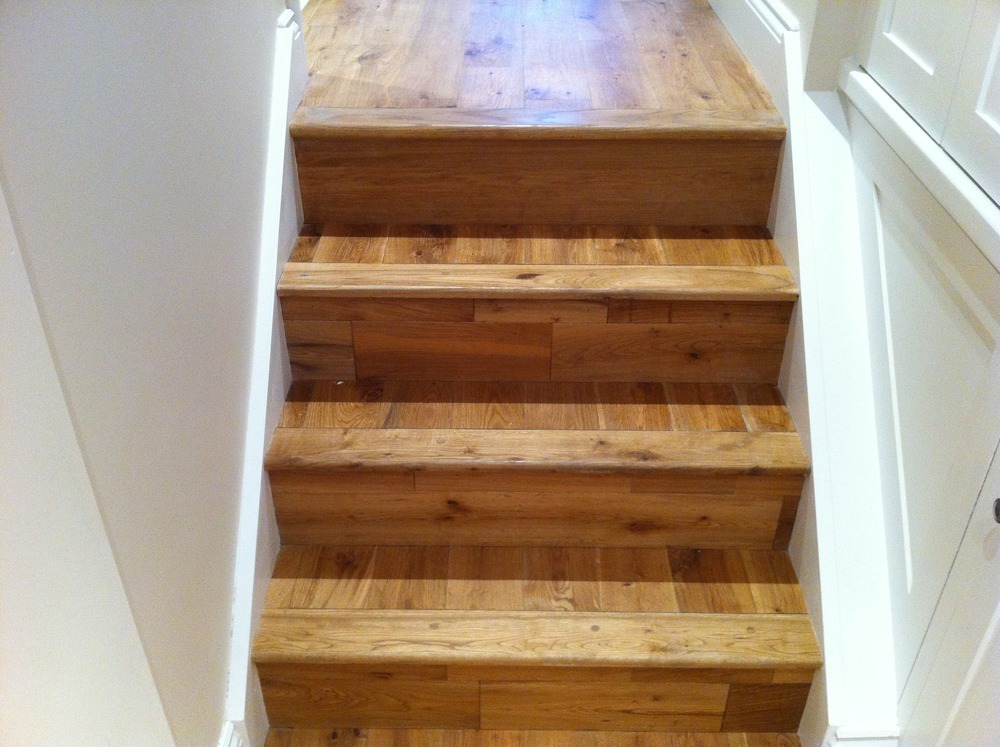
something like that – although obviously that was made as a one piece….
leffeboyFull MemberPosted 9 years agoit seems the best bet is to make and glue/brad on a small 1/4 inch deep x 1 inch or so to the nose of the flooring and then router with a 1/2 round bit on both sides.
Routing is quite easy really but for something that thin I would make a small jig that the 1/4×1 board can sit on flat and that is 1/4 high to make the router sit flat while you are doing the routing. Then glue it on to the nose
BUT
if you glue it on to the edge is it not likely to come off after it is stood on a few times?
edit (after your pic): Yep, that’s what I imagined that you were doing. I’m sure it is technically possibly to glue a piece on to the edge that will stick but I’ve never managed it on something taking that weight :(.
edit2 (after 2nd pic): Now that is much more possible 🙂 . Route the top edge and then add a small piece underneath with the same profile. As above though, make a small jig to sit the strip in for routing and do a whole length at once and then cut as slackalice suggested. You could even glue the piece first and then route afterwards but i would then recommend lying another piece of the same thickness onto the board while you are routing just to keep the base of the router flat as 1in wide isn’t much to sit the router on
trail_ratFree MemberPosted 9 years agomy stairs pre staining of the banister
built into the gable end on the left – the right is the hall at the bottom and the bedroom above and the underside of the stairs is the roof of the spare room.
How the floor and stained redwood looks together.
I understand what your saying slackalice about the risers being deeper and the treads being shorter – but surely the tread will increase in length on top as much as the riser decreases it by if I’m overhanging the riser with it ?
get what your saying too leffeboy – 1 inch isnt alot to sit owt on.
wwaswasFull MemberPosted 9 years agoIf it were me I’d paint them white and put a runner down there.
trail_ratFree MemberPosted 9 years agoused to be like that wwaswas . didnt like it.
im a glutton for punishment , we pulled all the glossed door frames out and redid them earlier in the year before fitting new doors that was some job that.
i hate gloss white paint with a passion.
trail_ratFree MemberPosted 9 years agoaye plan :d
a lady friend of mine in home design said “use off white gloss” – i said you mean gloss that looks like it needs refreshed imediately …. only thing worse than white gloss is – yellowed white gloss
robdobFree MemberPosted 9 years agoI can’t help thinking that the cladding will be a huge faff, cost a lot of money and may end up looking a bit naff unless you can do a proper pro job. If invest the effort into sorting out the stair wood as it is. Why not sand it back to bare wood and varnish/oil it? Pretty easy.
trail_ratFree MemberPosted 9 years ago“Why not sand it back to bare wood and varnish/oil it? Pretty easy.”
I did do this on the bottom 3 stairs . it took a lot of effort with a belt sander and detail sander & looked awful- its just not nice wood underneeth hence why I’ve gone down this route.
Ill post up pictures of the finished result i guess….
wont be for 5 weeks or so at least , 3 weeks in baku and 2 in the alps to go for first , just wondered if anyone had attempted it before.
deadlydarcyFree MemberPosted 9 years agoJust happens, I’m doing this today for a client and have some suggestions for you t_r. I’m on a phone though, so if you can wait till later when I can type something properly, I can give you some ideas. Or drop me a mail to deadlydarcy at gmail dot com and I’ll drop you a line.
bigblackshedFull MemberPosted 9 years agoMy stair case and bannister looked like yours when we moved in. Lots of stripping, sanding, sandblasting, swearing, mess, noise, and loosing the will to live, I ended up with this
Worth it in the end. And probably less work than cladding what you have now.
trail_ratFree MemberPosted 9 years agois where im aiming at – i actually like his white stringers on that – it works well.
Cheers darcy – i secretly hoped you would pop up – seeing as its your day job. I guess slackalice is a carpenter from his work ive seen.
will ping you a line later.
The other issue i have with sanding and blasting is – my stairs have obviously creaked at somepoint as they are full of screws in odd places so would be at it for a while with the filler after sanding.
sharkbaitFree MemberPosted 9 years agoT_R: being mostly enclosed your stairs are going to be pretty noisy if you go with bare wood.
Personally I’d be going with WWW suggestion, carpet or new stairs if I felt that strongly about it. If you don’t like gloss…. me neither but I like satinwood.
Hope all your work pays off, it would be interesting to see the finished product.deadlydarcyFree MemberPosted 9 years agot_r, just a couple of things…you’re pretty kitted up aren’t you? So, you have table saw, router (with half-round bit and biscuit cutter), chop-saw, etc.?
trail_ratFree MemberPosted 9 years agodont have my own router or biscuit cutter but can borrow one. Got a DB flip table saw and a sliding arm mitre.
will need to acquire a fine blade for my table saw though for this though.
deadlydarcyFree MemberPosted 9 years agoA biscuit cutter (for the router) with bearings for 0, 10, 20 biscuits might be a useful purchase. Think you can prob get a trend one (should be 1/2″ for oak) for around £30-40ish. Well worth it. You’ll most likely be routing biscuit “channels” rather than biscuiting at points so a specific biscuit jointer is probably not needed.
trail_ratFree MemberPosted 9 years agoi think i see where your going with this – biscuit a channel in the underside of the tread for the riser “tongue” to slot into ? – i was trying to work out if i could do that with a router.
hooliFull MemberPosted 9 years agoIf you don’t mind laminate then quickstep do a flooring system which has profiles for the steps. I don’t have it in my house but have seen it and it looks very, very good.
dooosukFree MemberPosted 9 years agoYou just haven’t put enough effort in. Just done the same and it’s a long old job:
https://plus.google.com/photos/101805388889461410096/albums/5934547611990636673?banner=pwa
trail_ratFree MemberPosted 9 years agolooks like a lot of effort considering i don’t think the end result suits the rest of my house + ill be left trying to tie into the upstairs hall way due to the floor boards being a martre after years plumbing and heating works – the crow bar was for removing the 4 inch nails used to resecure the boards from previous works.
the laminate system looks good and i had looked at it in the past – how ever although it will take me a bit more work and crafting , the material price was significantly less than laminate system. – and it will match my other floors.
deadlydarcyFree MemberPosted 9 years agoSorry t_r, you’ll have to be patient. I’ll do a detailed post later. 🙂
deadlydarcyFree MemberPosted 9 years agoOne last question: re. the string, are you chopping out what’s there, then fitting treads & risers, replacing string or are you just cladding what’s there, then cladding the existing string?
EDIT: and what size is the oak flooring (width, not length) you bought? I assume it’s t/g and if pre-finished, it’s microbevelled?
trail_ratFree MemberPosted 9 years agoCladding whats there.
6mm oak venered ply with a cap covering the horizontal with probabal overlap from the mouldings section i reckon.
Fitting that first then doing the stairs so the cuts would be hidden by the cladding.
I cant really remove much of the stringer being that they holding the stairs up.
deadlydarcyFree MemberPosted 9 years agoIs your flooring wider than the height of the risers or will the risers (and therefore the treads I suppose) be made from two pieces?
trail_ratFree MemberPosted 9 years agoFlooring not wider than risers 125mm comes to mind for width , im not at home atm
Its 18mm t +g and microbeveled
I was hoping to do the treads front to back with the lip and risers being width ways.
chickenmanFull MemberPosted 9 years agoNo way I would have a slippy surface on a staircase. I should add that when junior was six months old, my wife slipped on the (carpeted!) stair and dropped the wee fellow all the way down the stairs; spent a fairly crap night at the hospital where the duty doctor thought he was brain damaged (he wasn’t, but he did have a broken leg).
deadlydarcyFree MemberPosted 9 years agoHokay, so, dependent on a number of items, chiefly what kit you can have on site, a table saw being what will save you most time on this job.
Personally, I wouldn’t go for the look in your picture above, where the treads are cut from loads of short pieces with a nosing running at right angles. It looks very busy, your joins would have to be cock-on (lots of them) and (again, personally) I feel that this is a weak joint for a staircase. Also, all your short cuts would have to line up as you look up and down the stairs, which will be a bit of a ball-ache. Also, bevelled joins on risers don’t look great (but one across the whole width is acceptable), nor do risers made from two or three different pieces of t/g flooring.
I’m assuming you’ll be making the nosings out of the solid wood flooring you’ve got?
So, should you heed my advice and go for parallel joins for the treads and risers…and start from the bottom up!
I’m going to give you the sequence for making one riser. You can break this up into doing each stage 12 or 13 times (depending on how many treads/risers you have) but you should do the first riser and tread in one whole go. Hopefully all your risers will be roughly the same height. You’ll be making them all around 10mm too high (allowing for the thickness of your new flooring on the tread!!) or if two boards joined together is higher, then join two boards together without running them all through the table saw. Take the micro-bevel off the groove side of your riser…this will be the bottom half of the riser. Take the tongue (and micro-bevel of this board also. Take the tongue (and micro-bevel) of the second half of your riser, again using a table saw. Router a biscuit channel along the two sides that used to be “tongued”…20s preferably, but 10s would be acceptable. Glue (PVA is fine, but PU is better) and join. Use this video to make up parallel clamps from off cuts (they’re flipping awesome) and clamp the riser together.
[video]http://youtu.be/vSwlM7cf6mo[/video]
Once your riser is dry, offer it up to the step and cut it 2 or 3 mm (x) higher than it needs to be.
Next the tread. Hopefully you can machine something like this, using a half-round cutter for the nosing and a straight cutter for the channel underneath. The total width of the nosing should be around 100mm/4″ so that 3/4 of it is sat on the tread and the other 1/4ish os your over hang.
The channel depth should be x + another mm or 2. Your over-hang should be around 20mm, so the front side of your channel should be nice and straight, but the back-side can be free hand if you have to do it in a few passes, as long as it’s as wide or wider than the thickness of the riser.
Make up the back-part of the tread, removing the the micro-bevels as above and joining as above. Run it through the table saw to be 10 mm off the existing riser, and thus the gap is covered with the next riser that pops on top.
Repeat until your hair falls out.
Nah seriously, it sounds a faff, and I realise some of the above is teaching you to suck eggs as I know you’re a practical guy, but just trying to make sure I’ve put everything in.
Once you’ve got all your measurements from doing the first two, I’d just break it down into loads of stages and do each one multiplied by the number of pieces you need. That’ll speed it up. Use of someone’s workshop or router table would really help too if you have access.
Best of luck.
trail_ratFree MemberPosted 9 years agoCheers for that dd i see what your saying
Basically cut off all the microbevels and biscuit joint the remainder so it looks like wood and not wood flooring stuck to the stairs.
That will take more time but i can see the appeal. I will have a play when i get there- it might result in the redoing of my shelving unit drops :/ hum ho
deadlydarcyFree MemberPosted 9 years agoBasically cut off all the microbevels and biscuit joint the remainder so it looks like wood and not wood flooring stuck to the stairs.
Yeah, that’s pretty much it. You’ll know yourself that it’s two pieces of timber, but unless you join two wildly varying shades, or grains, you’ll get away with it. However, as I said, you could make the riser with one microbevelled join across the width, i.e. tongue into groove to save a bit of time but it should be the same for each one. Also, some people prefer the narrow shadow of having a microbevelled groove sat on the tread (again, saving a dozen or so passes through the table saw). But that’ll be down to you. Personally I’m not a fan and prefer a nice sharp edge, but plenty of clients have asked for the bevelled join – I tend not to try and change their mind. 😉
deadlydarcyFree MemberPosted 9 years ago‘likes’ parallel clamps. Adds to list of things to use
They’re great aren’t they? Virtually saved our lives earlier this year when we had to clad around 80 or 90 steps in London. The really nice thing about them is how they spread the pressure over a wide area rather than applying it over an inch or so with classic cramps. They keep the workpiece nice and flat too. Need to adjust width? Unscrew and re-screw back in somewhere else.
beaker2135Full MemberPosted 9 years agoTR why not use ply for the risers as well as the strings? would save a load of work if you only have to manufacture the treads
trail_ratFree MemberPosted 9 years agoManaged to find some time in between my other projects to make a dent in this today.
After seeing a set of three stairs done similar to how id like at my grandparenta i took a few pointers and added my own twist on it.
I couldnt face all the extra efford to do away with the micro bevels and kind of like the way it makes it clear the stairs are clad no real oak staira , its not pretending to be owt.
Added some spacer strips to the riser faces of my minging stairs.
Cut , glued and pinned all my risers
For the treads i used board the whole width of the tread for the front most board – put a 9.5mm half round on both sides using a jig i made from a pair of scaffoding battons and a bit of decking. Nailed it with hidden pins from the portanailer and sticks like shit under the whole tread.
Ignore the weights on it they are to ensure the joints close fully and the sticks like shit is fully adhered.
Stringers are staying white , saw a set done like this and much prefer it to wood covered stringers which was going to be a ballache to do and a bigger ballache to make look good. Bit of mqsking tape and plenty satin wood paint should sort them out, im pleased with the end result and most importantly so is mrs t-r which means i can get back to my landy rebuild which is a whole other thread as the progress on that in the last week has been 10 fold.
Cheers for all your help guys , even if it does look like i ignored some or alot of it , it was all taken on board and judgements made on the merits of all but im happy with what i got, im no carpenter , id probably have taken my fingers off trying to route new grooves and tongues 🙂
trail_ratFree MemberPosted 9 years agoweights all off , nothings moved and everyone thats seen it has gone wow – its also not slippy in the slightest – but then i expected that having already used the same flooring else where.
thats close enough to good for me.
Im sure if i’d paid darcy to do it his way it would have looked nicer but i dont have the patience to pay the bills on that one.
molgripsFree MemberPosted 9 years agoI wish we’d have known this was possible before speccing carpet in our hosue. I could of course still do it but it’d end up different to the rooms, which would look crap.


The topic ‘DIY querys: Cladding stairs with oak flooring – how to nose.’ is closed to new replies.