I figured I’d add a few details about recently buying a new bike, the considerations, difficulties, etc. See if it could help anyone else there considering something similar - this is a litte long...
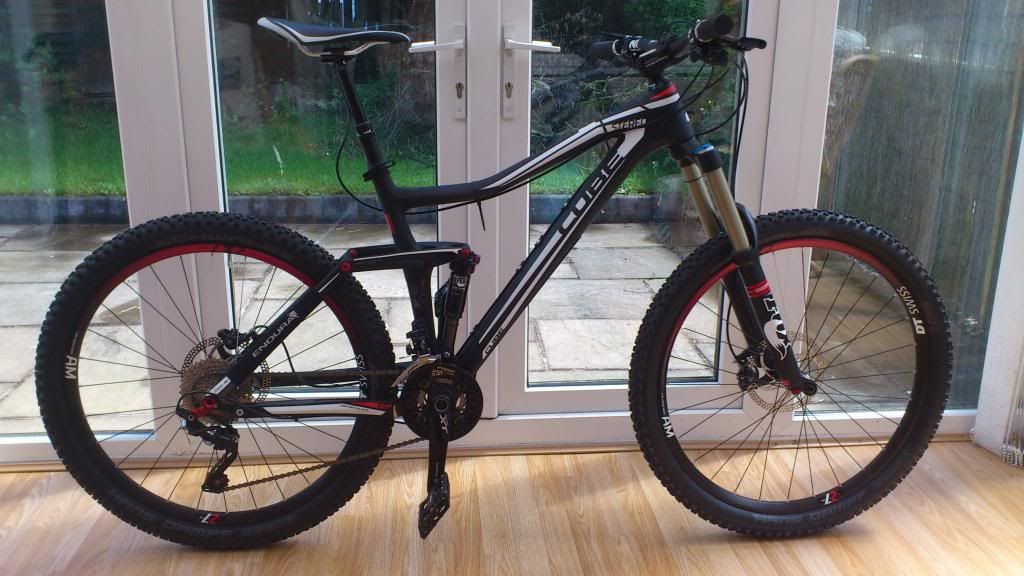
So I was riding a 2008 Spicy 316 that I bought second hand off a friend of a friend. It had a Rockshox Lyrik on the front, Vivid Coil on the rear, SRAM XO redwin shifters and rear derailleur, Avid Elixir (CRs I think) brakes, Truvativ stem, carbon handle bars, Stylo crank set, Joplin 4 dropper seat post. It was properly kitted out, but maybe 2 – 3 years out of date even though the gear was pretty high spec when brand new and mostly still worked well with a little TLC now and again (the SRAM shifters and derailleur and the brakes were epic). Hope Pro 2 Evo hubs, Mavic 521 rear, Mavic 721 front. Maxxis Minion 2.5 dual ply downhill tyres. It weighed in at about 36 pounds.
It was my first proper full sus and made for what I wanted to do, mainly cross country / downhill riding. Basically, if there was a choice between red and black I’d be hitting black every time. I took this bike to Fort William, it destroyed the red downhill course (in a very satisfying way might I add!) but definitely reached its limit on the world cup downhill. Took it to Verbier last year with Bike Verbier (which were excellent and I’d thoroughly recommend to everyone out there interested in riding in the alps) and it was again an epic ride but could have done with a few tweaks to the suspension. Then I rode a couple of enduro events at Innerleithen with the Alpine racing series. This is what promoted me to think about getting a new bike, mainly the massive effort I was putting in to pedalling it and not getting the pay off – I began to realise how inefficient it was to ride really. Cracked some ribs falling off it on the Antur Stiniog double black and I also went to Coed-y-Brenin and completed The Beast there and I couldn’t believe the effort I was putting in compared to some of my mates on certain sections.
So I started looking for a new All Mountain / Enduro machine and this is what I found.
I did shed loads of internet research, most of which was contradictory in some shape or form or was unhelpful. Some of which was great though. I had a budget of no more than £3K in mind that would have to go on finance so ordering something like a YT Industries Wicked or something similar was a no go as I was led to believe that it would require whole payment as there was no middle man who I could get finance through. I also wanted to sit and pedal on the thing.
I saw a demo day organised by Wheelbase up in Kendal but by the time I’d realised it was running the Intense Tracer 275 that I was interested in was fully booked out. Through the wisdom of youtube and other online sources, I decided on wanting to try a Norco Range Killer B2 and a Trek Slash 7. So headed off to the local Evans and had a look, except there were none to look at as you had to order them all in (a common theme with Evans with this level of bike it seemed).
So headed up to Stif Cycles near Harrogate and spoke to the guy there for about an hour and a half who was really helpful (even made me a cup of tea), had a pedal around on a Slash 7 (large, too big), a properly kitted out Orange Alpine 160 (18in, top tube seemed too long for me) and after a few more discussions the shop guy’s Santa Cruz carbon Nomad (which he’d just beaten me on the previous weekend at one of the Innerleithen Alpine racing events!). The Nomad was, as you’d probably expect, pretty special and everyone who worked there seemed to own one as they were the ‘best bike I’d ever ridden’. The problem was this was completely out of my price range, even the aluminium version was too expensive for me.
The one thing I did come away with was that if I could get the bike through Stif Cycles then I would because they were competitive, knowledgeable and very helpful. I did ask if they could get a demo on a medium Trek Slash 7 but after checking they advised it would be too difficult. I tried Trek’s website which was helpfully completely out of date, so that was a no go.
During all of this, Dalby Bike Barn held an excellent Scott demo day which was running the Scott Genius which was also a 650b. So I headed up there and had a blast around the 20min demo route on the low spec Genius and it was an absolute trail weapon. I hit sections on the demo track at speeds I wasn’t even aware you get up to having only ever ridden my Spicy there. The Twinlock system was awesome and the rolling ability of the bike was incredible. So suddenly the Genius was also a potential as well as being suitably impressed with 650b tyres.
The only question mark I had was whether a properly sorted modern 26in wheeled bike would also compare to the Genius on the same demo route.
In the end I figured 650b was for me and decided to try and get hold of a Norco Range Killer B2 which was 160mm travel compared to the Genius’s 150mm and the Norco was constantly reviewed as an All Mountain bike capable on the descents as well as the climbs where as everyone seemed to think of the Genius as a fast cross country machine but that was a little out of its depth on the descents. But it turned out that Evans had stopped stocking the 2013 model (or at least that was the explanation I got) the helpful shop person said they were basically at the mercy of the buyers and the website, that getting a special order or any sort of assistance from the buyers was a no go which was frustrating – even a quick message to Norco came back with a generic response about Evans being the only supplier.
During all of this (and working all the hours under the sun – and moon in some instances! - somewhat delaying bike buying progress), Dalby Bike Barn had a Santa Cruz demo day with the possibility of a Bronson and a carbon Nomad. So off I went and it turns out only a Bronson frame made it to the trail centre (it wasn’t very fast!), but I had a go on the demo Nomad for 20min and it was as quick as the Genius although unsurprisingly a little more burly – it wasn’t as responsive in the climbs but the suspension was a little slack and not set up for me really. I also hired out a Genius from Dalby for 3 hours and whilst it was fast it did struggle on the really steep technical stuff they have there (which is limited).
Either way, I ordered a Trek Slash 7 in to Evans to try (I spoke with Stif again about a demo on a Trek and this time they were able to get one but it was going to take about 3 weeks and I was basically getting impatient by now). I figured that if the Slash felt right and pedalled well then it was basically as good as it gets for that type of bike and price – plus it was bright green! So I had a pedal around on one in the car park and to Evan’s credit, they just said go out on it for as long as you like.
But it just didn’t pedal as fast as I was expecting it to and with a niggling doubt in the back of my mind I had to reluctantly give it back. I guess if I’d ridden one on a trail it may have changed my mind, but I had one more bike I wanted to try and so asked them to hold on to it for a couple of days. I even tried a Norco Sight Killer B1 but this wasn’t as burly as I’d liked and was also out of my price range. By this time I figured I was splitting hairs about this and that, so it was basically going to be a toss-up between the Slash and a Cube Stereo Super HPC 160 Race.
Got up early on the Saturday and headed over to Tweak Cycles in Wrexham which were about the only shop within 3hrs of me that had a medium cube in. I went out for a ride on it and it just felt right from the off. Suitably burly with 160mm of travel but quick to pedal around the car park. I knew straight away that it was going to be the right one for me. I’d read about it but there was very little on the net, etc. and the lack of ISCG mounts and a 3 x 10 set up seemed very un All Mountain which is the market that this bike is squarely (‘scuse the pun) aimed at.
Anyways, so I bought it because logically it felt right, had the 650b tyres which I’d been really impressed with on the Genius, was light as it’s all carbon fibre and because it pedalled so well and efficiently in the car park. Fitted a bash guard, a dropper seat post, shortened the stem (which I’ve had to do on all bikes I’ve owned so this was a surprise for me) and I’m in the process of changing the middle (now larger) ring as the gearing is slightly off having lost the larger chain ring. It isn’t bright green though and I guess aesthetically, I’ve always liked the look of the Spicy / Santa Cruz VPP type suspension with the rear shock mounted on one of the front tubes as opposed to being positioned vertically adjacent to the seat tube – but that’s just opinion and has no substance to how the bikes perform. It’s definitely been bought by the mind, not the heart, but I am warming to it as it’s just so damn capable (plus it was bloody expensive!).
So I took it around Dalby and it was fast, as fast as the Genius and as capable as the Nomad. Then I went up to Kirroughtree and blasted around the black route there last Friday but wasn’t feeling too well so although the bike performed well I found the last 10 – 15% of the red route a complete f*^king monotonous bore, real disappointment really at the end which is a shame as the rest of it was fun. So headed to Whinlatter on Saturday, did the North loop twice and the South once. All of these were epic, really fast and flowy in places.
So how has the cube performed so far? On climbs it’s light, stiff and just ploughs up pretty much everything you’ve got the legs for to tackle. I’ve found that with the shorter stem I am wheelieing a bit on the real steep technical stuff but I put this down mainly to technique and adjusting to this – my spicy also did this but less; however, it weighted a lot more. On cross country type runs it’s fast and keeps up your momentum really well, the ‘Trail’ setting on the shocks is perfect for this and most red / black stuff you come across, you rarely have to touch the settings on the suspension. The type 2 clutch rear derailleur reduces chain slap but I am going to get a Bionicon chain guide to reduce this further – I’ve not lost the chain yet even on really rocky sections.
I’ve not hit much in the way of technical black stuff similar to the Innerleithen enduro courses. On harder stuff the suspension feels very plush and stable and you notice the difference when you put the suspension into the descent mode. I did struggle on McMoab at Kirroughtree but then the wind was howling across the top of the granite and I was just struggling in general, I didn’t find the bike difficult to turn though – rather just the whole thing was difficult due to how I was feeling and the conditions. I don’t recall anything else being that hard except the rock slab ascent after a left hand corner on Judgement, tried this three times and just couldn’t get past the last couple of metres.
One thing that is different though is the ground clearance beneath the pedals. The bottom bracket feels ok and with the bash guard I’ve expected to ground it a couple of times and to my surprise, it’s rolled over without touching. But I have hit the pedals on the ground a lot, I’m not sure whether this was predominately at Kirroughtree due to the very rocky nature of the course or due to actual lower ground clearance. It could be that my spicy had shorter cranks so it’s all part of the adjustment or whether I will consider getting shorter cranks in time. I’ve still got to try it at a few other places that I’ve ridden my Spicy at to compare the two.
I’ve also had to be a bit more careful with the carbon frame. With my old bike I was pragmatic about getting scratches, etc. and wasn’t really bothered about chucking in my van or car with random stuff placed on it. Now I’m going to try and be a bit more careful with it (at least during transport, during the riding it’s no different as far as I’m concerned otherwise what would be the point in buying it), just to make sure the frame doesn’t get any abnormal loads put on it.
I guess one of the main things is how do the 650b tyres perform compared to riding a 26in bike? The wheels and tyres on my previous bike were almost at downhill levels of hardness so I think it’s inevitable that the wheels on this feel a little more light weight. The Hans Dampf tyres are performing well so far, there seems to be loads of grip and they actually inspire more confidence than my Minions did, although that could be the result of having a properly sorted bike wearing them as well. I’d read that 650b was all about trying to get the roll over ability and speed of a 29er whilst still retaining the technical agility of a 26er; that you often leaned in more on a 29er but had more tyre contact (and therefore grip) as a result.
I have found that I am leaning in more than I did on my old bike, but that could also be because I’m hitting corners at faster speeds – the result of a modern light bike against an older heavier bike and nothing to do with wheel size maybe? I’ve not struggled to get the bike around anything technical I’ve encountered so far although I’ve noticed that my line is regularly off going through corners, I’m either not carrying enough speed because the bike is gripping and I’m inadvertently riding a tighter line than anticipated or I’m over shooting on the exits sometimes, again I think because I’m carrying more speed than expected. I figure that at the moment at least, this is just some adjustment that I need to develop on my behalf.
It does roll awfully well though, I’m sure that is probably one of the biggest differences, the speed the wheels carry over rough terrain whether you’re pointing uphill, downhill or around a corner. I don’t have a particular preference for wheel size although I wasn’t interested in a 29er, the proportions just didn’t look right for me and I still wanted to maintain tight technical ability – who knows, once I’m used to this wheel size I may even go up to a 29er in like 3yrs time or something for the next bike. 650b was the limit for me and my choice of wheel size was based purely on how well they performed on the bike in the brief time I sat and rode on them.
You’ll be pleased to hear that’s about it for now. I can update in a bit if you’re not all asleep already, let you know how it’s performing after a few more rides. I just wanted to convey my experience of getting a bike like this, the difficulties and miles and hours spent travelling and surfing around and how it performs as there isn’t that much out there on the cube stereo at the moment.
A few others I’d considered – NS Bikes Soda Air, Specialised Enduro Comp, Lapierre Spicy 516, Nukeproof Mega, Scott Voltage, Cube Hanzz, Mondraker Foxy (I think), Ibis Mojo HD (too much, but brilliant in all reviews), Santa Cruz Bronson (too much), Orange Patriot (bit too burly), Transition, anything that looked good and was in the sale with massive discounts!, etc.
If you want to know anything more specific about the cube or other considerations then let me know and I’ll let my wisdom shine forth…or not as the case may be!
I enjoyed that cheers
But no pics?
How much does the cube weigh?
Nice read, im getting the stereo super hpc 160sl so i expect it to be just as good 😉 ordered it 3 months ago and it should be arrving at lbs this week or next 🙂
+1 on the well written read, thanks.
I can relate insofar as my recent acquisition has been with a search for a bike with shorter travel. It's a fun process that continues with the fine tuning and fettling and learning how to ride it well!
I'm aiming to scribe my own thoughts and feelings soon so like you, they may be useful for someone.
Enjoy your new ride! 😀
I like the way your review was almost as long as the name of the bike! 😉
larrythelathe
I'm not sure how much it weighs to be honest, I think it's about 27 / 28 pounds. It's about 8 pounds lighter than the Spicy I had.
See pics below!
[url=[URL=
 [/IMG][/URL]]Was" title="Photo Storage" rel="nofollow" target="_blank" >
 [/IMG][/URL]]Was"
 ist das?
[url=[URL=
 [/IMG][/URL]]South" title="Photo Storage" rel="nofollow" target="_blank" >
 [/IMG][/URL]]South"
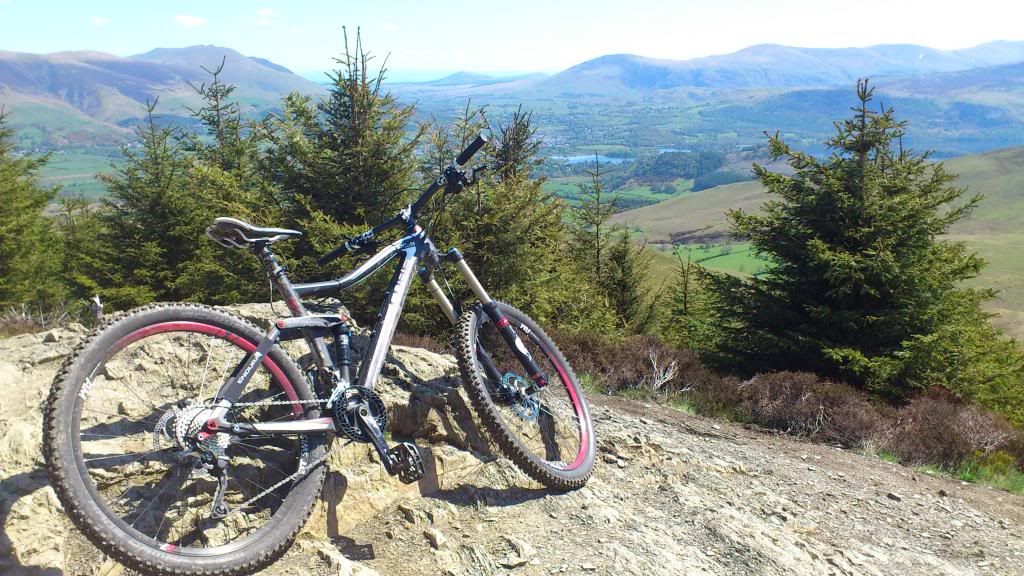
 Loop Whinlatter - looks a bit like a 29er in this
[url=[URL= http://i290.photobucket.com/albums/ll255/whippetboy/DSC_0210.jp g" target="_blank"> http://i290.photobucket.com/albums/ll255/whippetboy/DSC_0210.jp g"/> [/IMG][/URL]]South Loop Whinlatter
merouria
The SL, you must be flush!! You'll have to let us know how you get on with it, I'm sure you'll love it.
Thanks slackalice
Maybe I was nieve, but I figured it would be easier initially but then I guess a lot of the bikes I was looking at cost so much that it's impractical for a shop to stock many of them - plus I'm too impatient! What bikes you looking at?
Aye chiefgrooveguru, it's a very German name I think, a bit like Mclaren naming it's road cars, kind of devoid of emotion but brutally efficient - I'm just going to have to try and add some flare of my own I think like painting it bright green...
MP4-12C is a spectacularly stupid name for a V8 supercar but it still doesn't compare to the new 'LaFerrari'!
"Aight, D', when ma re'up comin', I need to sling weight on this corner, takin' ma bitch out later"
288GTO, F40, F50, Enzo, LaFerrari... WTF?!!
Nice bike though! 🙂
My list was a rather short one as I was after a shortish travel ( 100 -120mm) XC bike and I was particularly keen to go 650B.
There aren't too many of those around and I was waiting patiently for the Morewood Zula 650B to arrive as I had ridden the 26" very briefly last year and really liked the feel. Anyway, I became sidetracked when I learnt about Patrick Morewood's new venture and his new range of PYGA bikes. The reviews of the 29er were impressive and when I saw the same but different in 650B guise, well, my patience for the Zula left me!
So, I'm now the very chuffed owner of a PYGA OneTwenty 650B and absolutely certain I have made a great choice for me 😀
Having bought the frame and ordering components, I've been riding it for a couple of weeks now, fine tuning stem length and height and simply loving the whole process!
whippetboy
Yes i am very excited, it should be arriving any day now and i can't get to sleep easily! All i do is end up looking at photos of other peoples stereo sl lol! I have bought some new rotors already the stock ones a bit too bland lol.
[img]  [/img]
I have 2 6 bolt rotors aswell so i can refund the ones i don't need lol i could not find any close up pictures of the rotors on the sl to see which ones i need.
Hamsterley Forest on the Cube.
So as the title suggests, went up to Hamsterley Forest yesterday and blasted around the black route. And then I went round again about half way and took in some of the enduro tracks that had been ridden last weekend there.
The bike handled everything brilliantly. It was as capable there as my old Spicy was and I hammered down sections and made what felt like quicker progress than before.
One key thing was that it climbed the various fire roads and single track at a really good rate, the only thing that stopped me in my tracks was a random rear puncture on the fire road up to Transition, although on the second part of the lap I saw a a small branch with massive thorns on it in the road way so I can only assume it was this as the rear had been flat about 50m after this. The inner tube felt like a piece of paper, so I think some burlier inners may be on the shopping list next, I can't really be bothered with all the mess of tubeless and I'm not overly convinced by it as well. A new pump as well as mine takes forever to pump up a tyre!
I managed to kick my front wheel out on the stone henge type summit of Transition and nearly fall off right in front of a group of riders, great! But on the down section itself it was light over the jumps, felt much more in control of the bike during the very short time I was in the air (jumps aren't really my thing, I just see them as a whole world of pain waiting to be explored, as long as I can pop over stuff - even big stuff - at high speed then I'm quite happy) and was good in the corners, leant it right over and if need be just kicked out the inside leg to catch it if it felt like it might start sliding out at the front.
I found my lines on Accelerator (I think that's what it's called) were awful first time down but I think that was speed related again - I was going much faster this time round and suddenly I'm having to bank in a lot more and trust in the grip of the tyres. Second time round and being followed by someone (a local, so no pressure there!) who I'd got chatting to who was at a similar level to me I absolutely nailed it and it felt great.
The rough rooty single track on Pike's Teeth and where an enduro track was located (part black route, part woods) was great fun, you could really throw the bike into the corners and the lines meant that even if it slipped out you could catch the wheel a lot. I also found myself being able to pick my lines a lot more, even on some of the fast rough rocky trails on the enduro loop where as before I'd just point it and deal with the chaos that was unleashed on the Spicy! It must have been awesome doing the routes last weekend - seriously considering a round on the Gravity Enduro, but not too sure. I am signed up to the Ardrock thingy that's advertised on here though in Swaledale at the end of the month.
Section 13 was similar to Transition, nice and fast and enjoyed the jumps - much more predictable. The only stuff I haven't done at Hamsterley now is mainly the downhill tracks, which I didn't do on the Spicy either, so will have to give them a go sometime in the future.
All in all, the bike handled really well, was nice, fast and efficient and lived up to the high expectations I had for it. Plus the weather was awesome, the bloke I was chatting to was sound although I didn't even get his name when he went off to complete the rest of the black for a second time (I only managed one and half loops, but my legs were ****ed after that) and I couldn't have asked for anything more other than a hot dog or burger off someone doing a BBQ as it was driving me mad with hunger riding back to the car!
I'm always amazed that people can tell "how fast a bike is" by riding it round a car park? I have a sub 10kg, 80mm XC race bike, and a nearly 13kg 160mm AM bike, and yes, the race bike is quicker, but not by as much as you might imagine, although i suspect the engine is the limiting factor in both cases! 😉
Another nice write up, your not helping me to not buy one!
Come on larry, go out and buy one, you know you want to!! Just need to take it round Gisburn and I'll be reasonably happy it's taken the crown from the Spicy, just got to hit up a bit more of Scotland (Fort Bil, Glentress, Innerleithen as a minimum) to really know for sure!! Spicy wins hands down though for looks, you just can't beat bright Orange and White!
Maxtorque, I found riding around the car park very difficult to gauge the speed of the bike, the Genius was by far the fastest I had a go on, both on the trails and just meandering around, but limited in what I wanted to do on a bike. The cube did feel good though, best of the rest behind the Genius for speed, but knowing that it would probably kill the Genius when descending the hard stuff.
I'm also plannig a 65km haul across the North York Moors which I've only done previously on my hardtail, I wouldn't have even considered it on the Spicy, but I'm going to take the cube out this time as it pedals so well.
Ok, so probably boring you all to death now but I went out on Saturday and rode about 40 miles across the North York Moors on the Fylingdale loop that seems to be different from all the other Fylingdale loops out there and managed to knock an hour and a half off my time when riding my old hard tail.
My fitness is a lot better now and it was drier than last time, but still, quite a difference. The loop is awesome, I'd urge anyone who rides around Dalby regularly to sack that off one day and have an all day ride following this loop - it's well worth it even if it is a whole day taken up - but what a way to spend it.
The bike is well and truly christened now as it got scratched all over from the heather, had to happen eventually.
Bring on Wiggle Mountain Mayhem.
Forgot I popped my strava cherry as well, it sort of worked, but I guess it gets better the more you do it right...?!
 STRAVA.COM
 The bike is well and truly christened now as it got scratched all over from the heather, had to happen eventually.
Is the Matt Black really marked that easily? If so, I'm out - it was a concern, and whilst I don't mind my bikes being 'battle scarred', I do like to keep them looking good and hate unnecessary scuffs - i.e. branches/being chucked in the back of a van etc.
I guess that was a slightly overly dramatic description! The chain stay area is definitely marked up, not significantly, but if you look closely then it is apparent. I'm planning on wrapping these in some protection to prevent further scratching. The rest of the bike is essentially unscathed. You do have to be more careful with the matt black finish than a normal paint finish - I'm not sure if this is the same on all carbon bikes or not, probably not if it is a gloss finish.
My old bike was scratched all over and it all worked fine so I'm not too bothered about superficial marking, just as long as it's not significant. If I was really organised then I'd have protected the frame before the first ride, but I'm not and I'm impatient!
Nah my 4 yr old S-Works Enduro carbon is gloss and virtually unmarked
merouria, if you're reading this, what do you reckon to the SL then?
Just about to commit to buying one. your write up was an early factor in the Cube 160 being on my short list. BUT now concerned by your most recent comment on scratches from "HEATHER"..PLANT NOT MISSUS I ASSUME! Any chance of a pic showing chain stay scratches.
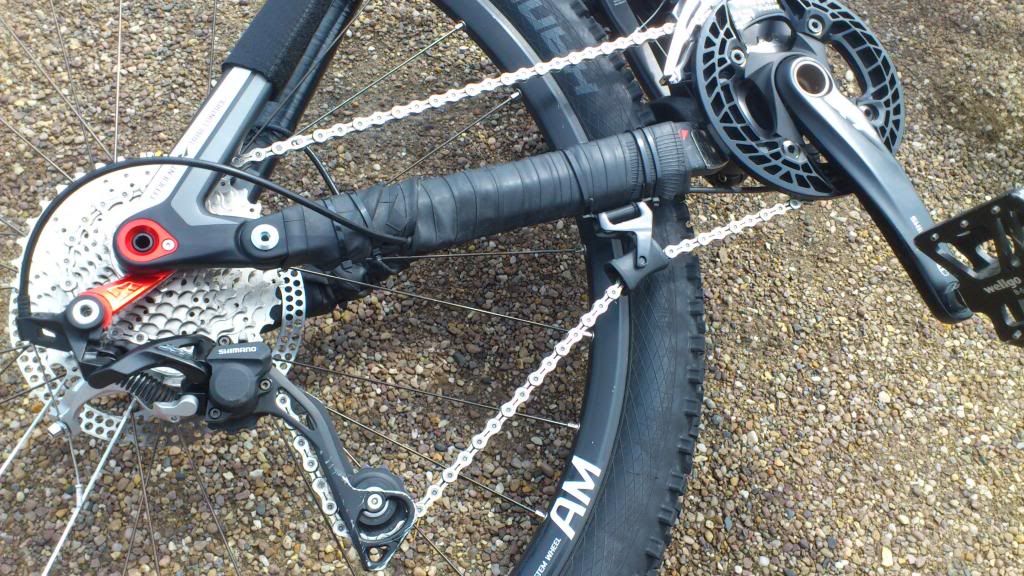
Now then Stumpyloser, I did take some photos the other day but they're not that clear really and as I've wrapped all the chain-stays in either old inner tubes or black electrical tape, not much to see either. The scratches are minimal although there is a nice chip near the front of the chain-stay behind the seat post tube and the crank arms are nicely scratched and chipped along with the pedals, but then the bike has had an absolute thrashing since I've owned it and rocks that get flicked up often ricochet off the cranks and back at the frame causing the scratches and minor chips.
To be honest, with the type of riding I've been doing lately, there's not a hope in hell that the frame will remain untarnished, scratches and chips are inevitable really; however, if the frame cracked or anything like that then I would be straight back to Cube with it as I'm only doing on it what it's been designed for really.
My sister's boyfriend has cracked two Lapierre Zesty 514 frames, around the weld for the shock on the down tube and cracked the rear carbon triangle and they've mostly been very good at replacing it. So as long as you look after what ever bike you get and don't try and do 20ft drops to flat on it (unless it's freeride or downhill, etc.) you should be ok! Keeping a bike frame perfect though to me means you're not riding it properly, especially in this sector of the market 🙂
Keeping a bike frame perfect though to me means you're not riding it properly
Agreed. My "new" Tracer 275 is already a mess of cosmetic scars 😉 I can envisage getting it "raw"d in a year or two
Nice bike BTW.
Just got back from a bit of a trip around Scotland, so I figured I'd let you all know how ye olde Cube got on up there.
First stop was Knilochleven and the Gleann Iolairean route that I'd spotted (
It's billed as very hard, so figured this would give me a full days riding. Parked up in Kinlochleven and then basically climbed what felt like about 350m in about 10mins it was that steep in places! The views at the top and further in of the surrounding hills though made up for it and it was fun blasting past groups of walkers who all seemed to have this expression of what the hell are you doing up here, we've been hiking here for days?!
After a good hour and a half I had to follow the route along a river for a while. It was nice and dry and managed to follow some cow singletrack. But I wouldn't have liked to have done that section by myself when it was boggy, think it would have been a little unnerving really. And just when you think you're in the middle of nowhere a bloody house appears, albeit abandoned, but still - what an existence (boring and lonely mostly I'd suggest). Then about an hour of hike a bike and from there on, didn't see anyone else. Once you crested this valley, it was singletrack all the way to a reservoir and dam, but it was hard slow going as it was narrow and rocky so you were constantly having to get off and trail riders had been up there. Normally I have no problem with sharing tracks with motor cross riders, but they'd completely ruined all the areas where streams crossed the paths and it had been boggy, so that just became annoying trying to navigate these constantly.
Then I dropped on to the Ciaran Path from the dam downwards because I'd read it was Trail of the Year material. In my opinion, it wasn't, at all. Plus said trail bikes had ruined the top of this section even more than on the moorland areas. Some bits were fun, but all in all it was all a bit mediocre really and not much fun by yourself. Took me about 6hrs I think, but if it had been wet it would have been slower due to the bogs. The website that's listed above with the route was very good, would recommend it if you're thinking about doing it or looking for other trails with printable OS maps (which you can zoom in on).
So I was planning on doing the Torridon Path a couple days after this but decided to leave it until there's a group of us - only downside by leaving it was the weather was probably about as good as it gets on the day I'd planned to do it, oh well!
Went to Fort Bill the following day. I'd originally planned on doing the red downhill only as last time I was up there I'd sworn that I'd hire a full downhiller to do the World Cup course again but I didn't have the money available. Somewhat inevitably, I ended up riding both the red and World Cup downhill courses on the Cube. Started off on the World Champ course as a warm up and most of the top section was shut which was a bit rubbish. So jumped on the Nevis red and seemed a little apprehensive on the long boardwalk sections at the top. Last time I was here I was pretty much hell bent on destruction and absolutely threw it down these, but wasn't in that same frame of mind, so took it a bit easier on this section.
Other than that the bike was brilliant down here, you just pointed it and steered really. Ended up chatting to a couple of people there and riding the rest of the day with them so did a couple runs on the World Cup course with them which was good fun, better than I remembered it. Again, the bike handled this well although I'd have obviously preferred 8 - 10 inches of travel all round on a downhill weapon. Managed to give myself two pinch flats on these two runs at the bottom on the sort of rock drop offs at the very end.
To be honest, the only weakness on the bike so far has been getting pinch flats and ruining tubes.
I'd love to ride it on a full downhiller following someone who knows the course well, reckon it would be one hell of an experience.
So after that I drove over to stay with my sister in Aberdeen. Had a day of rest whilst her and her boyfriend Dave went off to this new place near the ski fields on the Friday (Glenlivet, maybe that's a whiskey, but I'm sure it sounded like that - it's not open yet but the trails are mostly complete).
Then rode Scolty Hill on the Saturday as it's Dave's local stomping ground. I've ridden Scolty a couple of times before and in my opinion, it's much harder than the World Cup downhill course. Maybe it's just a different kind of riding, but it's just so freaking narly! I don't think I've ridden anywhere else in the UK that matches it other than some of the enduro tracks at Innerleithen. It's all local made singletrack by local riders crossing through local woodlands (so it's local then!).
I'm trying to keep up with Dave and I'm flying down twisty (normally muddy, but bone dry on this day), rooty, rocky, steep tracks, trying to maintain my balance and flick it between stumps, etc. in the way. The rocks you roll over are not small and steep into other obstacles. There's rock gardens, drops, more roots, trees to avoid. It's proper full on riding. The climbs are technical and steep as well.
There's a decent drop (about 6ft) on the final down from the top of Scolty Hill and we hit this although my attempt was embarrassing as I took off wrong and landed at an angle, smashed my ankle on the pedal and ****ed it up nicely. If you ride there then strava it as there's healthy competition between all the riders (I did strava my time but it messed up so it's incomplete -
Finally, on my way back down South, I stopped in at Glentress and did the red and black back to back, so I was reasonably ****ed after about 46km of prime Scottish singletrack.
So how did the Cube handle it all?
Well, mostly brilliantly. The only negative was the pinch flats but I went tubeless last night and so I'm hoping that should be mostly solved now. I've found that the front fork is good fully open in descend mode on fast rocky track, but on slower steep, rocky and rooty tracks it's better to have it in Trail mode to prevent bottoming out so easily and potentially folding underneath you as you spectacularly fly over the handle bars. Rear shock works really well in Trail mode for most stuff, with Descend only being used for bigger rougher terrain. Climb is ok but I only use this on the road, it stays in Trail on all off-road climbing.
It's just so damn efficient at everything. It carries speed so well over more level ground, climbs very well and you can pretty much point it down anything and it will just go. I've found the wide handle bars allow me to tweak the front wheel when hitting rock gardens and maintain some choice over line as opposed to letting the bike take you where it wants to go (although you can normally do this as well).
I've not been very impressed with the Shimano group set and if I had the spare cash I'd buy some SRAM XO as this is what I had on my previous bike and it performed pretty much faultlessly. A real effort is required to change up on the front derailleur but I'm not interested in going to a 1 x 10 set up as I use my granny gear a lot, it definitely adds to the versatility of the bike. Plus I've started to drop my chain when changing down at the front which is a show stopper and annoying - I've checked and it's all tuned in right, I'm wondering if there's an internal chain guide I can get that will fit to prevent this. Plus the rear derailleur is struggling to change up the cassette from higher gears (or to a lower gear), again I've checked the tuning and it works perfectly on the bike stand, but not under loading. I have this same problem on an older bike that uses Shimano. The shifters are annoyingly large as well with the pointless window thingy showing which gear you're in (what is the point of this other than to take up space?).
The brakes (Formula 1 RC Tune I believe) are very effective overall. Two main issues are they squealed like a pig in Deliverance when descending in the dusty conditions at Scolty and Glentress, it actually got very annoying as I ended up sounding like a complete amateur on the brakes all the time when in reality I was going so fast between corners that I had to dab the rear constantly to check my speed!! (honest).
Also, for the first time I suffered from brake fade on the World Cup downhill course which was slightly disconcerting when you're flying down sections picking up mega levels of speed and constantly trying to wipe it off just in time to compose yourself for the next major obstacle. I was able to adjust the brake levers but I ended up having to stop, let them cool off for a couple of minutes (and give my arms a rest), pump some life back into them before continuing with even more nerves and adrenaline than before, wondering if they're going to work when you most need them! I'm planning on checking what fluid they're using and seeing if a higher spec DOT fluid can be used and would make a difference. In fairness, this is going to be a rare problem anyway unless you do something similar or go out to the Alps, but it's annoying all the same.
Other than that, Dave was pretty sure that I'd worn out the bushes in the rear shock at one end, so I'm planning on changing these (shouldn't cost much, I think the tool is more expensive that the parts themselves), was slightly surprised by this but then it has had a thrashing so I can't complain too much really (there was very slight movement between the bottom of the shock and the pivot point when you compressed the suspension).
On one final note, to confirm how damn effective this thing is at pedalling. I completed the Dalby red run in 2hrs 7mins the other day, was trying to get a sub 2hr time but fell just short of this. Previous best time of my Spicy was about 2hrs 45mins. I am super fit now but that's still mightily impressive on a 160mm travel All Mountain bike in my humble opinion! Think a carbon 29er hardtail and maybe some lycra will be required to break the 2hr mark... Nah, think I'll stick with the Cube and my baggy shorts!
All in all, I think the weakest link on this bike is the rider. As I hopefully get better and more experienced the bike will continue to impress.
Some pics to follow hopefully. Any questions, let me know. Hope this wasn't too boring!
Now then Buzz, nearly went for a Tracer 275 (by Intense right?), how'd you find it? Any pics?
I have the same bike & love it -agree with all you say.
I went tubeless straight away & solved everything puncture wise - so good!
My shifting also got really stiff, where the cable goes in to the frame it can get a bit bunged up, take the cable out, clean or replace it & put back in & problem should be sorted - made a big difference
A pal bought one last week, but after it's first ride we noticed (as he was taking the wheels out to put it in his car) that the rear tyre had marked the inside of the swing arm, at the chain stays - seems that it'd be better with a slightly narrower rear tyre (only a couple of mill).
He liked it though, and said it felt very stable.
I was just looking at one of these along with the 29er version in cycle surgery yesterday. Did look good.
Some pics, none of the bike I'm afraid!
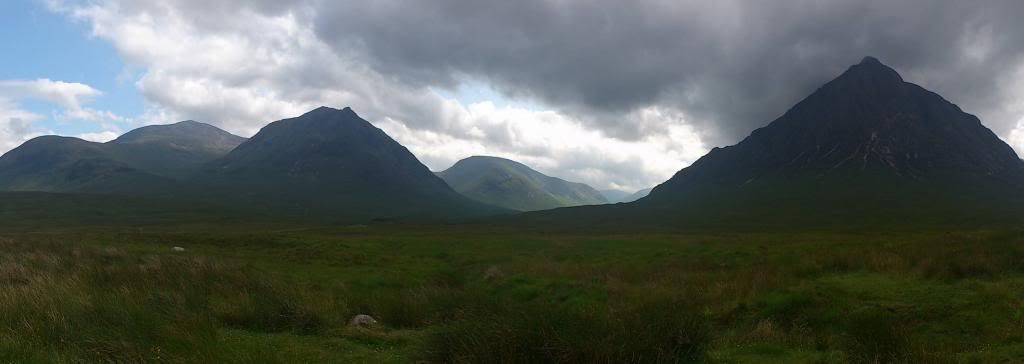
Drive in through Glen Coe
[URL=
 [/IMG][/URL]" title="Photo Storage" rel="nofollow" target="_blank" >
 [/IMG][/URL]"
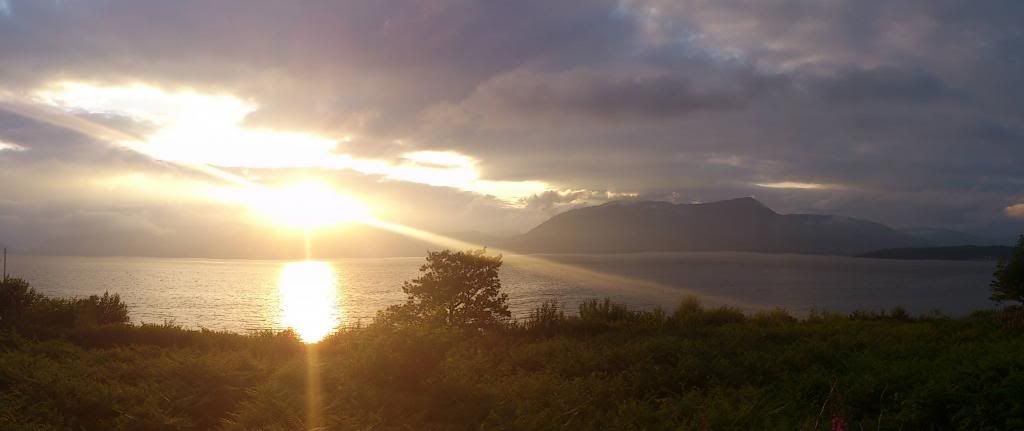
Sunset near Glen Coe
[URL=
 [/IMG][/URL]" title="Photo Storage" rel="nofollow" target="_blank" >
 [/IMG][/URL]"
Lake was the start at Kinlochleven, then straight up...
[URL= http://i290.photobucket.com/albums/ll255/whippetboy/Cube/DSC_0235.jp g" target="_blank"> http://i290.photobucket.com/albums/ll255/whippetboy/Cube/DSC_0235.jp g"/> [/IMG][/URL]
Bothy
[URL= http://i290.photobucket.com/albums/ll255/whippetboy/Cube/DSC_0237.jp g" target="_blank"> http://i290.photobucket.com/albums/ll255/whippetboy/Cube/DSC_0237.jp g"/> [/IMG][/URL]
Dry boggy part with cow singletrack
[URL= http://i290.photobucket.com/albums/ll255/whippetboy/Cube/DSC_0238.jp g" target="_blank"> http://i290.photobucket.com/albums/ll255/whippetboy/Cube/DSC_0238.jp g"/> [/IMG][/URL]
Dam Kinlochleven
[URL= http://i290.photobucket.com/albums/ll255/whippetboy/Cube/DSC_0244.jp g" target="_blank"> http://i290.photobucket.com/albums/ll255/whippetboy/Cube/DSC_0244.jp g"/> [/IMG][/URL]
Top of Scolty
[URL= http://i290.photobucket.com/albums/ll255/whippetboy/Cube/DSC_0246.jp g" target="_blank"> http://i290.photobucket.com/albums/ll255/whippetboy/Cube/DSC_0246.jp g"/> [/IMG][/URL]
[URL= http://i290.photobucket.com/albums/ll255/whippetboy/Cube/DSC_0247.jp g" target="_blank"> http://i290.photobucket.com/albums/ll255/whippetboy/Cube/DSC_0247.jp g"/> [/IMG][/URL]
Glentress
[URL= http://i290.photobucket.com/albums/ll255/whippetboy/Cube/DSC_0249.jp g" target="_blank"> http://i290.photobucket.com/albums/ll255/whippetboy/Cube/DSC_0249.jp g"/> [/IMG][/URL]
Great article and I thought I'd share my experiences with the Cube Stereo Super HPC SL. About 2 months ago my 650b beast arrived and after a very long wait it has proved to be well worth it!
To begin with I stripped the bike down completely and fully invisiframed the bike with one of their custom kits which was a dream to fit and I can't recommend it highly enough, first bit was a dodgy but it was asleep learning curve! I then swapped all the X0 for XX1, fitted an e.13 top guide mount and refitted all the components
First ride out was Coed y Brenin in the pouring rain and I began to see how lightening fast the bike is. Using strava as a gauge I was noticeably faster on the climbs which shocked me but it was the descents where the bike really allows you to push on!! Bagged 3rd on the pink heifer and a couple of KOMs on climbs which I thought I was quick on 29er full suspension! I've raced all types of mtb's to a high level and ridden a lot of bikes as I'm a bike shop owner but this is the stand out bike for sure!
Quickly followed by this was a trip to the Alps to stay with White Room and ride La Marmotte The bike performed flawlessly all week with my only real issue with bike is the Fox 34's which struggle to hold a descent platform on the descents and the damping really letting the fork down on the descents, (pikes on order to sort this out) and Fox have clearly worked on this for 2014. The bike eats up the big hits on the rear with ease and the small bump sensitivity is great and climbing in the trail mode is fantastic.
Back in the UK however I have encountered a few problems which I would like to pass on to users of xx1 on this bike. First ride back and living in sunny north Wales I thought I'd hit Snowdon then the following day Telegraph on cheeky after work rides. Two rides, two slashed tyres, running tubeless too, first front, second rear. Now I know these are super rocky trails but the impacts have ruined the 700g tyres which only have snakeskin in the side walls, now upgraded to aftermarket hanzz dampf super gravity tyres which are a world apart In terms of stability and puncture resistance!
Second issue is with the rear derailleur hanger which has failed 3 times on three rides! Cube are onto this but unfortunately these original hangers are not designed to support the xx1 setup it would appear. The b tension adjuster sits right on the end of the hanger and cuts through the knuckle, causing the mech to loose tension and rub on cassette, but like I said having contacted Cube this will be sorted as of next week,
All in all great bike and its a keeper! Only with Pikes and Carbon wheels!!
Thanks for that Matt, good to hear other riders are enjoying the bike just as much as me. I'm unsure about the front forks, they seem good but I don't ride a lot of other bikes so for me it's hard to tell how they compare to similar on the market - you'll have to let me know how you get on with the Pikes.
I thought I'd also say how I got on with going tubeless the other night. All in all, it wasn't too difficult to fit (Joe's No Flats kit I think). I found the rim strips needed to be equally stretched around the rim to allow them to bed on the rim properly which took time and a lot of thumb strength!
I also had no hope of seating one side of the tyre on the rim to aid with initial inflation to seat the tyre fully before putting in the sealant. In the end I was either going to try putting an inner tube in with the valve hanging out one side (which I wasn't even sure would work or would help the side wall of the tyre) or I was going to go to a local garage and use a compressor. Luckily, my next door neighbour arrived home at this point and he lent me his compressor which eventually worked, but only after flexing the tyre repeatedly as the air was going in (and plenty of soapy water). Once seated with the compressor, I pumped it up with my track pump to 40 psi and no issues after that. Fluid in, job done.
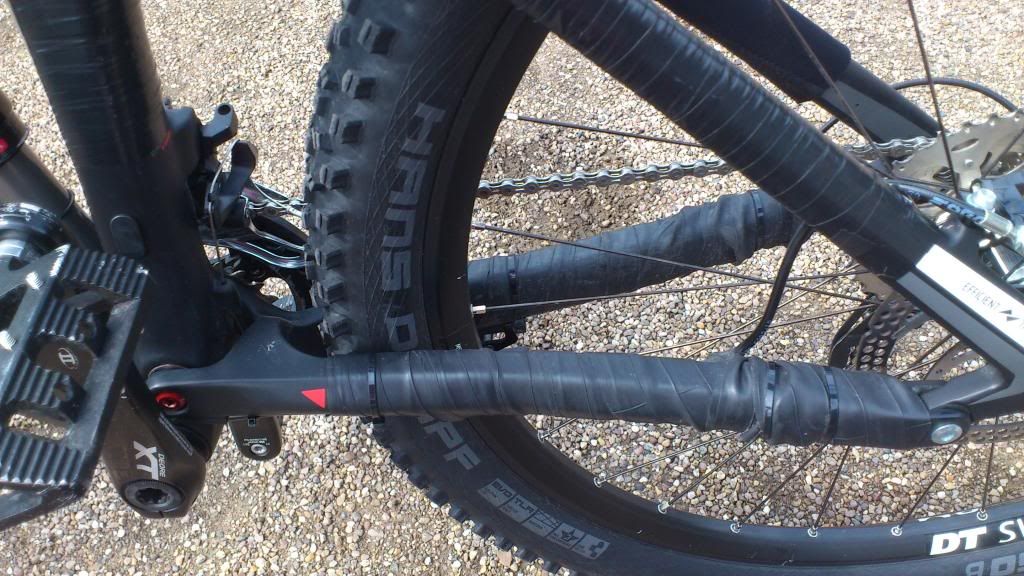
Also, here's some pictures of the protection to the chain stay area and at Gisburn Forest yesterday. This wasn't as good as I remember it, really rough in some areas but that may be purely to weathering. It's nice that they have the lower car park still free, but I'd happily pay £3 to park if it helped maintain the trails (the new upper one where you do pay was reserved for some festival thing). Think I also saw that long bearded fellow out teaching or guiding on the first part of the red, so made sure I railed the beamed corners as much as possible!
The only other thing there was some right off-camber high speed corners, caught me out a few times. I'm doing the enduro there at the end of Sept., so looking forward to that and wonder where the tracks will run.
[URL=
 [/IMG][/URL]" title="Photo Storage" rel="nofollow" target="_blank" >
 [/IMG][/URL]"
A bit of improvised inner tube wrapping here!
[URL=
 [/IMG][/URL]" title="Photo Storage" rel="nofollow" target="_blank" >
 [/IMG][/URL]"
And some electrical tape to add to the mix.
[URL= http://i290.photobucket.com/albums/ll255/whippetboy/Cube/DSC_0252.jp g" target="_blank"> http://i290.photobucket.com/albums/ll255/whippetboy/Cube/DSC_0252.jp g"/> [/IMG][/URL]
[URL= http://i290.photobucket.com/albums/ll255/whippetboy/Cube/DSC_0253.jp g" target="_blank"> http://i290.photobucket.com/albums/ll255/whippetboy/Cube/DSC_0253.jp g"/> [/IMG][/URL]
[URL= http://i290.photobucket.com/albums/ll255/whippetboy/Cube/DSC_0254.jp g" target="_blank"> http://i290.photobucket.com/albums/ll255/whippetboy/Cube/DSC_0254.jp g"/> [/IMG][/URL]
[URL= http://i290.photobucket.com/albums/ll255/whippetboy/Cube/DSC_0255.jp g" target="_blank"> http://i290.photobucket.com/albums/ll255/whippetboy/Cube/DSC_0255.jp g"/> [/IMG][/URL]
I thought I would let you guys know I bought one of these 2 weeks ago and have to say its the best bike I have ridden let alone owned.
As a side note my local bike shop saved my a few quid when I wanted to go tubeless. I have the SL and the DT Swiss wheel set's rim tape is meant to work in conjunction with stans fluid. It worked a treat!
As far as the bike goes it awesome I love how it pedals like a cross country bike yet you can really smash it into the technical trails. My brother in law had a ride on it today on my local routes he loved it I thought I might not get it back and he's a big guy.
I don't see the problem with the fork. It seems fine to me but I am far from the fastest.
I have three areas of concern
My shock looses air about 50 psi a day
I don't like the brakes nothing wrong with them it's just I like my old shimano XT more. I am considering changing these for some Zee's
Also my reverb needed bleeding today I am a bit concerned as to why.
I also fitted a invisi-frame protection kit.
I have a works thick thin chain ring I am happy with 1x10 and hope to be able to get away with no device.
I am off to afan on Tuesday I hope to have a blast.
Glad you like it, I've just had my 34's back from TF tuned following a service, they weren't using all their travel as the damper was overfilled - all sorted now.
Also bought a 32 tooth race face narrow-thick chain ring so also 1*10 with no device and is working a treat- no dropped chain at all
Best thing about this bike - walloped it round Cwmcarn XC route twice last Saturday & been at tidworth free ride park doing 6ft drops on it all week!
For your leaking shock it's worth checking the valve (where you attach the shock pump) isn't loose.
A valve key can be used to tighten it up if needed (ask your LBS for one).
M@tt - re the Xx1 issue how how are Cube sorting it out exactly as that mech hanger is not designed to take Xx 1. Thanks
Hi guys. I have a Stereo 650b and wanr to go single ring. Im looking at getting the e thirteen top guide but unsure as to which one I need. Any advice?? P.S. Absolutely outstanding bike, has improved my riding ten fold and its right at home in Bike Park Wales.
Hi guys. I have a Stereo 650b and wanr to go single ring. Im looking at getting the e thirteen top guide but unsure as to which one I need. Any advice?? P.S. Absolutely outstanding bike, has improved my riding ten fold and its right at home in Bike Park Wales.
Hi, gone single with a race face thick thin 32 tooth, took a link out of the chain and with no chain device it's not once slipped or dropped
m@tt
now upgraded to aftermarket hans dampf super gravity tyres which are a world apart In terms of stability and puncture resistance!
I ran these tyres when out that week with TWR on my Zesty, and although not riding at Matts pace, they seemed pretty tough! Back home, where i ride, they are are overkill, and i'm going back to NN's or something i think
BTW, i'd love to say how good the Stereo looked with Matt riding it in Les Arcs, but i never saw more than 10sec of the back of his rear tyre disappearing off round the hairpins ahead........... 😉
I got as far as "I had a nice lappierre on DH tyres" but what it looks like you've done, rather than spending maybe £70 on some faster rolling, lighter tyres for enduro type duties, is gone nuts and bought a whole new bike.
Congrats
Ha, yeah it's funny you should say that as I was driving to work this morning I did wonder what would have been the difference if I'd just bought new front and rear shocks instead of a whole new bike, but no point wondering about that now...!
It's still awesome, got very wet riding at Whinlatter on Tuesday morning, bike was actually cleaner after the ride than before as the driving rain acted like quite a good natural bike wash. Was loads of fun and disappointed I only had time for one blast around the two loops, would have liked to have done the North one again.
I did mention an issue with the bushings in the rear shock, well I took it out and it all looked solid to me, so leaving it for the time being. Just wondering if I should bite the bullet and get the shocks serviced at some point as it's just had a thrashing since I've owned it.
No issues since I went tubeless except I have to run the tyres at a higher pressure now, not sure if anyone else has had this, otherwise they feel under-inflated. Still need to re-tune the gears, single chain ring up front is seeming more attractive after each ride...
I thought I would put a quick update in. My love affair with my cube went on the rocks due to the rear shock leaking.... All the time. To be fair it's been fixed and we are back on track.
I have ditched the 3 chain rings shifter etc and put a works chain ring on. I have also changed the rubber as I just didn't like it. I have put some Mavic tires on, I am much happier with them. They are a fair bit heavier but they are more my soft of tire.
After these changes I weighed it 28 pounds dead with pedals. Not bad at all.
Has anyone else drop the shifter ? How did you plug the hole in the frame?
I've dropped the single ring, but not yet plugged the hole, shame it is bare metal underneath as well!
I really like the HD tyres, been great so far and I have run them as low as 15 psi with no issues being tubeless.
Anyone know where to get a bearing kit?
I have no idea where to get a bearing kit from I'm afraid, I'd probably start with the place you bought the bike from working on the assumption they must have some sort of idea where to get parts from. Other than that, start looking at the cube website for technical info on bearings, if you can find the actual types (as opposed to getting a full 'kit') I'd probably try and buy them from a specialist supplier who will no doubt be cheaper than cube or a related lbs. Depends how helpful cube or the lbs are really.
Did the Gisburn Enduro today, was really well organised and it had a good atmosphere (I can't work out why they built the new Hub café so far from the car park, or vica-versa). The trails were good, there's not masses of elevation at Gisburn so it was always going to involve more pedalling than some other enduros I've been to. Totally burned my legs out on the last stage and then they'd moved the finish 50m up the track after I'd done the practice so just when I came round the corner thinking it was all over I had another hill section to climb!
Bike was great, gears attached to bike not so. I spent about 45mins yesterday fine tuning the front and rear derailleurs, went riding up the street shifting up and down repeatedly. Got the front one dialled in after a while, and it didn't drop the chain past the granny wheel at any point like it's done in the last few rides. It requires a tremendous amount of thumb power to shift up on the front derailleur though. I'm very close to going single up front, so any tips on what I need to be aware of in this bike would be helpful.
The rear derailleur though, what a load of rubbish. It's fully dialled in so it shifts no problem (well 95%) on the bike stand. But when you're riding it's just a different story, failing to shift in the middle gears of the cassette, having to go up two gears and back down one constantly, phantom shifting, slow under power. I'm constantly comparing it my old SRAM XO gears, but once they were set up, they shifted faultlessly every time. I know the Shimano are cheaper, but it should still work.
Anyways, I'm thinking single cog up front, new cassette and rear derailleur out back. Now, just need to work some overtime to be able to afford all of that!
One final point, I'm wondering if I burped the rear tyre on the 2nd stage practice run as it seemed flatter after that, but I'm pretty paranoid about tyre pressures at the moment so maybe I was just finding a problem where there wasn't one. I was really glad I was running tubeless today as there was some rock sections that you ploughed through at top speed. I do find the valves leak fluid a bit when pumping the tyre up though. Otherwise the tyres seemed to work really well. I had one major moment on a gravel road trying to turn into stage 3 start at top speed and drifted into it, thanking my lucky stars I ride flat pedals as the quick foot tap saved me crashing, but they seemed to work well with the rear giving way under pressure but in a controlled manner, the front stuck well (I have been working on that in my cornering though so hoping it's paid off a bit).
Gears aside, it was a great bike to ride yet again.
Put my deposit down 4 weeks ago on the stereo race 2014. Wont be here till November but very excited and should be the first to own 1. Decent spec but never used formula brakes (T1S) any1 had experience with these? Cheers
You won't regret it mate it's a awesome bike. I had a ride on a mates Santa Cruz he had spent 6.5k on. Ye it was nice but no better than my SL. He even said as much when we swaped back.
I have the SL I see they have changed it over to XT know, I love shimano brakes so that's a good thing in my eyes.
Let's have a picure when you get it.
Also, for the first time I suffered from brake fade on the World Cup downhill course which was slightly disconcerting when you're flying down sections picking up mega levels of speed and constantly trying to wipe it off just in time to compose yourself for the next major obstacle.
You adjusted the levers? Sounds like boiling fluid as opposed to fade, fade is where the rotors get to hot for the pads to brake effectively. So you end up just having no power. Are you using organic pads? If so, swap to sintered as they work better at higher temperatures (and it the wet)...but they will also boil your lines more easily...so replace your fluid with Motul 600 or better Castrol SRF, if the brakes use dot 4 or dot 5.1 - the wet boiling temperature of both these fluids are much higher than the dry temperature of most off the shelf fluids.
The Cube seems a hell of a lot of bike for the money compared to other competitors, shame it comes with a Fox 34 though. Judging by the reviews it would hands down be one of the best bikes for the money if it had a Pike/Monarch or xfusion combo.
Hey Tom, I haven't looked into the brake issue too much since that day as nothing I've done since has required the same level of constant heavy braking. I was using metal sintered pads (I think), definitely not organic. I did think about using DOT 5 instead of 4, but I've read that all Formula brakes must use DOT 4. I'll check it again though with those suggestions, see if it makes a difference.
Speaking of brakes, I went round Dalby yesterday and got absolutely covered in sandy mud (as is usual when Dalby's soaking wet) and my brakes were a bit rubbish at the end but they were covered with wet sand, so some tweaking required in general.
Also, rear derailleur is now nearly seized due to the cable, so got new cables yesterday after the ride, so thinking the gear issue all along may have been the cable (only had the bike since May so wasn't expecting to have to change them just yet...).
Also, for all of those out there using Muc Off and fairy washing up liquid on your bike (i.e. me!), there was this mini expo thing at Dalby yesterday and one guy / rep there said these contained salts which could effect the warranty / service on Fox forks, he was plugging Rhino Goo as an alternative that is apparently used in the moto x industry a lot, both for cleaning and then an after spray which helped repel muck and water in the first place. Will have a look into it when I've used my remaining supplies up, anyone heard anything like this as well, or using it?
I cant speak for muc off, but i defoe wouldn't use fairy to clean my bike (or car), its far too harsh.
and yes, my understanding is the salt content is to blame.
Quick up date I had two days away at bike park wales on the cube.
The bike performed way better than I thought it would. I had a mega before and the cube felt better in the big stuff.
I am not signing up the fox 34 is rubbish, I have the fit one and I was impressed just kept on taking me smashing it into the rock gardens.
I have managed to ding a rim though 🙁
Changed the gear cables, now it shifts faultlessly. Hmmm, guess I should have sorted this first before slating the shimano gears! In my defence, I just didn't think the cables would need changing that soon.
However, I haven't been able to re-thread them back through the down tube. I'm not that bothered either, apart from a bit of electrical tape holding things in place, I reckon they'll perform better for longer as there's now less openings along the cable length for mud to get in. Just need to plug the redundant holes now.
How was bike park Wales then larry, did it live up to the hype?
Ye it was pretty good. Uplift was a bit tardy. Tracks were very good. From baby smooth up the way up, I was loving all the rock gardens.
WhippetBoy - I've got the 29er Stereo, which I ride in many of the locations that you do.
I too got the problem with shifting, it's an issue with dirt getting in the cables, usually after a couple of loops of Whinlatter.
Switch to a cable set with inner tubes like the Jagwire ones, really helps.
As for getting through the down tube, an old spoke works great for hooking the cable and pulling through.
Wheel size withstanding fully agree with you, the Stereo is awesome!
Mine is for sale, l love it but want to do more DH so something has to give! It's in the classifieds 🙁
Probably going to order a Stereo 650b in the next couple of weeks and wanted to check with owners as to the sizing? I'm 5' 7" and think I'll need the 16. Slightly concerned as to how short the effective top tube length is though.
Guys, how do you find climbing? Do you use the talas a lot? Thinking of the 2014 sl, it doesn't have talas? Been used to the 2012 Stereo and did use the talas on techy climbs.
The 2012 stereo was 150mm with a head angle of 68 degrees.
What do you reckon?
Cheers
Alan
@monster101 never use the talas on mine, the wife got a Stereo too and doesn't use the Talas, no real need, they climb amazingly in full travel just left in trail mode.
I agree, I haven't touched the talas other than to wonder what it is and does it work mechanically (it does obviously!), the bike climbs so well in full travel mode it's just not been an issue.
I'm 5'10" and well basically as normally proportioned as you can be, got the medium which I think is 18" and needed a shorter stem but I've needed to shorten the stem on every bike I've owned so this wasn't a surprise for me. I guess if there was a 17" available this may be a slightly better fit but it's 16 or 18 as far as I'm aware.
I've had to tweak the seat a couple of times and move it forward as I sometimes get lower back pain as if I'm lent too far over, but it's sometimes due to not tightening my camelback up properly and it riding on my lower spine. The wider handle bars do also cause you to lean over a bit more and I normally find on long climbs I'll adopt a narrower hand position on my grips as long as the trail allows it.
If you're ordering one in, surely you get the option to reject if it doesn't feel right?
Thanks. 16 it is then. I'm probably going to be buying online to get interest-free credit (can't afford til mid next year but am impatient) so returning it would be a bit of a hassle.
Apparently not going to be available until end of Jan 2014 though now. Doh.
Anywhere near East Yorkshire, you could always have a sit on it?!
Just signed up to the Innerleithen Day / Night enduro on the 30th November, so will hopefully finally get to see what it's like up there. Just need to get some lights now...
Got my cube stereo race 2014 at the weekend went for a light ride round my local woods. Wow wot a bike will post a few pics soon!
Nice writeup. But could you not have just fitted less ridiculous tyres to the Spicy?
Hey Tom, I haven't looked into the brake issue too much since that day as nothing I've done since has required the same level of constant heavy braking. I was using metal sintered pads (I think), definitely not organic. I did think about using DOT 5 instead of 4, but I've read that all Formula brakes must use DOT 4. I'll check it again though with those suggestions, see if it makes a difference.
Castrol SRF is Dot 4 and has a higher boiling tempt than any Dot 5 or Dot 5.1 fluid. Never use Dot 5 unless you want your brake seals to die a horrible death.... either Dot 5.1 or 4.
Might I suggest you fit a 203mm rotor on the front as well, it will make a huge difference to braking perrformance on extended downhill runs.
Can't say my hopes have problems braking when sandy and wet when using sintered pads though.
You might have glazed the pads?
I've had to tweak the seat a couple of times and move it forward as I sometimes get lower back pain as if I'm lent too far over, but it's sometimes due to not tightening my camelback up properly and it riding on my lower spine. The wider handle bars do also cause you to lean over a bit more and I normally find on long climbs I'll adopt a narrower hand position on my grips as long as the trail allows it.
You are running your bars to low, the wider you go the taller you have to run them to keep your body position the same.
Hi Tom, thanks for the tips. I have to admit I'd prefer tweaking the brakes rather than going out and buying new, especially as I can't afford it either. The comment on the bars was interesting though, going to check the rise of the stock bars and possibly see about trying a riser bar to see if that makes a difference.
I can guarantee with 95 percent confidence that taller bars will solve your issue mate.
I went from 10mm rise to 50mm rise and boom, my back issues and arm fatigue went. And I actually gained more control over the bike.
Wide bars are great, but wide and flat is an utter fad. Sure I lost a little bit of confidence on flat turns because the front wheel is less weighted....but guess what you have to do to resolve that? Lean forward a little more to the position you'd be in with flat bars.
The correct bar height gives you a nice neutral position that allows you to get over the back or weight up the front, WHEN NEEDED. Slammed bars have you weighting up the front wheel when you don't need to and needlessly increase rider fatigue.
Let me know how the 203mm rotor and Castrol SRF/Motul 600 go. Have a look at some guidelines on how to properly bed pads if you've glazed them.
I've got some brand new boxed 30mm rise black Spank 777 evo bars, you can have them for 20 quid....dunno if those will be enough rise for you? How many spacer's do you have above the stem (if any)? If you can't move the bars up to try the rise before you get a pair of riser bars (because masses of spacers looks awful)....get a couple of bars with different rises...try them out...send the on you don't like back.
Now then, figured I'd give an update on how ye olde cube is getting on.
Stuff I've changed since my last post -
Got some Nukeproof 760 wide bars with a 38mm rise in them to try and cure a slight pain in my lower back. Seems to have done the trick.
Changed my brakes, got some Shimano XT and sold the Formula RC Tune on ebay - was going to try bleeding with a higher temperature brake fluid like Tom suggested in a previous post but ended up changing them. As a side note, Halfords brake fluid has the same active ingredients as the Motul and Castrol but was about half the price and readily available.
Decided on this after a number of rides with me just falling out with my brakes. I think one of the key things was I didn't like the way the lever pivoted and I basically couldn't get them set up how I like to brake without a lot of discomfort. I also didn't like the modulation on them - something that I have since discovered is absolutely awesome on the XTs. I don't exactly have cash flying around, so changing them was a big cost even though the XTs were reasonably priced at about £135 for front and rear. So I ventured onto ebay and managed to sell the Formulas for £75 which was a result. Then I also sold a load of other stuff that covered the cost completely and a new set of tyres.
The XTs are awesome. The first time I tried them was at round 1 of the Scottish Enduro and they weren't exactly bedded in, but on the slopes you could just apply them and the modulation and feel was a world apart from the Formulas which seemed to just be on or off in comparison. It's possible the formulas needed bleeding anyways, but either way, it was a sound purchase. I also had to shorten the rear brake hose (at 12pm on the Friday before the weekend of the enduro) and started looking round for bleed kits when I realised you could shorten it without having to re-bleed as long as you had an insert and gromit (with spares coming with the brakes), so did that no problem.
Also got a set of WTB Vigilantes which I've been looking for since before xmas but they were either out of stock or too expensive. Saw some on sale so got them and I'm running them tubeless. One minor thing is they are freaking tight on the rim, I don't actually think I'll get them off again without ripping out the rim strip first. They seem to have loads of grip in the rubbish weather though although the argument could be made that I got them the wrong side of winter, but never mind. My rear Hans Dampf was pretty much bald and I could feel the difference straight away with the Vigilantes.
Also went for a 1 x 10 setup after botching changing a cable on my front deraileur and having no option but to remove it to go out the following day. The gearing has worked absolutely fine and I find myself wondering why I ever had a 2 x 10 setup in the first place (I had a spare 32 ring from when I bought the bike and got rid of the outer 3rd chain ring and replaced it with a bash guard). It did drop the chain though so got a race face thin fat chain ring which has worked absolutely fine so far and I have to say I like the bars and bike in general being less clustered.
I did the Innerleithen Day Night enduro back at the end of November feeling a bit rubbish and it absolutely destroyed me. Since then I've been out pretty regularly and as mentioned completed the 1st round of the Scottish enduro series at Fort William. Was good fun and my fitness was good even if it did absolutely chuck it down most of the time. Round 2 is next weekend at Innerleithen and I'm looking forward to that with some slight trepidation.
Fitness is generally good at the moment. I don't commute and I'm planning on getting out on the evening a bit more but it's difficult with work so mostly weekends for me. Went to Gisburn a couple weekends ago and I think I'll leave going back there. It's quite a drive and just not worth it really, the trail's too short and just so freaking rocky it becomes unpleasant. I'd rather slog it through mud than get vibrated to pieces. There's the odd bit that's good, but it's in need to repair in places and lengthening - not easy I appreciate, but there's just better alternatives closer to home for me.
Main two issues at the moment is a pain in my left knee and left wrist. I think the left knee is a result of getting some five 10 shoes with that stealth sole which grips your flat pedals like there's no tomorrow. But I find I pedal a bit wonky just due to my freakish left leg and as a result, I think the lack of give in the sole means that I'm putting my knee through a more unnatural range of motion than before when I wore trainers and they were less grippy and had some flex. As a result I'm going back to clip ins tomorrow for a ride to see if the same pains comes, the hope being that the clipped pedals will force me to pedal in a more natural range of motion. I'm also going to see a physio just to get it checked out so i'll have to see how it pans out.
The left wrist issue is a bit more tricky and I've tweaked my bars and brakes to see if this goes away. It could basically be a number of things so I won't bore you with the details, just tweaking here, going for a ride, tweaking there, etc, etc.
Other service stuff that needs doing. Both the fork and shock could do with a service, or at least a strip down and oil change. The headset bearing casings are rusting up but the bearing seems to be fine. The rockshox reverb could do with having the hose shortened (but I'm very wary about this one as my mate had issues with his and he fixed it at great cost for spare parts - like an extortionate £45 for a bit of metal in the handlebar lever).
Other than that, I'd still like to change the gear lever and deraileur as I#m still unhappy with them but can live with that and the wheels have taken a right battering to the point that my free wheel fell apart the other week when putting on the Vigilantes. I managed to fix it but the free wheel hub body is basically loose. It rides fine (for now), but it's a DT Swiss hub so if it does loosen then the ratchet won't engage and I'll just be spinning a lot and going nowhere! So i'm considering getting a new rear wheel. I can't true wheels, the rims damaged as well as some spokes and the hubs a bit ****ed, so I figure it's cheaper to get a new wheel than pay someone to lace in a new hub. But I haven't checked this exactly as it's all still working for the time being and the bathroom needs redecorating!
Hope everyone has a great weekend riding.
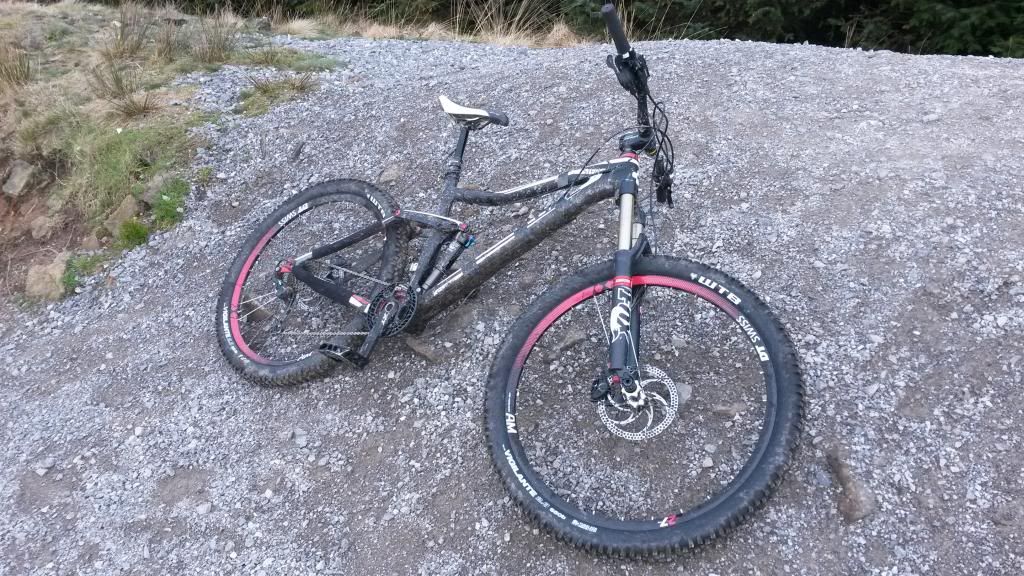
Here's a picture!
[url=[URL=
 [/IMG][/URL]" title="Photo Storage" rel="nofollow" target="_blank" >
 [/IMG][/URL]"
Nice write up Whippet 🙂
I just pondering a new bike and had the briefest of rides on one of these it certainly seemed a lot lighter than my Five.
One thing that has put me off cubes, is that a few have snapped among the people I ride with, but you seem to be riding this one pretty hard and so far it's been OK.
Think I will try and get a test ride.
Right, I'd thought I'd bore you to death with another update. First, I hadn't heard of a cube snapping but I guess it's possible. Someone who I see at these scottish enduros snapped his devinci in the EWS at inners, but I think he's sponsored so he got a new bike to keep on riding although I don't think any of his times were then valid (I didn't enter this as I couldn't afford it at the time and was then massively jealous reading and watching all the stuff on it!).
Since Gisburn I've done the second and third round of the scottish enduro series. Inners was very muddy and slippery and I have to say that riding clipped in there was pretty unnerving but I just got on with it really and for the most part it was ok. I played around with the air pressure in the front tyre and ran it pretty low working on the assumption that as long as I could get my front tyre to go where I wanted it to, the rear of the bike and me on it can follow in whatever bike kung fu pose I could muster.
Most of the stages were ok if ridiculously steep and technical as only inners seems to know how, but withe the full face inspiring a bit of confidence I rode it pretty well except the top section of stage 5.
Following on from that me and a few mates had a long weekend up in Dalbeattie, rode there, Kirroughtree and Ae. All good fun.
Went back up to inners a couple of weeks ago in the lead up to the third round of the enduro series and had a bit of a mare riding there even though it was bone dry, just wasn't on it mentally. Had a better time at Scolty outside of Aberdeen riding the local trails there which are real good fun and have a cool fresh cut, gnarly technical appeal to them - if only that was my local riding spot!
Laggan was a cool place ot ride, first time I'd been there and the enduro tracks were really good fun. Could have done a bit better but was still pleased with the result.
Since my last post I don't think I've done anything to the bike other than ride it. I've just ordered a whole new set of linkage bearings as the first part of some expensive tlc. I'll get the front wheel bearings changed at the same time but a new rear wheel is still on the cards. I'll service the fork and shock in some way shape or form too.
Also bought a cheap road bike from halfords to get some miles in on the evening, quite enjoying it now and it's helping my fitness.
The bike in general is still riding really well, I'm still the weakest link on it. This was reinforced by the guy who won the EWS in scotland as he was riding the team version of the cube, so it's definitely a fast bike! I'm considering a coaching session or two as I want to get better at jumping and try to learn the steep rooty technical stuff that you get at the likes of inners in a more competent fashion, riding the bike as opposed to feeling like a passenger on it hanging on for dear life and being grateful I got to the bottom in one piece!
I've stayed riding clipped in and my left knee doesn't hurt anymore and neither does my left wrist. i find riding clipped in really helps with technical climbing, in scolty there's some hard stuff to get up and being able to pull as well as push made a massive difference.
On a side note, I do find it slightly amusing how everything has enduro slapped in front of it now as if it will help stuff sell because I 'need' it to be more enduro focused! Some of it's great gear, but I do wonder how many people just buy it because of the marketing hype. Almost makes me cringe buying stuff now, but then as I'm broke most of the time at the moment I'm more of a bystander these days.
Bathroom is basically done now as well, toilet is shite and needs replacing!
So it's Saturday night and my active social life means I have time to write up an update on here...
So since the last entry, the bike has had almost another years worth of riding. I've not replaced the toilet and it's still shite and I've spent some £££ on the ye olde cube.
The main thing rolling over from the last entry was getting the linkage bearings replaced. This is where me and my carbon framed bike fell out of love a bit. To cut a long story short, I seemed to round off one of bolts for the main (central) horst link that goes through the seat tube. As a result I had to pay a bike engineering firm to CNC drill the bolt out (I just didn't feel confident handing it to some plucky lad at a bike shop on a Saturday afternoon for him to be let loose with a pillar drill on it and I didn't have the tools myself having spent about 3.5hrs with an engineering bike enthusiast friend one evening trying all manner of ways to get it out) and then fit the new bearings. This they did very well but at great expense to me (all in all including the cost of the bearings it set me back about £350 - 400 not to mention a couple 5hr round trips to drop and then pick up the bike).
So much for proactive maintenance! To an extent, I only had myself to blame as I'd never stripped down the linkages and cleaned everything out which I'm sure contributed to this. As a result, I stripped the linkage down a month afterwards to clean and the same bolt caused more problems so I left it well alone. In the end, several months later (and after hearing nothing from repeated e-mails to cube - very poor customer service) I took the bike back to where I bought it to have it looked at before the 2yr warranty ran out on the frame and the mechanic there undid the problem bolt no problems - so two 5hr round trips and £20 to get a bolt undone - but in my defence, I wanted him to experience the same problem as me in the flesh - it just turns out he didn't experience it!
Either way, I would have felt more comfortable bodging around with an aluminium frame as opposed to a carbon one as they're a bit of an unknown entity to me, even though they are stronger - it's just a different material and I was worried it may be result in something snapping, cracking if I put any force into getting the problem bolt out. It's a poor design in my opinion and something I'd recommend potential buyers consider on whatever type of bike they might get - that it needs to be serviceable.
Anyway, all the linkage parts strip down and can be regularly cleaned out and greased and the bearings are doing ok. All I'd say is that if you ride in muddy weather throughout winter and regularly have to wash your bike, just make sure you strip down the linkages and clean them out, it will likely save you money and time in the long run. Lesson learned!
New stuff I've got on it. Shimano Zee derailleur and shifter, just fitted a 40t crawler cog on the back (had to replace the B tension screw with a longer M4 x 25mm bolt from halfords though to get the clearance and add a few links to the chain) - will be testing this new sprocket tomorrow hopefully.
Got new wheels eventually (one at a time), Hope hubs on Stan rims. Can't fault them. Tubeless set up was a bit of a pain, but eventually resolved after much swearing although the older WTB Vigilante needed cutting off in the end and I punctured several inner tubes in several places trying to get a tube in to help seat the tyre. I've since made a DIY coke bottle compressor thingy but not had to use it yet.
Been running a Magic Mary on the front over winter and it's an epic tyre. Was my saving grace at Rd 5 of the SES last October at Inners - very muddy and slippy and this tyre just got me through stuff that should have seen me dumping it otherwise. Very confidence inspiring and decided to keep it on over summer as well. Slapped a new Hans Dampf on the back.
Front fork has been playing up with not getting full travel and scratched stanchions, thought it might be dried out seals so changed them but to no avail. After much procrastinating I decided to opt for a new pike instead of trying to revive the existing Fox 34 - I worked out that if my worst fears were realised with the Fox (which is usually what actually happens) then the cost of this would cover a large part of the new pike and the pike is epic compared to the 2013 Fox - according to all the reviews and fellow bikers. I can only just afford it but I'm hoping it will be a decent upgrade as I don't plan on spending any more money on it for months now if I can help it.
Enjoyed the Vallelujah (sp?) race in March near Selkirk. Very muddy again in places but good fun and good tracks. Didn't do so well at Inners Rd 1 of the SES in March and enjoyed the tracks at Ae forest for Rd 2 of the SES. Rode the practice days at Inners/Glentress last week for the EWS (I tried to get a place but was too late), I think the under performing front fork definitely contributed to a lack of confidence on certain parts of the track, but if was still fun all the same although felt like pish the whole time due to illness. Planning on being there this weekend coming with some mates for a lads weekend so looking forward to giving some of the stages another go.
Overall, the bike is still awesome after two years although I've changed a significant number of components on it now mainly due to wear and some personal preference. Buying, maintaining and upgrading parts on a bike of this type is expensive for me, I don't put new items on without some serious consideration. The costs relating to the linkage bearings was annoying and I'd not planned on changing the fork - but I think it will be the right decision in the long run with the fork. The bike is enormously capable, evidenced by Greg Callaghan's win in Ireland in the EWS and 3rd place last weekend in the Scottish EWS. So I do try to keep some perspective on things when spending money on it that I am the weakest link on it and strive to improve my skills as much as possible.
It's a fun, fast and light bike and I've had some awesome times on it over the last two years, so all those benjamins have counted for something! I've just this month finished paying it off (I've also included it on the house insurance now which I find gives you a certain piece of mind) which means I'll have some extra cash to spend on that pike. I'm sure people on here have just as much fun on something a third of the cost and that reality isn't lost on me, when it comes to changing it again at some point in the (distant) future, I'll be keeping that in mind.
If you have any questions then let me know.
Picture of me nailing it at Inners last October...!![img]

Stopped riding clipped in as well. Knee seems to have sorted itself out and riding flats is better for my confidence if not as pedal efficient.
I reckon if Sam Hill can manage with flats then so can I...!