- This topic has 690 replies, 36 voices, and was last updated 3 years ago by zilog6128.
-
Cheap 3d printer kits – Experiences?
-
papamountainFree MemberPosted 6 years ago
Also that looks great WCA. How do you find the petg? Is 230 the temp you usually use with it? I’m off to read up about petg and its qualities.
I’m itching to print something else.. Need to get some pla ordered 😀
Oh, do you remove the filament each time you stop using it? If so, while the nozzle is still hot? I let it all cool down then remembered about removing the filament so heated the nozzle back up to 185 and pulled it out.
AlexSimonFull MemberPosted 6 years agoOh, do you remove the filament each time you stop using it? If so, while the nozzle is still hot? I let it all cool down then remembered about removing the filament so heated the nozzle back up to 185 and pulled it out.
No. I just leave it (especially as once finished, the printer cools down). If I want a different filament next time, I’ll do the swap once it’s at temperature before that print.
The only reason I would unload filament would be if it was particularly susceptible to moisture (like nylon, etc).WorldClassAccidentFree MemberPosted 6 years agoYesterday perfect, today with identical setting I get snot.
 [url=https://flic.kr/p/22uiweP]20180128_113158[/url] by WCA!, on Flickr
I wish the bloody printer was consistent. trying again at half speed for the first hour or so.
stumpy01Full MemberPosted 6 years agopapamountain…for the bed levelling and the slightly lower centre, I cut a load of 50mm squares of alu foil and played around with the quantity under the glass until it was nearer the level of the extremities. It seemed to work well and was a quick and easy thing to try. I think I started with 5 pieces stacked up, but have just been playing with the bed levelling and have taken a piece out.
I think I’d got a bit over concerned about the nozzle being mega close to the bed. Just running another calibration cube now and the base looks a heap squarer (no visible elephants foot). Will be interesting to measure and compare to yesterdays one.
One thing I am finding quite annoying is that the bed seems to need levelling every time i print and some times it several iterations to get it spot on, which obviously adds time.
papamountainFree MemberPosted 6 years agoYeh I think I’ll try that first and see how it goes. I think the sweet spot is just feeling some vibration on the paper, not actually dragging.
Do you level with bed and/or nozzle hot or cold?
NorthwindFull MemberPosted 6 years agoI hate this “bit of paper” stuff, I know it works but it’s so open to interpretation, give me a feeler gauge ffs.
stumpy01Full MemberPosted 6 years agopapamountain
<div class=”bbp-author-role”>
<div>Member</div>
</div>
<div class=”bbp-reply-content”>Yeh I think I’ll try that first and see how it goes. I think the sweet spot is just feeling some vibration on the paper, not actually dragging.
</div>
<div class=”bbp-reply-content”>
Do you level with bed and/or nozzle hot or cold?
</div>
Yeah, that was the conclusion that I came to; rather than have the paper dragging, just wait until you can feel the fan vibration through the bed.I have been setting the bed height with everything hot.
<div class=”bbp-reply-content”>
I hate this “bit of paper” stuff, I know it works but it’s so open to interpretation, give me a feeler gauge ffs.
</div>
Yeah, I keep meaning to dig out my feeler gauges from the garage!PS – Quoting with this new forum format seems a bit erm, tricky!
WorldClassAccidentFree MemberPosted 6 years agoOkay, I give up. This is the third attempt at Baby Groots body.
I used the same settings as I used for the head. One of the hands lifted.
I used some hair spray on the taped bed and it seemed better but after I watched the first few layers go down I left the room and it looked much like it does in the picture.
This time it was printed at 80% speed and still failed after I left the room.
[url=https://flic.kr/p/22S6uSS]20180131_114607[/url] by WCA!, on FlickrI am not sitting watching it for 9 hours so any suggestions please. It is PETG.
I am thinking of dropping the nozzle temperature 5 degrees as there are burnt bits in the ruined print. I think these are actually caused by the PETG sticking to the nozzle instead of the model though.
Help!
AlexSimonFull MemberPosted 6 years agoI think these are actually caused by the PETG sticking to the nozzle instead of the model though.
That was my experience.
Are you printing with supports? And a brim?
Have you got any Purple Elmers glue?WorldClassAccidentFree MemberPosted 6 years agoIt is design I downloaded from Thingiverse and my computer isn’t capable of changing the model. The head had brim when I downloaded it, the body didn’t.
I know the first print failed because the base layer shifted but the last two failed prints were definitely well stuck. I watched the base layer going down and there was no lift or curl.
I am re-slicing with first layer filament temp of 230 and subsequent layers at 225 to see if that helps.
Unfortunately the laptop I have is so old it takes about 30 minutes to slice each time. That is why I am asking for suggestions on what settings to fiddle with. Each experiment takes and hour or so to slice, start printing and then fail. Given the full print is estimated at 9 hours and I don’t want the noise of the printer overnight I don’t get too many chances each day.
AlexSimonFull MemberPosted 6 years agoBlimey – sounds tough. Brim should be in the slicer under adhesion.
But if you think it was stuck well, that might not be the problem.
I found PETG best with very little part cooling (allowing the layers to stick better to each other).
I don’t know what else to suggest as the head came out so well.I printed PETG at 235, but I thought that was low compared to most.(My hot end has a PTFE throat, so doesn’t like going hotter).
MilkieFree MemberPosted 6 years agoI generally find to sort out these problems, you need to watch it, so you can see what causes the problem. 30 mins to slice tho!!! I just sliced it to see if I could see any issues, I won’t tell you how many seconds it took. I did notice there are a few overhangs, while this should be fine, if you haven’t got your settings dialled in they do tend to compound over each layer.
I’ve found if I’m chasing my settings and prints aren’t consistent then its usually the material. Also if you have had a few bad prints and the nozzle has dragged over cooled material, there maybe a tiny blockage in the nozzle. Best way to find this is buy extruding some material and if it spirals or goes off to one size, rather than directly down, then its usually got a small blockage. eSun Cleaning material is great for this, the Atomic method also works with this, I also use it when changing material.
WorldClassAccidentFree MemberPosted 6 years agoStill slicing….
I had used works PCs before but the new security clamp down prevents all personal use so I have a knackered laptop from 2004 or 2005.
When I get some cash together I will be getting a new one – perhaps an upgrade to a ZX Spectrum 🙂
WorldClassAccidentFree MemberPosted 6 years agoRepetier had crashed but the error message wasn’t being displayed until I tried to use it. Oh well.
What I tried to use it for was to extrude some filiment to see if it appeared to snag but looks fine to me.
[url=https://flic.kr/p/23WWCMg]20180131_134400[/url] by WCA!, on FlickrMilkieFree MemberPosted 6 years agoOMG how dirty is your nozzle, that is supposed to be brass colour! I think something is wrong though, if I extrude like that it ends up in a nice coil on the bed, not tangled up, but I have a different printer.
Rather than slicing the whole model, can you slice the first 10mm as the problems seem to occur by then? Will reduce the slicing time down by quite a bit I would think!
stumpy01Full MemberPosted 6 years ago<div>
Milkie
<div class=”bbp-author-role”>
<div>Member</div>
</div>
<div class=”bbp-reply-content”>OMG how dirty is your nozzle, that is supposed to be brass colour! I think something is wrong though, if I extrude like that it ends up in a nice coil on the bed, not tangled up, but I have a different printer.
Rather than slicing the whole model, can you slice the first 10mm as the problems seem to occur by then? Will reduce the slicing time down by quite a bit I would think!
</div>
If you haven’t tried it, you can do this in Ideamaker – another free slicer. I downloaded it last night & had a quick play with it.
You can choose a cut line which splits the part. You can then treat them like separate models, so could just delete the portion above the cut line.
</div>
I have yet to print anything too demanding, or encounter any major problems. I am dreading seeing an image like WCA’s failed Groot prints! I hope you sort it out soon…Surely, if the failed portion is not warped/curled or coming away from the bed you can rule out first layer adhesion?
WorldClassAccidentFree MemberPosted 6 years agoRight, I have just bought a new computer with a graphics car. Got through most the installation and set up stuff so now trying to remember what the 3D printing software I was using. on the old crap laptop.
From memory Repetier Host (or something like that) and Slic3r.
both free which was the main point. Any other recommendations for free software that is easy to use and FREE. I will check out IdeaMaker.
Also recommendations on free and easy to use CAD software to start creating stuff would be good.
MilkieFree MemberPosted 6 years agoI use Simplify3D, but that’s not free, but pretty awesome at the time I bought it.
Cura is free.Here is a list:
https://all3dp.com/1/best-3d-slicer-software-3d-printer/MilkieFree MemberPosted 6 years agoFusion360 is what I use for designing. Loads of tutorials on it on YouTube.
WorldClassAccidentFree MemberPosted 6 years agoOh wow!
How frickin fast. It is like I have just moved from riding a mule to flying a jet plane. I know the printing will still be slow but I don’t even have time to drink coffee while it slices.
I will be playing lots while I recover from the ankle op.
WorldClassAccidentFree MemberPosted 6 years agoCan’t edit old posts – now should I mention that…
I realised that the really quick slicing was using Cura with default settings ending with a model with predicted 2 hour 27 minute print time.
Just running Slic3r to do the same thing and it takes about twice as long. Still less than a minute though and gives a model print time of 3 hours 18.
both significantly less than the 9.5 hours previously.
AlexSimonFull MemberPosted 6 years agoThat’ll be a lie. It’ll be close to a 9hr print.
They’ll be overestimating the printers travel, acceleration and jerk settings.
You’d do well to obtain a Printer profile and a PETG profile for your printer from a suitable facebook group or forum. Then you’ll a) get reliable prints and b) accurate time estimations.Cura is excellent in my experience.
WorldClassAccidentFree MemberPosted 6 years agoThanks – I will google some settings. Happy to use Cura
WorldClassAccidentFree MemberPosted 6 years agoCura sliced the model in a few seconds on the new computer after I had adjusted the settings for PETG and my printer.
I then realised I wouldn’t be able to print it before going into hospital so sliced another smaller model which gave me time to print before leaving.
It started printing with a 2 hour estimated print duration. An hour and a half later and it is a 1:15 duration remaining.
Looks like it should be okay print though, just a little scorching at one point
[url=https://flic.kr/p/EjiPLx]20180201_110816[/url] by WCA!, on FlickrwwaswasFull MemberPosted 6 years agoMy son’s printer finally arrived (and not Vat or duty to pay!)
(apologies for crap pic)
AlexSimonFull MemberPosted 6 years agoGood stuff wwaswas – I would move that black cable bundle around the back of the printer – alongside the bowden tube
wwaswasFull MemberPosted 6 years agohe’s read the instructions now and a number of assembly changes have been made 🙂
stumpy01Full MemberPosted 6 years agoWell, this afternoon I decided to do my first functional print. It’s a shim for our rotary washing line as the pole in the ground has a larger ID than the OD of the drier pole, so it flops around again.
Quite a learning exercise so far!
Because the last print I did (calibration cube) came out so well I didn’t bother levelling the bed. I figured that it can’t be sensible to have to level it every time so would just leave it be.
First print was a messy curl of plastic that refused to adhere to the bed, so stopped print, cleared the bed and gave it a really good clean and another dose of glue.
Second print was better, but still lifting in places. I thought I’d let it run and see what it looked like. About 15 mins in I realised it was going pretty badly, so stopped it.
Ended up levelling the bed again which took ages and trying again. I don’t get how it can drift from print to print. Hey ho.
Finally I don’t think I have my settings very well tuned for this print. I really wanted it to be printed with no infill because the walls are so thin. But it is trying to put an infill in which appears to be 1 nozzle width wide. This is making it massively slow as it’s basically laying a dot in each infill position.
And I think as a result of this, the rest of the layers aren’t going down very well. There are thin areas on the outer walls in places and it generally looks a bit shite..
I’m leaving it to run because I think it will be a valuable learning experience. And to be honest, as long as it’s dimensionally accurate it should do the job anyway.
But – there’s quite a lot to this printing malarky to get good results! When it goes well, it seems so easy. But when it doesn’t go well, so many factors come into play!
MilkieFree MemberPosted 6 years agoMaybe this troubleshooting guide will help.
https://www.simplify3d.com/support/print-quality-troubleshooting/
Yes there is a lot to learn to get good print results. Good settings for one model will not be the same for a different model. You’ll find you have settings for great quality another set for overhangs, etc. It really depends on the finish you are happy with.
stumpy01Full MemberPosted 6 years agoCheers, Milkie. I’ll have a look! Although I have spent a lot of time looking at various ‘how to’ guides.
I think this particular print was not helped by the thin walls.
I have created another shim model that biases the two tubes over to one side, rather than an even thickness around the entire gap; it’s more of a wedge I suppose than a shim. There is no requirement for the tubes to be concentric, so it probably makes more sense to do it like this.
It did actually finish the print last night, but doesn’t look terribly good. I haven’t measured it yet but it looks circular & the sides seem to have stayed square to the bed. There are quite a few zits and blemishes to remove before trial fitting it.
I have made a new (non-functioning) version today that is thicker 1.6mm wall thickness, so I’ll see if the slicer will allow me to slice it as a complete solid. I’ve also cut it down to ~10mm so I can print it fairly quickly & compare it to the first one.
Here’s a couple of pics of yesterday’s attempt:
[url=https://flic.kr/p/23ZfPng]IMG_20180201_222854[/url] by STW stumpy01, on Flickr[url=https://flic.kr/p/22UuUV3]IMG_20180201_223031[/url] by STW stumpy01, on FlickrAlexSimonFull MemberPosted 6 years agoSomething’s amiss. Very hard to narrow down as I’m a relative newbie too.
I would post those on the CR-10 facebook group.
Are you using a Cura profile that’s known to be good? A thin wall shouldn’t cause too many issues. Vase mode (single perimeter) produces the cleanest prints of all usually.When it’s going around the perimeter, does the printer bed seem to move smoothly?
MilkieFree MemberPosted 6 years agoThose dots on your skirt look like under extrusion. I don’t think you need to increase your extrusion multiplier, while it might fix it I don’t think it is the root cause.
It could be cause by a little nozzle blockage, especially if you are noticing it on one side the print. Or it could be the coil is tangled slightly. This is assuming your settings are correct and its slicing it correctly.
Did you design it yourself? If so, these tutorials might help with designing for 3D printing.
https://www.stratasysdirect.com/resources/design-guidelines/fused-deposition-modeling
https://www.3dhubs.com/knowledge-base/how-design-parts-fdm-3d-printingstumpy01Full MemberPosted 6 years agoThanks for the replies. Sorry for the delay in getting back to you.
AlexSimon. I did post these on the FB page and got no real responses above what I didn’t already know.
I am convinced that the main issue is caused by the slicer attempting to add infill when there wasn’t really room for it. I made a cut down version of it today with 4 walls and that has sliced with zero infill – just solid extrusion. I am gonna print that tomorrow if I find time.
The bits of my part where there was a constant extrusion going down look fine. I think some of the poor appearance is down to me saving quite a coarse STL.
I think I might have sliced this with a slightly tweaked Cura profile. I’ve been playing with Ideamaker quite a lot and so am a bit lost what I sliced where!
Milkie, yeah I did wonder if that was a bit of under extrusion. I hadn’t pushed much filament through the nozzle after loading it though, so I presumed that was the reason.
The thing is…the thicker section of the part looks fine. It’s only the thin walled bit with its dotty attempt at infill that looks poor.
I’ve got some prints planned tomorrow that will hopefully help me see what’s what.
If I struggle with these, I will investigate a clogged nozzle.
Yeah, all designed by me. I’ll take a look at the tutorials, thanks.
FWIW, the ID and OD are very close to the designed dims, so it should be a functional part. I need to give the inner diameter a light sand to remove some blobs, but then I’ll give it a trial fit.
tthewFull MemberPosted 6 years agoI’d have thought if it’s dimensionaly correct, the blobs and imperfections will make it a nice interference fit when pushed home. Not like it needs to look nice for that application.
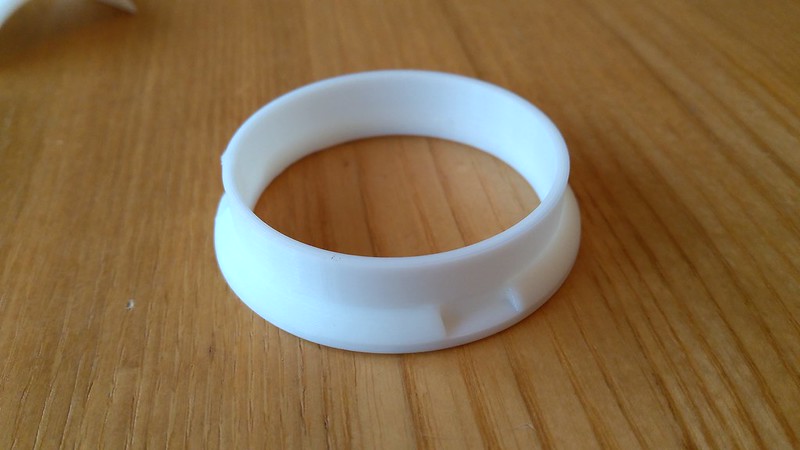
stumpy01Full MemberPosted 6 years agoSo, the thin walled shim was almost there, but not quite. It fitted perfectly into the larger dia pipe in the ground, but the pole for the rotary drier was too tight a fit to get the shim onto; I think it was due to the fairly large blobby seam that went up the inside of the shim.
I could have sanded it back a bit more to get it properly flush, but decided to try the crescent shaped shim that I did at work yesterday.
I did another print this morning – 2 objects. One is a crescent shaped ‘wedge’ type shim to bias the two tubes over to one side. The other is just a test piece to confirm whether or not it was the thin walls causing the issue.
I thickened the walls of the original part up to 1.6mm (4 line widths) and chopped down the base & most of the height.
I changed the print settings last night with a much slower first layer speed. Adhesion was much better & the parts printed loads better. I think I need to fiddle with my retraction settings because I am getting quite a lot of blobbing, particularly at the seam. And, the skirt isn’t coming away from the print bed as a homogeneous piece, but is still in it’s individual lines (you can see this in the pic below). So, I think I need to calibrate the extruder to check whether I am actually getting the right number of filament out of the nozzle. Pushing the filament through manually is no issue & it comes out nice & straight, so I don’t think it is a clog.
Anyway, here’s some pics of the test thin walled shim (with wall increased to 1.6mm) & the crescent shim, which I’ve fitted & works well. It could probably do with being 2x as long as it is but that’s a job for another day.
[url=https://flic.kr/p/22EA5mc]IMG_20180203_140011[/url] by STW stumpy01, on Flickr[url=https://flic.kr/p/242Zq8c]IMG_20180203_140215[/url] by STW stumpy01, on Flickr[url=https://flic.kr/p/K65VMX]IMG_20180203_140242[/url] by STW stumpy01, on FlickrWhite is not an easy colour plastic to photograph!
WorldClassAccidentFree MemberPosted 6 years agoI have to put my foot up for a while (http://singletrackworld.com/forum/topic/ankle-update-with-gory-pictures/) so decided to use the time and new computer to learn Fusion360 and design something useful to me. Like Stumpy I am currently going through the prototyping stages and here is prototype 1 with the completed big baby Groot next to it.
[url=https://flic.kr/p/22XgsTG]20180203_155916[/url] by WCA!, on FlickrThe printer seems to work so much better with a more powerful computer so I guess the crap laptop was causing many of my previous problems.
Amnyway, i am sure you are wondering what the prototype actually is for. Well, it is a wrist rest for my crutches.
[url=https://flic.kr/p/22EDX1T]20180203_160000[/url] by WCA!, on Flickrnormally the standard grey plastic wrist support doesn’t fit well. It is either too tight or in this case, too loose. This means that as you walk along the back of top of the crutch presses hard against our forearm with all the pressure in one place.
The idea is that this piece will clip over the shaft of the crutch and provide a nice large contact area to reduce the pressure on the forearm. The side you reest your arm against is glass smooth. Not sure why the top side is so rough, it is as if Fusion360 or the Cura slicer hasn’t stuck the final layers on it.
anyway, as you can see, I didn’t bother measuring and the clip for the crutch is in the wrong place. I updated the design to move it closer to the crutch and further from the arm rest. I also added some fillets for strength and chamfered the edges of the plate for comfort.
[url=https://flic.kr/p/EnSts2]20180203_160043[/url] by WCA!, on FlickrCurrently printing V2 having carefully levelled the bed
[url=https://flic.kr/p/2434Vpa]20180203_160113[/url] by WCA!, on FlickrWorldClassAccidentFree MemberPosted 6 years agoGrrr… Well into the print and then the back corner lifts.
[url=https://flic.kr/p/22XiR5w]20180203_163018[/url] by WCA!, on FlickrHairspray on glass, same as for the successful print. All the same settings just different results..
Do we think turn the bed heat up or down, or keep the same to begin with and then lower it?
The last option is what I did with Slic3r but haven’t seen the option in the Cura Engine that comes with Repetier yet. I will investigate further while I await your advice.
WorldClassAccidentFree MemberPosted 6 years agoBed temp raised to 70 degrees
28 minutes and layer 8 and the front corner is just starting to lift. Let’s see if it sticks
[url=https://flic.kr/p/Eo1rVi]20180203_173425[/url] by WCA!, on Flickr


The topic ‘Cheap 3d printer kits – Experiences?’ is closed to new replies.