[url= https://i.postimg.cc/xJ3FYtTN/20230204-161128.jp g" target="_blank">https://i.postimg.cc/xJ3FYtTN/20230204-161128.jp g"/> [/img][/url]
[url= https://i.postimg.cc/QHqXBw04/20230206-174159.jp g" target="_blank">https://i.postimg.cc/QHqXBw04/20230206-174159.jp g"/> [/img][/url]
Been sorting out my shed....
Made a TV and speaker stand and got the king of cool up
How much space?!?!? Garage envy
Nice size of workspace. 😀 also envious.
New wheels for the commuter
[img]  [/img]
that's pretty light, what spec?
Nextie hookless carbon 28mm internal, Chris King R45D, Sapim CX-Ray spokes , Sapim Polyax nipples
My garage gets very cold and as I plan to be making carbon fibre resin infused things in there soon I thought I would add some cheap and easy heating.
Feast your eyes on 'a heater'
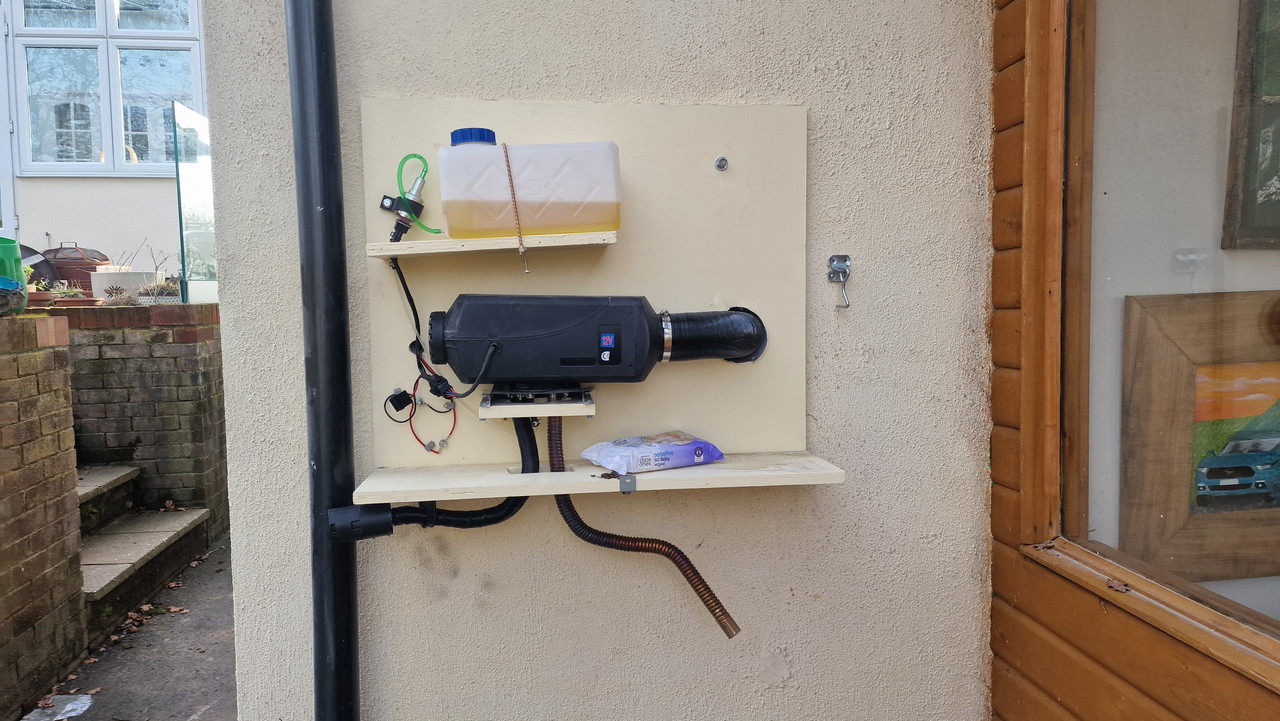
Or with instructional labels "A diesel heater"

If you duct the habit air intake inside it will make it more efficient.
Also the wiring get it weather proof its not great quality
Also run it full tilt before shut down keep it from coking up.
But they do work very well
I agree that feeding the warm air intake from within the garage would be more efficient but I can't be bothered to drill another big hole through the garage wall. A 10-15 minute test raised the garage from -1 up to 12 degrees which was ample for me.
I was planning on heat wrapping the wiring to give slightly better weather proofing. What else would you suggest? At the moment the power wires are just two ring connections bolted together to test it works. The other stuff is the connector blocks that came with it.
Wrap it in squirrel fur?
hiw about turning the shelf & back board into a box to enclose the unit?
I think you should also buy a couple of fire extinguishers. The foam type
At the moment the power wires are just two ring connections bolted together to test it works. The other stuff is the connector blocks that came with it.
You are bodging stuff that can kill you and other people if you get it wrong. If water enters that connector block the control box isn't going to be able to do much to regulate the burner. It's supposed to be self-regulating to a degree but it's cheap Chinese crap built from a stolen design at the lowest possible price.
Search for Wiska gel boxes if you want a quick and easy way to do this. I don't understand why you've deliberately taken other wires, left them exposed the elements, but deliberately secured them to the wood with incorrect fittings unless it's to create an industrial aesthetic? I mean, the least you could do is use double-insulated cabling in an IP enclosure.
And a final point is that maybe screwing the thing that's designed to burn diesel to the back of a wooden cupboard door is not the safest route. If it does catch fire it'll melt the diesel container, neatly flooding the whole thing with a fuel source. Don't know how hot the exhaust is but pointing it at a wooden wall also doesn't seem as safe as it could be...
Sorry if this comes across as grumpy but it looks to me as though you haven't considered the risks of what you're doing.
There is a waterproof box that covers the whole thing. I just took it off as the outside of a wooden box doesn't really show much.
[i] don’t understand why you’ve deliberately taken other wires, left them exposed the elements, but deliberately secured them to the wood with incorrect fittings [/i]
The power wires that came with it just ended in metal ring connectors. I used these to connect to the 12V power supply that is inside the garage as a temporary fit to check it actually worked. I fully intend to put something more weather proof and permeant there now I know it works which is why I asked advice on how best to do this.
It is all mounted to a marine ply panel which is bolted to a concrete block wall. The idea is that if I decide to remove it, the whole thing comes down in one piece. The exhaust points at the floor more that the wooden cabin and having held my hand near the exhaust exit and felt the wooden wall after running it for 20 minutes I am happy that little or no heat actually transfers to the wood. I was actually more concerned about the discolouration but it appears to run quite cleanly.
Yes, there is a risk of fire, as with any heat source, but this is meant to be mounted inside a vehicle so hopefully won't want to burst into flames every week. Trawling the internet does show the occasional fire but mostly due to electric faults and punctured or melted fuel lines.
The fuel tank is mounted where it is, on a sloping shelf, to minimise the risk of spillage when filling and to encourage any spillage to drain away from the motor but the baby wipes are there to mop up anything obvious when I fill it. The location also routes the fuel pipe away from the exhaust pipe to minimise the risk of melting - the fuel pipe actually enters the motor between the air in and the exhaust out so needs to be kept pulled to one side to remove the rick of touching the exhaust.
I don't feel upset that you are trying to save my life, I appreciate it, and I will check out the Wiska gel boxes. I was going to use the waterproof car wiring connectors I already have but will see what the differences are. Are you suggesting I replace ALL of the connectors provided or just the power ones?
Aren't you risking a significant chance that the cold air intake will be inhaling the exhaust?
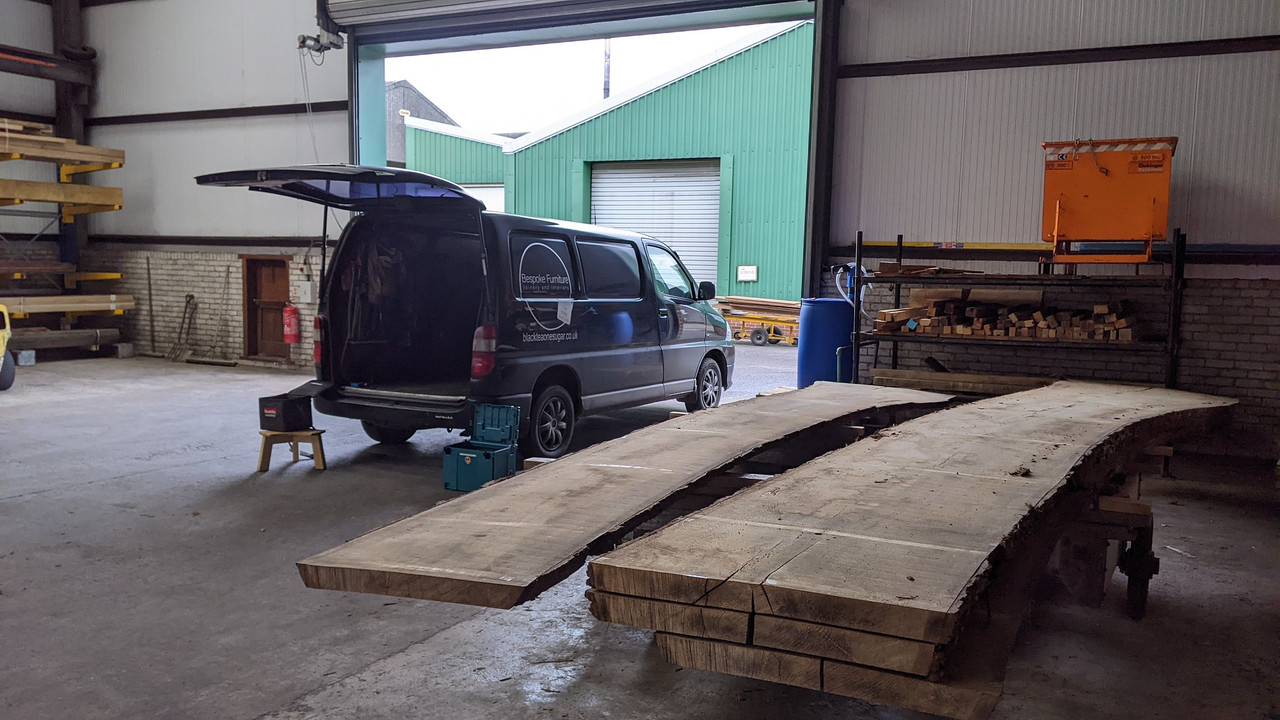
Anyway - wheels for the Spur:
[img]  [/img]
[img]  [/img]
I fully intend to put something more weather proof and permeant there now I know it works which is why I asked advice on how best to do this.
At a bare minimum.
IP waterproof junction box for all the wiring. Make sure the wires have a drip loop.
Not sure I'd term a ply boxes "waterproof", particularly given the structure your pic is showing.
Try and vent that exhaust at least up over the roof line, or at least a fair way further from the cold air intake for the air that is heated.
the fuel pipe actually enters the motor between the air in and the exhaust out so needs to be kept pulled to one side to remove the rick of touching the exhaust.

Have you thought about moving the whole lot indoors and running the exhaust tube to the outdoors?
I be he's thought about this....
Have you thought about moving the whole lot indoors
and running the exhaust tube to the outdoors?
But not this...
Have you thought about moving the whole lot indoors andrunning the exhaust tube to the outdoors?
😀
DrP
Boring geek alert.....
Needed a Sulzer/Bayer style static mixer, quoted £3.5k and 10week lead time. Reverse engineered the single 2" element I had in Solidworks and scaled it to suit 3"Schd40 pipe. Tig brazed them.
£140 for 13 elements.
[url= https://i.ibb.co/ChhKnnM/C8-BF60-AD-18-F3-496-F-BF02-450091-D01454.jp g" target="_blank">https://i.ibb.co/ChhKnnM/C8-BF60-AD-18-F3-496-F-BF02-450091-D01454.jp g"/> [/img][/url]
[url= https://i.ibb.co/tmTrkcJ/78-B4-F557-19-D5-45-C7-BB2-D-EDEB8115993-B.jp g" target="_blank">https://i.ibb.co/tmTrkcJ/78-B4-F557-19-D5-45-C7-BB2-D-EDEB8115993-B.jp g"/> [/img][/url]
[url= https://i.ibb.co/BzRD0Mh/757-BBF31-A877-4-DC6-A2-F5-5-B62900-A4994.jp g" target="_blank">https://i.ibb.co/BzRD0Mh/757-BBF31-A877-4-DC6-A2-F5-5-B62900-A4994.jp g"/> [/img][/url]
Just to put some peoples minds at rest:
1) The wiring connectors that were temporarily on show are now properly connected and inside the garage.
2) They are only 12V anyway so unlikely to fry anyone if they get a touch damp.
3) The motor itself is designed to be in a campervan so has a degree of weather proofness built in, plus it is a metal cylinder with a glow plug in it so pretty inert, not a rocket fueled monster.
4) The exhaust needs to be relatively short to keep the back pressure minimal and the engine running well.
5) It is pointing downwards so that the water produced drains rather than rusting through the exhaust.
6) The exhaust area is full of free flowing air and no-one is going to sit there and die from the fumes.
7) The air intake that might suck up exhaust fumes is the one that feeds to motor so gets mixed with diesel and burnt.
8) The air intake that feeds hot air into the garage is inside the box so unlikely to be affected by the external exhaust.
In summary, risk to peoples lives from a 12V supply have been minimised and risk to peoples lives from exhaust fumes minimise by location of exhaust.
Two tanks of fuel used without incident and I planned to be cremated anyway so nothing lost if it does go wrong.
Rustynissanprarie, that's a bloody work of art.
Especially compared to that Heath Robinson lash up shite that WCA posted.
Boring geek alert…..
Well done. But what is it ?.
Some more wheels here - 'Goldix' hubs - which seems like DT 240 copies, and WindWing rims at 430g each for 30mm (internal) 27.5" AM weight. They feel utterly bombproof. No access holes for the nipples which I was a bit nervous about, but lacing only took slightly longer than normal using a magnet to draw the nips around from the valve hole. I might feel differently if I was a pro wheelbuilder with the extra faff, but as a one off it's quite nice to have a rim that won't need tape.

No access holes for the nipples which I was a bit nervous about, but lacing only took slightly longer than normal using a magnet to draw the nips around from the valve hole.
Crikey, what a faff, but a cracking result 👌
Needed a Sulzer/Bayer style static mixer,
A what now?
Also in the don't know what they are but very impressed camp. 😊👏
A 'ball in a box'


(Playing with the last-but-one thing I made - a small CNC machine)
Oi tillydog,where's the timelapse film to go with that? 🙃🤣
Nice work 👍
Ta - The CNC is a homebrew affair:

(I've re-designed the spindle since those photos were taken)
More info here (my website) or here (MIG Welding forum).
🙂
Some more wheels here – ‘Goldix’ hubs – which seems like DT 240 copies, and WindWing rims at 430g each for 30mm (internal) 27.5″ AM weight. They feel utterly bombproof.
That does look very faffy, but amazing result.
get yourself some eberspacher type fuel line for the heater - the green stuff you have can perish quickly outside. the hose from teh pump to the heater needs to be the same. they are sensitive to fuel delivery.
the fuel pump also should be mounted with the outlet to the heater upwards at 45degrees.
my pump electrics are all exposed under a old VW van driven in teh rain for a year and a bit and are all fine (unlike the crappy fuel hose). i did wrap a bit more electric tape over them but nothing bonkers.
Hmm. I read somewhere else that the fuel pump should point down to the heater which is why I mounted it like that. Any reason you say up? I can switch it over easily enough or even have it horizontal or vertical. Just need to know which is best and why.
I will probably use some old car fuel pipe when I dig the box of bits out for the new car build. That is a braided rubber hose designed for engine bays.
Probably total overkill for this but I have some and after some of the earlier panic over a 12v electrical connector and en exhaust pipe venting below roof height I would hate to upset the H&S gang.
My 2nd and 3rd time wheel building. Been waiting for two years to rebuild according to when I posted this thread. Not yet ready to build a wheel without following Ali Clarksons wheel lacing and tensioning videos yet, they're excellent.
Have replaced the straightpull hubs with 2nd hand Hope Pro 2 Evo hubs, and spokes are ACI Alpina DB with brass nipples (avoiding aluminium since they corroded and broke).


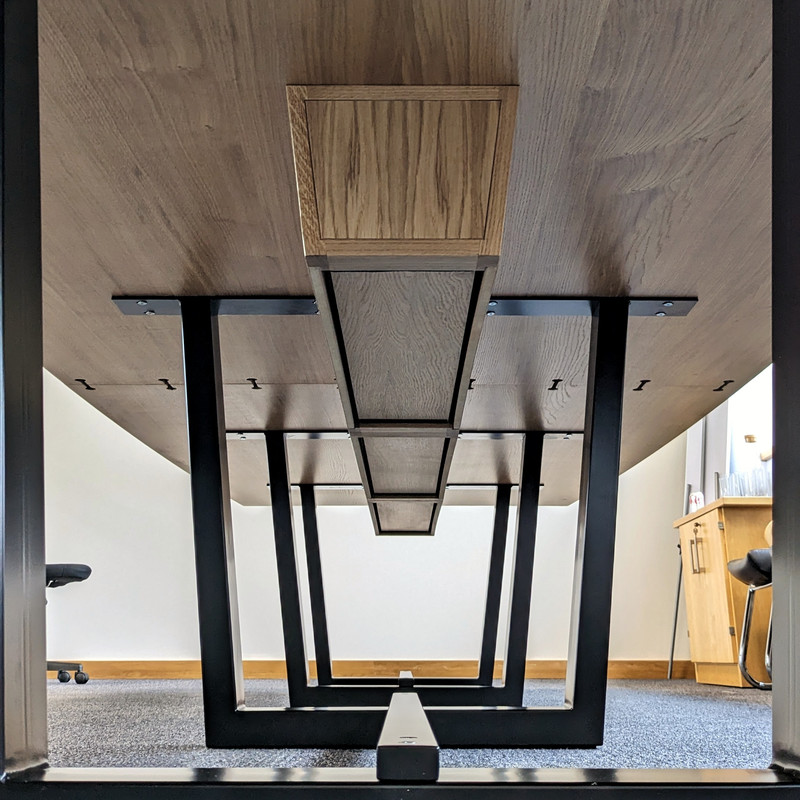
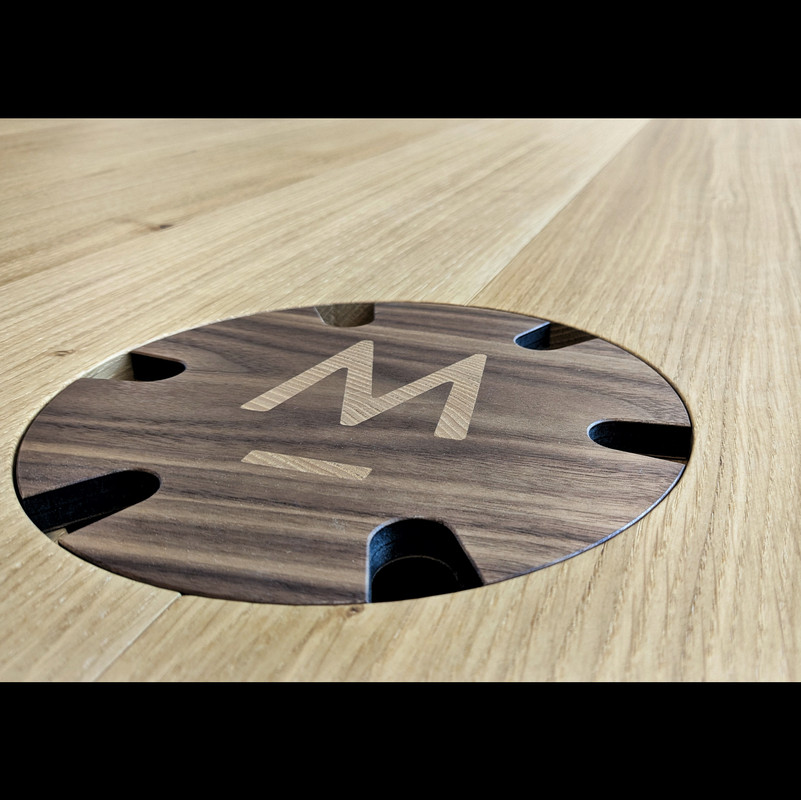

Just wow - that table!!! Good effort!
Chapeau
Lovely that table

Can anyone else see a surprised looking face in the middle on that?
It is meant to be 'A cold, hard stone' but I might have to post if on the "Agh, my eye" thread now 🙂
@kayak23 That table is amazing. I've only used oak twice and found it so sensitive to conditions. How on earth do you ensure it doesn't split and crack into pieces after being installed?
used oak twice and found it so sensitive to conditions. How on earth do you ensure it doesn’t split and crack into pieces after being installed?
It's a natural material so there's always a chance things can go wrong. However, all you can do is to give it the best shot by selecting decent material, well-seasoned, in a stable environment and built following the principles of working with wood since forever. It'll still do whatever it wants though. 🙂
Did a little wall panelling job for the MIL up in Manchester.
Really hard to get anything done when someone insists you have a biscuit, or a tea, or a sandwich every five minutes 😂
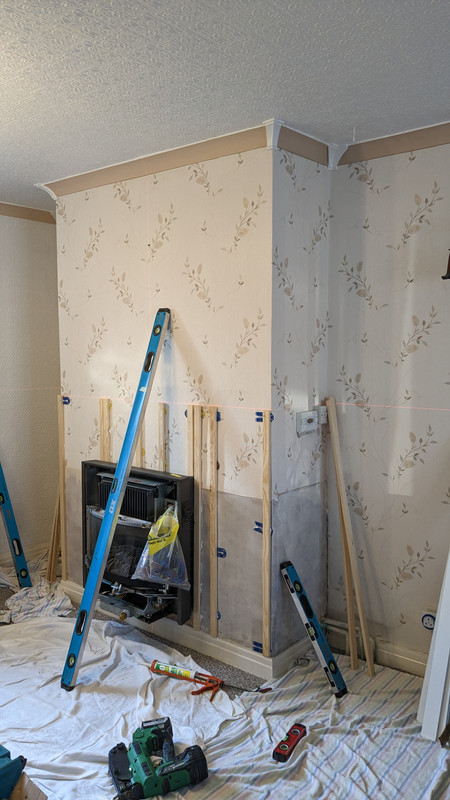
Harold was a great help.
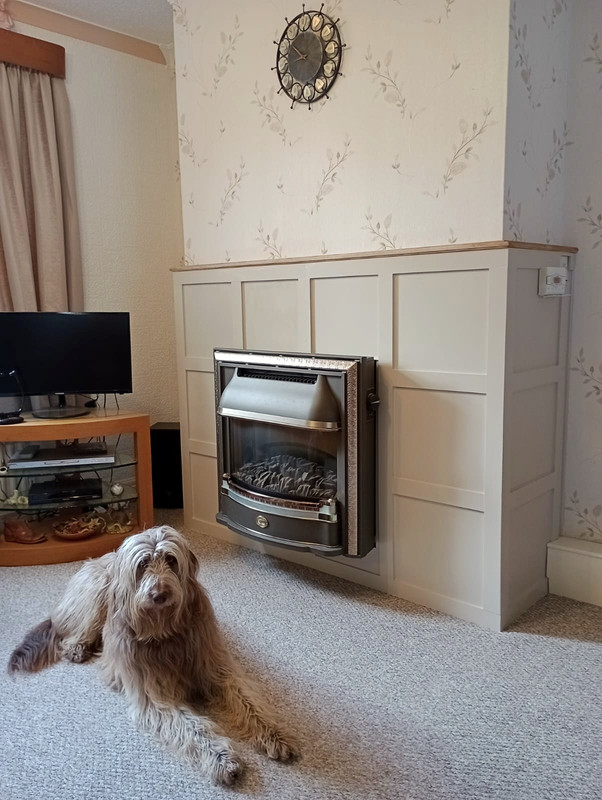
I didn't pre-make the oak trim on top wide enough at the workshop so had to go to B&Q in Ashton.
I almost cried when I had to pay £35 for a couple of poxy strips of oak moulding! 😭
I've got shed loads of it in my workshop.
[i]I almost cried when I had to pay £35 for a couple of poxy strips of oak moulding! [/i]
I remember when I was building the garden cabin I needed window surround for 8 1m square windows. I thought I would just buy some D profile wood, cut in half lengthways and put one bit in the inside of the glass and the other on the outside. It turned out to be cheaper to buy square cut wood and a router then put the profile on myself. They seem to double the price for any shaping or profiling.
