Hi Mick,
was/still am involved with Brompton. Sadly I'm not allowed to share all the interesting projects i get to do there.
I wondered why Brompton was suddenly doing new and interesting stuff 🙂
I am prepping my Gallery* for the Hampshire Open Studios week. As I started to hang the paintings I realised they didn't look great with all of the different frame designs.
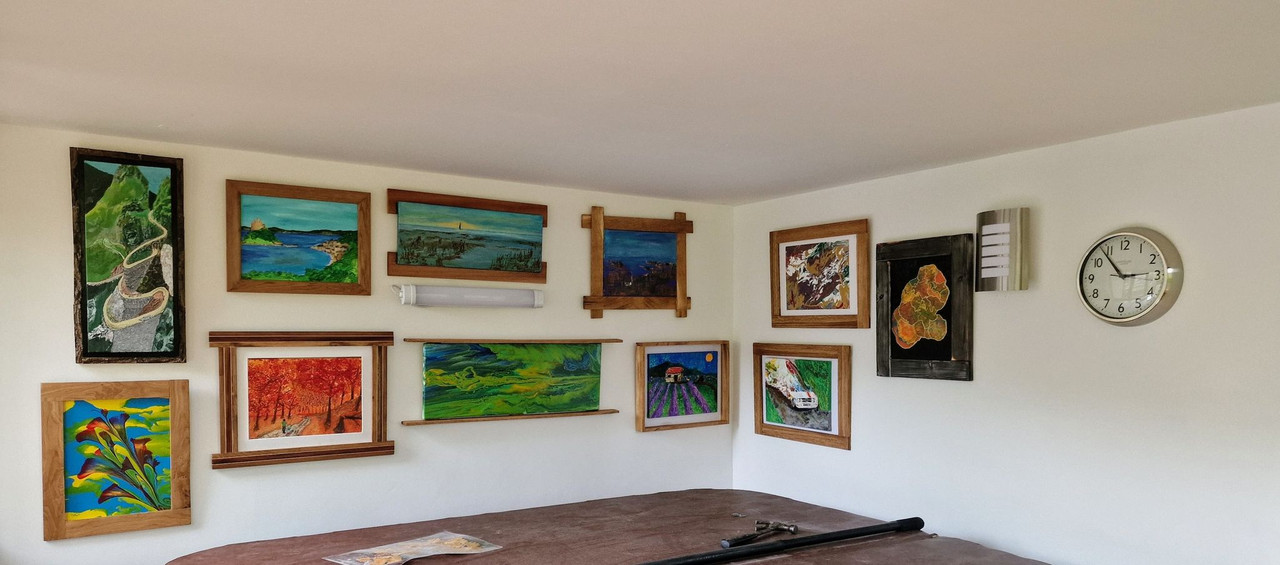
I have started making new frames** to a consistent design, there are differences and there will be more for the different shaped canvas but the style should be consistent going forward.
*Yes, the gallery is the garden cabin with the hot tub in but hopefully, with a tablecloth over the top, no-one will notice
** The first 4 out of 16. 16 frasmes is why I didn't go to a professional frame builder who wanted £40+ per frame
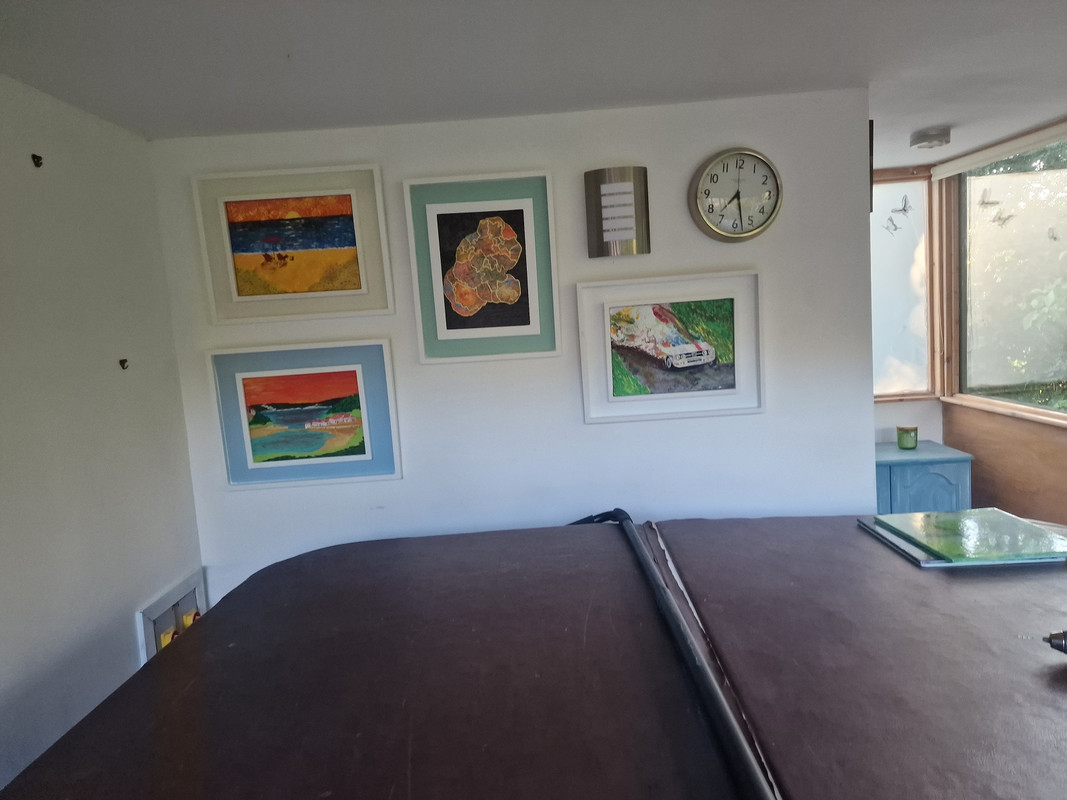
Few more frames completed. Just another 9 or so to make.
The lowest quote for something similar was £40 a frame if I ordered 10 exactly the same size so I figure £100 on wood and a few hours in the garage was worth it, especially as the paintings are not all the same size.
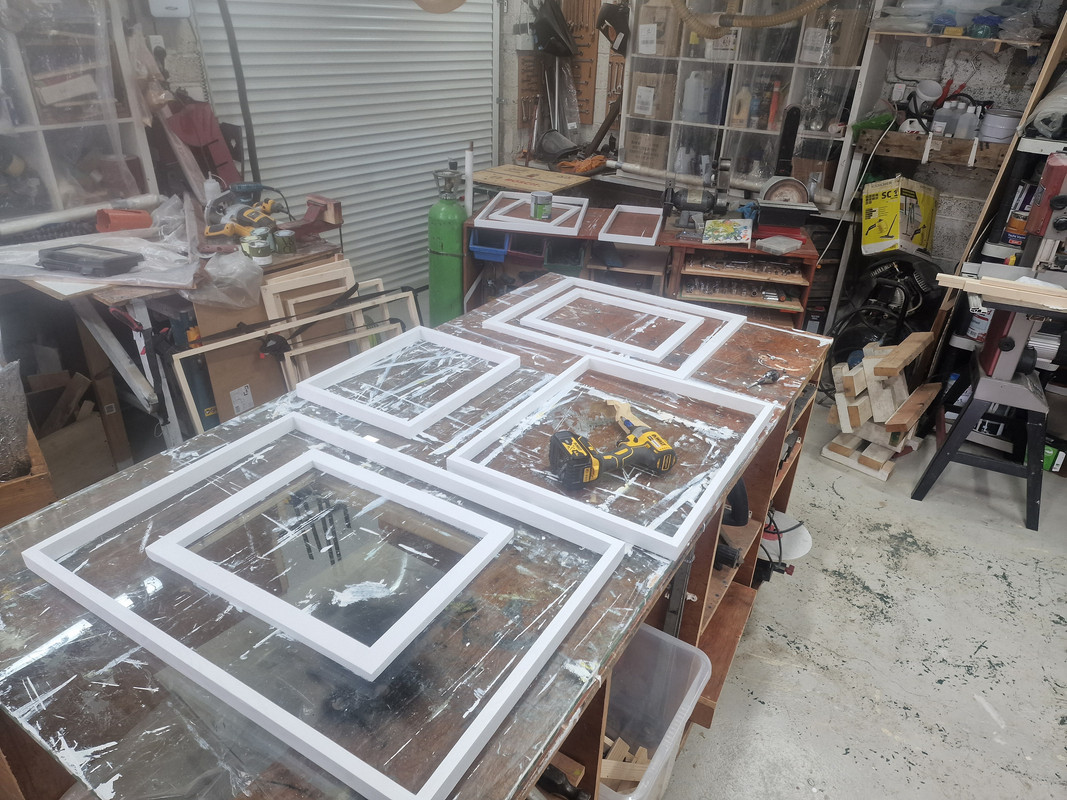
How are you making the frames ?. Got a mitre trimmer, framing kit ,V nailer(underpinner) ??
I know mitre trimmers are usually expensive bits of kit(Bloody invaluable imo) but Trend do a hand one thats about 6o quid. Although there are other makes at a lot less than that.
https://www.dm-tools.co.uk/Trend-HM-SHEAR-Hand-Mitre-Shear/P13363 - this one is overpriced, it was the pic I was looking for)
This thing is normally 200 notes. Could be a bargain if youre lucky.
https://www.ebay.co.uk/itm/256151141101?hash=item3ba3cc3aed:g:AOoAAOSwEatksn-W
But joint some 20mm x 34mm wood with glue and paint it white. Make an inside rectangle tight to the picture and an outside what ever size you want the overall frame to be. I leav approximately an 8cm gap between the 'frames'. Cut some 6mm MDF to fit the larger frame and paint that the background colour. Fix the wooden frames to the MDF, trying to keep them square and equal on all sides,
3D printed stand for my very cheap safety razor (King Gillette, £10). It's got hexagonal holes in the base with M12 nuts superglued in so is very stable. There's also a small drain hole beneath the main hole.
I was going to make one from steel originally but I stripped the nylon gears on my mini lathe so printed this instead whilst I rebuild the lathe.

I stripped the nylon gears on my mini lathe so printed this instead whilst I rebuild the lathe.
Print a new gear?
Print a new gear?
I doubt PLA would be strong enough, in any case I splashed out on steel gears. That means that if anything strips it'll be the change gears which are easy to get to.

Very nice as always WCA
Drain hole beneath the main hole 💪

It looks a lot like the sort of thing a viking might have carried. Looks great.
Being Scandinavian that was the idea 🙂 took inspiration from some viking axe finds.
Nice axe! 👏
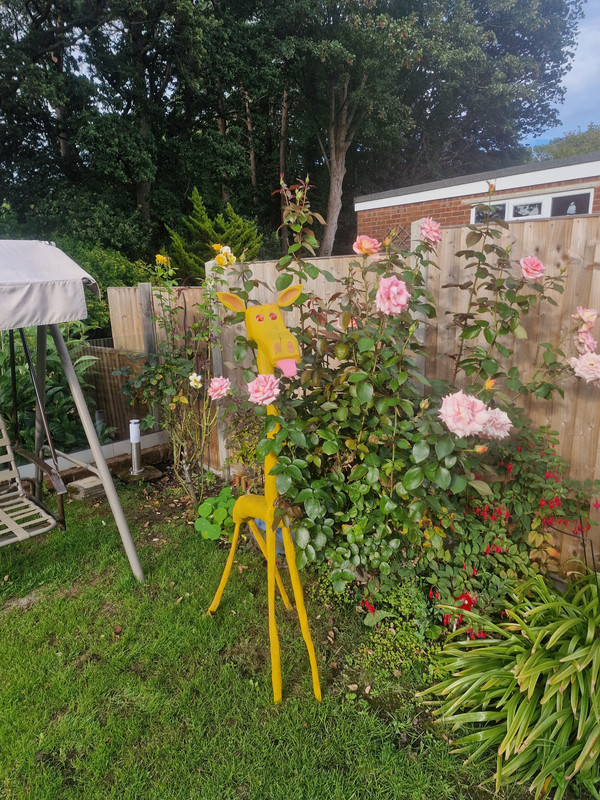
Cheeky young Giraffe
It is. Needs to wind his neck in.
:-0 Sticking its tongue out while squatting for a shit on the roses
Has it got blood stains? 🙂
Nice giraffe.
It started as a length of old climbing rope, it ended up as a ball for the dog to play with.

Shelves for the weights in the gym

Converted our spare room with a foldy desk bed thing.
It was a double bed that just about fitted in the room and was only really useful to pile junk in, an occasional guest required a big tidy up.
It's now a home office with built in shelving unit and desk, which folds down for guests.
It was meant to be a cantilevered desk but it doesn't get folded down often enough to be worth it so we just clear the desk each time, however the bed is frikken heavy which is the only downside.
The only silly thing is we rarely work from home now so it just gets used for the odd stint of route planning and one day a week for work!

It started as a length of old climbing rope, it ended up as a ball for the dog to play with.
Turk's head knot ?
Converted our spare room with a foldy desk bed thing
That's rad 😊👏
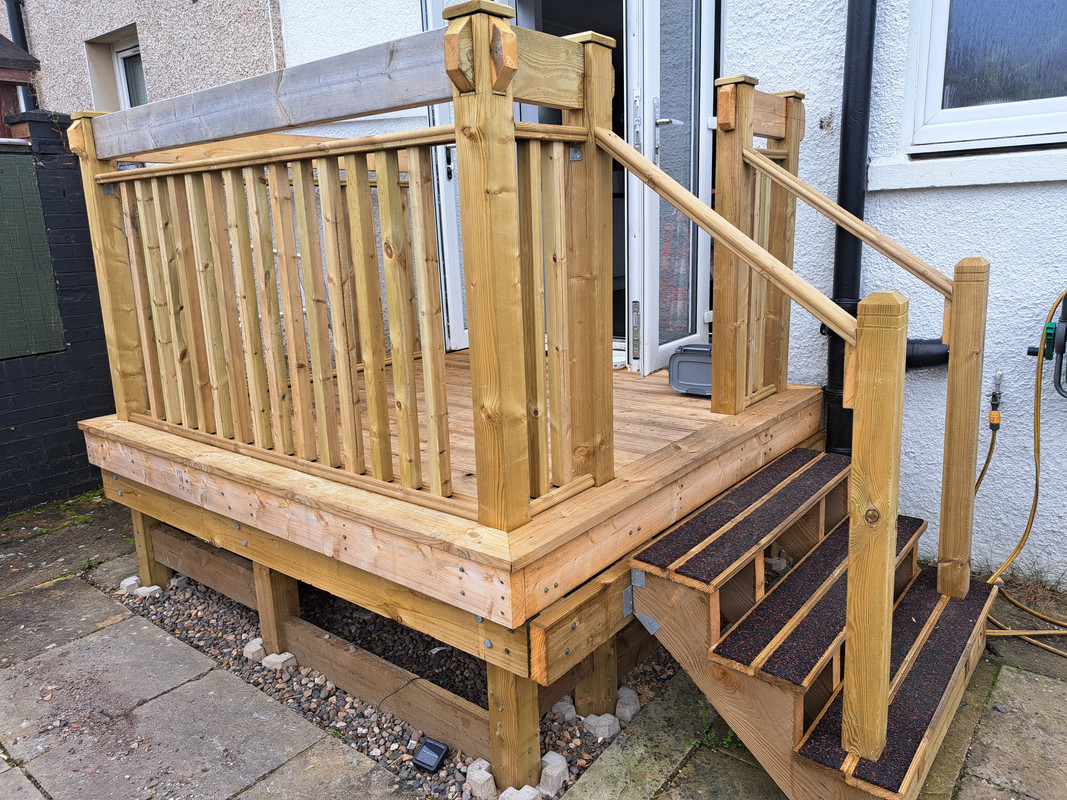
Four months after falling through our old decking I finally finished building the replacement yesterday. It has several flaws but I'm really chuffed with the result.
Turk's head tightened around a thumb knot hidden inside. The tail was then pushed through and trimmed off.
A very simple plywood box for car camping stuff. Been trying to find a box the right shape and size to replace the plastic box we keep them camping stuff it that fits more stuff in and makes better use of the space in the car. Another thread on here a few weeks ago reminded me that I was never going to find the right box so I needed to make one.
I added since handles, which I'd left room for in the dimensions so it would still fit in the car, but then it was annoyingly slightly too big to fit in there cupboard we store it in. I didn't want to do cut out handles for fear of losing stuff out of them, but having been forced to, I added some scraps of plastic sheet that prevent that without stopping you putting your hands in.


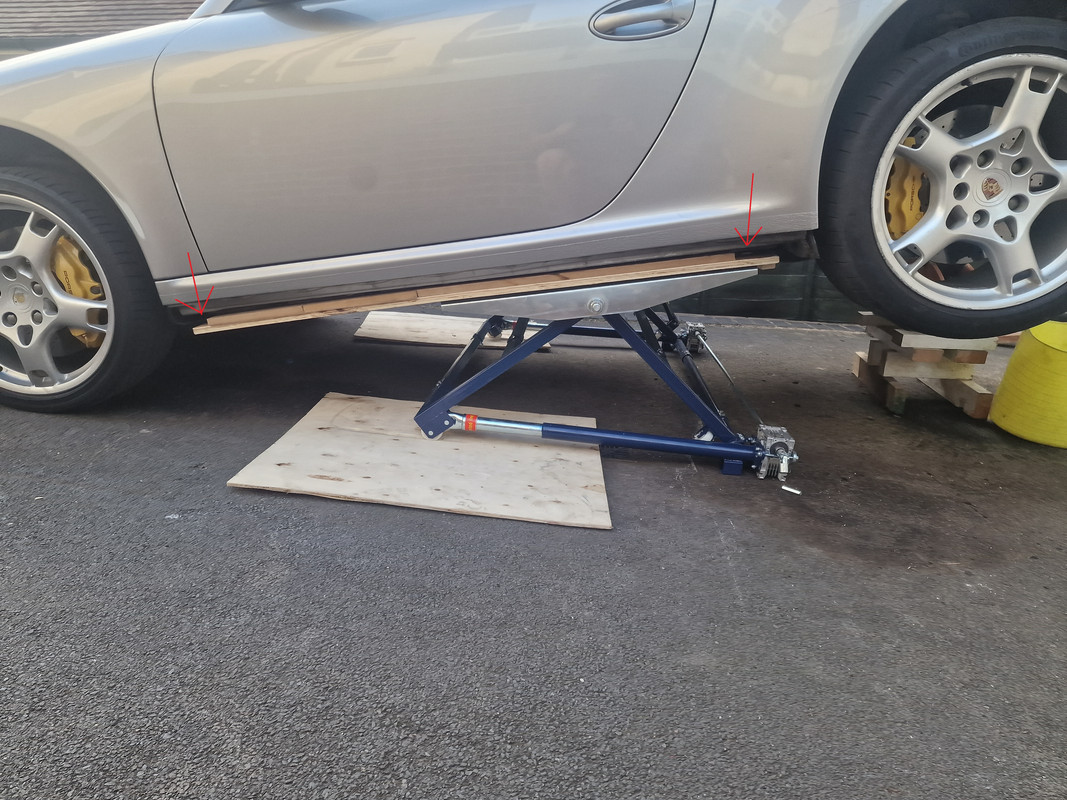
I can't find the 'Last thing you fixed' thread so posting here because I need group validation rather than a sad look of Why did you buy another broken car.
I fixed (replaced) the water pump and thermostat on my car. No big deal until I realised that for this car you need the whole car on ramps to raise the back end high enough to work under it and also separately have a jack supporting the engine as you are loosening the engine support bolts. Awkward in a garage with a 4 post lift. Terrifying on a sloping drive with whatever I can cobble together.
This brings me to 'What I made'. My car ramps lift the car from under the floor pan. Under the floor plan on this car are a load of pipes running the length of the car. I made a pair of support planks with special cut outs for the pipes, different each side, so I could still lift the car without crushing anything.

Couple of dining benches in Oak and Walnut.
Made to echo the joinery details of the table they'll sit with.


WCA please be very careful.
A teacher at the school my partner used to work at was killed when the Porsche he was working on fell of the jacks.
I used to have a TR6 that was also a pain to work under
Very nice Kayak, lovely. But whats to stop the ends parallelograming ?
[i]Very nice Kayak, lovely. But whats to stop the ends parallelograming ?[/i]
I was going to ask that! I might be making a display cabinet in the coming months which is basically a long rectangular box with a glass door. I just know that it will get lots of heavy stuff put at the top of it so will be using the back panel to try and stabilised it but if there is some secret way to make it even better then I am keen to know about it.
[i]WCA please be very careful. A teacher at the school my partner used to work at was killed when the Porsche he was working on fell of the jacks[/i]
Thanks and I agree. I am looking at getting some steel rectangular tubes with jack pucks on each end that will secure it to the car. These will then sit on my jack ramps. This should be almost as secure as a 4 post lift with arms under the jacking points, or at least not quite as scary as what I just used.
I think it will be worth doing as every maintenance task starts with "Raise the car on all four jacking points..." normally followed by "... and drop the engine and transmission for ease of access" and that is just to empty the ashtray 🙂

I've got a garden office incoming, but wasn't happy with the base from the plans, so whilst I waited I built my own and overengineered it. Higher grade timber, treated and more supports. Top is theirs, bottom is mine. It's 3.4x2.2m.
Need to tidy up the edges and treat the fence now.

igm
Shelves for the home gym made from left over flooring
Look good, but are they the same ones you posted two weeks ago? Have I missed a detail?
Not really up there with most of the stuff on this thread but I'm well pleased with it. Not the actual thing, that was a doddle but what it does and pretty much all of it was stuff I had laying around.
Fork mount rack for the back of the van: Some bits of left over fencing, the plastic bits off some roof box U fixings, a couple of m8 bolts, some penny washers and the fork mounts £9 each off amazon.

Very nice Kayak, lovely. But whats to stop the ends parallelograming ?
The joint itself using mitres with several deep dominoes perpendicular to the joint, and also a rail underneath, tenoned into each leg front and back that you can't really see in the angle of any of the photos.
They are VERY strong.
It was of course a factor that I....factored into the construction.
Edit. You can just see the rail underneath in this pic.
![]()
[i]It was of course a factor that I….factored into the construction.[/i] Okay then, but if my display cabinet collapses I will tell her it is all your fault. 🙂
Look good, but are they the same ones you posted two weeks ago? Have I missed a detail?
@stumpy01 - You are correct and I’m clearly losing it.
I sometimes like to take a drink with me on a dog walk, but get fed up of being lumbered with the empty cup afterwards, so I cobbled together a simple mug holder out of some old inner tube and a spare carabiner. It does the job well 👍


^^Genius bit of recycling.
I just finished making this
[img]  [/img]
out of this.
[img]  [/img]
(But in between I had made it into this!)
[img]  [/img]
A while ago I made the snappily named "DPCFS" Dog-Proof-Cat-Feeding-Station.
We wanted to leave food out for the cat without the dog getting it, and this was the solution. When we first got the dog she was a bit too keen on the cat, so it also doubled as a bit of a sanctuary for him when he wanted a few minutes without his arse being licked/sniffed/nuzzled...
The dog can get most of the way through the tunnel at the front but isn't flexible enough to bend up through the hole at the far end onto the suspended floor.


Made a little A5 'tortilla press' as a present for my sis who does Linocut print making evening classes.
You put your lino and paper in along with felt and hardboard packers to get the right thickness, press, then maybe turn it and press again for equal pressure.
Works pretty well 😊


Birch ply and Oak
I made an Axe
@Mikkel - that’s lovely, the head is the perfect bearded axe! Very nice work indeed! 🫶🏻👌🏻🎩
@Kayak23, I might steal that idea if you don't mind. My wife is an occasional lino printer.
@Kayak23, I might steal that idea if you don’t mind
It's far from my idea. I came across it on YouTube when looking for something simple as a birthday present.
Quite a nice little thing to have though.
A shelf for our landing, primarily made to obscure the thermostat! Made of oak with a lap joint in the middle and mitred corners reinforced with walnut dowels. Pretty pleased with it, though the angles hurt my head for a time!

 n
nWow I've finally got to post a photo, but I don't know how to get room for the text.
Anyway new curtains and cushions in our living room.
 A couple of signs to replace the one that disappeared from Moel Prysgau bothy.
@Bunnyhop - just tap in your text in the text box as usual, then hit return a couple of times then past in your photo.
You can post in the photo first, then scroll down, the cursor should be flashing at the bottom corner of the photo, then you can hit return a couple of times, giving space to type in your text. Occasionally tapping return at the bottom of the photo has deleted the photo on my iPad, but either should work ok for you.
Here’s something I literally made earlier today, although making the card template took me around nine or ten hours, spread across three days, because it was so tricky trying to get the design to fit and work properly, when it’s something that fits around an arm and there’s nobody around to help hold it in place to sort out details.

It’s a bracer for archery, it’s what you wear around your lower arm to protect against string strike, which stings a fair bit! Of course, I could buy one, and I did when I bought my bow and other kit, but I liked the idea of making something myself.
In particular I wanted to make it in one piece, instead of having separate straps stitched in place, which might have been a bit easier, but my wrists and thumb joints are getting quite painful and I’m finding it harder to handle smaller items and manipulate smaller items.
Basically it just wraps around my arm, the straps slide through the slots and the end holes fit over the brass Sam Browne studs.
It’s a wee bit of a fiddle to fit one-handed, but it fits better than I expected, and it’s nice and comfortable because the leather is very soft.
It’s Connolly leather as used in the likes of Aston Martin, Rolls Royce and Bentley, which I got from a local saddler who does leathercraft classes, and gets bags of offcuts for his classes.
I picked it up from his house, which smells of leather as soon as you walk in the door.
Rather unsurprisingly, he know Suzie on The Repair Shop…
As a break from painting the cricketers I finally finished and framed my latest commission. A birthday present for a guy with a beautiful red DS.
[url= https://i.postimg.cc/tCvcCS86/DS-for-Louis.jp g" target="_blank">https://i.postimg.cc/tCvcCS86/DS-for-Louis.jp g"/> [/img][/url]
Kayak and other wood workers - please don't look too closely at the frame corners 😉
[i]But I caved and looked at the corners 😔[/i] and saw right through the gaps? 🙁
Can someone help a numpty?
I finally got round to uploading a few images of things that I have made over the past year or so to Flickr with the intention of showing a few on here. However as you might have noticed above I have had a couple of goes copying a link on Flickr and then pasting into the box that pops down when you click on the image insert icon. Nothing happens. Is it likely to be because the images are too large? Or have I missed something. I tried searching the forum for a guide but failed that as well.
---
[Mod] scroll down to Image Uploading on the following link:
https://singletrackworld.com/terms-and-conditions/
@worldclassaccident - the folders to the top right of the painting seem to like it too 🙂
CountZero - thanks for the tips.
scroll down to Image Uploading on the following link:
Thanks. I think I may have worked it out- Flickr doesn’t make hotlinking straightforward, I didn’t realise that before I signed up. I will look at alternatives

I rescued this cupboard from a skip years ago (it didn’t have drawers or a door then either, and it already had the bad paint job). It was the perfect size for the dvd player, freesat etc but now that’s all gone it’s moved to the hall to be a shoe cupboard. So the bit I made is the extra shelf at the bottom for more shoes. And I found baskets the right size to fit in the top. I know this is extreme levels of bodgeness and low skill by comparison to most in this thread. But I did use a drill, and some solid wood laminate flooring I rescued from another skip and have been storing in my shed until i found a use for it 🙂

Meh, definitely needs half a clothes peg for levelling. 😉

Found one then t'other at the same beach on different trips. A thin line of epoxy and now to work out what it's for.
...and now to work out what it’s for
Wobbly table?
.
Nice curling stone gecko.
Or the world's worst ice skate.

So I bought a car.
It was an old car so it needed repairing but unlike most cars, the only way to get at anything was from underneath so I needed some ramps.
So I bought some ramps.
The ramps were great for all cars except the one I had because it only had 4 factory jacking points and ran coolant pipes under the floor where the ramp normally fitted
So I build the adaptor kit.
Are you bored enough to watch a car go up in the air?
Nice. I've made similar wooden ramps for my van. Always scared working under it though.
Could you not have just dug a big inspection pit in your drive?
🙂
The ramps are a lot easier/better. I can tilt the car so it is nose up or tail up. When I replaced the water pump last week I had the tail in the air which made access a lot easier. That was on the wooden prototypes which worked but I was a little nervous about using them on a regular basis, hence the steel replacements.
[img] 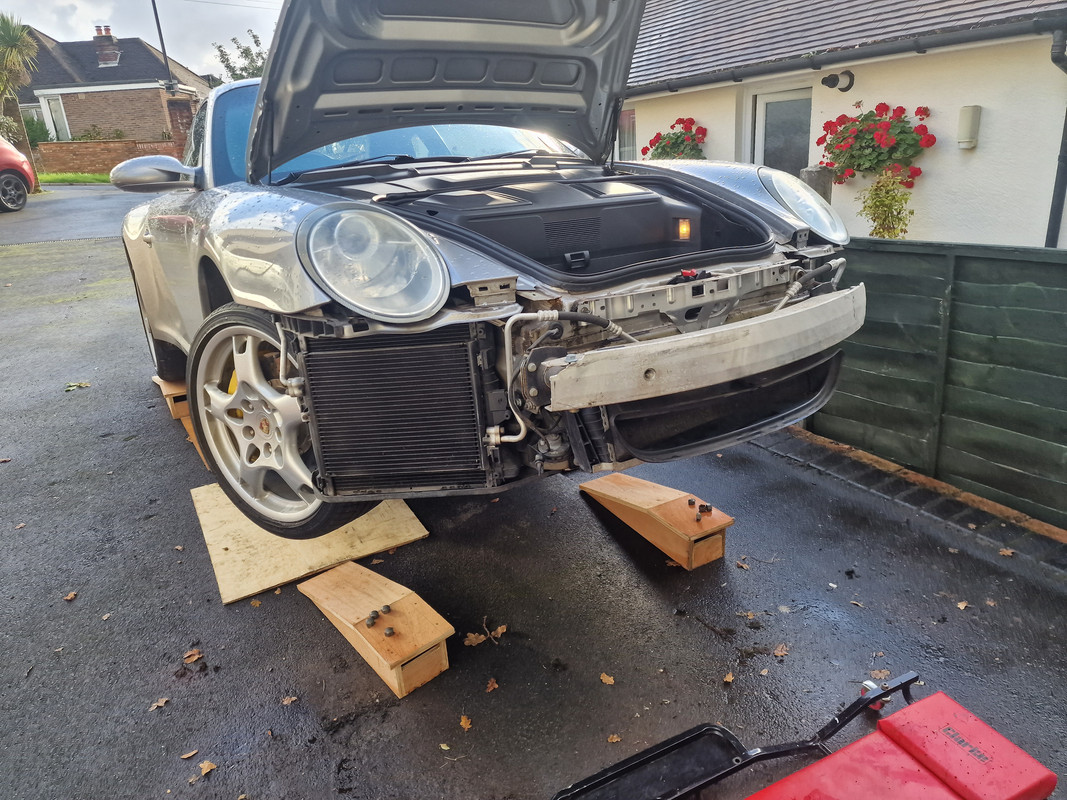 [/img]
Loads of space underneath, that ramp is towards the back, out the way and the car is rock solid when pinned there. Plus these ramps were less than £700 when the nearest alternatives were all £2,000+
Duplicates fromt he thread where I asked hwo to fit the glass but here is a medal box I created on request.
[url= https://i.postimg.cc/GmJJhWGc/Medal-box-1.jp g" target="_blank">https://i.postimg.cc/GmJJhWGc/Medal-box-1.jp g"/> [/img][/url]
[url= https://i.postimg.cc/Nf8r11MD/Medal-box-2.jp g" target="_blank">https://i.postimg.cc/Nf8r11MD/Medal-box-2.jp g"/> [/img][/url]
[url= https://i.postimg.cc/qvjhF42C/Medal-box-3.jp g" target="_blank">https://i.postimg.cc/qvjhF42C/Medal-box-3.jp g"/> [/img][/url]