Forum menu
I steam bent some yew for a table lamp. fairly happy with the result. Next one will have a bit more curve/bit longer though i think.
[url= https://farm8.staticflickr.com/7831/47269593672_f1044a9082_z.jp g" target="_blank">https://farm8.staticflickr.com/7831/47269593672_f1044a9082_z.jp g"/> [/img][/url][url= https://flic.kr/p/2f242mm ]4[/url] by [url= https://www.flickr.com/photos/154854686@N05/ ]oliver young[/url], on Flickr
Finshed a 3D printed dust shoe for my DIY CNC
(cut the acrylic with my CNC - which went really well).

Then used the CNC to make some Oak v-carved signs for our communal driveway.

Then used the CNC to cut some sole savers for my Time cleats.


Love the cnc alex - what 3d printed cnc machine is that? Also whats the black surface?
My wife teaches reception - made her a workbench for the kiddies. Apparently wood work is a thing for young kids now - they'll only hit their thumb once with a hammer i guess!
[img]  [/img]
[img]  [/img]
Is your wife left handed?
[URL= http://i680.photobucket.com/albums/vv167/porter_jamie/IMG-20190310-WA0012_zpsiat6rcqt.jpe g" target="_blank"> http://i680.photobucket.com/albums/vv167/porter_jamie/IMG-20190310-WA0012_zpsiat6rcqt.jpe g"/> [/IMG][/URL]
50 holes 🙂
Be interested to know about your cnc setup AlexSimon
Ewan
Love the cnc alex – what 3d printed cnc machine is that? Also whats the black surface?
kayak23
Be interested to know about your cnc setup AlexSimon
It's a Root 3 CNC. https://rootcnc.com/machines/root-3/
3D printed parts combined with loads of bits from Ali Express/Ebay/Etc.
In total, it cost just less than £500 (about £100 more than I thought mainly due to the unexpected high cost of the Linear Guides for the z-axis (£40) and the cost of stainless nuts and bolts (£70) and needing 3 spools of PETG). That includes the Katsu Router (Makita clone).
The equivalent buy-as-a-kit machines would be a Ooznest Workbee, A V-Carve or a Shapeoko which are all around £1200-1500 I think.
It's a great machine, but it was a steep learning curve putting it together. There were times that I thought the £1200 for the ooznest was worth it, but not now that it's built, working and seemingly very capable. The main problem is that not everything is spelled out for you - or at least it seems that way when you're unfamiliar.
I have a full Bill of Materials with purchase links if anyone needs one.
The base is just 18mm ply - the same as you can see under the oak piece.
The Work Area (maximum cutting dimensions) are 732x508x80mm. It takes up my whole workbench so I found a way to hang it on the wall. Unfortunately, it takes 2 people to move it 🙁
[url= https://farm5.staticflickr.com/4834/43948188600_3ae5fbc4e0_b.jp g" target="_blank">https://farm5.staticflickr.com/4834/43948188600_3ae5fbc4e0_b.jp g"/> [/img][/url]
Definitely recommended, and I personally prefer it to the other main 3D printed contender, the MPCNC as long as all you want to do it rout (the MPCNC is a bit more versatile at the expense of rigidity).
All the software I use is free. CNC is controlled by Marlin and I use Fusion 360 for modelling and generating G-Code.
50 holes
Spice rack? :o)
er, yes! im going to do a less spicey one too and maybe a very spicey one as well for your magnum spices
The Work Area (maximum cutting dimensions) are 732x508x80mm. It takes up my whole workbench so I found a way to hang it on the wall. Unfortunately, it takes 2 people to move it 🙁
Looks great - have you tried running it in that orientation? Did you use lead screws or belts?
I'll drop you a DM with my email address - would certainly be interesting in the BOM and links....
I haven't tried running it vertically, but there's no chance. I can't even lift the carriage when it's in that position (ok - I'm not strong, but still...).
There are a couple of people who have tried very hard to get vertical milling to work and they've achieved it eventually, but only with counterweights and compensation in software for the additional weight during accelerations.
I used belts (metal reinforced) and they seem amazing. I haven't experienced leadscrews or ballscrews, but I'm not currently worried.
BOM is here (it's got 3 pages)
https://1drv.ms/x/s!AvV_waWt2nC3lGQgTldjnTWO-V14
I spent ages looking at the 'normal' CNC machines on this website....then they released a vertical one!
https://buildyourcnc.com/item/cnc-machine-greenLean-v1
Can't see wood being the most stable material to build a CNC out of; especially when it'll be stuck in a damp garage for a lot of the year.
Plus, an Ooznest one made from alu extrusion is cheaper.
Oak bench
[IMG]  [/IMG]
Just to be clear, this is NOT my work.
I have an elderly neighbour who dabbles in intricate wood builds, after 10 years building a Rolls Royce & caring for his now departed wife he was looking to build a Branksome Steam Boat as used on Lake Windermere. Due to the museum being closed he was struggling to obtain images & plans in order to start. I put up a random thread on STW in 2015 asking if anyone had any Branksome Steam Boat plans & Ron from STW kindly posted the ones he had been keeping in his loft for his retirement hobby to me. I got them copied 1:1 & handed them on to my ever so happy neighbour. An unmeasurable amount of hours later & this is where he's at.
Every single piece is hand made, in wood & metal, he's contemplating a mini steam engine too!
Its not my work, but is linked via the STW forum & i thought some of you may appreciate his work. He's a very private guy & his skills won't otherwise be seen.
[url= https://farm8.staticflickr.com/7805/33481568418_9d8da8a655_c.jp g" target="_blank">https://farm8.staticflickr.com/7805/33481568418_9d8da8a655_c.jp g"/> [/img][/url][url= https://flic.kr/p/T1DMP1 ]2019-03-12_09-46-52[/url] by [url= https://www.flickr.com/photos/martinddd/ ]martinddd[/url], on Flickr
[url= https://farm8.staticflickr.com/7905/47357642901_70979af4a5_c.jp g" target="_blank">https://farm8.staticflickr.com/7905/47357642901_70979af4a5_c.jp g"/> [/img][/url][url= https://flic.kr/p/2f9Qijv ]2019-03-12_09-47-23[/url] by [url= https://www.flickr.com/photos/martinddd/ ]martinddd[/url], on Flickr
[url= https://farm8.staticflickr.com/7805/46634461084_eca0a6f519_c.jp g" target="_blank">https://farm8.staticflickr.com/7805/46634461084_eca0a6f519_c.jp g"/> [/img][/url][url= https://flic.kr/p/2e3VNyu ]2019-03-12_09-47-45[/url] by [url= https://www.flickr.com/photos/martinddd/ ]martinddd[/url], on Flickr
[url= https://farm8.staticflickr.com/7886/40392236393_ac0df79d70_c.jp g" target="_blank">https://farm8.staticflickr.com/7886/40392236393_ac0df79d70_c.jp g"/> [/img][/url][url= https://flic.kr/p/24xjLCR ]2019-03-12_09-48-14[/url] by [url= https://www.flickr.com/photos/martinddd/ ]martinddd[/url], on Flickr
[url= https://farm8.staticflickr.com/7850/32415667087_b3878f106c_c.jp g" target="_blank">https://farm8.staticflickr.com/7850/32415667087_b3878f106c_c.jp g"/> [/img][/url][url= https://flic.kr/p/RosLtR ]2019-03-12_09-48-32[/url] by [url= https://www.flickr.com/photos/martinddd/ ]martinddd[/url], on Flickr
[url= https://farm8.staticflickr.com/7886/47304933312_296567268d_c.jp g" target="_blank">https://farm8.staticflickr.com/7886/47304933312_296567268d_c.jp g"/> [/img][/url][url= https://flic.kr/p/2f5b9Au ]2019-03-12_09-48-51[/url] by [url= https://www.flickr.com/photos/martinddd/ ]martinddd[/url], on Flickr
[url= https://farm8.staticflickr.com/7855/40392241313_d5ed403609_c.jp g" target="_blank">https://farm8.staticflickr.com/7855/40392241313_d5ed403609_c.jp g"/> [/img][/url][url= https://flic.kr/p/24xjN6F ]2019-03-12_09-49-03[/url] by [url= https://www.flickr.com/photos/martinddd/ ]martinddd[/url], on Flickr
Ongoing work in progress.
That's beautiful! Will look forward to seeing it finished 🙂
Blimey!
That is spectacular even in an unfinished state!
Make sure you show him the replies from gobsmacked folk on here.
Made another relief map. This time with my son.
A forum member off here saw the last one and asked if I could make one for his local area as a gift for his wife.
My son decided to take on the job as long as I helped. He made an especially nice job of the feet!
[url= https://farm8.staticflickr.com/7817/47426266251_7948cbbaf7_b.jp g" target="_blank">https://farm8.staticflickr.com/7817/47426266251_7948cbbaf7_b.jp g"/> [/img][/url]
[url= https://farm8.staticflickr.com/7868/46703143964_b170acf2a5_b.jp g" target="_blank">https://farm8.staticflickr.com/7868/46703143964_b170acf2a5_b.jp g"/> [/img][/url]
[url= https://farm8.staticflickr.com/7836/46511106885_3db28fce4d_b.jp g" target="_blank">https://farm8.staticflickr.com/7836/46511106885_3db28fce4d_b.jp g"/> [/img][/url]
[url= https://farm8.staticflickr.com/7909/32484380217_82ed1890fe_b.jp g" target="_blank">https://farm8.staticflickr.com/7909/32484380217_82ed1890fe_b.jp g"/> [/img][/url]
Love the 3D maps Alex.
Those maps are rad 👍
Been a busy bee lately. Knackered.
Made some built in cupboards.
Made a corner bench in a restaurant out of all bits of reclaimed flooring.
Then the bar area, bar, mirrors behind it and a long shelf and footrest.
https://www.instagram.com/p/BvULM_BAUe7/?utm_source=ig_share_sheet&igshid=10g3rku2x3mqx
Need a sit down now 😄

Failed my O level CDT but can still knock up a bit of something functional
Image not showing? Beats me..
Maybe this will work pealy

My second completed CNC project. Very nice to get this up for our court of 8 houses.
[url= https://farm8.staticflickr.com/7917/33571553358_17feab1f3b_b.jp g" target="_blank">https://farm8.staticflickr.com/7917/33571553358_17feab1f3b_b.jp g"/> [/img][/url]
Thank you kindly AlexSimon - will avoid using my phone to post in future..
Hopefully my awesome drying rack brings a little balance to the thread.
I'm with pealy, while I love the more impressive stuff that gets posted here it's bound to be putting off some people from posting their creations.
So with that in mind, behold my bespoke oven tray rack!
[url= https://farm8.staticflickr.com/7848/46727265774_8a1d3cbef7_z.jp g" target="_blank">https://farm8.staticflickr.com/7848/46727265774_8a1d3cbef7_z.jp g"/> [/img][/url]
So with that in mind, behold my bespoke oven tray rack!
A triumph WillH - let's show the world what grass-roots mediocrity looks like!
But they are both ace!
DI Mobile Phone Stand
Using that plastic mtb tyres seem to always come with 🙂

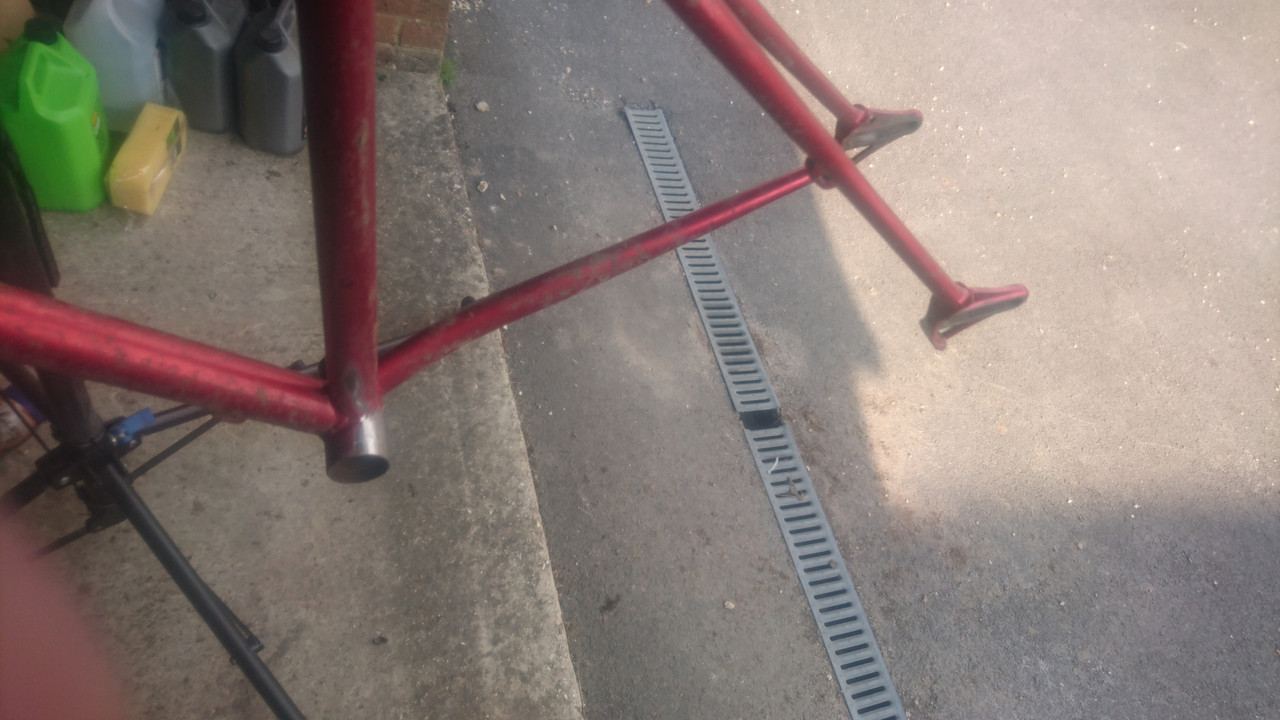
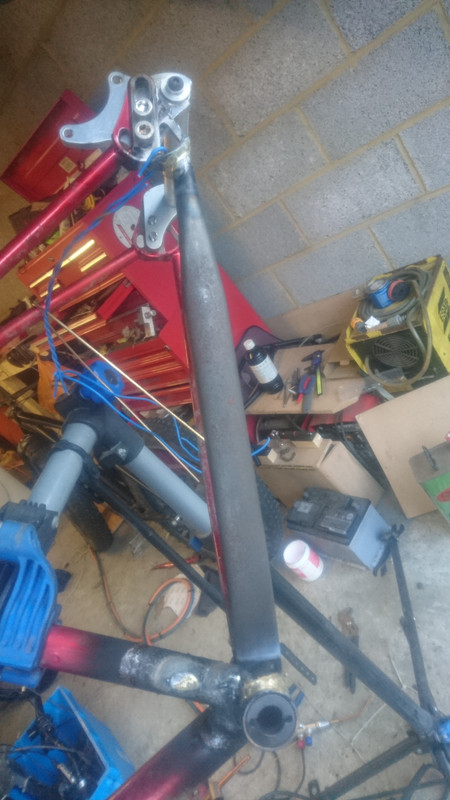
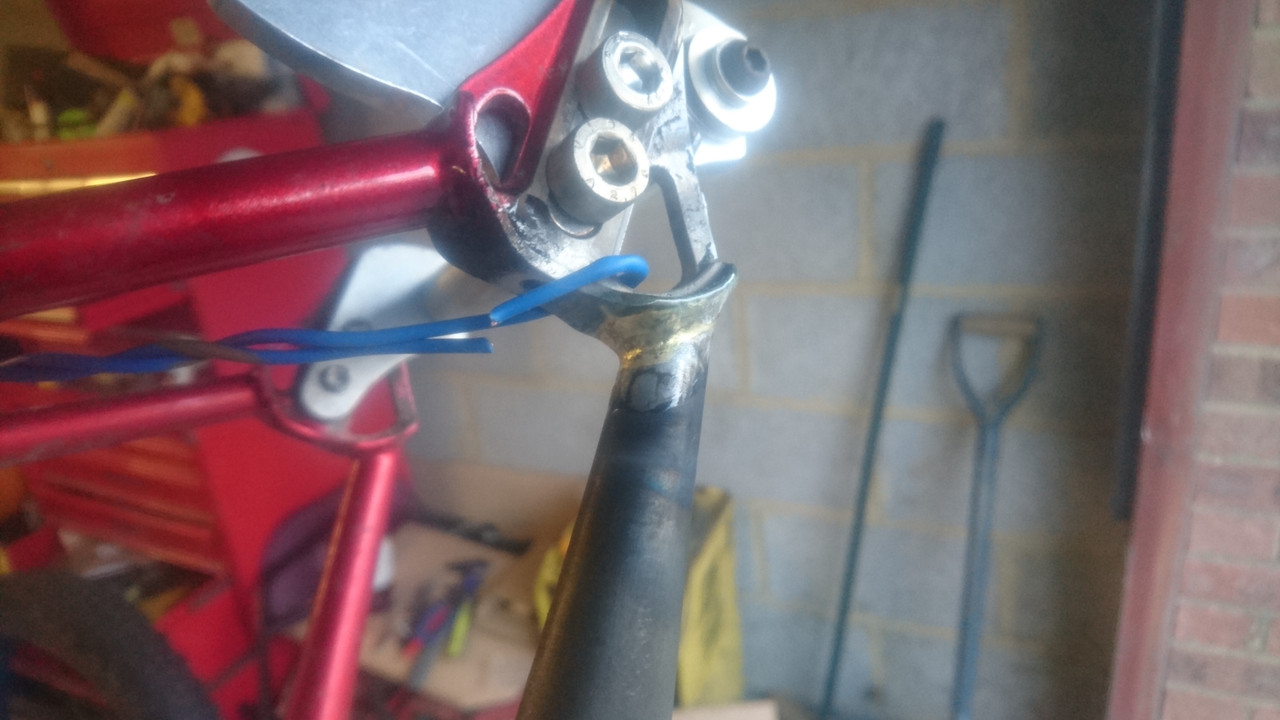
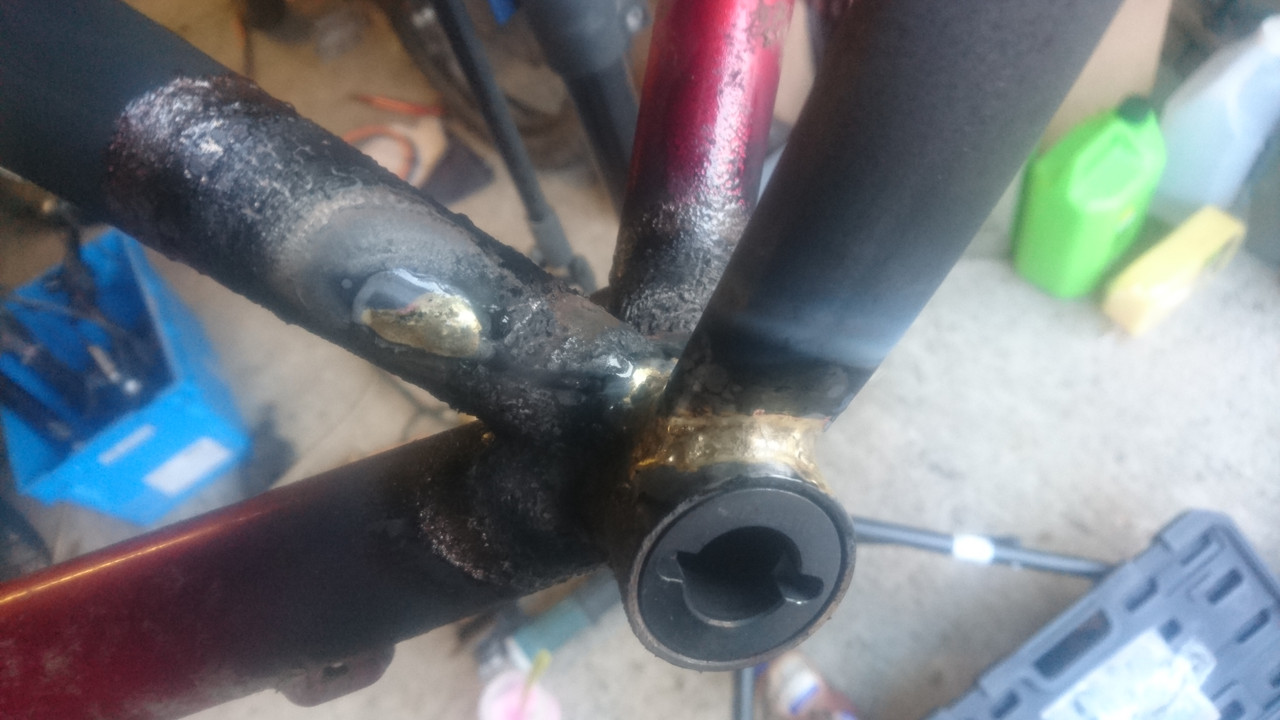
Friend building his first frame, 3" tyred coaster brake belt drive klunker. We welded the frame around the belt. Still finding this machine a bit hilarious
Hope you got the gear ratio right Retrodirect!
Looks good!
🙂👍
Colin how big is that frame, meant to ask when I saw it, looks monstrous!
Not got access to the drawing just now to check. It was an xc stretch with a 35mm stem and Motocross bars though. Short rigid forks and a headangle in the mid 60s. It's a beast
Open Pro disc on existing hubs, which were 32 spoke. 28 would be more than enough, but I didn't want to buy new ones. Front one was a breeze, laced up true and tensioned first go, back one was a right bastard. Even relaced it thinking I must have spokes mixed up, and I've already had loose spokes after 100 miles. I see trouble in my future


Shed was broken into, bike stolen so made this to beef up security
Here's a link booji - looks beefy!
https://photobucket.com/gallery/user/henryk67/media/cGF0aDovSU1HXzA5NjlfenBzNGhjZnZpMTYuanBn/?ref=
The breezeblock/window interface looks like a weak link.
But nice work.
Cheers , don’t know why the pic never showed up
I guess I actually made this two weeks ago, but I wasn't happy with it so chopped the rear end off and rewelded. Off road fixedgear. Needs bottlezits and paint.
Love the stuff you do Colin.
I've also chopped the back end off my latest frame as wasn't happy with chainstay yoke. Now redesigned but not yet made.
I was also supposed to make a Reiver frame for someone - luckily he didn't specify which year.....
Thanks Mick,
luckily he didn’t specify which year…..
I so relate to this.

It's been a while since I had a project worth showing.
Ive wanted to sort out a standing desk in my office for a while. Sitting slumped over a hot financial model isn't doing my back any favours.
Saw something industrial looking and remembered I had some redundant 34mm galv handrail in the work shop.
£40 worth of bits from the https://www.keyclampstore.com/
I wanted to use some 1m solid wood kitchen work top but couldnt find any offcuts and a 3m piece was going to cost £200 so picked up two rough-sawn scaffold boards for £30. Hit them with the random orbital sander to soften them and crudely jointed one. Saving grace of the industrial look is not having to sweat the quality of the jointing and finish like kayak has to. Bit of oil and wax and ta-daa.

A little cable tidying required, but much better for core muscles and body posture now. I cant help but shuffle and move all the time now which will be much better for me.
Stoner i reckon with a couple of aditional collars and a few other bits and bobs you could make that be standing and sitting.
weird paint! Does it revert to yellow in the dark?
@joshvegas I think my bulk would dramatically change the very delicate balance of the desk were I to plonk my arse on it somewhere.
weird paint! Does it revert to yellow in the dark?
@Stoner Kinda, it reacts to UV light rather than any light. It changes in natural light but not under electric lighting. It's weird stuff. It's difficult to paint with as it is an additive that goes into clear paint so it shows up any drips you get, not pictured is the matching frame which I royally messed up.
Oooh, if you had two versions of that colour change paint, with the same colour pairings but opposite 'polarity' you could make a pattern that swapped over between day and night. Do it subtly and I think your friends might think they were going mad.
@joshvegas I think my bulk would dramatically change the very delicate balance of the desk were I to plonk my arse on it somewhere.
No no you make it slide up and doon. The chair you'll have to provide...
This is not really made but fixed. I built this frame 10 years ago and found a crack in the chainstay at the dropout weld on Wednesday. I had a manky ugly set of chainstays floating around from another old build so cut out the cracked one and brazed in a new one.
Said crack 🙁

Cut out chainstay
Brazed in new fugly stay
All sorted and hopefully will last another 10 years.
@jonm81 I really like the mismatched stays even if you do say they're ugly. looks cool!
I've been making stacks of handlebars. I liked my Jones bars for offroad touring stuff until I got them into real technical bits. Maybe I just have particularly sweaty hands, but I kept finding that my hands would constatly slide forward under repetitive impacts. I never had that problem with the surly Moloko's.
These have the same width and angle as the moloko's without having the bit at the front that I never used anyway. Just enough forward and rearward movement as you shift your hands about so stay comfortable on long rides and no extra nonsense.
Here's some photos and a picture of them attached to a friends bike.
Colin I was looking out for your bike and you at the reiver?
I don't think I saw Saul either? Not go in the end?
I had a last minute work-trip so had to bail. I was stuck repairing things inside a cardboard factory in France. How dull.
Saul, Andy, Fast Dave and a bunch of others you know were there.
AH I did actually see Fast Dave! but I didn't twig until he passed!
So didn't ask for or receive a skid.
Was there a really ratty transit van involved?
Ha. Thought it might be connected.
Was there also a weird aysemetric toptube seatstay fixed gear with a long reach road calliper?
Basically all the weird shit. It was you lot wasn't it.
The colourchanging fork now also smells like strawberries. splattered and clearcoated with strawberry smelling paint.
Built a 10m retaining wall out of decking for £80.
[img]  [/img]
Filled it with stuff for £30.
[img]  [/img]
Installed a moody cat for free.
[img]  [/img]
And all ready for some shrubbery.
[img]  [/img]
Then had a go at making an easter egg. This was the fifth attempt. Don't want to think about the cost.
[img]  [/img]
And tried to make it look pretty. A mere £4.
[img]  [/img]
Don't bother trying to make a decent Easter egg. It's just not worth it. Buy a diamond necklace instead - it's cheaper.
I've had a stalled framebuild for the last year, but Retrodirect's posts have inspired me to "be more Colin" 🙂
So I spent the day in the garage making chainstays. Not your normal chainstays, so lots of tiny tubes to mitre and some basic fixturing (wood, nails and a door hinge) to allow silver soldering of the sub-assembly.
Next step will be more woodwork for a fixture to hold things whilst mitring the tube ends (lots of compound angles to deal with).
[url= https://i.postimg.cc/R00V2JKt/DSC-0602.jp g" target="_blank">https://i.postimg.cc/R00V2JKt/DSC-0602.jp g"/> [/img][/url]
[url= https://i.postimg.cc/C5p0MRBm/DSC-0608.jp g" target="_blank">https://i.postimg.cc/C5p0MRBm/DSC-0608.jp g"/> [/img][/url]
Soon to be joined to these:-
[url= https://i.postimg.cc/pLTwHfcP/DSC-0465.jp g" target="_blank">https://i.postimg.cc/pLTwHfcP/DSC-0465.jp g"/> [/img][/url]
Retrodirect’s posts have inspired me
that was such a nice compliment to recieve, thanks.
Sometimes you need to see what others are doing to kick your arse off the sofa - and I'd totally stalled on this frame (even though I really want to get riding it).
I presume you're going to Bespoked? Unfortunately clashes with a birthday so won't be going this year.
Just grabbed an hour tonight for routergeddon. Tube notcher fixture sort of done (slight crime against timber - kayak23 should look away).
[url= https://i.postimg.cc/ZqRrCmXx/DSC-0610.jp g" target="_blank">https://i.postimg.cc/ZqRrCmXx/DSC-0610.jp g"/> [/img][/url]
Bringing the thread back down to earth with some more shonky woodwork:
[url= https://live.staticflickr.com/65535/46825631605_8a148d20e6_c.jp g" target="_blank">https://live.staticflickr.com/65535/46825631605_8a148d20e6_c.jp g"/> [/img][/url][url= https://flic.kr/p/2ekPATX ]testing[/url] by [url= https://www.flickr.com/photos/martinddd/ ]martinddd[/url], on Flickr
[url= https://live.staticflickr.com/65535/32805750237_5bf6acd730_c.jp g" target="_blank">https://live.staticflickr.com/65535/32805750237_5bf6acd730_c.jp g"/> [/img][/url][url= https://flic.kr/p/RYW3Bp ]Two scaffold board planters[/url] by [url= https://www.flickr.com/photos/martinddd/ ]martinddd[/url], on Flickr
The wife wanted to get rid of some plants in pots & replant them in some trough type planters. But whilst i was making them, she appears to have brought enough new plants to fill the planters, leaving the stuff in pots homeless. Bloody gardeners!
[URL= https://i14.photobucket.com/albums/a320/coynie09/59394162_10217737413934400_8786513166373748736_n_zpseg3tnujg.jp g" target="_blank"> https://i14.photobucket.com/albums/a320/coynie09/59394162_10217737413934400_8786513166373748736_n_zpseg3tnujg.jp g"/> [/IMG][/URL]

Made a belt sander for the workbench. I had a spare motor and some 30 x 30 aluminium extrusion languishing in a corner. I made all the pulleys and shafts etc. I've still to make grinding rest and perhaps some guarding for the belts.

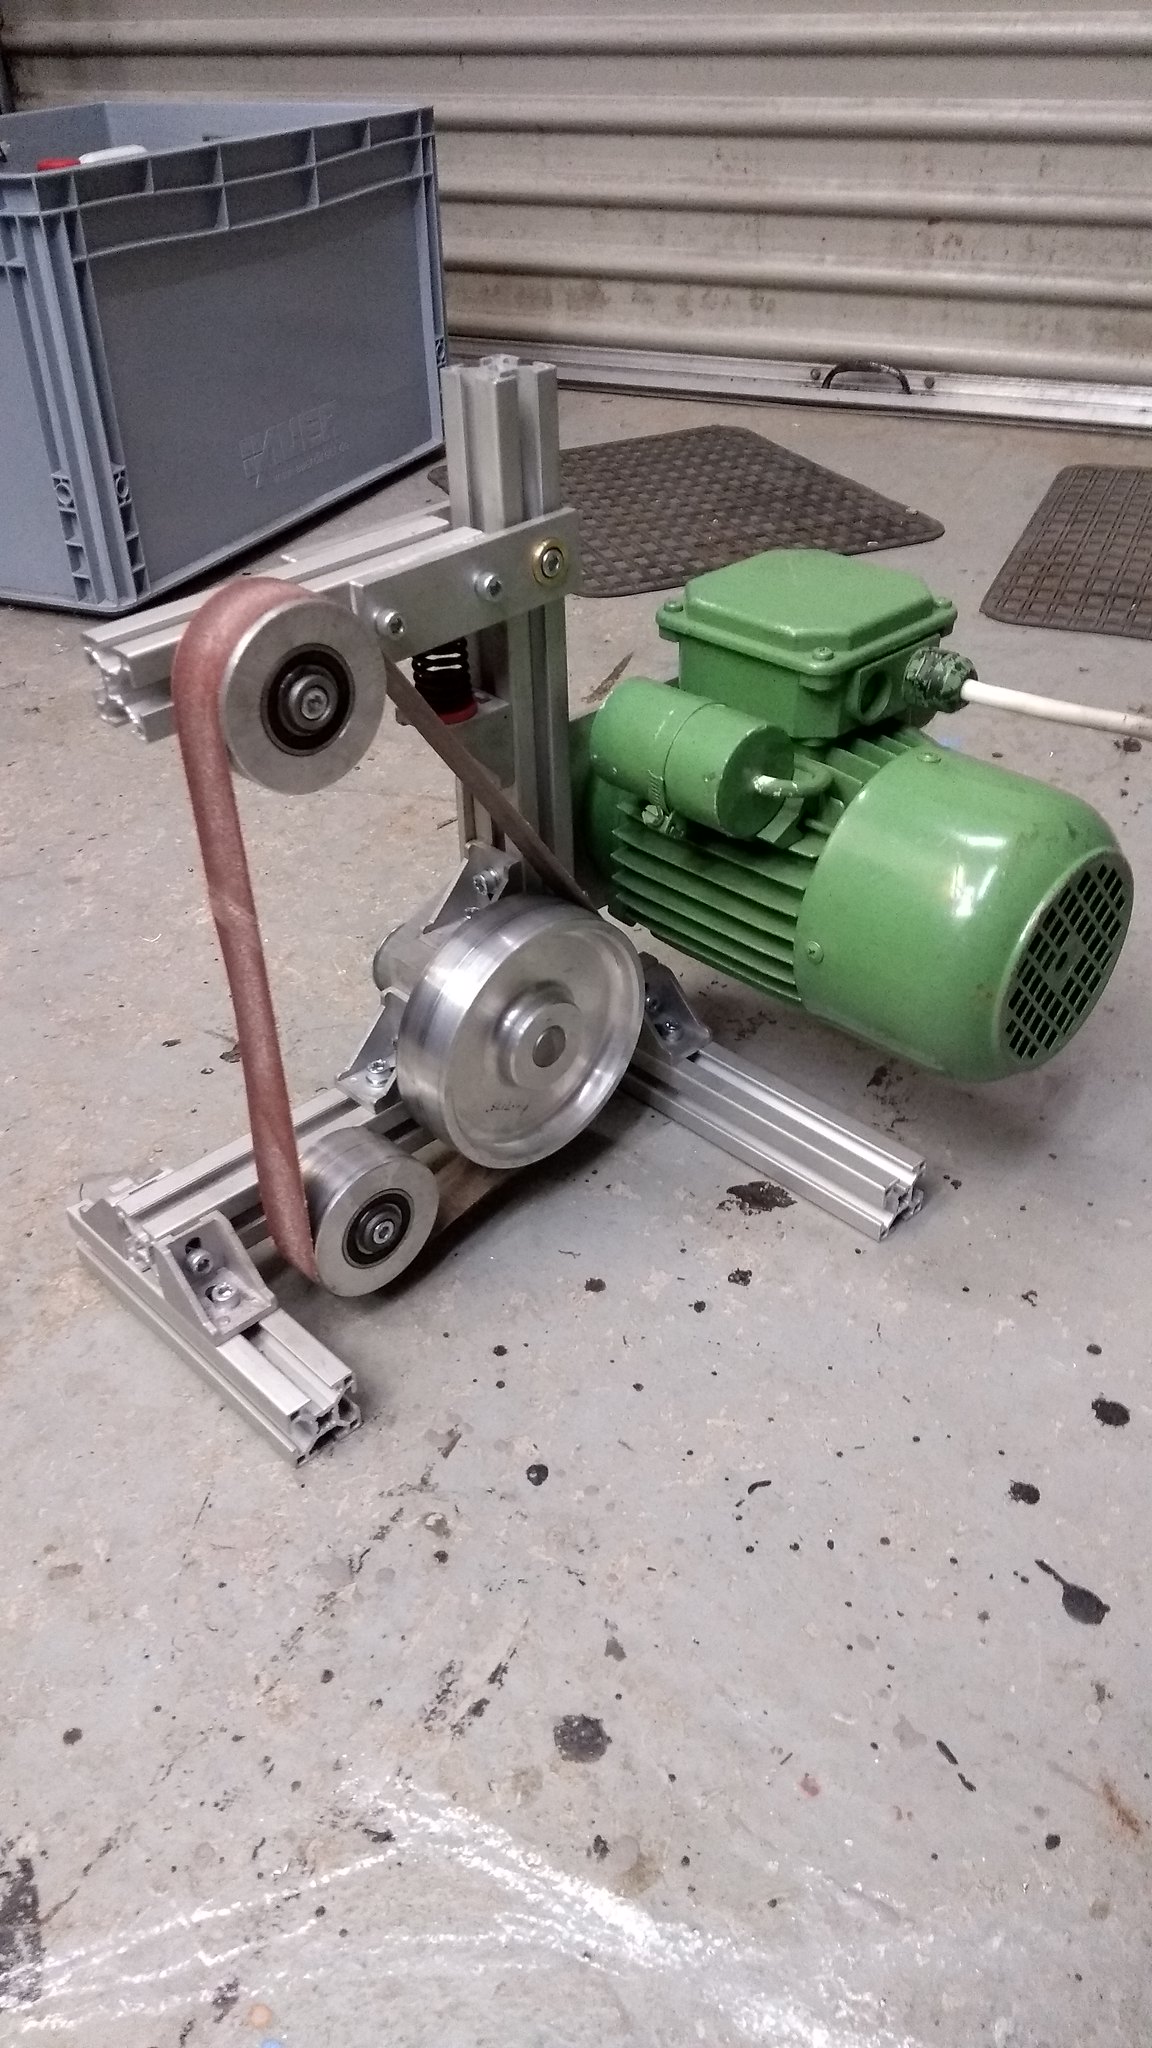
perhaps some guarding for the belts.
😂 Like your attitude to safety.
I'm currently making a slide out bike rack for the back of my van. The runners are made from 41mm steel unistrut, so it's going to be "sturdy". There will be pictures.
New 29er done! Just needs some graphics. Rides great. Every frame is an iteration on the geo of the last one, and think this is my favourite yet.
Rough numbers are 67deg HA unsagged. 468 reach (sagged). 72deg ish SA effective (I don't like the current steep trend). Stays shown at "longest" setting 417mm, adjust down to around 407.
All tubes bent myself, plus 35mm Zona top tube home-ovalised for a strong ST junction and a bit more lateral stiffness. Chainstays are 1/2" diameter for clearance, then trussed back together to stop them bowing apart under chain compression. Still surprisingly comfortable vertically.
Unpainted photo was singlespeeding up Lawson Park in Grizedale last week. Painted was final shakedown today.
[url= https://i.postimg.cc/nrdCD6NM/DSC-0629.jp g" target="_blank">https://i.postimg.cc/nrdCD6NM/DSC-0629.jp g"/> [/img][/url]
[url= https://i.postimg.cc/SN3Kb740/P1040097.jp g" target="_blank">https://i.postimg.cc/SN3Kb740/P1040097.jp g"/> [/img][/url]
[url= https://i.postimg.cc/wv16r7rx/P1040099.jp g" target="_blank">https://i.postimg.cc/wv16r7rx/P1040099.jp g"/> [/img][/url]
[url= https://i.postimg.cc/fR15dFhH/P1040105.jp g" target="_blank">https://i.postimg.cc/fR15dFhH/P1040105.jp g"/> [/img][/url]
[url= https://i.postimg.cc/Wb1PYDqB/P1040107.jp g" target="_blank">https://i.postimg.cc/Wb1PYDqB/P1040107.jp g"/> [/img][/url]
Awesome. Love the chainstay detail .
Thanks. Turned out slightly tight on clearance (will only fit a 2.2" at shortest setting). Sort of my own fault for using a 68mm shell / narrow chainline / short bb (was originally going to be an E-stay where all that wouldn't have mattered). Otherwise very happy.
Any new woodwork projects to show?
The model of the Windermere lake steam launch is stunning, it looks just like a full-size boat under construction in a boatyard!
Set of alcove cabinets. Doors made to echo the lovely windows in the room.
@mick_r that's a nice bike. what are you using for bending? that seattube has came out nice! Heating over wood forms?
Here's my latest. Finished a batch of these. even more Jones style bars. much wider, with way less flare than the originals and with wild paintjobs. 🙂
Then had a go at making an easter egg. This was the fifth attempt. Don’t want to think about the cost.
I'm reminded of this 🙂
https://imgur.com/gallery/jPZbQ
Set of alcove cabinets. Doors made to echo the lovely windows in the room.
must have been a bugger to fit that curved wall 😉
Soap! Cold process, basic 100% coconut oil with 20% superfat (leaving 20% of the coconut oil unsaponified because coconut soap can be really harsh). It's my first go. I'll know if it's ok tomorrow when I come to de-mould it...
[img]  ?1[/img]

A workbench including a wagon vise from an old car jack, almost entirely with handtools and starting from rough sawn timber, was a lot of work but I'm chuffed with the result.
instagram posts not showing anymore?
mahowlett - very fine it is too - especially like the vices