Forum menu
Picnic bench! Enjoyed this one.
Can anyone point me in the right direction for varnish/some way of protecting it from the weather? CBA painting it!

Now, I'm no expert, but is that Reynolds by any chance? 😛

I am fairly rubbish at making stuff, it usually ends up looking a bit shonky. However, I am quite pleased with this for an afternoon's work.
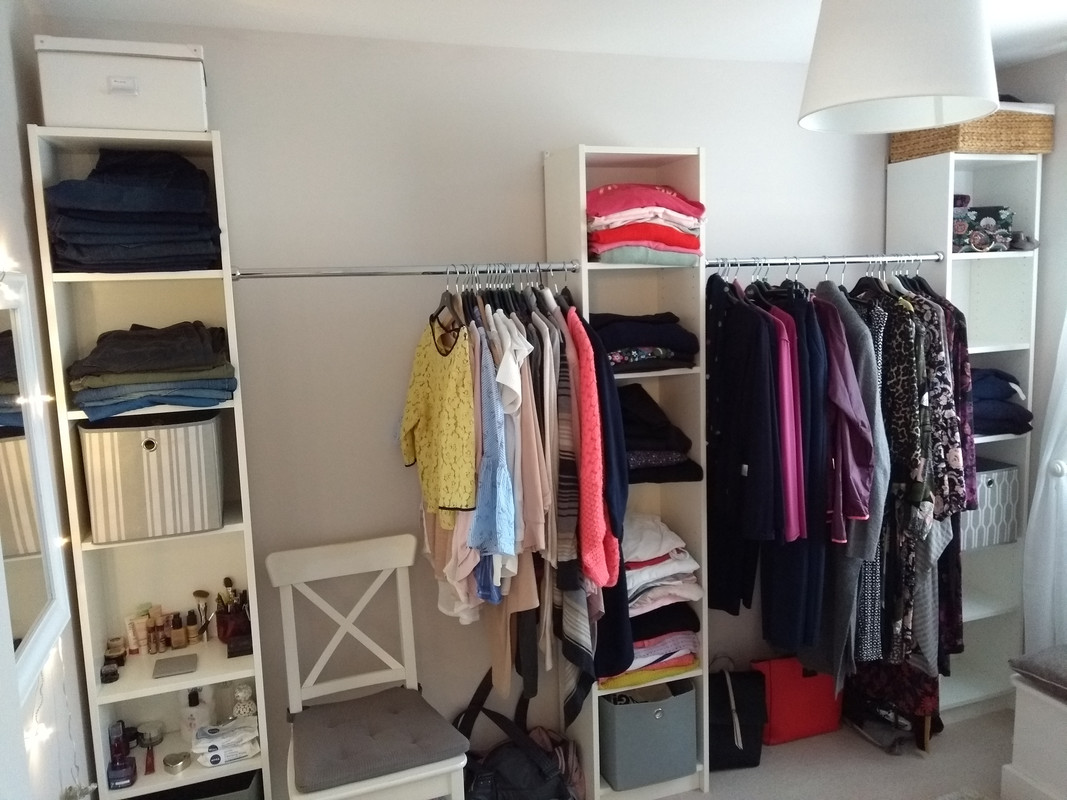
Mrs Mellie saw something similar on Pinterest. Three IKEA Billy bookcases re-purposed into storage for our third bedroom, which is now a dressing room (ooh, get us!) Batons at the top screwed into the very thin plasterboard to spread the load, then brackets screwed into bookcase and baton. Hanging rails from B&Q between each. A lot cheaper than buying wardrobes, and less 'looming' into the space. Needs a bit of finishing off.
(Love the garden projects bear).
That's very nice colp but shouldn't you have swapped the toilet and sink so you can reach for a book while sat on the bog?
I've gone done a big version of my 3D CNC machined Malvern Hills..
700 x 150 x 30mm:


That’s very nice colp but shouldn’t you have swapped the toilet and sink so you can reach for a book while sat on the bog?
Blimey! Never thought of that!
Here's another view of the sculpture. Shows the details quite nicely 🙂

Wanted a new framebag to fit the fatbike and as nothing off the shelf fit and I don't have custom money to spend I thought I'd have a crack. Also, who wants black/olive when you can have fluro orange and purple?
Material is 6oz PU coated polyester, zip is a double ended ykk plastic one, ordered the double ended version but it was the wrong way around so I swapped them round so it opens in the middle, 25mm webbing (x2 on top for the twin top tubes) and some Velcro onewrap (30mm and 50mm) to attach to the frame.
Fits a carefully packed gellert solo tent without too much bulging.
Stuff that worked well:
I massively over engineered putting the zip in, there are garages at each end and a storm flap over those, took longer than the rest of the bag!
Stuff that didn't work so well:
There was a mk1 that didn't quite work out and had a tapered top panel to fit the frame, I made this one 3" all round. It would have been better tapered as the tube splay apart to 85mm so the current taper in the webbing from 2 to 3" doest quite reach.
Onewrap gives two options, either rub the paint off the frame or the skin off your legs.
Cost £25, £15 of that was onewrap! Next time I'll just make some straps from webbing and Velcro which would be less abrasive too!
[img]  [/img]
[url= https://www.flickr.com/photos/7614571@N05/31443737478/ ]2018-10-14_06-33-22[/url] by [url= https://www.flickr.com/photos/7614571@N05/ ][/url] - [url= https://play.google.com/store/apps/details?id=com.dariogf.flickr2BBcode_lite ]Flickr2BBcode LITE[/url]
[img]  [/img]
[url= https://www.flickr.com/photos/7614571@N05/43498442670/ ]2018-10-14_03-15-19[/url] by [url= https://www.flickr.com/photos/7614571@N05/ ]https://www.flickr.com/photos/7614571@N05/[/url] - [url= https://play.google.com/store/apps/details?id=com.dariogf.flickr2BBcode_lite ]Flickr2BBcode LITE[/url]
[img]  [/img]
[url= https://www.flickr.com/photos/7614571@N05/45313304811/ ]2018-10-14_03-16-07[/url] by [url= https://www.flickr.com/photos/7614571@N05/ ]https://www.flickr.com/photos/7614571@N05/[/url] - [url= https://play.google.com/store/apps/details?id=com.dariogf.flickr2BBcode_lite ]Flickr2BBcode LITE[/url]
[img]  [/img]
[url= https://www.flickr.com/photos/7614571@N05/43498451130/ ]2018-10-14_03-15-38[/url] by [url= https://www.flickr.com/photos/7614571@N05/ ]https://www.flickr.com/photos/7614571@N05/[/url] - [url= https://play.google.com/store/apps/details?id=com.dariogf.flickr2BBcode_lite ]Flickr2BBcode LITE[/url]
Massive black shelving unit in black Valchromat in a black basement for a yoga studio in Birmingham.
BBC1 right now.
We won a BAFTA donchaknow!

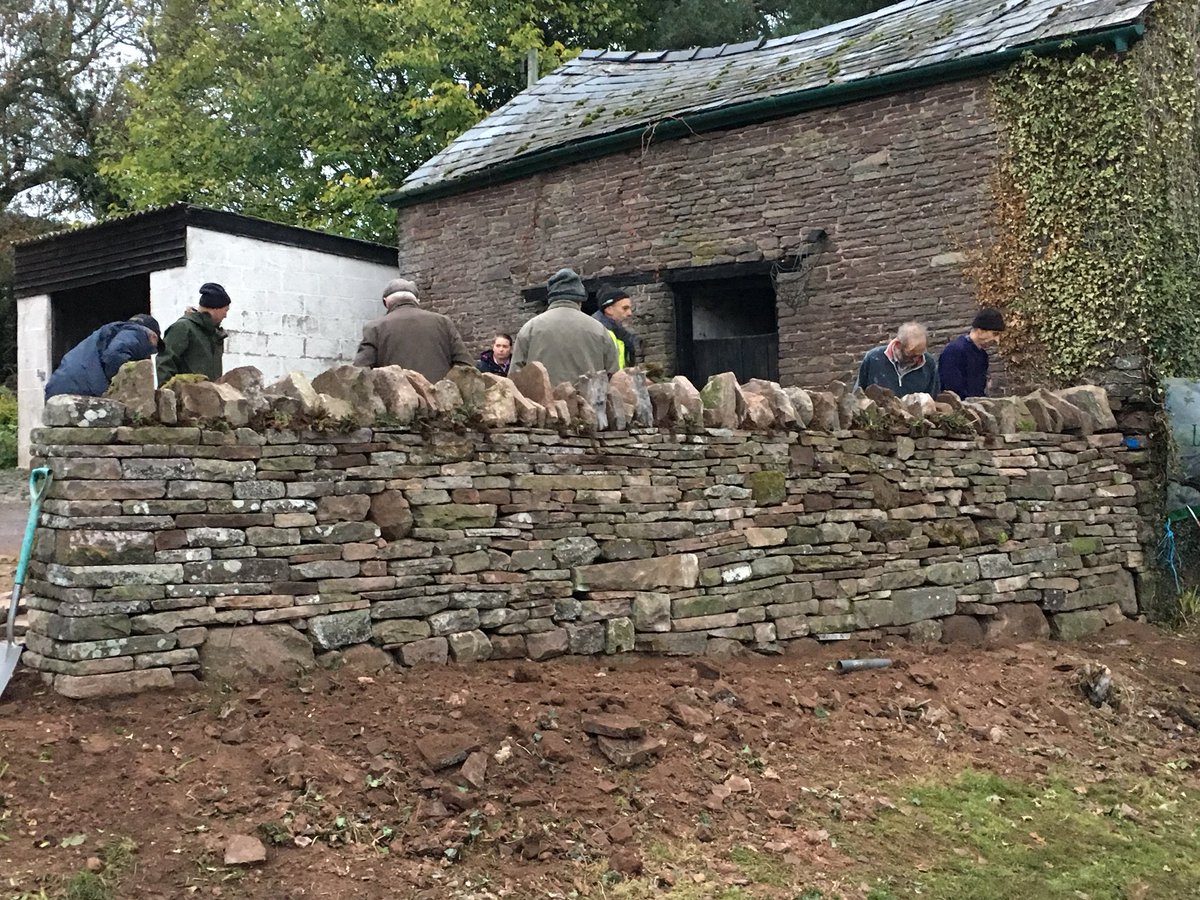
Spent my Saturday at the local hedging and stone walling competition. That is me in the middle making love to my spade! Was a tough day as the wall had to be taken down first before it could be rebuilt! The 2nd pic is the final result. Took first prize in the novice category as well as best local so, all in all, a good days work 🙂

Drove by the sign for the competition the other day welshfarmer, was tempted to call by and have a nose.
Been busy on the latest caravan/tiny home build:
[url= https://farm5.staticflickr.com/4835/45729613231_e2f3f30ddd_z.jp g" target="_blank">https://farm5.staticflickr.com/4835/45729613231_e2f3f30ddd_z.jp g"/> [/img][/url][url= https://flic.kr/p/2cEYdPr ]DSC_0825[/url] by [url= https://www.flickr.com/photos/57182396@N07/ ]neil.d.cox[/url], on Flickr
[url= https://farm2.staticflickr.com/1940/45729647171_fab9965bee_z.jp g" target="_blank">https://farm2.staticflickr.com/1940/45729647171_fab9965bee_z.jp g"/> [/img][/url][url= https://flic.kr/p/2cEYoUB ]DSC_0793[/url] by [url= https://www.flickr.com/photos/57182396@N07/ ]neil.d.cox[/url], on Flickr
I made a planter for my wife's friend but I'm buggered if I'm going to put a picture of it next to all this stuff^^
So much going on here I didn't think one or two photos would suffice. A friends paid me to repaint his bike, I agreed on the condition that I was able to paint it how I liked.
This is the result
Splatterpainting and fades for days.
www.instagram.com/colinlikesbikes/
[img]  [/img]
[img]  [/img]
[img]  [/img]
[img]  [/img]
[img]  [/img]
[img]  [/img]
[img]  [/img]
[img]  [/img]
[img]  [/img]
[img]  [/img]
[img]  [/img]
[img]  [/img]
[img]  [/img]
That's sick! 👍
Thats a great paint job, I am still wanting to do a hammerite hammered cammo on a frame frame but its a megga job.
Love the paint job.
That home made caravan is pretty amazing too!
Only just found this thread again as 'favourites' are now working!
9 months on and I haven't made much progress with the 3D printed Root 3 CNC dueto buying a van to convert into a camper, but at least it's assembled and wired - just need to add the Arduino now!
I've put holes in the base so it can hang up on the shed wall.
[url= https://farm5.staticflickr.com/4834/43948188600_3ae5fbc4e0_b.jp g" target="_blank">https://farm5.staticflickr.com/4834/43948188600_3ae5fbc4e0_b.jp g"/> [/img][/url]
[url= https://farm5.staticflickr.com/4890/30825902847_eef1804ae5_b.jp g" target="_blank">https://farm5.staticflickr.com/4890/30825902847_eef1804ae5_b.jp g"/> [/img][/url]
It's also got some bolts that fix it to insert nuts in the workbench.
Great paint job retro,your friend now has a very unique bike.
I was always a fan of the Kona splatt style so had my last build done like an old Explosif.
3D printed .............. van to convert into a camper,
Can't wait to see that 🙂
Can’t wait to see that
Beds might not be very comfy 🙂
I've already 3D printed all the window frame corners!
[url= https://farm5.staticflickr.com/4872/44853626405_cd56d0fb3f_b.jp g" target="_blank">https://farm5.staticflickr.com/4872/44853626405_cd56d0fb3f_b.jp g"/> [/img][/url]
[url= https://farm2.staticflickr.com/1901/45042096424_fab1f3f464_b.jp g" target="_blank">https://farm2.staticflickr.com/1901/45042096424_fab1f3f464_b.jp g"/> [/img][/url]
@Retrodirect I spotted a splatter paint cargo thing looking very similar in glasgow yesterday. One of yours?
https://drive.google.com/file/d/1TgB9ujc_QOThtmvt39KuAb2usEEyDaAS/view?usp=drivesdk
<span style="font-size: 0.8rem;">Fairly boring, compared to some of the stuff above, but I'm very pleased with it (and it's an improvement on the MTB version)</span>
Yep, that's another of mine, that'll be my friend Aaron. Pink and yellow splats with stickers all over it?
edit: this one?
The flat splat technique I was using was a bit experimental for that one and is a bit more refined now.
[img]  [/img]
[img]  [/img]
[img]  [/img]
yeah think so.
guy looked very happy on it 🙂
I made this for my cousin who works for Boeing. It's made from a 707 elevator hinge fitting and a bit of 787 fuselage repair patch.
[url= https://farm5.staticflickr.com/4898/43977290620_0e35b9d15d_z.jp g" target="_blank">https://farm5.staticflickr.com/4898/43977290620_0e35b9d15d_z.jp g"/> [/img][/url][url= https://flic.kr/p/2a187mC ]Trophy project[/url] by [url= https://www.flickr.com/photos/swavis/ ]Gavin Belton[/url], on Flickr
Lots of hard work for 2 years here ...
https://www.oculus.com/experiences/rift/1225876440769401/
https://store.steampowered.com/app/572540/Tin_Hearts/
That's cool Tenuous ,kids will love that .
Wow - best of luck with it Tenuous. I don't have an oculus unfortunately 🙁
Stevied done got himself famous in the local rag! Good lad!
That spatter pain job is a load of Pollocks! Sorry, couldn’t resist. It’s beautifully done, and works really well over the top of the fade base colours. Retro brought up to date. Nice!
Built myself a portable mitre saw station for my beast of a Bosch chop saw. Good job it's got braked castors as there's a bit of whiplash when she fires up. 😄
Fab skills getting better. I need to get some washers underneath those bolt-heads. Shaped by eye with an angle-grinder.
<div class="moz-text-html" lang="x-unicode">Free standing bike rack for 1 x 120mm old geo XC FS, 1 x modern hardtail, and 1 x 24" trials bike. Keeps the space they take up compact and can remove any one of them without disturbing the others. With front wheel removed they stand on their rear wheels. Supported by handlebars and stem turned 90 degrees. Rear wheels slot either side of middle bike, trials front wheel hangs on back of board.
 </div>
<div lang="x-unicode"></div>
<div lang="x-unicode">Had been intending to build one of these for several months, but never got round to it. To get things going I went out last month and bought some wood just guessing what I needed. Quickly realized there wasn't enough of it, and it probably wasn't strong enough to support the full weight of 3 bikes. A delivery left us with a nice pallet which I broke apart and used along with a few other bits and pieces. Revised the concept so bulk of weight supported by rear wheel. Roughly measured lengths and guessed angles hoping it would all work together. Luckily it did. Would be nice if it was a bit studier but it does the job.</div>
Made a little 3-legged dresser table with a single drawer to fit into a bit of an awkward space, above a radiator and below a windowsill.
Birch plywood and Oak.
[url= https://farm5.staticflickr.com/4851/45964877552_6de485a537_k.jp g" target="_blank">https://farm5.staticflickr.com/4851/45964877552_6de485a537_k.jp g"/> [/img][/url][url= https://flic.kr/p/2d2L1GQ ]Lawton 5[/url] by [url= https://www.flickr.com/photos/79912681@N06/ ]Kayak23[/url], on Flickr
[url= https://farm5.staticflickr.com/4879/45102764195_1257fc98f7_k.jp g" target="_blank">https://farm5.staticflickr.com/4879/45102764195_1257fc98f7_k.jp g"/> [/img][/url][url= https://flic.kr/p/2bHzsrr ]Lawton 2[/url] by [url= https://www.flickr.com/photos/79912681@N06/ ]kayak23[/url], on Flickr
[url= https://farm5.staticflickr.com/4812/46014235981_c528e8326a_k.jp g" target="_blank">https://farm5.staticflickr.com/4812/46014235981_c528e8326a_k.jp g"/> [/img][/url][url= https://flic.kr/p/2d77Zfe ]Lawton 3[/url] by [url= https://www.flickr.com/photos/79912681@N06/ ]kayak23[/url], on Flickr
Lovely Kayak
Kayak, Wrightyson and Bravissimo may want to look away now! 3 Weeks ago I lost a bike to the local scumbags and had to make a new door for the garage. It took a while and much brain ache as I'm not a carpenter (well maybe for packing cases) but this is the replacement door.

Gutting to lose a bike. New door looks nice and beefy! 👌😊
3x2 treated framework and 4x1 panelling and bracing. Plus lots of stainless screws, lots and lots of screws.
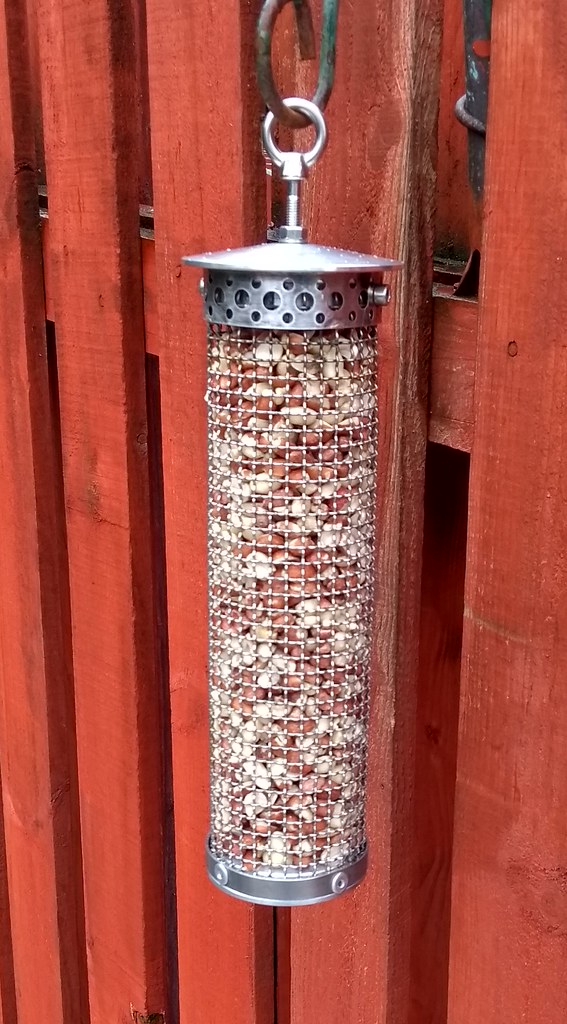
Fed up with squirrels destroying cheap bird feeders so decided to make my own.
Mesh is 1.2mm stainless so hopefully too tough for the squirrels. Other bits are aluminium so none of it will rust.
That looks great fruitbat!
I needed a pair of bleeding blocks for a Magura MT7 brake today so made them out of some pine which happened to be very close to the right thickness. Cut it into a pair of wedges, so they won't fall straight through. Needed to sand the face of each to get them to fit, then sanded a leading chamfer on both faces of each block and then lightly sanded all the sharp edges off. Worked a treat, was tempted to photograph them but can't be bothered now.
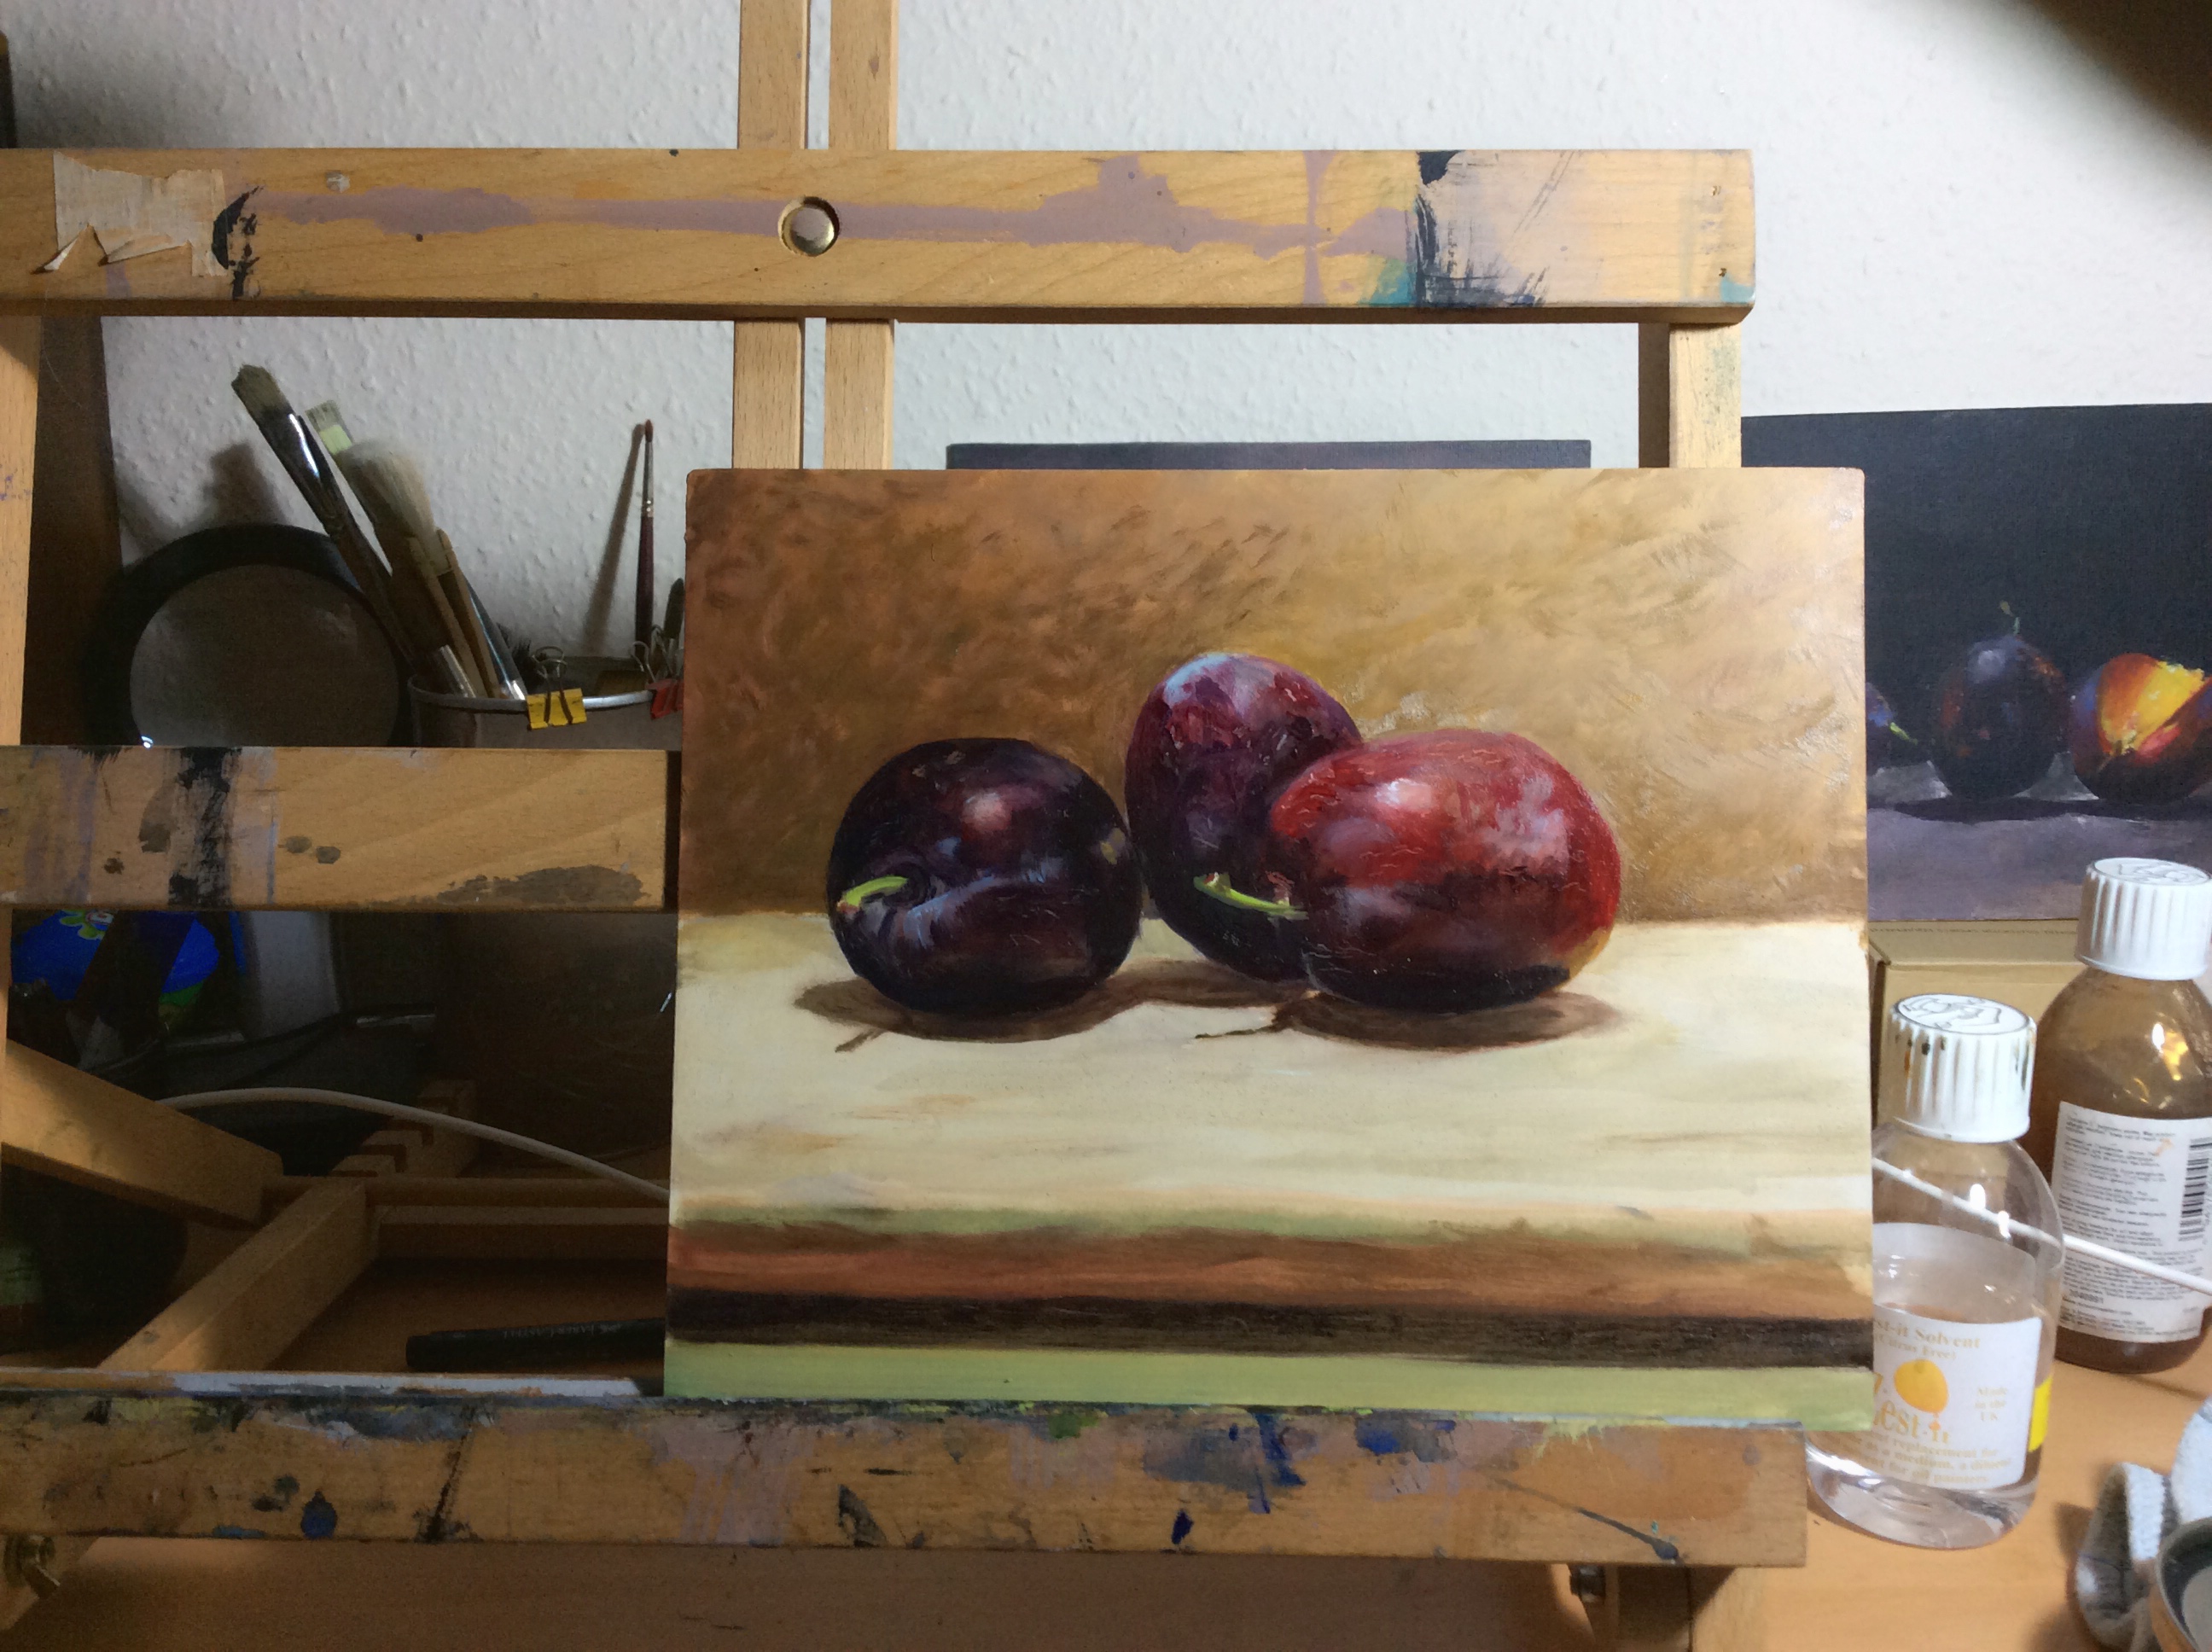
Our local fruit farmer gave me three plums (Marjorie's Seeders) and before gobbing them I took a few pics meaning to try a still-life study with oils on aluminium
Finally getting it together. The cost of decent tubes of oil paint gave me the vapours though 😲
That squirrel-proof birdfeeder is magnificent. If it works then please get it to market!
Nice that Malvern, really got the skin tones/texture of yer plumbs there.
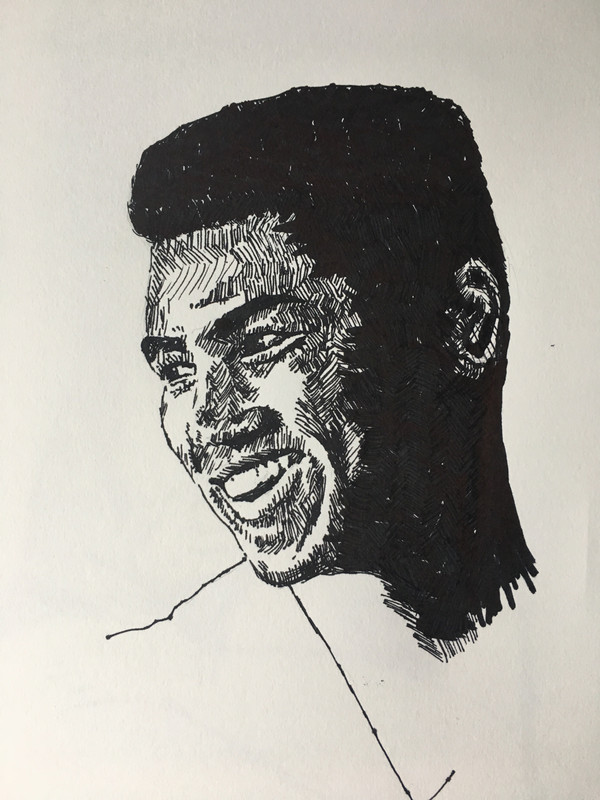
After Inktober, I got the taste for doing some art again, stopped back in the 80s, which was a bit of a waste. Waiting for some pens to turn up, in the meantime trying out some different shading techniques.

I made bagels.
They look and taste like bagels.
I've given up with posting photos.
Couple of gallons of sloe gin.
[url= https://farm5.staticflickr.com/4905/46099493612_ddda2a7727_b.jp g" target="_blank">https://farm5.staticflickr.com/4905/46099493612_ddda2a7727_b.jp g"/> [/img][/url][url= https://flic.kr/p/2deDXno ]DSC_0702[/url] by [url= https://www.flickr.com/photos/25846484@N04/ ]TandemJeremy[/url], on Flickr
My very old cat, Bruce Lee

Today I handed a new art portfolio to a potential client and they looked a bit sceptical so I did a cutout and comp in Fauxtoshop. Nothing too astounding to me from a commercial studio / newspaper background, it took under 15 minutes including finding stock images.
They said their in house guys would have taken an hour or two to do it. So there you go, its not up there with illustration - I can't do the drawing thing and am most envious - but at least it makes money.
The last 'proper' thing I made would have been a radio control glider fit out.
Double carbon skin and easily good for over 200mph when loaded with ballast.
https://flic.kr/p/Q1x5ak
https://flic.kr/p/QETAUA
Ten legs of 100m with a corner at each end in 27.68 seconds.
Made a cross cut jig for my circular saw. Very pleased with it as it works perfectly.
I then made a Christmas tree out of old pallet wood. I like it. The girlfriend likes it. Win for me.
I'm not posting any pictures as the standard of the stuff on here is far too high!
Si
eddiebaby - those gliders look soooo easy to crash and destroy. Is it as hard to fly as it looks?
Yes. At that level very much so. At my level less so. Mark you when a bad crash can cost you £2.5k for the airframe and £750 for fit out and maybe £400 for tungsten ballastto replace the brass, then you tend to work your way up to it.
And you get very good at fixing composites.
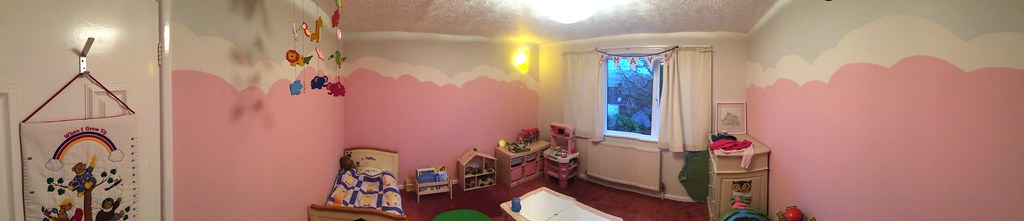
Not sure this is what my wife meant when she said I could get out of visiting the in-laws for a week if I decorated Daughter Mk1's bedroom.
When she gets home tomorrow she'll either be happy or I'll be in the shit again. 🙂

Very nice jonm81!
Made my sister's kids a mud kitchen for their Chrimbo present!!
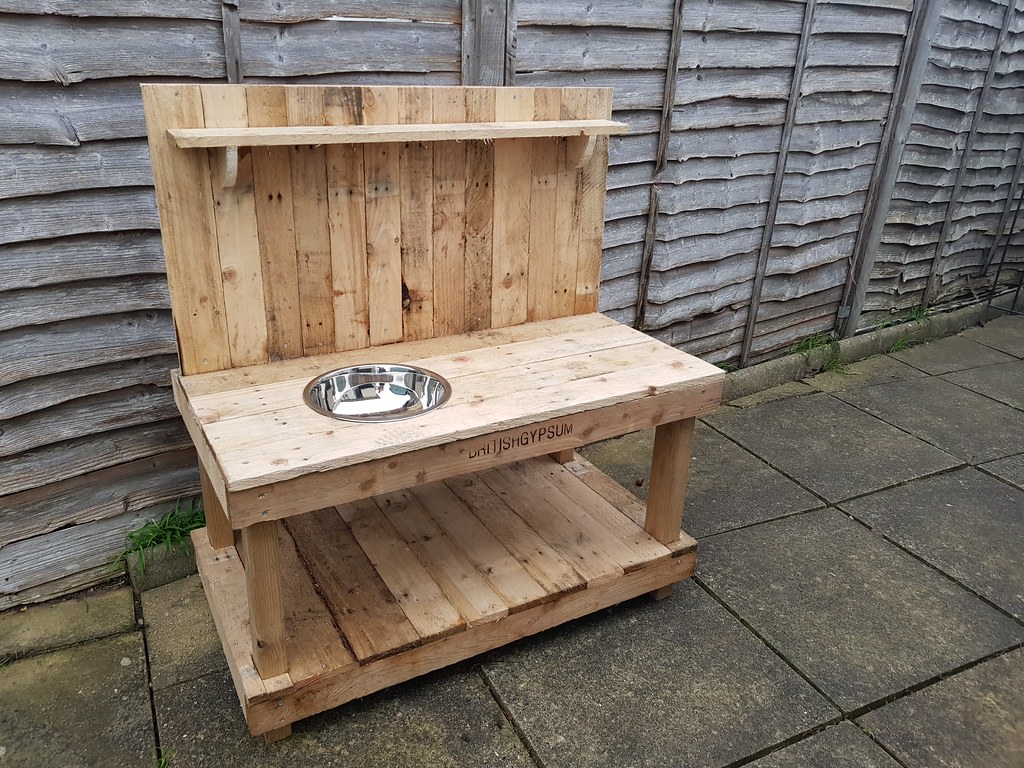
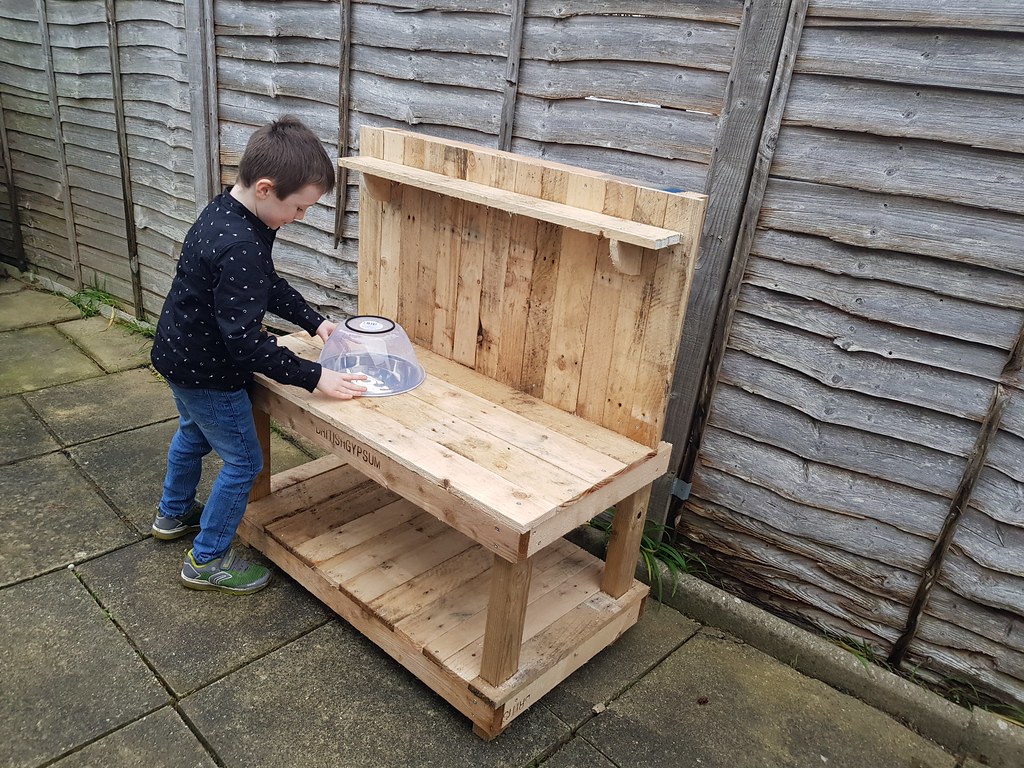
Put some pallets and a few hours to good use!
DrP
^^^ That's wicked Dr P.😊👌
That is excellent....and having just shown the pic to my 5yr old, I'll have to get some pallets to make one now 😂
JonM81 fancy coming up here and doing the living room? That's amazing!
Not as good as that Calvin and Hobbes, but my daughter requested pink clouds in her room , so I did this.... (though having seen the above, I might have to add a tree in the corner)
De Havilland DH.88 Comet weathervane from stainless steel.
Welwyn Machine Works - DH.88 Comet Weathervane
Great to see some paintings making an appearance. Jon dont think you will be in the shit, it's full of happy winfulness.
And want mud kitchen now.
Painting bike-parts in temperature changing paint!
I can't seem to add the video on stw so click here:
Nice idea Retrodirect. I bet you'll see it in direct summer sunlight. Does your hand gripping it do it?
Thats a really nice way of representing propellors Arbathx
@retrodirect, how Dow describe that to the police if it gets pinched? Looks ace.
Hand gripping it doesn't do it, it's also not been fitted to a bike yet so not had a chance to check outside. Seller of the paint thinks it will change on a warm day. 🙂
Blimey - that's an interesting paint job on that frame. I've not seen a split frame like that before!
My daughter kept whacking her fingers on door frames while riding her balance bike in the house. She also had a couple of close calls outside with lamp posts etc.
She can ride OK but tends to get distracted, look around & then veer off course.
So - I designed & 3-D printed her some moto-x style hand guards. Probably gone overboard with piccies. The first iteration was just to check for fit & see how best to lay the print out for support removal etc. I only did one of these.
[url= https://farm8.staticflickr.com/7843/32770737348_69c3e1c43b_z.jp g" target="_blank">https://farm8.staticflickr.com/7843/32770737348_69c3e1c43b_z.jp g"/> [/img][/url][url= https://flic.kr/p/RVQAuU ]IMG_20181201_110313[/url] by [url= https://www.flickr.com/photos/me96kka/ ]STW stumpy01[/url], on Flickr
Then she wanted purple, so I got her some translucent purple & made the guards slightly bigger as she was having trouble getting her gloves into the gap. They are now fitted & she's well pleased - although after buying the purple, her favourite colour changed from purple to orange....I ignored this....
I've got some nice domed nuts that I need to swap the standard nuts for, but I need to dremel the screws to size before I can fit them...
[url= https://farm8.staticflickr.com/7801/31703939377_6942dacea7_z.jp g" target="_blank">https://farm8.staticflickr.com/7801/31703939377_6942dacea7_z.jp g"/> [/img][/url][url= https://flic.kr/p/QiyYCr ]IMG_20181230_132814[/url] by [url= https://www.flickr.com/photos/me96kka/ ]STW stumpy01[/url], on Flickr
[url= https://farm8.staticflickr.com/7892/39680401913_20accbf1ee_z.jp g" target="_blank">https://farm8.staticflickr.com/7892/39680401913_20accbf1ee_z.jp g"/> [/img][/url][url= https://flic.kr/p/23sqr3z ]IMG_20181230_203048[/url] by [url= https://www.flickr.com/photos/me96kka/ ]STW stumpy01[/url], on Flickr
[url= https://farm5.staticflickr.com/4850/39680401933_f1fbd6c783_z.jp g" target="_blank">https://farm5.staticflickr.com/4850/39680401933_f1fbd6c783_z.jp g"/> [/img][/url][url= https://flic.kr/p/23sqr3V ]IMG_20190101_145815[/url] by [url= https://www.flickr.com/photos/me96kka/ ]STW stumpy01[/url], on Flickr
The handguards are cool!
I made a shoe rack. I should probably take a photo of it at some point, but it's not even close to comparing to some of the amazingness on here!
Finally started to do some basic wood construction...
[url= https://farm5.staticflickr.com/4873/31710152197_881a92b18a_b.jp g" target="_blank">https://farm5.staticflickr.com/4873/31710152197_881a92b18a_b.jp g"/> [/img][/url]
[url= https://farm8.staticflickr.com/7809/39686602583_46eb56957a_b.jp g" target="_blank">https://farm8.staticflickr.com/7809/39686602583_46eb56957a_b.jp g"/> [/img][/url]
Limited by a hand mitre saw (in a frame), hand drill and basic electric sander (couldn't get in the corners). However well received. Really simple to make utilising LED lights from ebay, printed words, laid out holes and then drilled through (making sure I got the right diameter bits). Poor mitre work meant nothing lined up perfectly but will get myself better (electric) mitre saw for the future.
Cool handguards. Looks like Sam Hill's bike. 🙂
Liking the LED signs too. I bet they love them.
The only thing I’ve made recently is a little hedgehog sleeping ‘box’, or rather more like dome. It’s an old plastic planter which the base had broken off, so I cut a door in one side, put some rabbit hay inside and sat it on a piece of shed roofing felt.
Then waited to see if the hedgehog would take advantage of it; they apparently move around sleeping places, so no guarantee. Anyway, it seems to have rather taken to it, and uses it every day, which is nice. I can tell, because it drags dry leaves back into the entrance every time it goes in.
Cheap, cheerful and effective. I’ve just thought, while writing this, I ought to put a little ‘Home Sweet Home’ sign on the front...
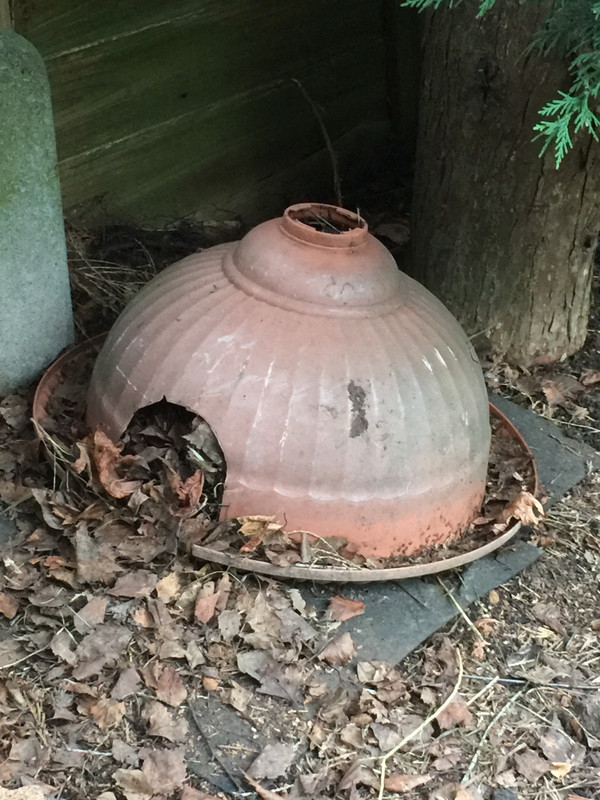
^^^ that hedgehog house is really cool and great that you have a resident hedgehog!
We had one that i got given as a present, which never attracted any hedgehogs & after not very long my clumsy father in law managed to stand on it while doing some gardening & broke it. I keep meaning to replace it.
Knocked up a bar for the summer house. Sum total of 0 quid as all stuff was liberated from work. Old pallets and galv angle just knocking about and a couple of cheeky scaff boards.
[url= https://i.postimg.cc/r0fLFmK3/20190113-190908.jp g" target="_blank">https://i.postimg.cc/r0fLFmK3/20190113-190908.jp g"/> [/img][/url]
[url= https://i.postimg.cc/yWNHpFGH/20190113-182414.jp g" target="_blank">https://i.postimg.cc/yWNHpFGH/20190113-182414.jp g"/> [/img][/url]