They're brilliant!
I would like a couple of Lang's on quick points though as the gerardi is a bit limited for the longer wider stuff.
I think my boss will have other ideas though 😉
Made myself a little chest of drawers for my shed using OSB sheets and a nice old metal filing drawer that I ground the paint off.
Shapely Iroko legs...
[img] 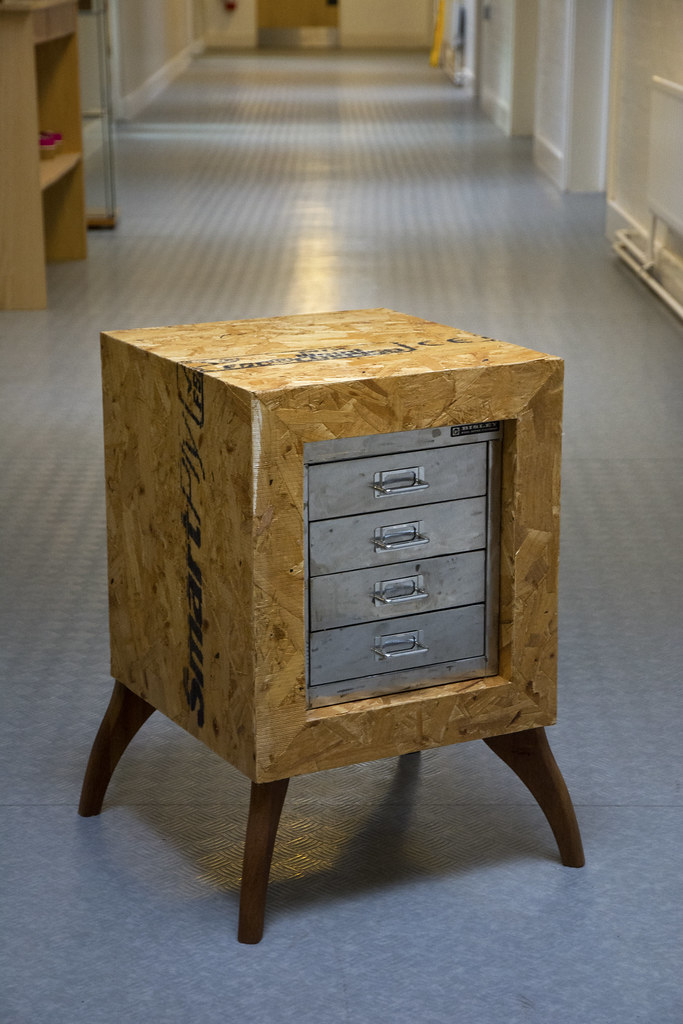 [/img]
[img] 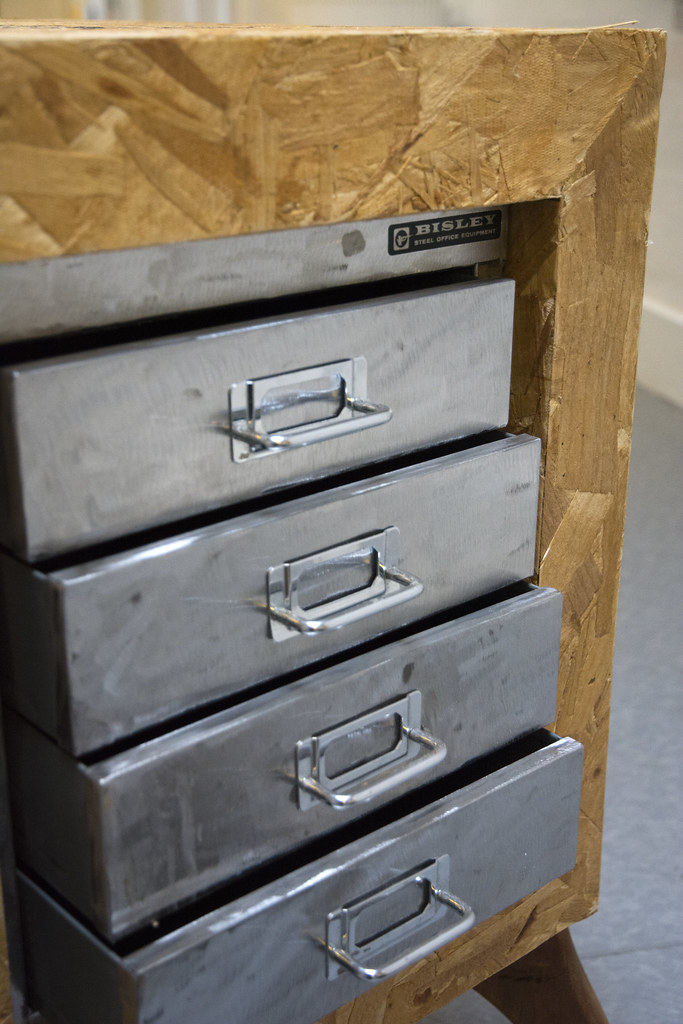 [/img]
Those are quite crisp edges for OSB
Nice work!
The YMT 5th axis vices are pretty good, for the price.
Kayak,
I think those drawers are blimmin gorgeous. Makes we wanna try some OSB furniture...
YMT stuff does indeed look good, had never heard of them before. Cheers stevied
[IMG] 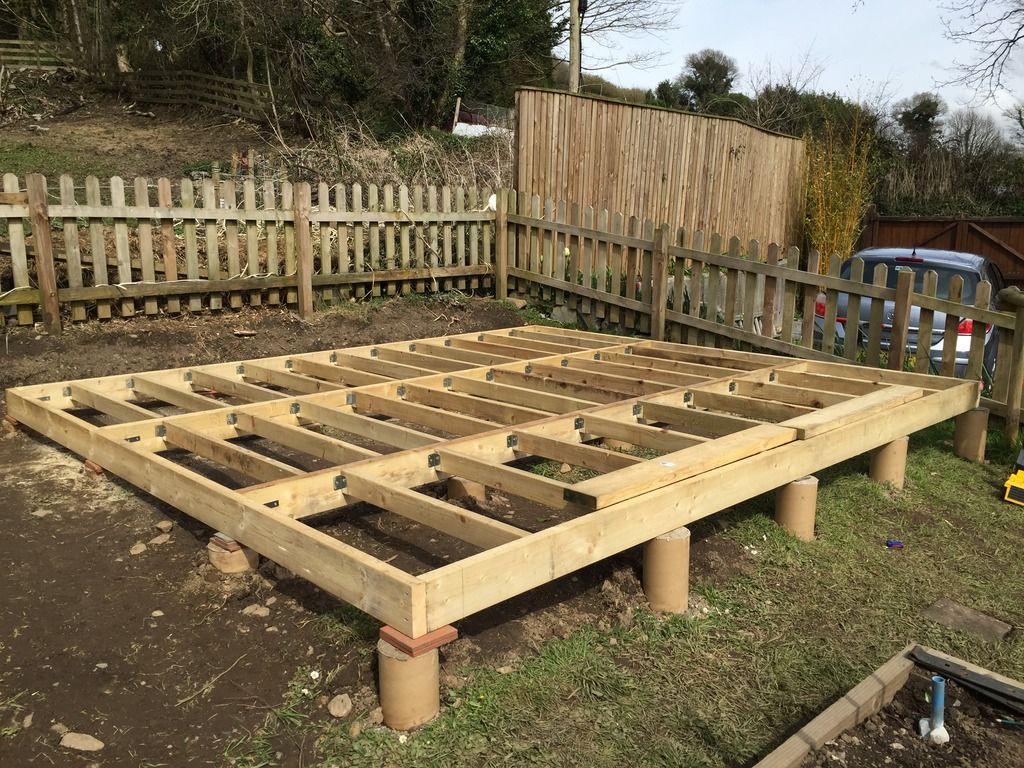 [/IMG]
A base for a studio.
Made myself a synthetic camping quilt. Its a bit less power tool action than a lot of stuff on this thread but quite happy with the way its turning out.
I am using pertex quantum outer with a cimashield inner, should get me near 4 degrees. I have put d rings up the side so i can, with cord, cinch up, create a foot box or tie to a mat.
Need to add a drawstring to the foot end yet.
[img]  ?dl=1[/img]
[img]  ?dl=1[/img]
[img]  ?dl=1[/img]
Any further info ajf?
What does it do? How do you use it? How small does it pack and why bother with this over a sleeping bag?
YMT stuff does indeed look good, had never heard of them before
I'm using a couple of the 5th axis vices and the normal vices. Best I could find for the price. Easy to make soft jaws for too which is a limiting factor with most of the other options
@BlobOnAStick not weighing until all finished properly but the materials were meant to weight about 550grams, reckon may weigh in end about 700grams. Packs pretty small.
Got a rab top bag sleeping bag already which has top down only nothing on bottom. Buy into idea of not needing much from the bottom of your sleeping bag so quilt nice and adaptable. Also going to use it in a layering system with sleeping bag for winter if I dare brave a winter bikepacking ride.
Cool! Thanks for that - I'm very interested in how it turns out. Never heard of one of these before and it sounds really versatile!
Finished my little stove. Added a vent to the bottom using scaffold tube and a vegetable steamer to the top of the flue for a bit of pzazz! 😀
Welding work is.....not the prettiest but it's my first try so not so bad.
[img] 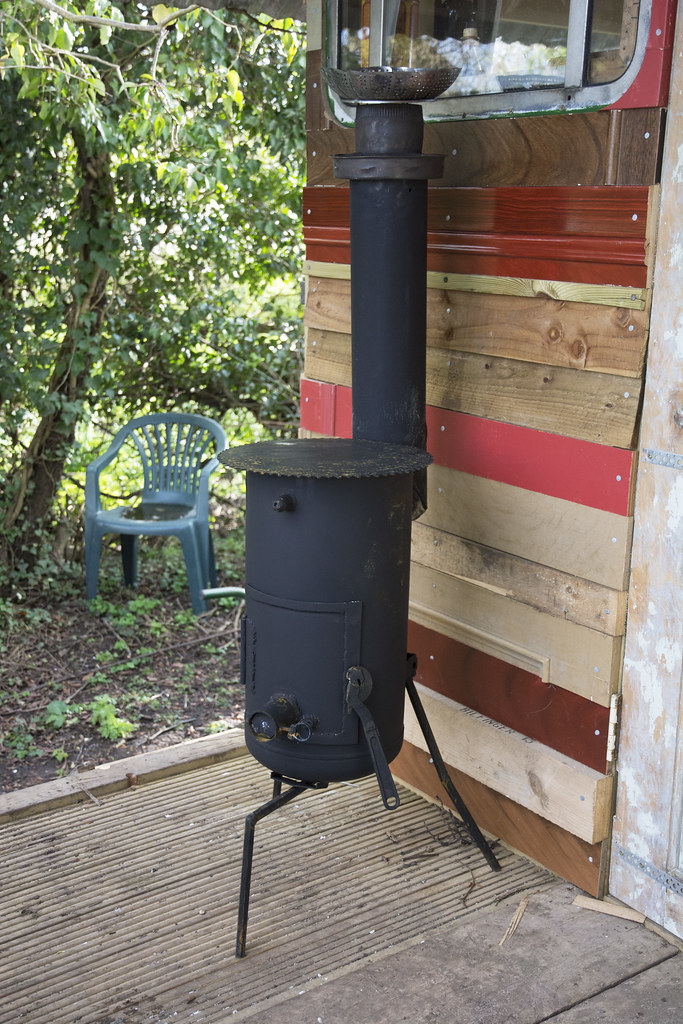 [/img]
[img] 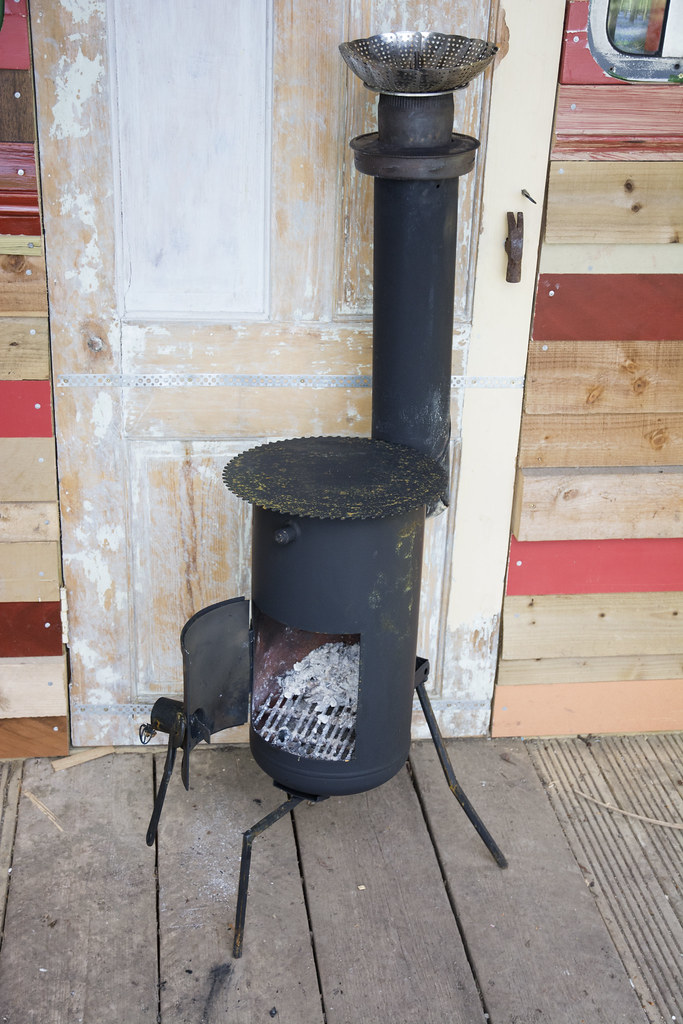 [/img]
It works really well. The vent is effective. Not made a cuppa on it yet mind but I think it'll be good.
[img][url= https://farm2.staticflickr.com/1613/25909585603_88a0bf7f31_c.jp g" target="_blank">https://farm2.staticflickr.com/1613/25909585603_88a0bf7f31_c.jp g"/> [/img][/url][url= https://flic.kr/p/Ftxp8a ]IMG_20160418_2313458[/url] by [url= https://www.flickr.com/photos/134931250@N03/ ]Bicycle Manufacturing[/url], on Flickr[/img] a jig for a special project
its the worlds first one man pirate ship
oh
[img][url= https://farm2.staticflickr.com/1631/26389186042_f4b1fc0f8d_z.jp g" target="_blank">https://farm2.staticflickr.com/1631/26389186042_f4b1fc0f8d_z.jp g"/> [/img][/url][url= https://flic.kr/p/GcVtCf ]IMG_20160406_200325[/url] by [url= https://www.flickr.com/photos/134931250@N03/ ]Bicycle Manufacturing[/url], on Flickr[/img]
and went back to messing about with carbon fibre for a bit again
Woah!,you have an optical table,like a proper optical table,and,and it's even tidy. 🙂
Another useful little tool to add to the collection:
[img]  [/img]
Been somewhat busy lately in the evenings knocking up all sorts of stuff. I think because we have construction going on at work I've been inspired to use all the cool stuff they chuck out! 🙂
An old extraction fan unit was taken off the roof next to our workshop to make way for a new system.
I salvaged the big cylinder that had a motor driving a big fan on it and decided to use it for a table base.
[img]  [/img]
For the top I decided to try a sort of eccentric starburst thing using pallets and scrappy wood, all coming out from a central point which I used a wire brush for a drill for.
The sections all sit on a framework made from an old cable reel and some chunky 2x4. I fitted an old peephole from a front door so that you can look through the top into the cylinder and watch the fan turn should you so desire.
[img] 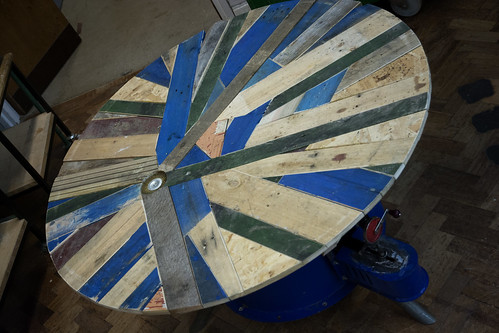 [/img]
[img]  [/img]
To make the fan inside the cylinder still turn, I took off the 'kin heavy motor that drove the twin drive belts and did some Heath Robinson shit with an old hand drill.
Works well.
[img] 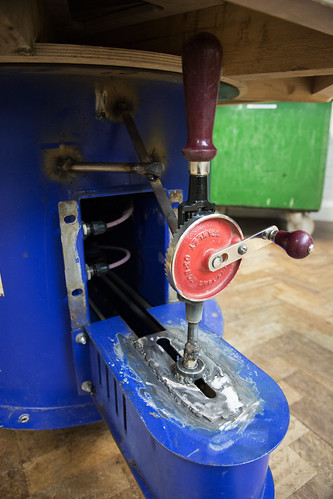 [/img]
🙂
Nice work again Kayak - as I've said before, it takes a special eye to make random reclaimed stuff work visually.
Very jealous that you have all the tools to hand.
My next projects are:
Bathroom vanity/sink unit
Built-in bed with storage
Bathroom cabinet
I think I've already decided that 2 new tools are required to even start 🙂
More shonky skillz, I liberated these from a demolition site:
[img][url= https://farm2.staticflickr.com/1711/26348855930_89a14ea912_o.jp g" target="_blank">https://farm2.staticflickr.com/1711/26348855930_89a14ea912_o.jp g"/> [/img][/url][url= https://flic.kr/p/G9mLTu ]2016-04-24_08-47-19[/url] by [url= https://www.flickr.com/photos/martinddd/ ]martinddd[/url], on Flickr[/img]
bish
[img][url= https://farm2.staticflickr.com/1465/26556725531_481cc4b9f2_o.jp g" target="_blank">https://farm2.staticflickr.com/1465/26556725531_481cc4b9f2_o.jp g"/> [/img][/url][url= https://flic.kr/p/GsJah8 ]2016-04-24_08-47-52[/url] by [url= https://www.flickr.com/photos/martinddd/ ]martinddd[/url], on Flickr[/img]
bosh
[img][url= https://farm2.staticflickr.com/1660/26016598784_246347fd08_o.jp g" target="_blank">https://farm2.staticflickr.com/1660/26016598784_246347fd08_o.jp g"/> [/img][/url][url= https://flic.kr/p/FCZSq1 ]2016-04-24_08-48-14[/url] by [url= https://www.flickr.com/photos/martinddd/ ]martinddd[/url], on Flickr[/img]
Leftovers going to school bonfire.
now i just need a wood burner!
A little brown fish. You really want pics?
I made a rubbish tip into a garden!
[img]  [/img]
The old wooden gate in the first few photos became the raised bed.
Woah! How did you make your images slideshow!? 🙂
After two and a half years of planning I finally got time in the workshop to build myself a new front triangle for my Saracen Kili Flyer. I've ridden long, low and slack frames before but this takes it to new level, critical dimensions:
All based on my XFusion Sweep set at 140mm, rear travel unchanged at 120mm
62 degree head angle (+/- 1 degree with angleset which can be rotated with allen keys)
75 degree seat angle
690mm top tube
525mm reach
615mm stack
25mm BB drop
431mm chainstays
400mm seat tube (I will only be able to get full ride height with a 170mm Reverb, once it arrives)
853 downtube and externally butted 4130 top and seat tube. The top tube has 6 different diameters on it, the seat tube is simpler with 3. All fillet brazed
No option for a front mech, stealth dropper only
Sandblasted graphics which will get covered with clear powder once I've done a test build
[img]  [/img]
That looks incredible! Photos when it's built up please.
cool.
some brackets to hold oak posts
[URL= http://i680.photobucket.com/albums/vv167/porter_jamie/20160422_120844%201_zpsxjuilmfg.jp g" target="_blank"> http://i680.photobucket.com/albums/vv167/porter_jamie/20160422_120844%201_zpsxjuilmfg.jp g"/> [/IMG][/URL]
[URL= http://i680.photobucket.com/albums/vv167/porter_jamie/IMG_0219_zpsh01ez1h1.jp g" target="_blank"> http://i680.photobucket.com/albums/vv167/porter_jamie/IMG_0219_zpsh01ez1h1.jp g"/> [/IMG][/URL]
My prototype wood-burning camp shower. Works fine but can definitely be improved. The upper "heat exchange" unit can be removed to leave a simple word-burner should the mood take one.
[img]  [/img]
welshfarmer - Member
My prototype wood-burning camp shower. Works fine but can definitely be improved. The upper "heat exchange" unit can be removed to leave a simple [b]word[/b]-burner should the mood take one.
Books not popular round your way 😆
Funnily enough, but you can buy bundles of old paperbacks from Hay-on-Wye, just over the hill, specifically sold for burning.
😀
This garden trug (the green one) with my dad today, base is all left over shiplap from a shed he built for a customer a few weeks back. Handle I bent up from a knackered old iron hurdle.
[IMG]  [/IMG]
He makes and sells all sorts of timber products, mostly re/upcycled stuff, had to pack in building due to collapsed discs, so now workshop based. I had a day off work and not much to do so cycled the 5 miles there and back and helped make and photograph some stuff for his website.
18BikesMatt - looks superb - reminds me of the Swarf.
I take it you're normally an XL?
Have you left everything about the shock pivots/curves exactly as per the original?
I got tired of lugging my 2x12 guitar cab around, so decided to make a smaller (and nicer looking) 1x12.
[url= https://farm8.staticflickr.com/7169/26593907100_cbfce79e9d_c.jp g" target="_blank">https://farm8.staticflickr.com/7169/26593907100_cbfce79e9d_c.jp g"/> [/img][/url][url= https://flic.kr/p/Gw1J4E ]image[/url
[url= https://farm8.staticflickr.com/7493/26833054786_e908698cac_c.jp g" target="_blank">https://farm8.staticflickr.com/7493/26833054786_e908698cac_c.jp g"/> [/img][/url][url= https://flic.kr/p/GT9qkC ]image[/url]
[url= https://farm8.staticflickr.com/7329/26261303674_18e11b0704_c.jp g" target="_blank">https://farm8.staticflickr.com/7329/26261303674_18e11b0704_c.jp g"/> [/img][/url][url= https://flic.kr/p/G1C3DQ ]image[/url]
[url= https://farm8.staticflickr.com/7286/26593890430_f0fb0eba89_c.jp g" target="_blank">https://farm8.staticflickr.com/7286/26593890430_f0fb0eba89_c.jp g"/> [/img][/url][url= https://flic.kr/p/Gw1D7f ]image[/url]
[url= https://farm8.staticflickr.com/7643/26593884590_7ca8b86efd_c.jp g" target="_blank">https://farm8.staticflickr.com/7643/26593884590_7ca8b86efd_c.jp g"/> [/img][/url][url= https://flic.kr/p/Gw1Bny ]image[/url]
[url= https://farm8.staticflickr.com/7305/26866814035_53502bd78d_c.jp g" target="_blank">https://farm8.staticflickr.com/7305/26866814035_53502bd78d_c.jp g"/> [/img][/url][url= https://flic.kr/p/GW8rMD ]image[/url]
[url= https://farm8.staticflickr.com/7348/26262482973_89a233bbb9_c.jp g" target="_blank">https://farm8.staticflickr.com/7348/26262482973_89a233bbb9_c.jp g"/> [/img][/url][url= https://flic.kr/p/G1J6dz ]image[/url]
[url= https://farm8.staticflickr.com/7424/26773117102_6110336e01_c.jp g" target="_blank">https://farm8.staticflickr.com/7424/26773117102_6110336e01_c.jp g"/> [/img][/url][url= https://flic.kr/p/GMRdXh ]image[/url]
[url= https://farm8.staticflickr.com/7626/26773113212_9284cd0a90_c.jp g" target="_blank">https://farm8.staticflickr.com/7626/26773113212_9284cd0a90_c.jp g"/> [/img][/url][url= https://flic.kr/p/GMRcNd ]image[/url]
Mix of reclaimed/recycled woods - Oak, Sapele, Birch, & Plywood offcuts.
Finger joints cut on band-saw and fret saw, they need a bit of filing/sanding to get them straight.
A little logo milled out on the front panel.
Storage in the bottom for amp head and cables.
12" Celestion 70/80 speaker - though I've also got a Vintage 30 I'm going to try in it.
To finish it needs fabric over the speaker, sanding all over, edges rounding off, and finish applying. Might try Danish Oil, and then a n oil based varnish over that.
Plugged and played this morning, sounds lovely, nice tight sound. No boominess or rattles. The built in layback angle projects the sound nicely, as does the semi-open back.
Ace
nice
Did a painting for someone's birthday. Not having any framing tools or moulding I used a knackered saw, some old roofing wood and my SAK and some pins and staples to bang a frame together. After sanding it was quite a nice rustic (read imperfect!) match.
[IMG]  [/IMG]
[URL= http://i51.photobucket.com/albums/f384/muz_topbanana/20160508_195410_zpsj5l1j953.jp g" target="_blank"> http://i51.photobucket.com/albums/f384/muz_topbanana/20160508_195410_zpsj5l1j953.jp g"/> [/IMG][/URL]
Extended the seating area in the garden. Lots of earth moved!
@AlexSimon - Thanks, I just wanted clean lines and simple(ish) construction. I have been riding the original front triangle which is a large with a 50mm stem. I would be able to ride a lot XLs though, depending on brand and stem choice. I'm just shy of 6'1" but have a large ape index (6'5.5" span)
The pivots are all in the original location relative to the rear axle and bottom bracket and each other, except they were rotated about the rear axle to increase the bottom bracket drop from 9mm to 25mm
Cheese Noodles !!
knocked up a small bench for the kids to sit on from some scaffold boards;
[img]  [/img]
Ah interesting. Thanks for the explanation!The pivots are all in the original location relative to the rear axle and bottom bracket and each other, except they were rotated about the rear axle to increase the bottom bracket drop from 9mm to 25mm
Mods this thread needs a 'like' button.
Finished - holes and chips filled, sanded, edges rounded, feet and grill cloth fitted......
[url= https://farm8.staticflickr.com/7312/26335050014_66e78f1014_c.jp g" target="_blank">https://farm8.staticflickr.com/7312/26335050014_66e78f1014_c.jp g"/> [/img][/url][url= https://flic.kr/p/G891Ss ]image[/url] by [url= https://www.flickr.com/photos/toretz/ ]tom harrison[/url], on Flickr
[url= https://farm8.staticflickr.com/7238/26872599711_10f954e2b3_c.jp g" target="_blank">https://farm8.staticflickr.com/7238/26872599711_10f954e2b3_c.jp g"/> [/img][/url][url= https://flic.kr/p/GWD6EF ]image[/url] by [url= https://www.flickr.com/photos/toretz/ ]tom harrison[/url], on Flickr
Sycamore bowl, turned on a pole lathe.
Chunkier than I generally like, as it was a demonstration piece for students.
[img]  [/img]
Got the front triangle back from the powdercoater and managed to build the bike for a ride on Friday morning. This is in 'steep' mode and it felt amazingly normal. Fit is pretty much spot on, just needs a few little changes and some more ride time but initial impressions are good!
[img]  [/img]
The saddle is about 5-10mm too high for me in this shot
That shot makes it look a lot longer than the previous photos! Looks amazingly stretched out.
Girlfriend found an old(French possibly) weather vane compass points thingy at the dump, missing it's spinny top thingy.
Made a Narwhal to sit atop it, mounted on a bearing from an old machine.
[img]  [/img]
Now living on top of the river shed.
[img]  [/img]
Love the Narwahl weather vane ....
As requested here is the bike now it's been powdercoated (clear) and assembled properly and had a maiden voyage.
[img]  [/img]
(this is in 'steep' mode)
If you haven't seen it there are more pictures on the news story on the [url= http://singletrackworld.com/wp-content/uploads/2016/05/18-bikes-project-stupid/ ]front page[/url]
I'll be riding it over the summer to get it dialed in and then deciding whether I'll carry on riding it or make some alterations/build a replacement. The bike will be available for demo at the shop if anyone is interested and I'll be doing a news story on our site once I've had a few more rides
I do like the look of that.
I didn't make this sculpture, but I did put the bearings on it and bolt it to a gatepost in the park:
[url= https://c6.staticflickr.com/8/7248/27259128141_5a0f352ba0_z.jp g" target="_blank">https://c6.staticflickr.com/8/7248/27259128141_5a0f352ba0_z.jp g"/> [/img][/url][url= https://flic.kr/p/HwNa6X ]Untitled[/url] by [url= https://www.flickr.com/photos/cycleologist/ ]Ben Cooper[/url], on Flickr
It spins around:
[url= https://c1.staticflickr.com/8/7344/27296339616_045894f0d3_z.jp g" target="_blank">https://c1.staticflickr.com/8/7344/27296339616_045894f0d3_z.jp g"/> [/img][/url][url= https://flic.kr/p/HA5SM7 ]Untitled[/url] by [url= https://www.flickr.com/photos/cycleologist/ ]Ben Cooper[/url], on Flickr
Just recently finished painting this to exhibit in the town's music and arts festival
[img]  [/img]
and also knocked up this Jamie Hewlett tribute to give away to a member of the public as a piece of free street art to help promote the event
[img]  [/img]
Hydraulic cable crimper bodged to crimp chainstays, fork blades etc.
[url= https://c5.staticflickr.com/8/7466/26764385044_12141916e5_z.jp g" target="_blank">https://c5.staticflickr.com/8/7466/26764385044_12141916e5_z.jp g"/> [/img][/url][url= https://flic.kr/p/GM5tdy ]Untitled[/url] by [url= https://www.flickr.com/photos/cycleologist/ ]Ben Cooper[/url], on Flickr
HI, me again. Sorry 😳
Just finished making myself a firewood storage bench (Ottoman) for my shed. I thought I'd have a go at casting concrete as I hadn't tried it before. Was pretty fun to do, but the wooden blocks took 'kin ages...
[img]  [/img]
[img]  [/img]
[img]  [/img]
concrete and wood blocks combo is a lovely thing.
Can't work it out from the video, but how is the concrete part attached to the rest, is the concrete poured on/around the main wooden frame?
Yes exactly. It's essentially a wooden box with a third cut off it and then the mould made to contain it and the concrete together.
The edges of the wood have long screws into them but not driven home so that the concrete forms and bonds around the screw heads and has something to cling on to.
This is done in the vertical edges of the side and also the edges of the base which runs the whole length of the box.
Took down an old fence during the week and thought I could put the old timber to some use. So voilà - a couple of painted planters - total cost about £6 (primer & fixings, paints both left over from doors). I'd imagine this kind of thing would have kayak23 quaking in his fancy furniture making boots. 😆
[img]  [/img]
Very nice them DD. Are you growing a dogwood tree? 😀
Cheers kayak. You're too kind. We're thinking some compost, a bit of miracle-gro and she might grow to the size of a normal BT. 😀
For not being a plumber I was pretty proud of this, its a low loss header to allow me to combine an oil burner and a boiler stove with my DHW & CH system, a pump on each circuit so they don't interfere with each other, ie water doesn't get pumped through the boiler when the stove is on and vise versa.
[img]  [/img]
Oh come on now docstar,none of that nonsense ,give us a tune. 🙂
Trying to solve the problem of bar clutter, came up with this:
[img]  [/img]
[img]  [/img]
[img]  [/img]
[img]  [/img]
I made this-
[IMG]  [/IMG]
It's an adapter to fit on a Sunn Charger frame to take an ISCG-05 chain doofer. The frames came with a direct mount adapter fitted but no way (other than a BB mount) to fit a chain device. Sunn called it the 'Plaque' system and it'd have been a good idea if they hadn't gone bust (again!) and you could still buy different types.
There are countersunk bolts holding the adapter onto the frame at the (68mm wide) BB shell and the adapter is 5mm thick. A chain device just bolts onto the threaded ISCG-05 tabs on the adapter.
Next up are some dropouts with holes to take a rack for when we do a bit of distance on the bikes.
Ooooooooo.....,I'd love one of those dropper post levers - don't suppose you made a spare:0)
its a low loss header to allow me to combine an oil burner and a boiler stove with my DHW & CH system, a pump on each circuit
How does it work for the boiler stove when you get a power fail and the stove is cranked up full blast?
Physio wanted a 25 degree incline board for tendonitis rehab work.
[url= https://c7.staticflickr.com/8/7359/27323478790_3dc376d754_z.jp g" target="_blank">https://c7.staticflickr.com/8/7359/27323478790_3dc376d754_z.jp g"/> [/img][/url][url= https://flic.kr/p/HCtYiU ]Calf raise rehab ramp[/url] by [url= https://www.flickr.com/photos/brf/ ]Ben Freeman[/url], on Flickr
I made this for use as a physics demonstration. It's mesmerising trying to find the best music for it.
That's brilliant!
don't suppose you made a spare:0)
Only made the one, which is being tested by a mate who rides much more than I do. Should have some feedback soon..
[img] 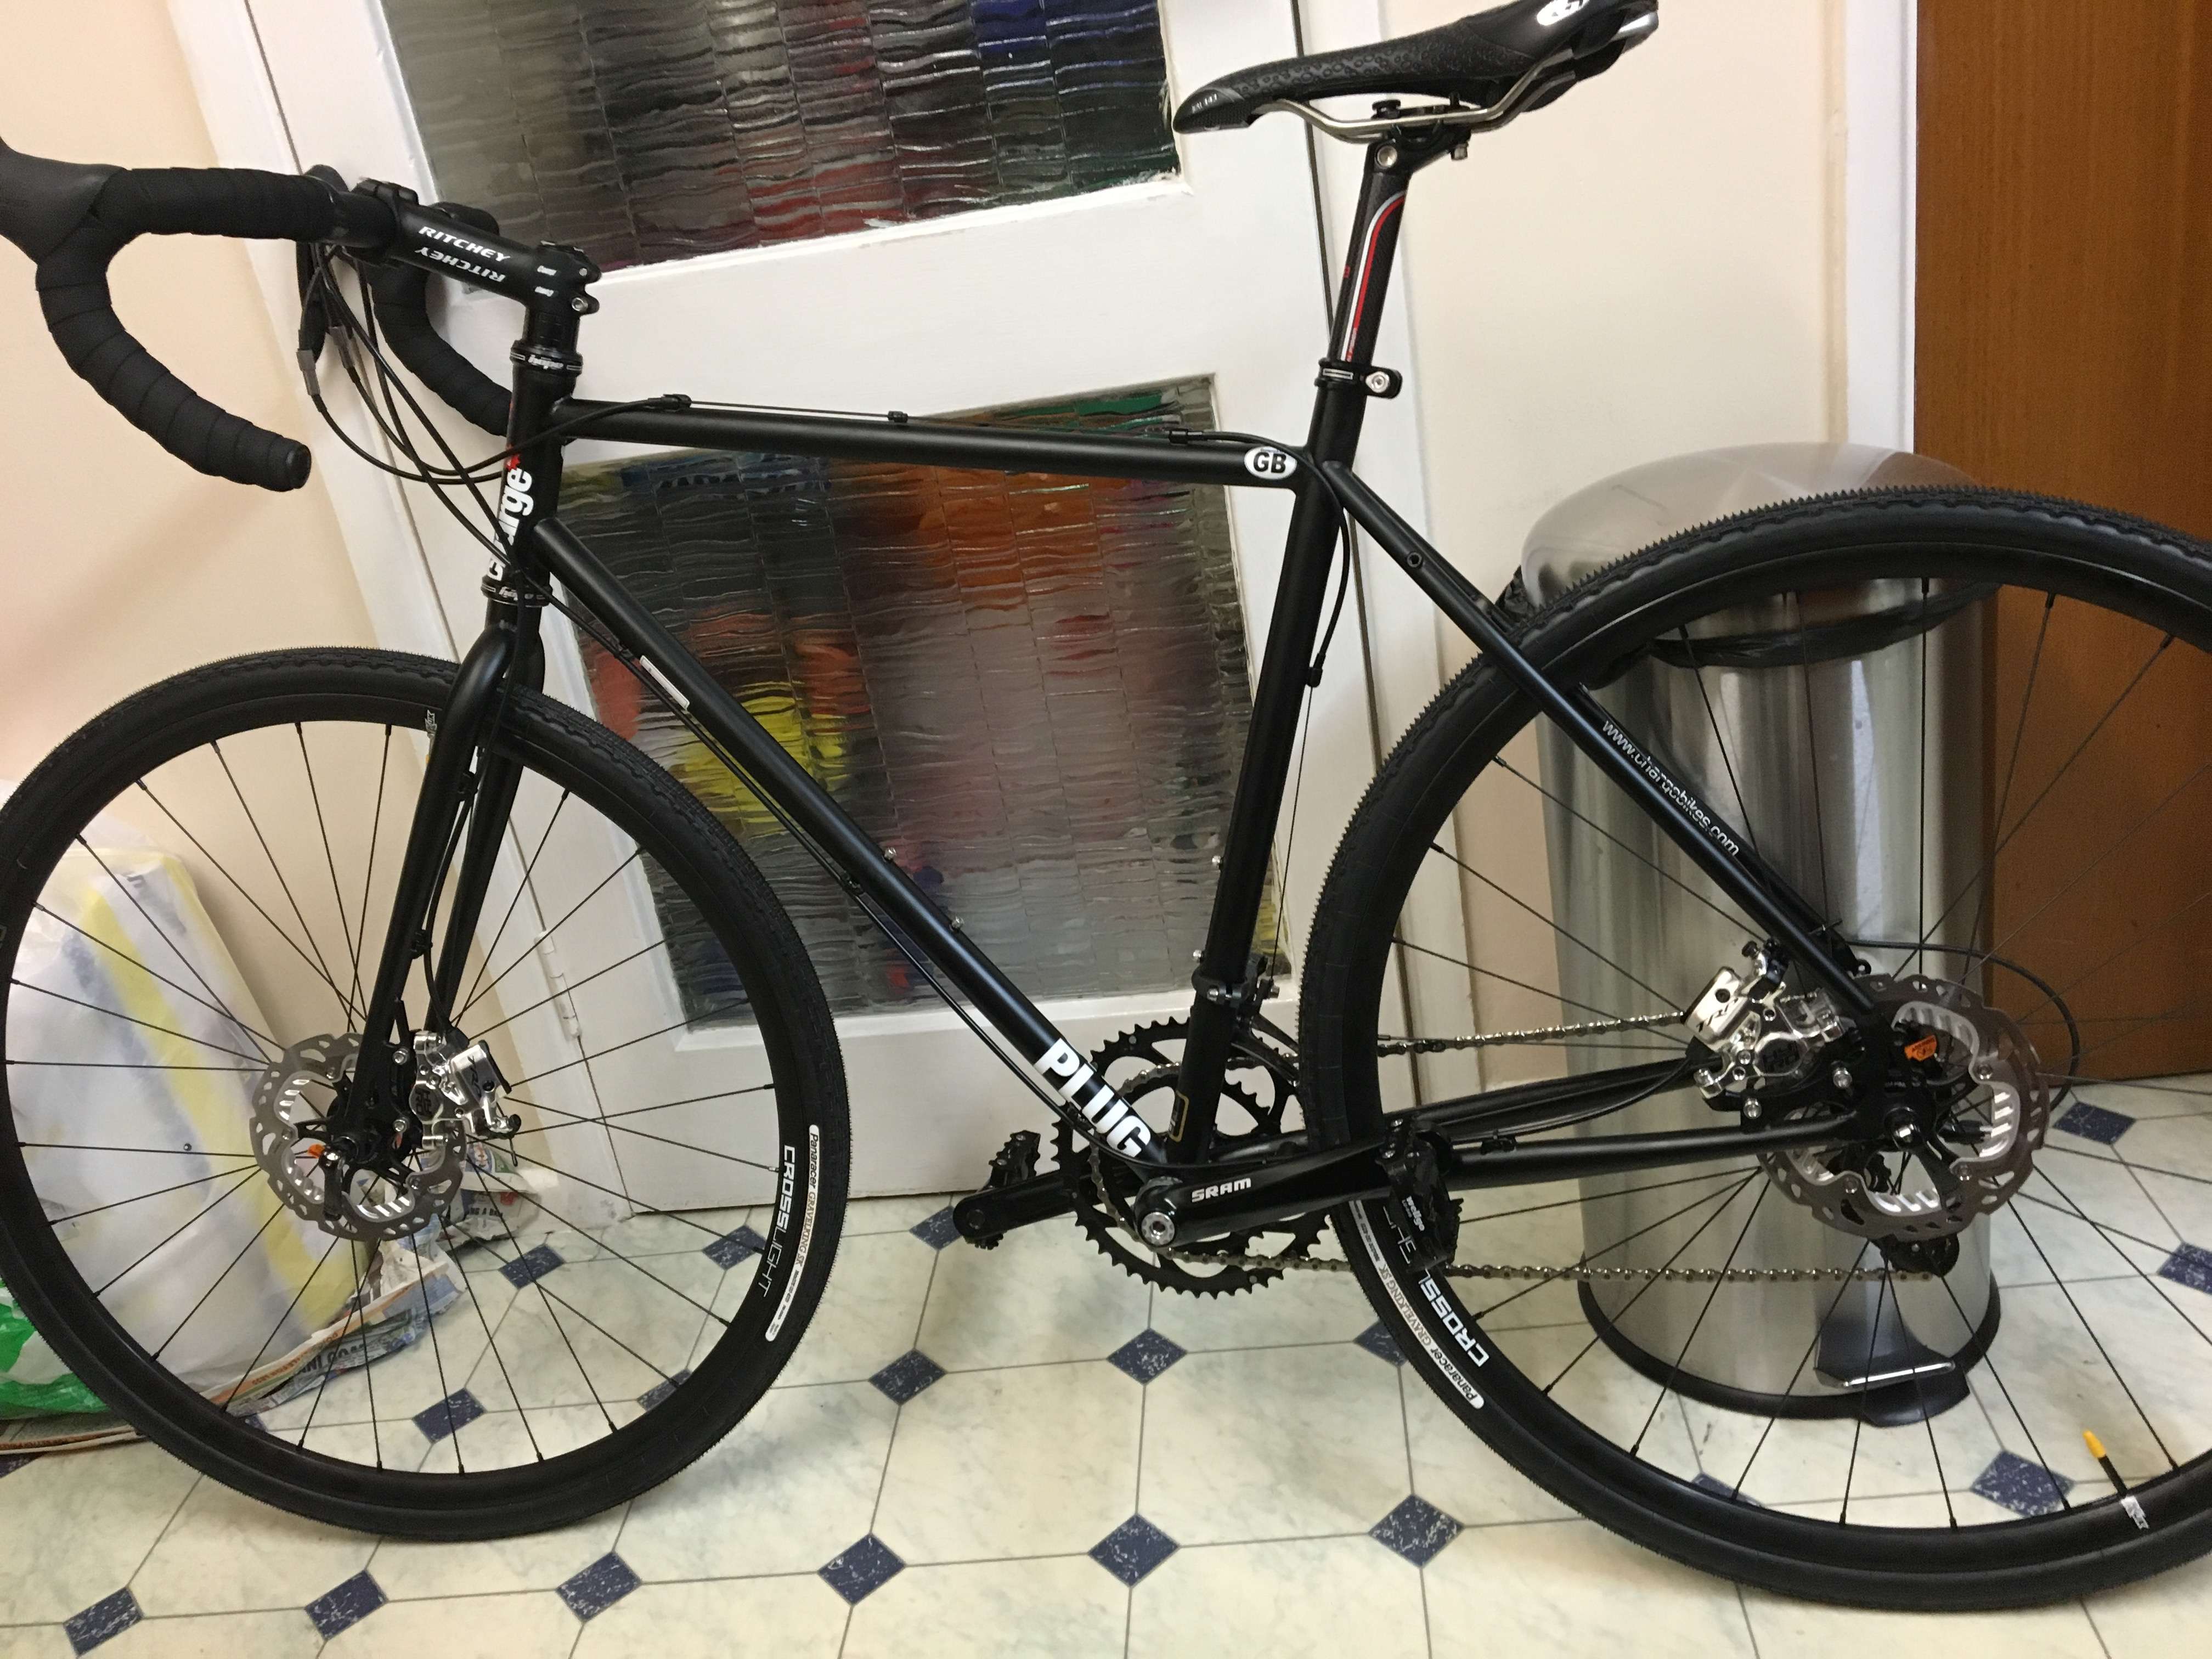 [/img]
Piece of steel bar and some fence posts for a pull up bar up the orchard, posts have been stained green since putting it up. Absolutely love it!
[IMG] 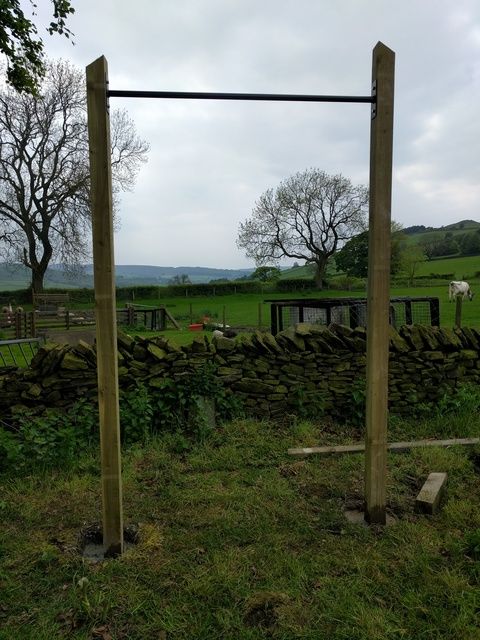 [/IMG]
The desk is made from solid Cherry (and White Beech drawer rails) with steel legs.
[IMG]  [/IMG]
[IMG]  [/IMG]
[IMG]  [/IMG]
Quick bit of bodgineering after work today - a DIY under saddle lever for my X-Fusion HiLo.
Seems to work on the stand, but we'll have to see how it stands up to proper abuse out and about.
[url= https://c7.staticflickr.com/8/7644/27373035470_b60b01609c_c.jp g" target="_blank">https://c7.staticflickr.com/8/7644/27373035470_b60b01609c_c.jp g"/> [/img][/url]
Made this a few months ago for a company to store the clip on writing tablets for their conference chairs.
[url= https://c5.staticflickr.com/8/7285/26875621764_ff8f7507c1_k.jp g" target="_blank">https://c5.staticflickr.com/8/7285/26875621764_ff8f7507c1_k.jp g"/> [/img][/url]
Home made routing jig
[url= https://c3.staticflickr.com/8/7390/27207702330_389f7325fc_n.jp g" target="_blank">https://c3.staticflickr.com/8/7390/27207702330_389f7325fc_n.jp g"/> [/img][/url]
and work in progress.
[url= https://c5.staticflickr.com/8/7731/27450088356_506a15402f_n.jp g" target="_blank">https://c5.staticflickr.com/8/7731/27450088356_506a15402f_n.jp g"/> [/img][/url]
[url= https://c2.staticflickr.com/8/7343/27412785561_984e94f8c7_n.jp g" target="_blank">https://c2.staticflickr.com/8/7343/27412785561_984e94f8c7_n.jp g"/> [/img][/url]
And a swing for my niece[url= https://c3.staticflickr.com/4/3889/14346471914_07be4fbd57_z.jp g" target="_blank">https://c3.staticflickr.com/4/3889/14346471914_07be4fbd57_z.jp g"/> [/img][/url]
Love that desk Three Fish. Swing is great too! 🙂
Some archery targets for the club to use at the Three Counties show this weekend. Vinyl roundels for the sucker-arrows to stick to.
I've also made a target for the foam-headed arrows. With sized holes.
[img] https://goo.gl/yTXrLx [/img]
Extensive Nerf testing underway
[img] https://goo.gl/ohNwMP [/img]
Turned a bit of waste ground in the local park into a community garden with a water collection system, and a bunch of raised beds.
[url= https://c5.staticflickr.com/8/7310/27574786972_fcbce2ba4d_z.jp g" target="_blank">https://c5.staticflickr.com/8/7310/27574786972_fcbce2ba4d_z.jp g"/> [/img][/url][url= https://flic.kr/p/J1FZtA ]Untitled[/url] by [url= https://www.flickr.com/photos/cycleologist/ ]Ben Cooper[/url], on Flickr
[url= https://c1.staticflickr.com/8/7286/27397029920_35ec420be6_z.jp g" target="_blank">https://c1.staticflickr.com/8/7286/27397029920_35ec420be6_z.jp g"/> [/img][/url][url= https://flic.kr/p/HJYWuQ ]Untitled[/url] by [url= https://www.flickr.com/photos/cycleologist/ ]Ben Cooper[/url], on Flickr
And mounted a rotating sculpture on an old gatepost:
[url= https://c6.staticflickr.com/8/7248/27259128141_5a0f352ba0_z.jp g" target="_blank">https://c6.staticflickr.com/8/7248/27259128141_5a0f352ba0_z.jp g"/> [/img][/url][url= https://flic.kr/p/HwNa6X ]Untitled[/url] by [url= https://www.flickr.com/photos/cycleologist/ ]Ben Cooper[/url], on Flickr
Nice work Ben,good to see spaces like that being brought back from the dead.
[IMG] 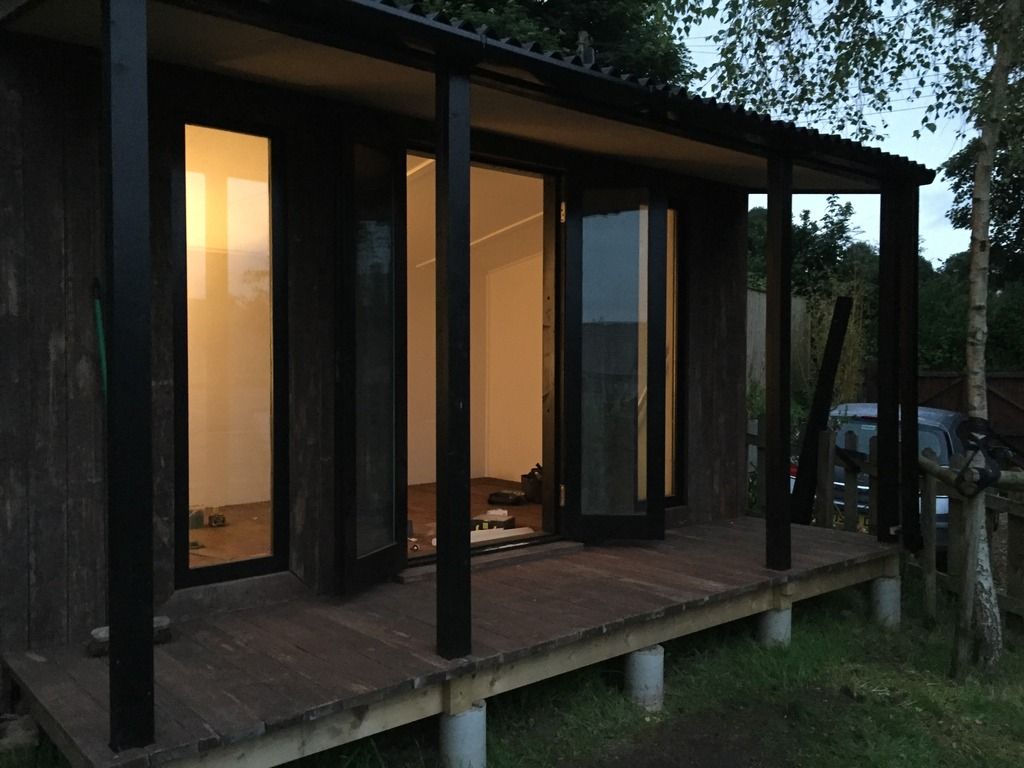 [/IMG]
nearly done...
End of year again for our City & Guilds level 1, 2 & 3 students.
I made a video of the exhibition I made of their work. As ever, some really nice work from them all.
The sounds on the video are courtesy of a level 3 student who made a children's musical chair he calls the Mini-Maestro, which has strings, a Cajon and Xylophone as part of its construction.
[url= http://www.earthwoodcrafts.com/ ]Mini-Maestro[/url]
If you hear what sounds like a helicopter flying over and feet being ground into gravel, it was... 😉
Now a holiday 🙂