It's not a huge space, around 1.2m long x 1.5m tall, full width until about 0.8m high before angling for the stairs. I'm not too worried about the fronts, it's more the material pros and cons of making a strong frame for deep drawers which could exert a lot of leverage on the frame. I'm sure both will work, but from what I've seen, making in ply looks a lot neater than a scaffold, but with probably a financial penalty.
Ply would probably be a lot easier and quicker, especially if you can get most of the sheets pre-cut. You would basically have a set of pre-cut shelves and then just add the uprights. The drawers could then just slide in and out on the shelves. Also would allow you to miss out drawers or have different size ones to cope with those awkward shaped things you need to store.
Just my idle thoughts
B&Q are good for this. You make up a cutting list and they'll use their wall saw to cut it all to size.
One time I found it cheaper to get them to run off 2 8'x4' boards at 8'x4" strips that i ran across the router table to give them a top round over, rather than buy pre-made skirting which added up to about 200 quid for the same amount. MDF strips, 22 of them cost me at the time about 50 quid.
OK bit of work, doing the moulding, sealing and painting them, but still a considerable saving


I made/finished a car port and installed some bike hangers in the corner. The frame and groundwork was originally done last year by my ex and I finally finished it this summer (roof supports, roof, side supports, side panel, paint). I only have to paint and nail up about 35 strips of läkt to make the sides look the same as the shed and then learn how to park so that the van actually fits all the way in it.
And then build an extension for wood storage.
And then build an extended wall and rof for the entrance to the shed.
Ok, not very finished.
Up until this morning, I was making Ash frames for pre war cars.
Turns out the bloke I worked for wasn't really a people person and this morning I left for good. I'd only been there maybe 2.5 months.
The end product (Blue Train Bentley) is frikkin awesome looking, but actually, virtually every step that you do woodwork-wise is kind of the exact same process so was sadly never that exciting to do (not to mention the weird unfriendly atmosphere I felt) but i thought maybe a few carheads on here might like to see it anyway.
A fully finished one
(image taken from a Google search)

One that he had made the framework for quite a while ago, had been out for the metal panelling and trim and engine work etc. coming back to the workshop for interior fitout.

A few images of various stages of building up the framework on a chassis. The chassis stay at the workshop and just the framework goes off for the next stages when complete.
A finished frame removed from the chassis


More


More
You can see all the templates hanging up on the wall. Basically, every stage really is, plane up a piece of Ash to the appropriate size, mark the shape off with the template, bandsaw near to the line, sand to the line with disc sanders and linishers, fit joints etc, screw together with flat headed screws, rinse and repeat.


I'll be adding flat headed screws to the disproportionately cross thread too . Laughing emoji


@kayak23 how are the joints made? They surely aren't just screwed together?
@kayak23 how are the joints made? They surely aren’t just screwed together?
A lot of them are mortise and tenoned, a lot of them are housings, a lot of them are mitre-housings or mitre-bridle joints, a little like the sketch below

All screwed and glued.
You can see a little of that below.

With the English wheeled steel panels on top and everything else, it's very strong, though I suppose a little bit of flex is desirable in a road going structure.
Im going to be a bit critical here, but aren't the curved sections supposed to be steam bent ?
There's not a lot of strength in short grain.
That said, maybe int he original construction methods of coach built, with most of those methods being transferred over from coach and carriage manufacture.
But very nice all the same.
What's next, Morris Traveller ?
Well yes. To be honest myself and the bloke has a few issues early on getting along.
I come from a background where I want to question things and how they're done and always want to look to improve on things.
I asked those same questions. 'could that be steam bent?' 'could that be laminated?' and instead of welcoming my interest and questions, he seemed to take everything as an insult or an insinuation that I thought what he was doing was rubbish.
That was of course absolutely not the case. Anyway, he is absolutely down the line traditional and doesn't want anything done differently to how it's always been done. I'm not really like that and so I am where I am.
We actually did the same degree course(though several years apart) so our starkly different approaches are kind of interesting to me.
Didn’t take too long to guess 🙂
As this is STW, I should have added that some means of easily carrying a bottle and 2 glasses over a lawn in such a poor state as that is definitely needed 😀
lawn in such a poor state
Surely a perfect lawn means you haven't been riding enough!
Unfortunately I've managed the double-whammy of having a tatty lawn AND not being on my bike enough
Our new bedroom is in a dormer extension so nice upright walls are a scarcity. I needed to make a wardrobe and it started out like this. You need to get the first bit in to see what sizes you end up with.
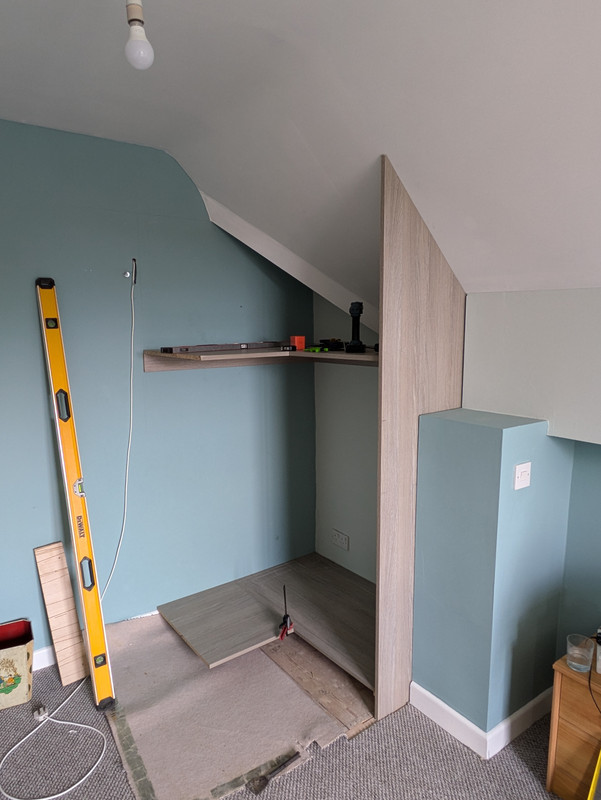
Finished this week, carpets laid and everything in and working. Quite pleased with the result. All made by me and my trusty Festool tracksaw and Domino, except the doors which come from HPP, made to measure.

Not sure whether this counts as made or repaired.
I'm missing some screw cutting gears for my lathe. They are bloody expensive second hand and not available new so I started making some
This is the 40T blank being turned to size

And with the 3/4" bore

I had to make an arbour so it could be mounted in my rotary table on the milling machine. This was my first attempt at single point threading.

Cutting the teeth with a DP16, 14.5pa involute cutter

Finished gear (not quite, I still need to broach the 1/8" keyway)


I mentioned to an art group that I did balloon modelling sometimes. This turned into a request for 50 flowers to decorate the exhibition hall for the Autumn exhibition.
Prior to this I did snakes, worms, swords or dogs. Today I tried my first flower.
[url= https://i.postimg.cc/rFkVDwxh/Baloon-flower.jp g" target="_blank">https://i.postimg.cc/rFkVDwxh/Baloon-flower.jp g"/> [/img][/url]
A very simple garden bench seat made from a chunky piece of timber someone gave me ages ago.
Finally finish the control cabinet for my CNC mill that I finished about a year ago. All the electrical bits were fixed to a sheet of MDF hanging from the wall, now in a smart cabinet.
White sheet behind is to control the chips a bit, on the list is an enclosure for the mill.

richmarsFull Member
Finally finish the control cabinet for my CNC mill that I finished about a year ago.
Interesting configuration - Is it for anything special?
I'm in the process of renovating a 1982 Alfa romeo GTV and during this I found that some of the push button switches weren't working. Replacements cost silly money if you can find them so I chose to get some alternative rocker switches and make the centre console more ergonomic (IMO).
I also wanted to replace the ancient push button radio cassette with something a bit more modern. But the Kenwood unit I fitted has a maximum installation angle of 30° so I had to make a transition piece to reduce the standard Alfa angle of 35° to 25°.
Now the purists will not approve but this is the before and after:


Interesting configuration – Is it for anything special?
Not really, just seemed a fun thing to make.
Having the Z axis horizontal means you don't need a heavy cantilever hanging over the X and Y axis, which would need to be pretty chunky to be stiff enough. I wanted to keep it reasonably movable, but it is still about 30Kg. With the bench, which is all mild steel, you need a trolly to move it.
It was printed on an EOS M290 but designed with the EOS, RenAM and SLM platforms in mind so should be printable on all of them in each of the 3 materials. There's no standalone features less than 250micons.
I think the platform is around €800k and powder runs at around €50-£150/kg.
https://uk.eos.info/en-gb/industrial-3d-printer/metal/eos-m-290
So that’s a no then. Fascinating
Not really, just seemed a fun thing to make.
Fair enough! I can't argue with that 😀

https://misterg.org.uk/cnc-introduction/
@daffy I was gonna say, where the hell do you get inconel from? That explains it.
A keyway broach finally turned up in the post so I could finish the lathe gear. They didn't have a 3/4" arbour though so I had to make one.
Turned a random bit of steel from the scrap box on the lathe then cut the guide on the horizontal mill


Pressed the broach through the guide and gear on the hydraulic press. It's not on the piss, I just can't take a straight photo!

Finished gear. Now I just have to repeat for about another 9 different tooth counts.

I've absolutely ZERO need for any more speakers/audio stuff.
So of course i'm in the process of seeing what 3d printed speakers would sound like!


The transmission line case was a file I downloaded, but have made a few tweeks and additions to fit the speaker cone..
(It was a 36 hour print!).
Need to stuff it and finish it off...then print the OTHER one!
DrP
