
MegaSack DRAW - This year's winner is user - rgwb
We will be in touch
Any suggestions for a bumbling novice on the best way to shoot in snow with light cloud cover or sun?
I've just inherited an Olympus E510 digital SLR and have been trying to get to grips with it with mixed results.
At the moment I'm getting quite frustrated as the snow is creating some epic landscapes but I just can't seem to capture them on film.
your problem is trying to use film in a digital camera 😉
Dial in an EV of +1.5 - +2 (the camera gets confused by all the white and under exposes). Ideally take photos at sunset and sunrise (assuming there's no cloud cover). I wish I'd taken my camera this morning, it was epic.
Are the piccies coming out too dark so the snow looks grey? If so, spot meter off a bright patch of snow, dial in +2EV of exposure compensation and give that a whirl. Take a pic, check your histogram, tweak exposure to suit and away you go.
Oh, and trying to capture landscapes on film with a digital camera won't help either 😀 I'll get me coat.
[edit: me type too slow]
as a slightly more sensible answer, you need to over expose images, as the white snow is confusing the metering system. Very simply, a camera tries to get the scene to an average specific shade of grey (if it was a b&w image, which essentially is what the meter sees). So as there is so much white snow, you need to over expose the image. in doing this, you generally keep the shutter open for longer... assuming you are in Aperture priority or another program mode, you can probably adjust this easily, but may need the manual to get the specific combination of key presses.
Thanks all. Will try these tips out (as soon as I drag my carcass out of bed). I've obviously got lots to learn, particlulary using film in a digital camera, I thought it felt wrong shoving 35mm in that little slot on the side!!
Does the camera have exposure lock? If so meter using the sky. Point to sky, press shutter release halfway down and hold it there, compose shot, press shutter release fully down.
I think it has exposure lock (AEL?) so that could be useful.
That won't work. EV +2 is where to start.
If you meter on the sky you'll underexpose even more - the sky will be the brightest thing around. Just overexpose by a stop or two.
In addition (nothing beats getting the correct exposure right off, but I often can't be bothered to meter correctly if in a hurry) -there are two quick ways to get an idea of how things work-
Shoot in raw- this gives greater latitude to adjust the exposure in software- take a few shots as the camera exposes them, then adjust the exposure in software using Olympus camedia, photoshop, Capture One or whatever software you're using- you'll need a raw converter that handles your camera's output, most of them should do so. This will help you understand the effects of adjusting the exposure, and give you a guideline of what adjustment needs to be made.
The second way is to bracket the exposure- your camera will have a setting to take multiple shots at the same time over and under exposing each shot off it's metering, giving you a set of photos to pick from.
I had the same problem the other day, then started reading up on how cameras meter light (i.e. they only see a mid-grey so have to compensate etc)and realized that I would have to overexpose as said abouve - but as a novice, I've a couple of questions:
1. What does EV stand for?
2. Do EV steps i.e. 0.3, 0.6, 1.0 etc etc relate to f-stops? and therefore does say dialing in EV+2.0 only affect the aperture size or does it adjust a combination of aperture, shutter speed and ISO?
3. Could anyone heer please give me a simple step guide to taking a landscape picture?
cheers
back in film days you were meant to make the camera over expose (2 stops perhaps) so the snow looks white and not blue or gray. Film days, the saying was - Expose for the shadows, develop for the highlights.
It can be risky to over expose digital as highlights will be lost forever so I'd be more inclined to fiddle with images on the PC after exposing for highlights.
"Expose for the highlights and develop for the shadows" (for digital)
Bracketing is the answer - at least at first.
[i]Just overexpose by a stop or two. [/i]
Does this mean adjust the EV or the axctual aperture?
There's a great book called 'Understanding Exposure' which covers the whole aperture- shutter speed- iso triangle really well.
It's available on Amazon, or there's a scanned copy available in the usual suspect torrent sites, but it is really worthwhile buying.
@yoshimi: EV relates to "units" of exposure. One way to get an extra 1EV is to open the aperture 1 f stop. Another way is to half the shutter speed. By dialling in an exposure compensation in EV, you are just saying to the camera "whatever you think of the light here, you're wrong by x amount - so now give me an exposure appropriate", by changing the aperture, shutter speed, or both, according to the P, A, S setting you chose.
Hmmm ... probably that doesn't make sense ...
1. What does EV stand for?
2. Do EV steps i.e. 0.3, 0.6, 1.0 etc etc relate to f-stops? and therefore does say dialing in EV+2.0 only affect the aperture size or does it adjust a combination of aperture, shutter speed and ISO?
3. Could anyone heer please give me a simple step guide to taking a landscape picture?
1. Exposure value.
2. The f-stop remains the same but the shutter speed is altered to overexpose (+ ev) or under expose (- ev) compared to what the camera 'thinks' the exposure should be. All bracketing does is take 3 pictures at -ev 0ev and +ev (you select how much + and - ev is used, -2 0 +2 for example). Pointless in snow because you know you need +ev. +2 is the rule of thumb.
2. Counter-intuitively you need to focus on something close otherwise the foreground will be out of focus. To get the whole picture in focus you need to know a bit about hyperfocal distance. Have a read of this:
[url= http://www.dofmaster.com/hyperfocal.html ]http://www.dofmaster.com/hyperfocal.html[/url]
Then have a look at this:
[url= http://www.dofmaster.com/doftable.html ]http://www.dofmaster.com/doftable.html[/url]
Does this mean adjust the EV or the axctual aperture?
If you are using A mode, tehn if you change teh aperture the camera will just cancel out your change with a different shutter speed and the resulting picture will look the same, so you would need to change EV setting.
If you are using M, then you set the aperture and shutter to what you want, so for example, set it to what the camera suggests, and then open up the aperture.
In general, changing the EV works.
If you are using A mode, tehn if you change teh aperture the camera will just cancel out your change with a different shutter speed and the resulting picture will look the same, so you would need to change EV setting.
Exactly. The net exposure will always be the same unless you override it with the EV setting.
EV = exposure value, which is a measure of light intensity where adding one EV = doubling intensity = 1 stop in aperture terms. Digital cameras usually break each stop into 3 equal parts: 0.3, 0.6 & 1. So one EV more exposure would be halving* the shutter speed or dividing the aperture by 1.4 (actually square root of 2) eg f4 to f2.8
* eg 1/500 to 1/250 actally doubling the time, as exposure is in reciprocal seconds 🙂
Yoshimi - if your camera is in P, S or A modes just dial in a value of over-exposure and let the camera get on with it. It will take the 'correct exposure' values for shutter & aperture and adjust them accordingly to over-expose by the quantity you have requested.
I would start at +1 and take it from there.
If you are in manual mode, then either increasing the shutter speed or opening the aperture (smaller f-stop) will tend to over-expose (or adjustng both, of course). I generally take a shot in P-mode to get some base settings and then adjust from there. The meter in the camera should still tell you if you are under or over-exposing; most camera have a little bar graph that will either go towards -ve for under-exposure or +ve if the shot will be over-exposed.
DrJ - that does help
So 1EV = 1 f stop
Therefore if as above someone says adjust by 2 f stops, this can be done by dialling in EV+2.0
A top tip I once read about photographing snow was to find contrast. Whilst an icing sugar frosting over every surface looks beautiful, it is difficult to convey it in a photograph. Try finding some dark surfaces too (such as a row of trees) to get that contrast you need.
Just bought a Canon 450d and am deturmined not to use the muppet auto part of the dial(Landscape, sport, portrait etc)
Aperture priority set, then, and attempting the EV compensation of around 1.5 and he snow is burnt out, my images are blurred - I just aint got it.
Mrs imp sticks it on the muppetist setting on the thing(Green square) and hey presto - Nice looking images.
Its going to take a while I reckon.
All bracketing does is take 3 pictures at -ev 0ev and +ev (you select how much + and - ev is used, -2 0 +2 for example). Pointless in snow because you know you need +-ev. +2 is the rule of thumb.
Not pointless because:
+2 is a rule of thumb, and not guaranteed to work in your lighting conditions
suitable bracketing will assure you of a correct exposure (with a lot of wasted frames, to be sure) e.g. I have it set to take 7 shots, 0.7ev apart.
you can get more sophisticated and bracket around the value you want, say around +1, or whatever
Therefore if as above someone says adjust by 2 f stops, this can be done by dialling in EV+2.0
You can think of it like that if it helps, but the aperture isn't changing, it's the shutter speed.
Not pointless because
OK, pointless is a bit harsh maybe. Setting the EV and a quick glance at the histogram would be easier (for me anyway).
Aperture priority set, then, and attempting the EV compensation of around 1.5 and he snow is burnt out, my images are blurred - I just aint got it.
Drop to +1 if the highlights are blown, although if the contrast is high you may be stuffed.
The blurring is because of the increased shutter time. Have a look at what shutter speed was used and adjust ISO to get it to at least 1/focal length.
not to use the muppet auto part of the dial
why make things hard for yourself? Those numbers have little to do with actual images apart from depth of field issues
Sorry my last post bit slowe there
Cheers for all your help - I'm currently reading a fairly basic photography tutorial book along with the camera manual, but I'm finding myself re-reading pages over and over again so its pretty slow going and things aren't explained that well. Such as when EV is refered to, it doesn't say this means exposure value. lots lots more reading and practicing to do!
Just this has helped me understand
[i]If you are using A mode, tehn if you change teh aperture the camera will just cancel out your change with a different shutter speed and the resulting picture will look the same, so you would need to change EV setting.[/i]
Along with this
[i]Digital cameras usually break each stop into 3 equal parts: 0.3, 0.6 & 1. So one EV more exposure would be halving the shutter speed or dividing the aperture by 1.4 (actually square root of 2) eg f4 to f2.8 [/i]
You can think of it like that if it helps, but the aperture isn't changing, it's the shutter speed.
Unless you're in Shutter Priority (the S of the PSAM modes) in which changing the EV will alter the aperture.
As mentioned above, EV is exposure value and is a combination of aperture and shutter speed. For a landscape shot you want to fix the aperture at something suitably small (f8-f11 fine for a crop sensor camera - good depth of field without diffraction effects softening the image).
Then, to add +2EV you can either:
1. Set camera in aperture priority mode and then dial in +ve exposure comp using the dedicated function - this usually just tells the camera to increase the shutter speed
2. Set the camera in manual, adjusting the shutter speed until the needle on the light meter in the view finder is to the right of the centre mark by the required amount of EV's (stops)
Unless you are taking a meter reading from the brightest patch of snow (ie. by using spot metering), dialling in the +2EV exposure compensation will more often than not result in blown highlights. Metering the whole scene, which will invariably be darker overall than just a patch of bright snow, will require less exposure comp to be added.
And forget all that bracketing nonsense with digital, unless you want to blend exposures later - use the histogram, that's what it's there for.
And if you can't be bothered working out hyperfocal focussing distances, if you are using a suitably wide angle lens (I dunno, up to about 24mm say) just focus on a point 20-30ft ahead. The rule of thumb is to focus a third of the way into the scene but where a third lies is often open to interpretation.
Yoshimi, I'm with you on the determination to learn how to use the bloody thing, snd it's most definitely going to take a while.
Still, its a good way to waste time whilst supposedly looking for a job!
Those numbers have little to do with actual images apart from depth of field issues
Don't "those numbers" pretty much define everything about the image, apart from the actual composition itself? (depth of field, bokeh, contrast, brightness, colour, grain, sharpness)
And forget all that bracketing nonsense with digital, unless you want to blend exposures later - use the histogram, that's what it's there for.
Have to disagree (again) Bracketing is quick, foolproof, and (with digital) free.
Checking the histogram gets you to the right result quicker, without checking through god knows how many images once you've down loaded them all 😉
Seriously, thankyou all, this has helped lots - cant wait for weekend to try a few of these ideas out 😀
'histogram' not even going to ask about that yet - I've seen them but don't know what they are....something for further down the learning process I think.
jbig - good luck, think we'll need it:)
@Dudie - you do it your way, I'll do it mine 🙂
The histogram gives a distribution from the whole scene. If it's a once-in-a-lifetime shot, that may have small elements in it I want to be sure are properly exposed, then bracketing gives me that (near-) certainty.
Stick it in manual mode and get used to it, would be my opinion. I spent almost all of yesterday shooting in manual with no probs at all (first time I've ever shot at ISO100, F9, 1/4000th and still got a lovely bright scene!
Having said that, when I put mine in "shoot fast things" auto mode for the missus and I to get shots of sledging without thinking too deeply and it seemed to produce perfectly nice bright images despite the snow, it uses centre-weighted metering for that IIRC.
I use bracketing for blending mainly, rarely for getting the correct exposure, but it is handy for those shots you can't afford to miss (takes time to chimp over the histogram).
Just tried a couple of shots in the garden. Better, but still not quite there, but there's loads more tips to try out yet.
Its like adjusting your gears though, you get it almost right then keep adjusting, it gets worse again but you can't remember how you got to the good spot in the first place!
I'll stick at it though.
Stick it in manual mode and get used to it, would be my opinion.
Never really seen the point in manual mode for every day shots. The only time I really use it is for long (bulb) exposures or for stitched panoramas.
Good tips guys.
When I photograph snow it comes out blue (Sony A200). Will overexposing cure this too?
When I photograph snow it comes out blue (Sony A200). Will overexposing cure this too?
Sounds like a White Balance problem ?
Haven't read the whole thread in detail, but if no-one's mentioned a polarizing filter yet, I'll do it. If you find your skies are looking washed out and not showing cloud detail, a polarizer can help a lot. Snow, clouds, water shots, a polarizer will always make a big difference. Won't fix exposure problems though.
Snow is actually a bit blue in daylight (reflects blue light from the sky) - see glaciers etc.
But if the whole scene has a blue cast then your White Balance is wrong. Try either setting it to "Cloudy", setting a custom white balance (usually by pointing at something white), or shoot RAW and correct it later.
Its just the snow, not the whole scene,but it can be quite dark blue and the whole picture can be really dark, so probably a combination of white balance and exposure.
All about experimenting really isnt it?
I know on the E520 there is a SCENES option on the dial. When this is selected there is a range of different preset options - one of which is BEACH/SNOW which may help you with a starting point for changing the settings manually to get the picture that you are after.
Sometimes I think the dark snow thing can look quite nice:
[img]  [/img]
[size=1]Whistler, Canada (Nikon D80, 10mm at f11, 1/80s, ISO100)[/size]
Lets try to keep things simple.
Your camera is just a machine, it thinks the world is mid grey and tries to make all the pictures it takes mid grey, so snow comes out mid grey and looks terrible, it would do the same thing with a black cat sat on some coal.
The best way to get round this is to set the exposure yourself manually by reading how much light is falling on to your subject. Point the camera at the palm of your hand and fill the frame, it does not have to be in focus (your palm should be in the same light as your subject), your palm is usually a little bit lighter than the mid grey the camera thinks the world is, whatever reading the camera gives you set it on the camera in manual mode, you will probably have to give it a little bit more exposure, so open the aperture by a click or two toward a smaller number or open the shutter by a click or two, again toward a smaller number,your camera will usually have three clicks for each f-stop, take a picture and have a look, if the picture is too dark open up a bit - smaller numbers, if its to light close down a bit - bigger numbers.
As a general rule dont let your shutter speed go lower than the length of your lens, if youre on a 28mm dont go below a 30th of a second, a 200mm dont go below a 200th etc, this helps prevent camera shake.
If your subject is moving try not to go below a 500th of a second, a 1000th if possible.
If you are doing a landscape try to use a higher number aperture as you can, this helps with depth of field, the bigger the number the better the depth of field.
Of course all of this is dependent on how much light is around etc but youll soon get the hang of it.
Remember 99% of photography is what you put in the box and when you push the button. Happy shooting.
Never really seen the point in manual mode for every day shots. The only time I really use it is for long (bulb) exposures or for stitched panoramas.
Each to his own, I just like to have full control over things, sticking it in Av or Tv always results in me seeing the camera doing it's thing but me wanting to change it as that's not producing what I want - I don't always like to expose as the meter would like, and instead of faffing with EC I just keep it in M and faff with that 🙂
As a general rule dont let your shutter speed go lower than the length of your lens, if youre on a 28mm dont go below a 30th of a second, a 200mm dont go below a 200th etc, this helps prevent camera shake.
IIRC that was the old rule for film cameras, most digitals (obviously not full-frame cameras) use a 1.6 multiplication factor on that, certainly from my experience using a 50mm, 1/50th is too slow to avoid shake.
instead of faffing with EC I just keep it in M and faff with that
Yeah that's the bit I don't get: does using M actually gain you anything or just change which button/dial you faff with?
Yeah that's the bit I don't get: does using M actually gain you anything or just change which button/dial you faff with?
Just changes the way I think about it, it's effectively the same as using EC - auto is pretty poor in most situations so everyone has to sit in some manual mode (we agree Av with EC is essentially teh same as M), it's just a choice of which one from that point.
CC thats quite fair actually Ill usually use it at a 320th on a 200mm unless the IS is on or the light is low that is, wide angles you can get away with quite a bit if you can be steady, as needs must and all that cal.
So - how do you use the camera to take a 'reading' and how do you set a benchmark from which you can deviate using M?
You should see an bar in the viewfinder that shows the exposure. You want it in the middle. Adjust the dial to change shutter or aperture until the meter is in the middle (or +2 for snow) and away you go. No different to dialling in +2 ev, except you have to do it for every photo in M.
[i]You should see an bar in the viewfinder that shows the exposure. You want it in the middle. Adjust the dial to change shutter or aperture until the meter is in the middle (or +2 for snow) and away you go. No different to dialling in +2 ev, except you have to do it for every photo in M. [/i]
Ahhhhhhhh.....now I see!
Don't "those numbers" pretty much define everything about the image, apart from the actual composition itself? (depth of field, bokeh, contrast, brightness, colour, grain, sharpness)
only slightly, contrast and colour are scene dependent, bokeh a bit of a wild card, and I'm not clear on the difference between sharpness and depth of field
Checking the histogram gets you to the right result quicker, without checking through god knows how many images once you've down loaded them all
I'd rather do that checking at leisure...
You should see an bar in the viewfinder that shows the exposure. You want it in the middle.
If that's the case, use the bloody thing in auto 😉
[url= http://www.amazon.co.uk/Nude-Photography-Craft-Pascal-Baetens/dp/1405322187/ref=sr_1_2?ie=UTF8&s=books&qid=1262868389&sr=1-2 ]Pascal Baetens[/url] told me - "just put the camera on P, for Professional mode". Seems to work for him 🙂
I'm too slow at the mo to set the camera up for the shot and end up forgetting one (or seven!) of the the settings or features that would make the shot.
Sat here thinking I realise that I had spot metered on the kids AND compensated for the snow all around them so have OVER compensated = blown highlights (yes?).
Histogram look-see after first shot would have shown this up. Did I look? Will I remember to look next time?
I'm not watching the shutter speed either! ISO adjustment probably needed.
Must... resist... full... auto....
This is shot on program with no adjustment and the exposure looks correct to me:
[url= http://i47.tinypic.com/xayq2e.jp g" target="_blank"> http://i47.tinypic.com/xayq2e.jp g"/> [/IMG][/url]
Pen-y-Ghent today - Nikon D300
Yep, looks fine. Lots of shadow areas though which help.
This one didn't need tweaking in PP (looks OK to me):
[img] 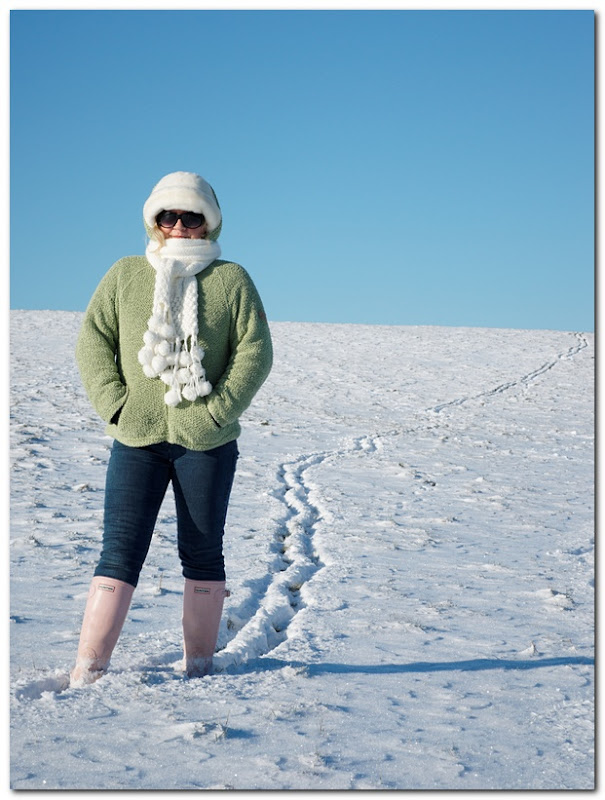 [/img]
+.7EV
Yep, looks fine Simon, but I don't think it suffers for being a little brighter and having more contrast either:
[img] 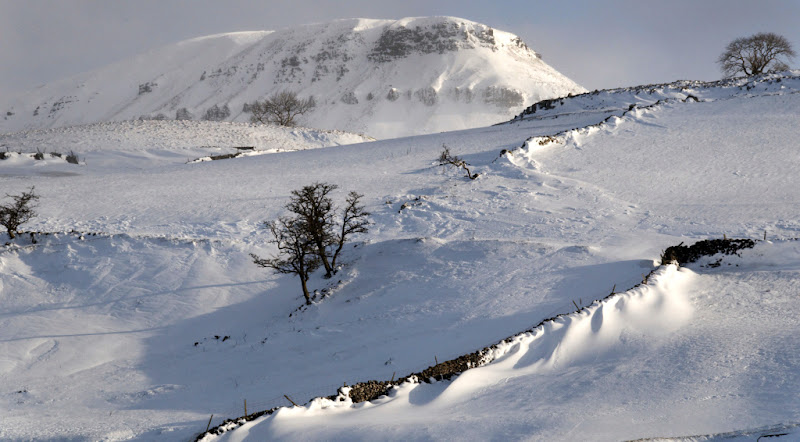 [/img]
It just depends what look you're after I guess.
(Apologies for hacking up your image, but just trying to illustrate the point).
OK here is a question, some thing I have not worked out with digital yet.
Back in the days of 35mm I used to push the film.
So if shooting with Kodachrome 64, I would set the ASA as 80,
if shooting with 100 ASA, set as 125 ASA. This was slide not negative,
which seemed to give a deeper colour.
I can't see the question.
To 'push' adjust the ISO setting.
but I don't think it suffers for being a little brighter and having more contrast either:
of course, but the exposure was still pretty much correct without intervention
grahamh: I think what you're talking about now comes down to a combination of saturation and level controls during post-processing.
of course, but the exposure was still pretty much correct without intervention
Agreed, I only increased the exposure around +0.3EV, but in this happy scene, 18% mid-grey corresponded quite nicely with the correct exposure. If you'd had 5thElefant's missus standing in front of it then it would probably have been a little dark.
my camera likes the snow. its survived being dropped in it twice ( along with flashgun and sigma 10-20) and i have to say i'm quite surprised as these were proper dunkings.
my snow shoot strategy is to shoot manual.. I don't use my DSLR in many other modes. i have my compact for everyday shots.
OK here is a question, some thing I have not worked out with digital yet.
Back in the days of 35mm I used to push the film.
So if shooting with Kodachrome 64, I would set the ASA as 80,
if shooting with 100 ASA, set as 125 ASA. This was slide not negative,
which seemed to give a deeper colour.
eee, the good old days, still have a couple of rolls of Velvia kicking around, must be long past their best but I really should shoot them to see what comes back.....
Back to your point - i think, as I can't 'see' the question...
Rating at 80 as opposed to the 'correct' 64 was underexposing your shots which served to boost saturation.
Digitally think the same way - i.e. whatever the meter tells set your exposure compensation to underexpose a touch for the same effect. Hope that makes sense....
edit - though, as Grahams says, you can tweak these things after the event in digital... 😉
my snow shoot strategy is to shoot manual..
As mentioned above though, shooting manual is pretty much exactly the same as shooting in A or S and using exposure compensation as required.
Just different ways to achieve the same thing.
I disagree.. av and shutter priority are still dependent on the camera's meter and not my handheld ambient light meter 😉
also i find manual is no extra effort on the 30d body though as you have the two control dials and no toggling to have to switch aperture / shutter.
Blimey - do people still use separate light meters?
Do you find you gain much by doing that? Can you just taking a normal exposure reading from the light meter then or do you still have to adjust for the brightness of the snow?
What's wrong with the light meter in the camera?
OK here is a question, some thing I have not worked out with digital yet.
Back in the days of 35mm I used to push the film.
So if shooting with Kodachrome 64, I would set the ASA as 80,
if shooting with 100 ASA, set as 125 ASA. This was slide not negative,
which seemed to give a deeper colour.
To be pedantic - doesn't "pushing" film refer to processing underexposed film diffrently, rather than just preferring an underexposed shot ??
To be pedantic - doesn't "pushing" film refer to processing underexposed film diffrently, rather than just preferring an underexposed shot ??
Correct, but lets no go there - that's a whole other can of worms - especially in the world of the true black and white film exponents - there's a whole world of exposure -v- development times and temperature.. 😉
@Graham i still use medium format film and my body for which (Bronica SqAi) has no meter, even if it did i wouldnt trust it as my previous metering prism for that camera was abysmal.
@duncan: but do you actually use the meter for the 30d body, and if so what do you gain over the camera's meter?
Separate meter!
Back in the day, used an incident light meter when shooting on snow, measure light falling on the subject rather than reflected from the subject. Ok for group photos and portraits, not to good for action and landscape.