Have you not finished this jeffing thing yet? 😆
9 months!!
I had to drop the hitch point to match my old trailer before I replaced it's broken suspension and raised it an extra 4" off the deck.
TBH I really would have had this finished ages ago if I had got the galv parts back from the specialist sooner. I was hoping to get them in October/November last year. I might get the last bit back this week. 😯
Im just fiddling now as I cant finish the roof etc without the last sill part.
Tow electrics in that cut out in rear cross member for protection?
Towbar electrics are a disposable item like screen wash, don't want it anywhere too inaccessible when it inevitably goes wrong.
We do a lot of ploughing with the tow bar on our 130 as it is so far back from the axle, despite the HD suspension. Often wondered about making a skid plate for it. May just be because we spend a lot of time in axle deep muck while cutting new forest tracks though, probably not a universal problem.
🙂
What's the black finish on the cappings? is that applied over the zinc?
Timbur - all the 110's and 130's that Lix hired me had removeable tow bar mounts for that reason, and the little bit left had two 45* ish right angle sections coming into them to help 'surf' rather than 'plough'. It leaves nice marks on rocks....
I will be removing that grey primed extension plate on the hitch so the toe ball will go up 4" and give me a little over a foot of clearance. Not loads admittedly. Fortunately its only clay and some old stumps in the coppice so I hope not to rip the hitch off 😯
None of those cappings are galv'd this time round gti.
I know Id like to have them dipped but I just havent done it. However, I know I can get them off in less than an hour when they show signs of rust and get them done. Its not ideal and it's not up to the quality of the rest of the build but I can only do so much. The corner cappings are painted in a simoniz "tough black" which does what it says on the tin. The tub cappings were shot blasted and then drowned in hammerite. Will see how long they last,.
Stripped the starter motor and put it back together again. Cant see why it doesnt always engage with the flywheel drive ring properly, so....
...£95 for a new starter motor on eBay. Mad not too.
Seems on the LR forums, everyone has "spare parts" starters in their sheds. Obviously another Solihull consumable 😉
These are brilliant
[img]  [/img]
[img]  [/img]
[url= http://www.extreme4x4.co.uk/acatalog/copy_of_copy_of_DEFENDER_QUICKLY_DETACHABLE_TOWBARS.html ]Linky[/url]
But I can't afford one 🙁
indeedy - but I was about to say I bet they cost a bomb.
It's been a crappy week. ANything mechanical, electrical or technical has conspired to micturate on my pomme frites this week. Not just on the Landy.
The good news first - the new starter motor went in no problem and works a treat. Fires first time and engages perfectly with the ring gear. So I shall refurbish the original one with a replacement clutch/bendix thingy and put it on the shelf for a rainy day.
I also got the Gunson Eezibleed out of it's box for the first time and it was a doddle to bleed the brakes. Happy with that.
I moved on to bleeding the clutch though and the skies started to darken...very long story short, tricky pushrod/slave cylinder games, first test of clutch and DOT4 all over the garage floor - pushrod prob slipped off the fork, but I was very worried about possibility of the pivot having punched a hole in the clutch release fork. Not wishing to open the gearbox to have a look so bought a "cheap" borescope from Maplin, and fortunately fork is intact.
[img]  [/img][img] http://forum.landrovernet.com/attachment.php?attachmentid=169680&d=1391179894 [/img]
So going to try and refit the slave and pushrod later and try again.
In the meantime Ive done the first door. It's been tricky - feel like a watchmaker at times, and it didnt help that the GRP manufacturer doesnt seem to have been too accurate with his cut outs hence my needing to buy a dremel-a-like to make some modifications. However, first one done, and it seems OK. We will see how well it fits in a week or so. There are some big holes for the rain to come in though. I might need to add some modifications but Ive made the Landy "rust proof" and rot proof by removing fabrics and of course the door is now plastic. Only the glass channels will be probably rust.
[img]  [/img]
[img]  [/img]
And finally I did manage to collect the remaining sill from Swindon way this week. It's come out a treat, and in fact fitted even easier than the first. I can now put the roof one which is something my dad will come and help me with this week.
Ongoing thread of the year contender for me.
I moved on to bleeding the clutch though and the skies started to darken...
Told ya 😆
There is a small plastic retainer clip on the fork that the slave rod sits and clips into and it's a Thomas WAT!! to get in place 😡
[img] 1RCBP)6rem2pw~~60_35.JPG) [/img]
[/img]
So you put the plastic clip on the slave and it holds it into the fork
When I did mine much swearing!!!!!
My dad was gloating too - he said it was all going too smoothly for a proper car rebuild 😉
Like an idiot I took the psuhrod (and clip) off when I removed the original slave cylinder months ago.
Ive broken 2x clips trying to replace it so have given up.
Theres loads of people on the forum who claim to have lived for 6yrs without the clip in place and I can see why. So Im using a dab of sikaflex to hold the rod on the fork overnight then tomorrow morning I will slip the slave on and have another go at bleeding. Stupid sodding Solihull design 😉
That stuff they use to sick 😀 crap to magazines, the clear sticky stuff is supposed to be ace!!
It only needs to hold for the time before it's bled, after that it can slowly degrade. The piston spring does the rest of.
Ive fitted so many of those clips i can do it so easily it makes the young lads swear after theyve spent an hour trying 🙂
Yep, a mate at a landrover garage claims similar. Something to do with some long nosed cranked pliers. But mines not driveable to his ramp yet.
Woohoo! Success!
Pushrod stuck nicely with sikaflex. Slave reinstalled, bled and it's all fine - good clutch feel, can select gear no problem. Exhaust reattached, had to give the alternator a squirt of WD40 and a nudge - it had seized from sitting still for 6m after a good bath. I can drive her out of the shed and re-fit the roof next week.
Feel much better about things today. Im off for a pint to celebrate!
Happy days!
Amazing how a good night's sleep seems to help when dealing with this kind of problem.
If you ever have the box out, weld a nice 5mm lump of metal in behind the push rod socket on the release arm! (or try to find one of the early cast iron versions)
Will do. Will probably also fit a 130 clutch and replace the lower crank seal too. But hopefully not needing to open the box up for a few years yet.
Your 'truck' gives me a semi.
I've been following the thread with interest and have nothing useful to add, except that that your epitaph should include a picture of your LR!
*hats off*
cheers makecoldplayhistory, well here's a treat for you and all the other thread fans. Fender* got a drive out of the workshop today.
Dad came round to help me lift the roof on. There's a bit of shoving and easing to be done, but it should fit OK later when I start bolting it together.
The bonnet is on and will soon have some new external catches fitted to pull it down square. I want to fit some new bump stops for the bonnet too.
She really starts like a dream - not even a quarter turnover needed and she fires straight up. Sweet! The front vent flaps and the new rear door are at the paintshop at the moment - vent covers will be white as well.
Now just got to press on with the doors, both the roof down, put the seats in, fit the seat belts and she'll be ready for her MOT. Couple of weeks tops I hope.
[img] https://lh6.googleusercontent.com/-bQd-bSFN5Fs/UvDeuxfOSZI/AAAAAAAAHfs/rN6JRQLvB4s/s640/%255BUNSET%255D.jpg [/img][img] https://lh4.googleusercontent.com/-fLUGGA6T7Ec/UvDehBR7rfI/AAAAAAAAHfM/WMdIJheabOI/s640/%255BUNSET%255D.jp g" target="_blank"> https://lh6.googleusercontent.com/-bQd-bSFN5Fs/UvDeuxfOSZI/AAAAAAAAHfs/rN6JRQLvB4s/s640/%255BUNSET%255D.jpg [/img][img] https://lh4.googleusercontent.com/-fLUGGA6T7Ec/UvDehBR7rfI/AAAAAAAAHfM/WMdIJheabOI/s640/%255BUNSET%255D.jp g"/> [/img]
* I know it's not strictly a defender, but the boys have named it
Hmmmm.... what size are those tyres? I suppose the springs will settle a little as you add weight.
Looking good - Don't leave that anywhere other than in a locked & alarmed garage !!
235/70R16
Not big I know. I might consider going up a size someday, but theyre brand new. They might possibly fit on the freelander though.
Wheels man! Wheels maketh a 110!!
"don't spoil the ship for a ha'p'orth of tar" and all that Jazz
Get some proper bloody wheels with the right size tyres!
either Classic LR Steels with 750r16
or
Boosts with 235/85/16
ha'p'orth
£600 more like 😉
I think the 235/70 will fit the freelander so they wouldnt go to waste if I swapped them.
Its not easy finding 75:25 Road:Offroad tyres in 235/80 sizes though 🙁
the STD General Grabbers TRs are a good road tyre
as are the Conti they fit now as standard
(235 85 r16) is the STD 110 size
just found those. And the General Grabber ATs are alright too. I have AT2s on the Freelander and rate them v highly.
Will see what coppers I have in the bottom of the piggy bank when this is all done.
I've got a couple of good Michelin Radial XZL 750 x 16 tyres on standard 110 rims if you want them for the cause. They've both got 9mm of tread.
I think 110s look great on standard rims. The only thing that looks better are galvanized 130 rims which are hard to come by.
Random search on Ebay yielded these new take offs.
[img] 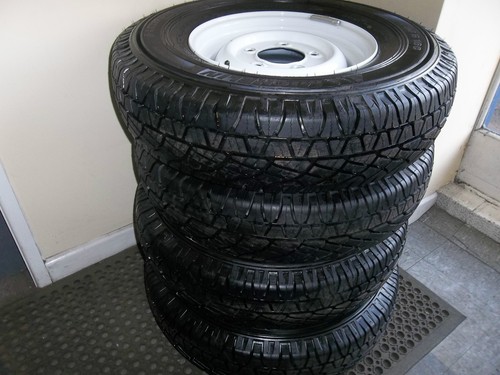 [/img]
Wow, hadn't found those. They would look perfect wouldn't they.
They say they have a few sets. Not too far to get them either.
Stoner the 8 spokes you got on are EXCELLENT rims, thats why the electricity boards spec them on their landys so technically a factory fit.
The STD landy rims are OK (ish) but they are VERY heavy and will kill your acceleration and affect fuel consumption. If I was going for factory std then I'd go for the wolf rims fitted to the Defender XD, strong, and lighter than the std rim - also be very aware that there is a significant difference in the loading spec of std rims! i.e. 90s and 110 can have different spec wheels even though they look similar - something to be aware of when buying second hand.
this thread is full of the awesum
BTW
Cheers jock.
Thing is 5x new 235/80 for those 8 spokes is not cheap. If I can get factory 7.50s rim and tyres for a bargain they'd look the better part.
Always found BF Goodrich AT's an excellent tyre. Last for ages too.
Buy those standard rims!!!!! (Bin the the current chav go cart wheels)
Make me happy 8)
The latitude is a great tyre also 🙂
+1 for those standard take offs. 8spokes are naff.
Splendid thread, comrade - a proper labour of love.
[img]  ?nr=91411&company=airfix&name=land%20rover[/img]
Wow! I would go for those take-offs. If I still had my ex-MOD 90 I'd be tempted because my wheels were rusty. The 750x16 size looks perfect on a 90 or a 110 and I've never been in favour of fat tyres; they reduce your ground pressure and I've seen them build up a bow wave in very deep mud rather than cut down and through.
This pic taken after I'd hand-painted the wheels with Dulux Once in Ivory colour. It lasted surprisingly well.
Stoner, why don't you look around for a galvanised MOD front bumper with a towing pintle, as pictured below? This was galv, I just painted it black.
[img] 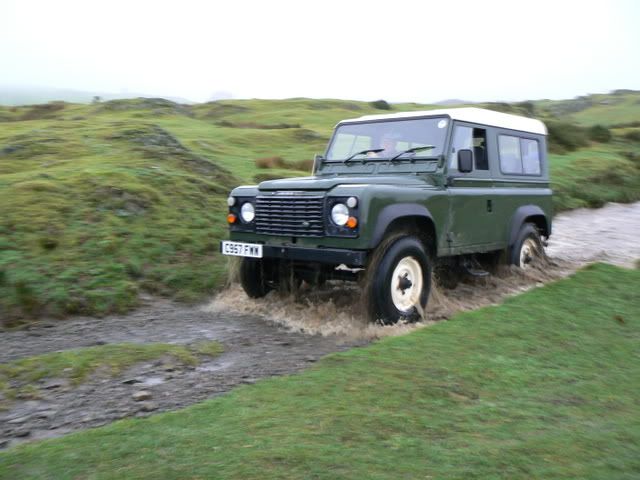 [/img]
those do like nice on that one gti.
I will keep an eye on that listing and see how silly the price gets. it's not top of my need list, but I will see what I can afford to get.
Really not planning on doing anything with the bumper. the galv one on it is absolutley fine and it really isnt going to be pulling much around.
