If I let slip that there's a Seafire Mk 47, MrsPJM will probably spang me with a sturdy frying pan.
Just call one of them a Messerschmitt & see if she notices
Or a Hurricane
The DS looks lovely - the only thing that obviously gives it away as a model is the headlights. Something to do with either how the reflections of the non-scale thickness perspex works, or flat silver backing rather than chrome.
B***er doing them tank tracks.
Anyway - a wee Aldi Jet Provost for your delectation.
Easy build. OOB, bar some (slighty unneccessary) resin bang seats. I cocked up the painting a bit - preshaded in black as normal and then just could not knock it back with the red. There's almost an entire bottle of red paint on it - probably 20 coats! The decals settled down beautifully (although not obvious in the pics)
[url= https://live.staticflickr.com/65535/51174603343_9db8b56aa1_b.jp g" target="_blank">https://live.staticflickr.com/65535/51174603343_9db8b56aa1_b.jp g"/> [/img][/url]
[url= https://live.staticflickr.com/65535/51175470930_124e77507f_b.jp g" target="_blank">https://live.staticflickr.com/65535/51175470930_124e77507f_b.jp g"/> [/img][/url]
[url= https://live.staticflickr.com/65535/51174602768_e8f0c18b8d_b.jp g" target="_blank">https://live.staticflickr.com/65535/51174602768_e8f0c18b8d_b.jp g"/> [/img][/url]
[url= https://live.staticflickr.com/65535/51174602368_cba49633ae_b.jp g" target="_blank">https://live.staticflickr.com/65535/51174602368_cba49633ae_b.jp g"/> [/img][/url]
[url= https://live.staticflickr.com/65535/51175168334_223102aa46_b.jp g" target="_blank">https://live.staticflickr.com/65535/51175168334_223102aa46_b.jp g"/> [/img][/url]
[url= https://live.staticflickr.com/65535/51175469450_0af0481407_b.jp g" target="_blank">https://live.staticflickr.com/65535/51175469450_0af0481407_b.jp g"/> [/img][/url]
[url= https://live.staticflickr.com/65535/51175468990_e8d894b1db_b.jp g" target="_blank">https://live.staticflickr.com/65535/51175468990_e8d894b1db_b.jp g"/> [/img][/url]
very pretty, came out well in the end!
I do like that JP, excellent work.
Red is a very, very difficult colour to paint so kudos there.
I like that JP a lot.
Reds and Oranges are a PITA, which is why I haven't built my Severn Class Lifeboat yet.
JP looks ace - have had a soft spot ever since the ‘fighter pilot’ series in the 80’s. If I ever won the lottery then a working one would be very high up the shopping list!
True story - I did once date a girl who's father owned a JP. She was quite keen on getting her dad to take me out for a spin, until I realised that she was a Turbo Louise and I had to pull the metaphorical ejector seat handle and bail out long before I got to strap myself into an ejector seat as it were.
I still think of that Jet Provost.
Hey. I must admit I've dipped in and out of this thread but not read all the way through. I used to do a bit of Airfix as a kid. No one really taught me how to do it properly. I started off just gluing the kits together (I remember my first was a 1:72 Hurricane I managed to even get the propeller glued stuck).
I persevered and was painting models. Had some nice results like a 1:48 Lancaster if I remember correctly. I haven't built a kit since I was a kid so 30+ years.
My 10 year old lad is plane mad like I was. He just got his first kit as a present from his Grandparents. A Hobby Boss F4U 1:48 Corsair. Not a brand I've heard of. Googling suggests these kits are OK.
I want to show him the right way to do these. Paint, and assemble patiently. I need to get the paint and this kit only really has all the colours listed for 'Mr Hobby' paints. Are these any good any online suppliers in UK?
Thanks in advance I'm sure I'll be bombarding this thread with questions now.
Welcome to the thread. I'm a returning from knocking up a few mediocre kits as a teen modeller and my younger one (9) is getting quite into it.
Someone on here pointed me to emodels.co.uk for paints and stuff and I've found their website and ordering process excellent and standard delivery stuff is usually here in a week.
On paint colours I've been using the names of the colours as a guide to range equivalence between Vallejo, Revell and Humbrol. At my standard I reckon that might get me close enough, I'm mostly going for Revell Aquacolour paints as I seem to have a fair few of their kits and my local model shop stocks them and Airfix.
Britmodeller forum has been an excellent source of ideas etc (the work in progress threads are good).
I used to use mainly Revell & Tamiya acrylics but found a lot of the newer far-eastern kits use Vallejo or Ammo/MiG paint colours, so I’ve acquired a number of those too. Jury’s still out though, regarding quality.
https://www.emodels.co.uk/ , https://www.modelhobbies.co.uk/ and https://www.scalemodelshop.co.uk are my go-to sources when I can’t get to my LMS or when Hobbycraft don’t have what I need
Thanks all! No doubt I will be asking some questions as we make a start!
Have a look for Quick Kits on YouTube. A young lad called Owen showing you how he does it.
Well I've had my first learning curve. 2 numbers against the Mr Hobby paints in the kit instructions. After lots of staring I realised the first number was the code for Mr Hobby Water Based Paint (aka MR Color Aqueous), the second number was the Mr Hobby Solvent Based code.
But to add to the confusion the main colour for the Corsair was solvent based only (#365). And described as 'Navy Blue'. But #365 is actually described as Sea Blue (used on USN WWII planes) so I can only guess Navy / Sea got lost in translation from Chinese to English. LOL.
That Quick Kits Youtube channel was a great recommendation. Thanks for that. I watched a couple of the general tips and painting tips. Nice guy really good.
Found another useful colour conversion chart as well seems to have slightly more Mr Hobby / Mr Color colours.
PS just realised Mr Hobby is Japanese not Chinese?
I tend to take a relaxed view to getting colours correct - your average WW2 aircraft had to endure weather and maintenance and surface finishes were generally non-uniform. My own preference is for Tamiya paints - they're acrylic and are very easy to mix. I'm currently painting an Airfix Spitfire Mk 22 in standard RAF colours, I primed in NATO black, preshasded panels in light colours and mixed some black in with each camouflage shade and picked out the panel lines before adding a very, very thin top coat in each colour.
I do wish that Tamiya did an off the shelf RAF Azure Blue though, mixing that sucker is a challenge.
Posts like this make me feel so underprepared.
Gotta enjoy it right?
Any paint brush recommendations?
I guess take my our time. The first few models we're going on a learning curve. Do our best don't sweat any mistakes.
Decals...? Silvering. Varnish before or after? Arrggghhh 🙂
Paint brushes are a personal choice - I use an Iwata airbrush for the finished model but use Italeri brushes when I need to use a hairy stick.
Decals - first give the whole model a coat of glass varnish. Do the decals, using decal fixing solution if necessary, then a top coat of varnish - Matt for camouflage, gloss for shiny finish e.g. cars, trucks, motorcycles
The manufacturer (of brushes) is less important that the sizes. they come from 00 (really small) to size 4-5 (really big). If you're starting with 1/72 scale that's the biggest you'll need. get a good range of rounded and flat tipped.
Don't get hung up on colours, it really isn't madly important. You are after all, making a plastic toy for your own enjoyment, not a museum exhibit
Posts like this make me feel so underprepared.
Gotta enjoy it right?
I promise you that no-one starts out being brilliant at this - some of us have been building models for years and are still rubbish. I've seen some absolutely amazing models that have been brush painted, so I wouldn't worry about airbrushes or whatnot just yet.
It's worth remembering that with acrylic paint it's relatively easy to strip your model and repaint if it doesn't go well first time - my Spitfire has had the red tail band removed and repainted three times. A top tip is that if it all goes pear shaped then you can soak your model in diluted Dettol and within a couple of days the paint will be gone and you can start again.
As for the finish, the varnish is to give the decals something to purchase onto without air bubbles getting underneath.
Great tips all - thanks
Lots of cheap kits to practice on. I sometimes find it helpful to focus on one aspect I want to improve, for example - on this one I’m really going to focus on tidying up the seam lines, or I’m really going to focus on the decals. It just helps to stop you feeling overwhelmed!
One of my partner's degrees is in fine art, so I'm going to build her a model, prime it and let her loose on it to see what she comes up with.
Quick update on the Ta154 - ‘Goering’s Moskito’. After a long lay off I’ve finally made a bit of progress, a few hiccups along the way, but really just undercarriage, props, aerials etc to do now. It’s been a long time since I did a Luftwaffe scheme but you just gotta practice and accept it’ll only really work out 1 time in 4!!
[url= https://i.postimg.cc/QM1QNmsj/00-C453-EC-A215-48-E5-8-E06-909-AB9-D0-B9-EE.jp g" target="_blank">https://i.postimg.cc/QM1QNmsj/00-C453-EC-A215-48-E5-8-E06-909-AB9-D0-B9-EE.jp g"/> [/img][/url]
[url= https://i.postimg.cc/Jn8bsX4Z/315-B331-D-8560-4-B18-940-F-36632-B454-EFB.jp g" target="_blank">https://i.postimg.cc/Jn8bsX4Z/315-B331-D-8560-4-B18-940-F-36632-B454-EFB.jp g"/> [/img][/url]
[url= https://i.postimg.cc/x1kGhY4J/5-AFA04-AB-0-AC8-4650-9-C6-B-50-ED533-F9-C44.jp g" target="_blank">https://i.postimg.cc/x1kGhY4J/5-AFA04-AB-0-AC8-4650-9-C6-B-50-ED533-F9-C44.jp g"/> [/img][/url]
[url= https://i.postimg.cc/zBkTKfVM/60-DC68-F6-3403-49-A1-ABE5-66-F8-FD9-E191-D.jp g" target="_blank">https://i.postimg.cc/zBkTKfVM/60-DC68-F6-3403-49-A1-ABE5-66-F8-FD9-E191-D.jp g"/> [/img][/url]
[url= https://i.postimg.cc/P5Bbkcg6/67-DF589-F-E440-4-E73-9-B44-04-AB737-CDE6-D.jp g" target="_blank">https://i.postimg.cc/P5Bbkcg6/67-DF589-F-E440-4-E73-9-B44-04-AB737-CDE6-D.jp g"/> [/img][/url]
[url= https://i.postimg.cc/C1p4btJZ/EDAC0076-519-D-4476-B4-D6-CD375-A27-B982.jp g" target="_blank">https://i.postimg.cc/C1p4btJZ/EDAC0076-519-D-4476-B4-D6-CD375-A27-B982.jp g"/> [/img][/url]
Nice 😊
Looks quite big, what scale? 1:48?
Aye 1/48. Photos are out of sequence but I had a go at blackbasing. Prime in matt black, then random patterns in colours of your choice, then progressively misting on the top coat. Not totally happy with the result but it deffo has promise, and feels more controllable than pre and post shading. It’s also amazing how much it tones down when you add decals and successive layers of gloss and matt varnish. You have to be really disciplined not to crush the effect altogether!
Also while I’m on a roll here’s one for Harry! Heng Long Chally 2 which I finally got round to putting some paint and weathering onto. Great fun in the garden!
[url= https://i.postimg.cc/DzSrWxyR/70-A25985-41-BC-42-FF-80-A3-8-C14-FD9-F2-CD4.jp g" target="_blank">https://i.postimg.cc/DzSrWxyR/70-A25985-41-BC-42-FF-80-A3-8-C14-FD9-F2-CD4.jp g"/> [/img][/url]
[url= https://i.postimg.cc/wMCcHLdn/854211-C8-99-AB-4754-A18-A-2-E9-C5-C54-A00-F.jp g" target="_blank">https://i.postimg.cc/wMCcHLdn/854211-C8-99-AB-4754-A18-A-2-E9-C5-C54-A00-F.jp g"/> [/img][/url]
[url= https://i.postimg.cc/wBnhDD1M/D8-B27707-46-C1-490-B-AB42-327-FB5-C4860-E.jp g" target="_blank">https://i.postimg.cc/wBnhDD1M/D8-B27707-46-C1-490-B-AB42-327-FB5-C4860-E.jp g"/> [/img][/url]
[url= https://i.postimg.cc/gkpHMyN6/E1896-B6-C-AD63-4-BDA-987-F-B7992-A2-A0-CAB.jp g" target="_blank">https://i.postimg.cc/gkpHMyN6/E1896-B6-C-AD63-4-BDA-987-F-B7992-A2-A0-CAB.jp g"/> [/img][/url]
^Nice.
I bet that is chuffing massive!
It is and it’s also bleedin heavy 😀
There's something deeply relaxing about rumbling your tank around the garden for 10 minutes with the sound effects turned up and the smoke on.
rumbling your junk around the garden for 10 minutes
😱
Oh crap. There are Challenger IIs in UK stock!
Must resist.
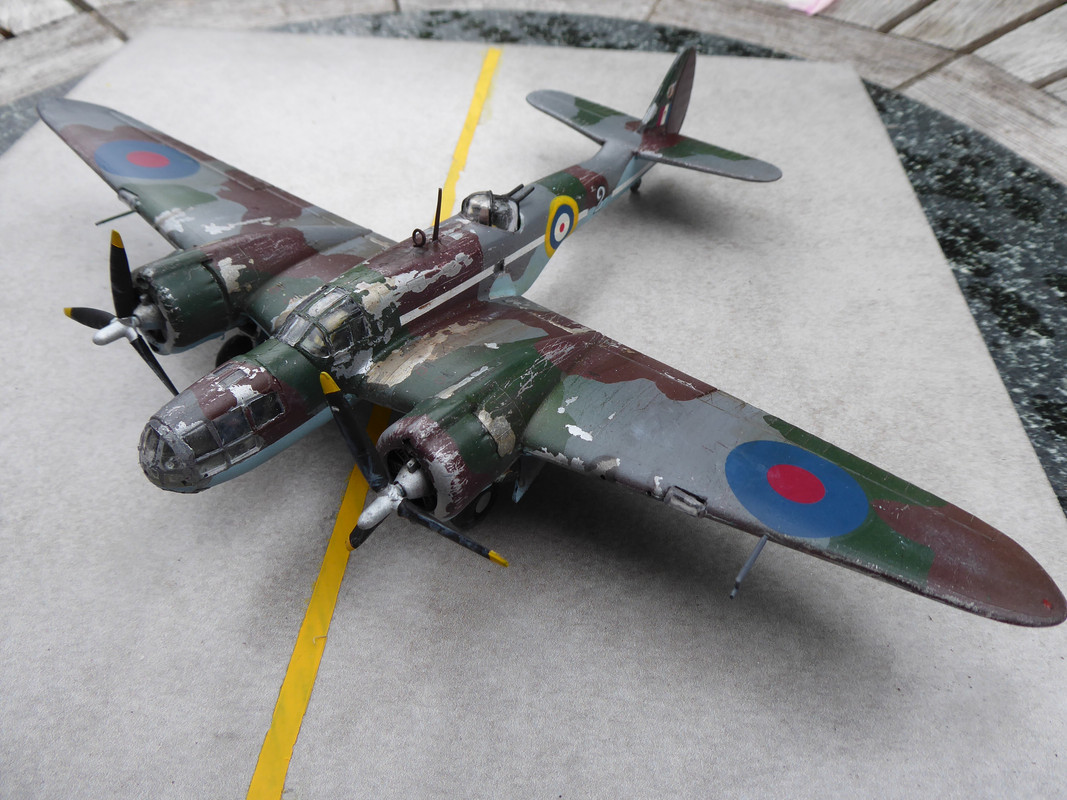
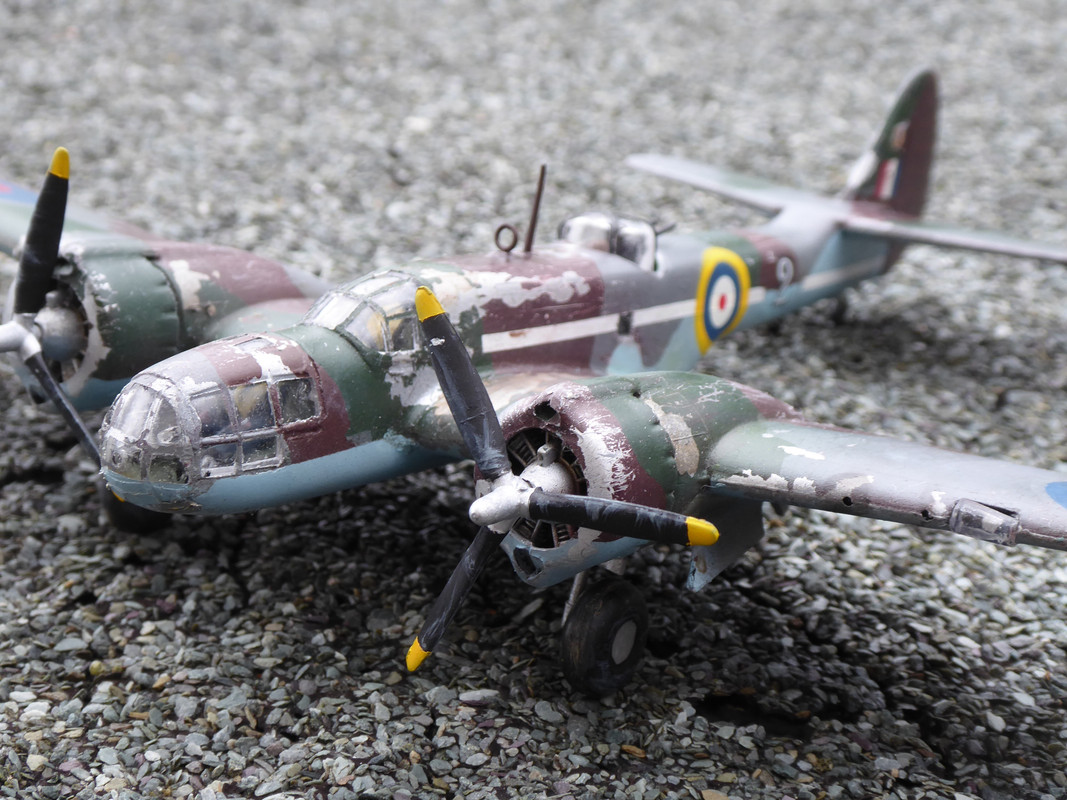
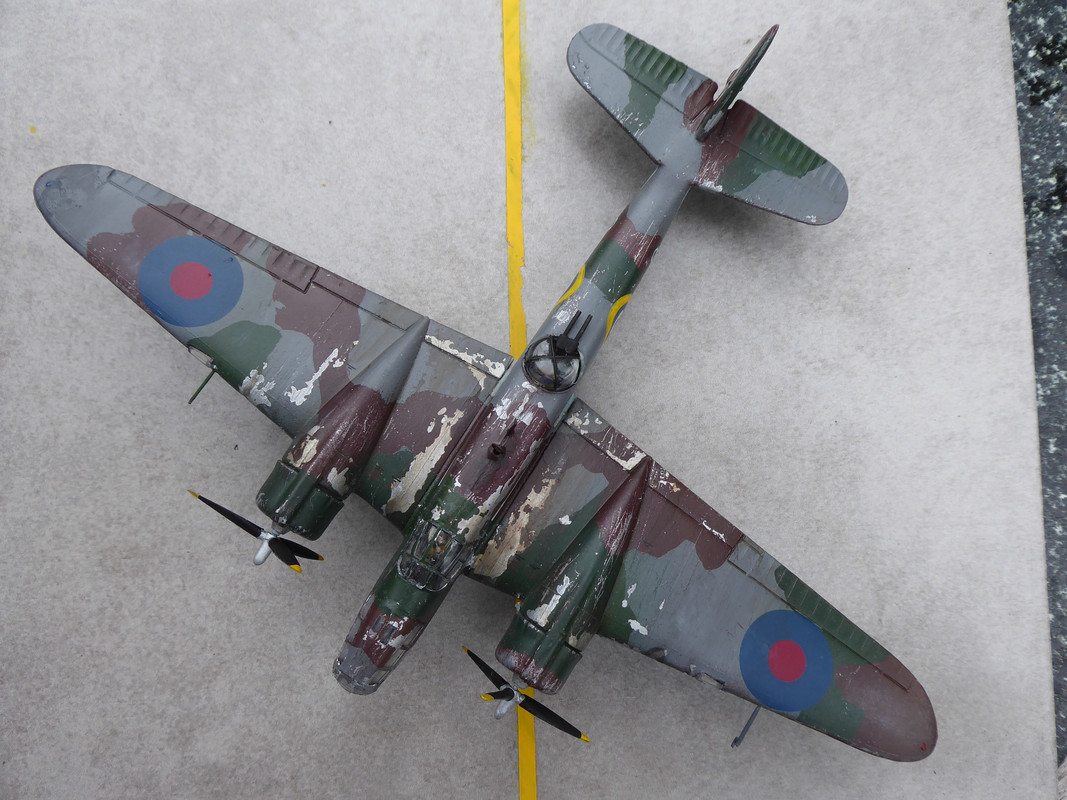
Adrian Warburton's absolutely knackered Martin Maryland.
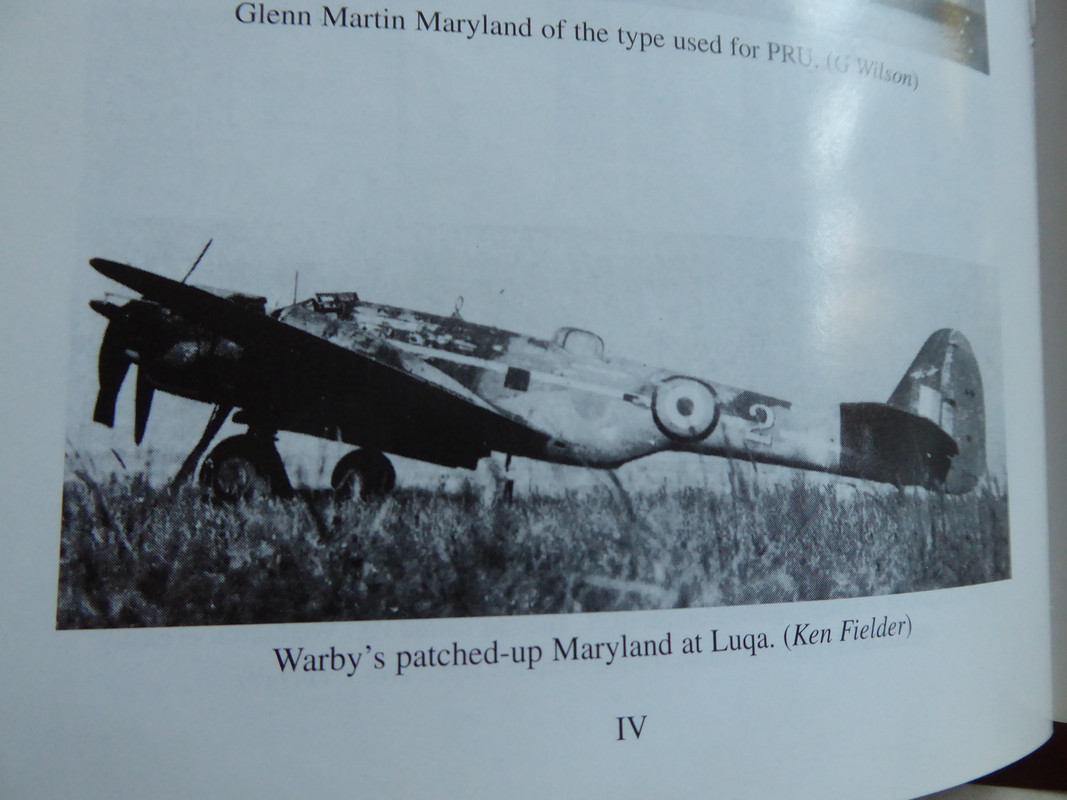
https://en.wikipedia.org/wiki/Adrian_Warburton
1/72 Eastern Express kit, which is a re-box of a 60 year old Frog.
Some home made decals (the "2" and the winged daemon on the tail) and every weathering technique that I could think of. The kit was a bit of a shocker, not helped by me losing the forward canopy glazing and having to make something out of spare parts.
Nice work Harry - very ‘beaten up’ and always nice to see a model with a bit of history to it.
On canopies I think it would be a great idea for manufacturers to include a spare in every kit. I’d certainly pay a little extra for it. The problem is that for aircraft models the glazing is such a massive part of success or failure. I have done some ‘home vac forming’ in the past using a canopy I had ruined as a mould. If you have no choice it’s worth a try!!
Nice. Good to see a different "ace" being remembered. The Adrian Warburton story deserves to be known far more widely. Proper boys own stuff
Yep. A loner who was nearly washed out. Got sent to Malta to keep him out of trouble. Hooked up with a Show Girl. Did some bat-shit crazy stuff. Stole a few aeroplanes. Crashed a few too. Became the most valuable pilot in the RAF for his photo recon work.
Warburton’s War and Fortress Malta are two excellent books if you want to know his story.
. A loner who was nearly washed out.
Hmmm, my recollection of reading about him was that although many fellow officers saw him as a loner, it disguised the fact that he was just friendly with the "wrong sort" i.e. the ground crew. And nearly washed out with good reason I think, he could barely manage to fly in his early career, just needs must and lots of practice in theatre meant he got away with it.
But yes, properly important contribution to the war who should be equally well known as Bader and Gibson IMO.
The three tone camouflage over pale blue on that Maryland looks distinctly un-RAF, was the real thing originally destined for France and diverted to the UK?
Very good effort on the beaten up paint scheme, you've done an excellent job on a jurassic kit with moulds that are clearly way past their best.
Also +1 for manufacturers putting an extra set of transparencies in the box.
Yeah. He fit in better with the ground crew than the officers. Also, he’d rather stay with his girlfriend than in his billet!
Was recommended for a VC, but it got knocked back because Bader hadn’t got one.
The aircraft was originally due to go to France, but the RAF took them when France fell. Also they weren't properly primed, so the paint fell off.
Had a touch of The Plague over the last couple of weeks and decided that after watching 6 seasons of Game Of Thrones that I could do with a change, so I went to the stash.
Kit selection criteria was as follows:
1) It had to be a kit that wasn't in the loft.
2) It had to be a kit that wasn't camouflaged as I really couldn't be bothered with faffing.
So, based on the above I present the Hasegawa Sea Harrier FRS1.
899 NAS, HMS Hermes 1982, EDSG all over.
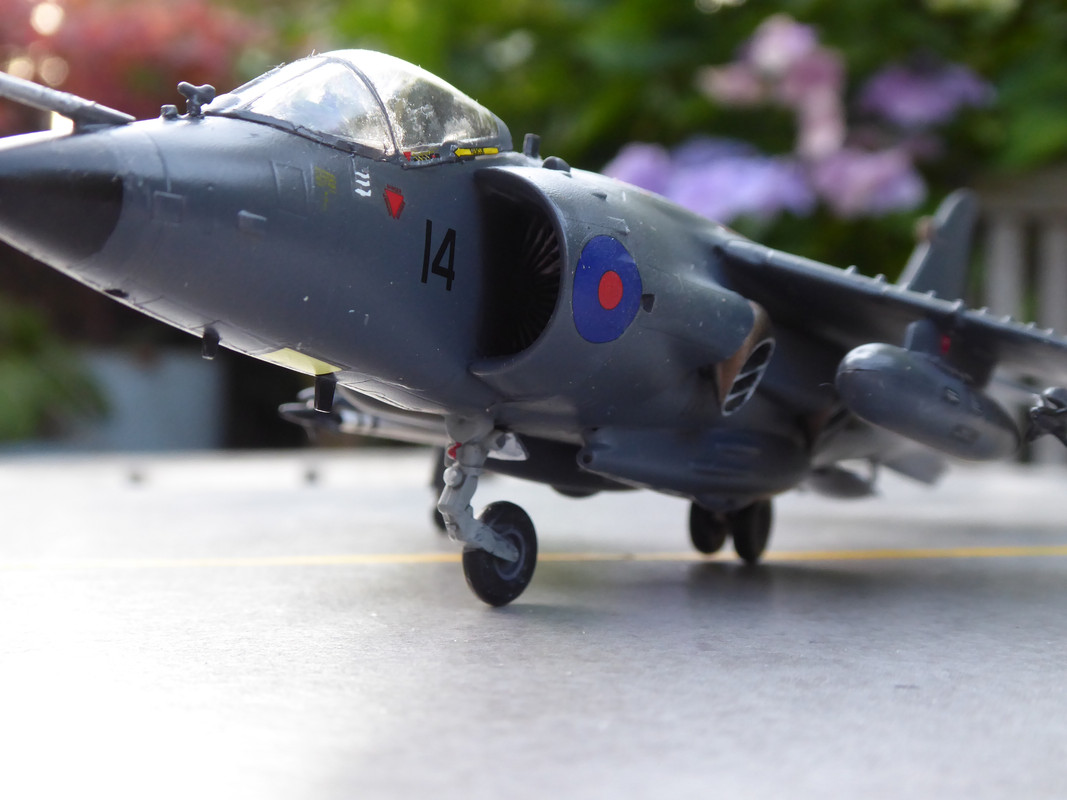
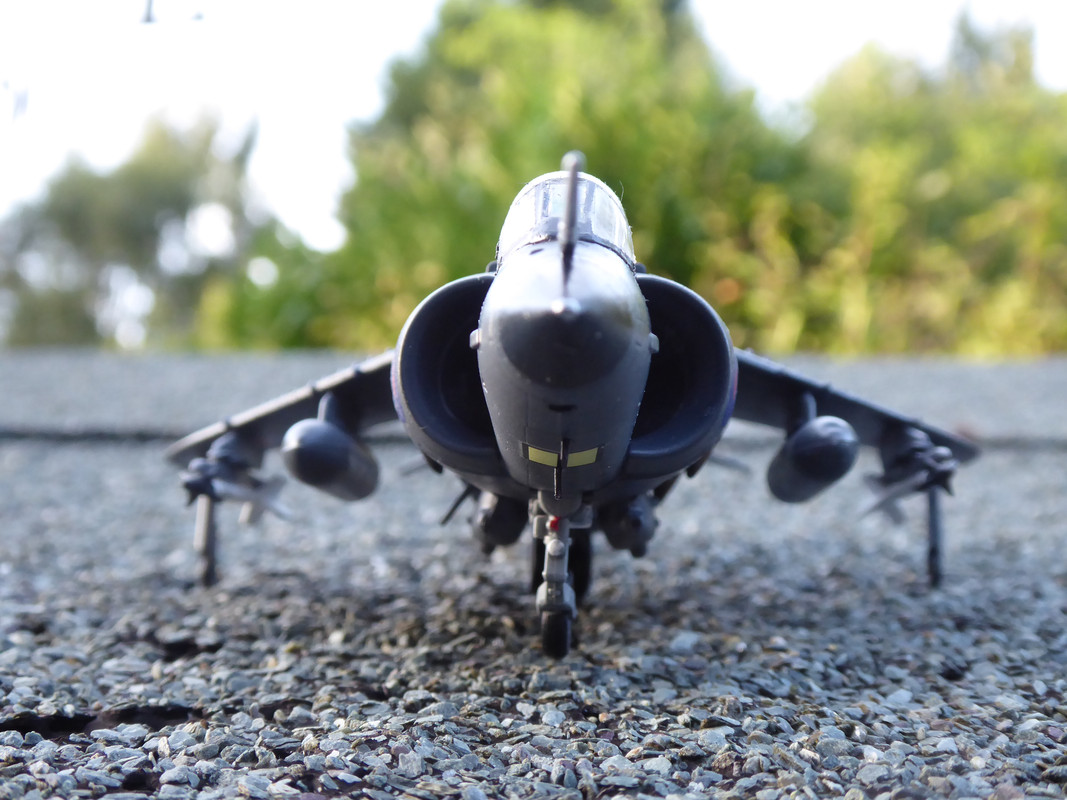
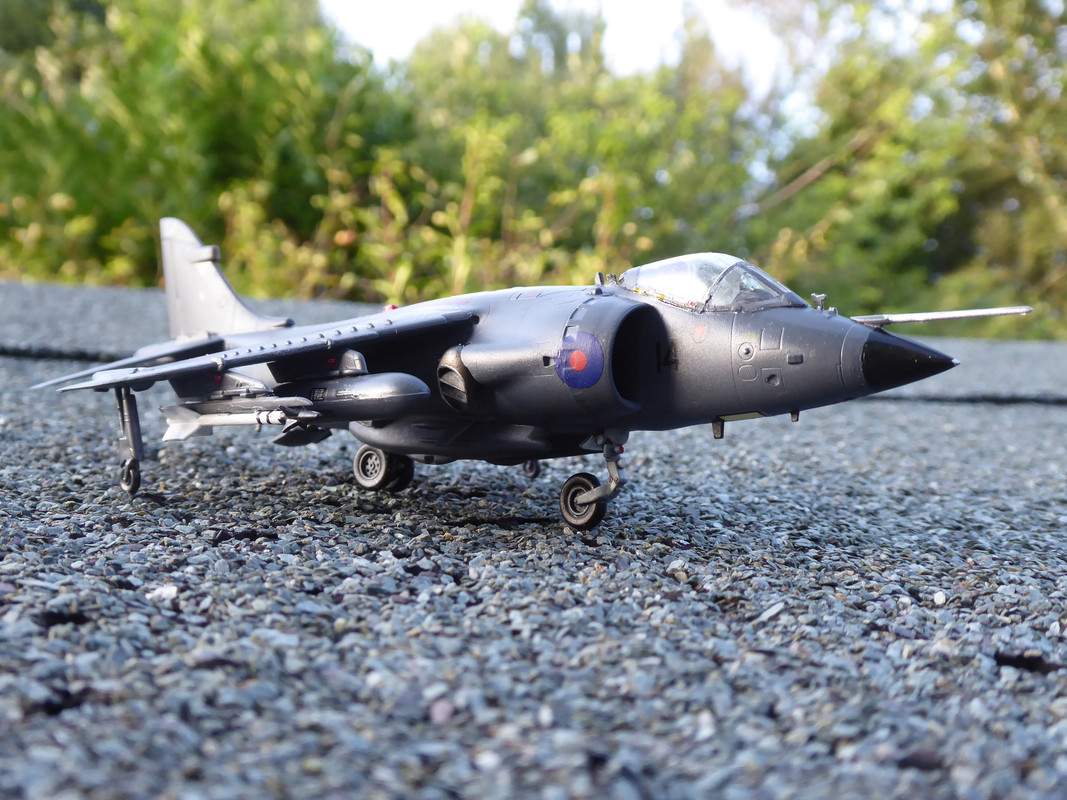
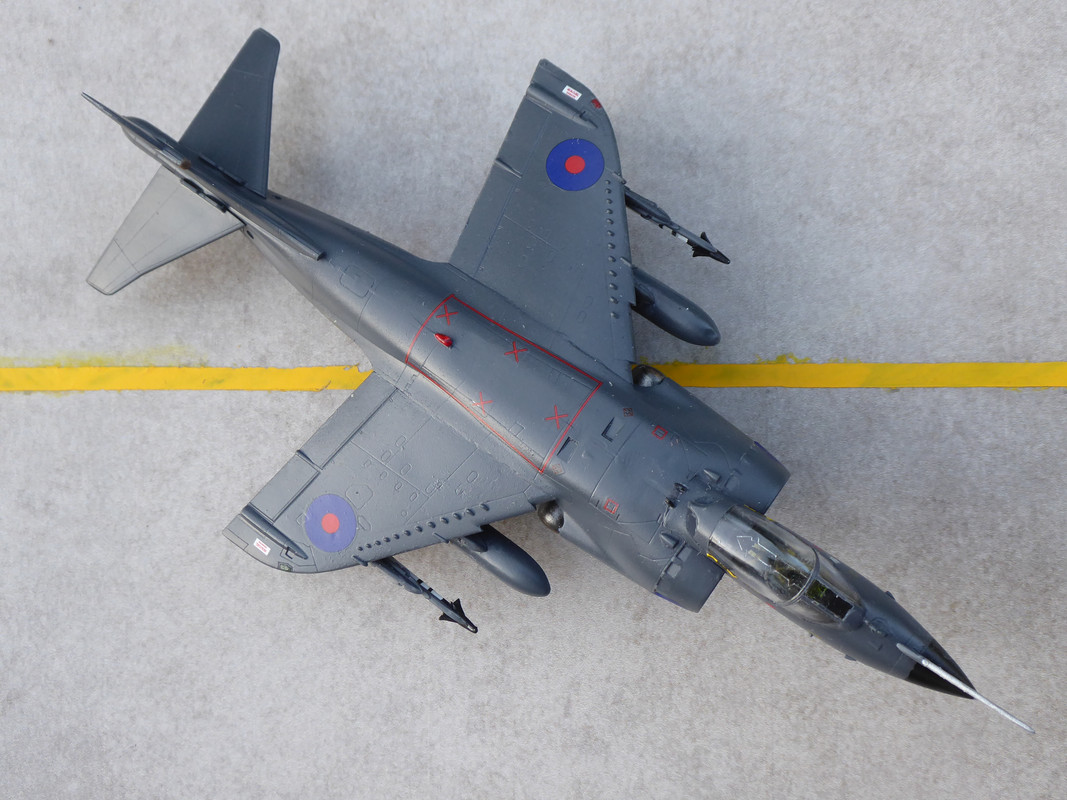
No weathering, no additions (other than tape belts), no messing, no fuss.
Not a bad little kit and it got me away from the TV.
1/72 scale? Looks nice.
I did tha Tamiya 1/48 Sea Harrier a few years ago. Not their finest offering…
Thank. Ancient Hasegawa 1/72. Did it over 2 days.
Not a bad kit, the join along the top of the fuselage was a bit troublesome, but other than that it went together well. In fact I've ordered another one so that I can do the low visibility scheme that was also present in the Falklands, and I've just un-boxed an Italeri GR.3 to do an RAF one.
Interestingly (not really) the Italeri has the wings and upper fuselage as one piece.
I really liked the simplicity of the paint after spending ages doing camouflage, chipping, smoke and weathering on recent builds. I just added a dark wash over the landing gear to bring out some detail and that was it.
Got a bit of a Harrier thing going on. There's a GR.9 in the loft somewhere too.
Nice work Harry. The plane that won the Falklands. Very interesting podcast on ‘We Have Ways…’ a few months back talking about the importance of the Harrier. I hadn’t realised the GR3’s that were sent down had very little modification and were basically totally unsuited to carrier operations. Also the RAF pilots were basically given 48 hours notice they were going!
Halfway through a Tamiya Storch which is a lovely little kit.
Also the RAF pilots were basically given 48 hours notice they were going!
My dad knows one the RAF pilots that was informed that he wasn't going to fly Phantoms in the US on a conversation course with the USAF, but he was in fact going to learn Sea Harrier Ops on his way to the South Atlantic...Apparently it came as "a bit of a surprise"
