Every few months it's nice to refresh nice little tips and tricks to make riding, fixing, and generally touching (ooh er) a bike easier!
I came across this one this evening shortly after I'd thought the rear mech had trebuchet'd the quick-link halfway across the village...! I found it eventually (in a patio crack!) but though it would be good to remove the chain tension when joining/removing the quick-link...
Normally have some RC servo wire to hand, but couldn't find any - then found the 'spring' from xt/elixir brakes works brilliantly, and I've got loads lying around!!
[img] 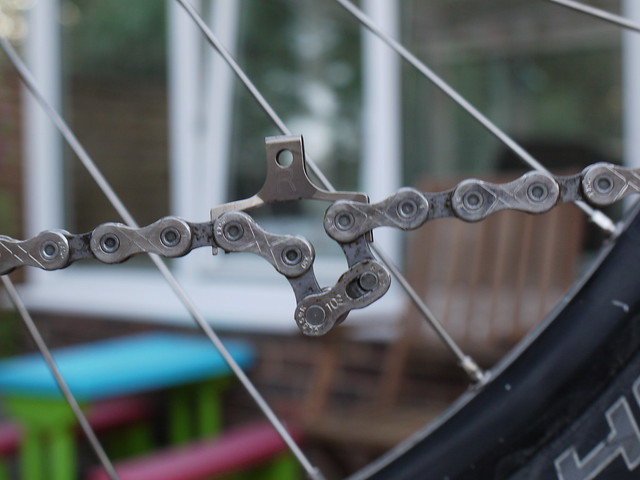 [/img]
So, post away, ideally with pics, all your tips and tricks...
DrP
Loving that.
About 10 inches of m10 threaded bar, 6 penny washers and a couple of m10 nuts and hey presto, a headset press for about 3 quid. I've lost count of the amount of headsets I've successfully fitted with this 'tool'.
That also works for press fit bb's Matt
if you had a gf who had access to nitrile gloves you would find that fixing punctures on manky/muddy days was no longer such a pain
headset removal - 22mm copper tube, cut 2" deep X in end, splay to fit cups - sorted
INVITED by vegetarians for dinner? As you’d no doubt be made aware of their special dietary requirements, tell them about yours – ask for a nice steak
[img]  [/img]
I always carry a few hefty zip-ties and a small roll of plastic electrical tape in my camelback--pretty amazing what you can cobble together to get back to where you parked.
Always change into smallest sprocket at the back before you remove wheel to fix a puncture.
Always put a bike down on its left (non gear) side.
I've used a bent spoke to hold the chain, something like this
[img]  [/img]
I just fit the quick link into the middle of the bottom run of the chain with smallest sprockets selected, therefore allowing easy fitting with one half of the quick link in each hand without needing any extra tools :p
INVITED by vegetarians for dinner? As you’d no doubt be made aware of their special dietary requirements, tell them about yours – ask for a nice steak
zzzzzzzzzzzzzzzzzzzzzzzzzzzzzzzzzzzzzzzzzzzzzzzzzzzzzzzzzzzzzzzzzzzzzzzzzzzzzzzzzzzzzzzzzzzzzzzzzzzzzzzzzzzzzzzzzzzzzzzzzzzzzz 🙄
why do people connect chains when its under tension? I tend to take the rear wheel out or drop the chain off the front chainring, the chain is then slack and makes it pretty straightforward
A20p fits the shimano hollowtech 2 chainset bolt perfectly
To hold a BB removal tool onto the splines I thread a rear wheel skewer through the BB and through some old cranks to take up the slack and then clamp together using the QR, so that I can get some leverage on the BB tool without worrying that its going to slip out the splines.
similar to this but with 2 old cranks..
[img]  [/img]
You can do the same thing for the chain if you pinch it up on the front chainrings. Takes all the tension out,much easier.
When removing pedals, put chain on biggest ring at front, prevents painful knuckle - tooth interfaces
A bic Biro lid is perfect for precision placement of ball bearings back into cup and cone hubs. Just roll them down the little chute on the inside of the pocket clip.
This is now irrelevant for me as I only now have cartridge hubs
if you commute and leave your bike locked up, you can buy locking dust caps for cars from halfords etc ..to prevent pesky people letting your tyres down.
OR..
You can tighten normal caps really tight and then put a really light smearing of petroleum jelly over them. Not too much though or it may go on the rims.
If you have V brakes on your commuter you can secure the springs to the brake arm with a zip tie, to again protect from the peskies.
in my experience V brakes work twice as well with bmx brake levers ( for u brakes, as opposed to bmx race v brake levers.) than normal v levers. Plus these can be picked up for next to nothing., come in funky colours and are designed to be used with one finger.They also have a better lever shape more often than not. Loads of bite, better modulation and greater overall stopping power.In summary, more powerful and responsive.
However haven't tried them with shifters but doubt this would cause issues.
if you have a saddle with some foam exposed from a slightly ripped cover then to prevent further ripping and get it as good as new ( from a funtional viewpoint ) drip some superglue into the wound. Superglue hardens the foam. vinyl bonds to foam. works a treat.
like this game.
if you commute you can get really thin (but with a decent sized cable inside) cable locks. Put this through your saddle rails and then optionally put it through your helmet, securing both items. Can then be looped, through another lock or the frame etc..to secure it. Only risk is the helmet getting damaged in some way, and you may not even be aware this occured.
When stuck and doing some trail side repairs, simply turn your bike upside down and it will balance on the bars/saddle.
Remove your bar end plugs or lock on grips and wrap a few spare spokes and nipples in a decent length of quality duct tape such as gorillia tape and include a number of zipties taped up so the zip tie ends reach from side to side of the internal bore of the bar to ease removal.
For setting up tubeless, lube the rim tape with undiluted motor cross tyre lube, or worst case fairy liquid. The tape, not the tyre bead.
Remove the valve core.
Then use a high volume, low pressure track pump.
Pump until about 25psi and pretty much all tyres will pop on the rim without any hassle at all.
Most tubeless issues are due to high friction, low volume pumps, and tight tyres.
When you want to remember which way to take the pedals off -
when the bike is upright and you put the pedal spanner on so it is vertical "Back Off" - turn the spanner towards the back of the bike and the pedal comes off 😀
to protect your stantions use pipe lagging.
to insulate a water reseviour ( to keep it cooler )apparently you can use a home made gaffer taped thin foam sleeve around it. Add some ice cubes into the water.
edt - the valve cap trick works best with bullet caps.
When you want to remember which way to take the pedals off -
when the bike is upright and you put the pedal spanner on so it is vertical [b](and pointing up)[/b] "Back Off" - turn the spanner towards the back of the bike and the pedal comes off
Changing into the largest chainring as well makes it even easier to put the wheel back on.Always change into smallest sprocket at the back before you remove wheel to fix a puncture.
[i]When stuck and doing some trail side repairs, simply turn your bike upside down and it will balance on the bars/saddle. [/i]
do not attempt this if you are easily confused.
[img]  [/img]
When on rides, always carry a bowl of water to aid finding and fixing punctures...
The hollowed out skin of a freshly baked jacket potato makes an ideal testicle warmer for chilly Spring mornings. Thanks STW from 3 years ago 😆
For those riding the SDW
If you're going up that's good
If you're going down that's probably ok as long as you can see another up just ahead.
If it's flat you're lost.
Drac - Moderator
INVITED by vegetarians for dinner? As you’d no doubt be made aware of their special dietary requirements, tell them about yours – ask for a nice steak
That is quality Drac! Best tip so far for me!
INVITED by vegetarians for dinner? As you’d no doubt be made aware of their special dietary requirements, tell them about yours – ask for a nice steak
Top Tip - troll as a moderator, then you can't get banned!
Zip tie your cassette to the spokes when your freehub goes free in all directions 100 miles from home.
A piece of cardboard or a large puncture patch will bodge a slit in your tyre well enough to stop the inner tube poking through.
The QR tip for bottom bracket removal also works well for removing a cassette.
Car gearbox oil appears to be the same as Fox Float fluid and is a fraction of the price.
Snapped off the gear cable inside the shifter? It happens on road stis. Use a zip tie to tension the cable at the derailleur end (tie it onto the seatstay) so it will hold the chain on one of the middle cogs. You then have a serviceable 2 or 3 speed bike to get you home.
For all those with tubless problems - use an inner tube 🙂
boblo - Member
When on rides, always carry a bowl of water to aid finding and fixing punctures...
Brilliant. 😀
For directional tyres and to avoid putting them on the wrong way round, most rotors have a rotation arrow on them , well I know Hopes do anyway.. works for me.
Put zip ties, spare chain links etc in your seat post, secure with a cork covered in duck tape. Obviously only works if you don't have a dropper post.
Lummox - Member
A bic Biro lid is perfect for precision placement of ball bearings back into cup and cone hubs. Just roll them down the little chute on the inside of the pocket clip.
THAT is genius.
don't lacerate your thumb removing your DT freehub (by pulling on the cassette) and then dowse your hands in dot4 bleeding brakes.
lummox brilliant!
ezzy does the stuff not rattle? My bikes have enough elusive rattles and squeaks without me adding more. But it does give you ideas, what else could I store in my seatpost? A few sausages for a mid ride bbq? rolled up twister mat, we all get bored waiting at the top of climbs on group rides.
One for D0NK
AVOID getting bored waiting at the top of climbs on group rides by riding uphill slowly.
There, saved you all the hassle of packing that twister mat.
I did try hitting the top, riding back down then riding alongside mates giving encouragement, didn't go well.
