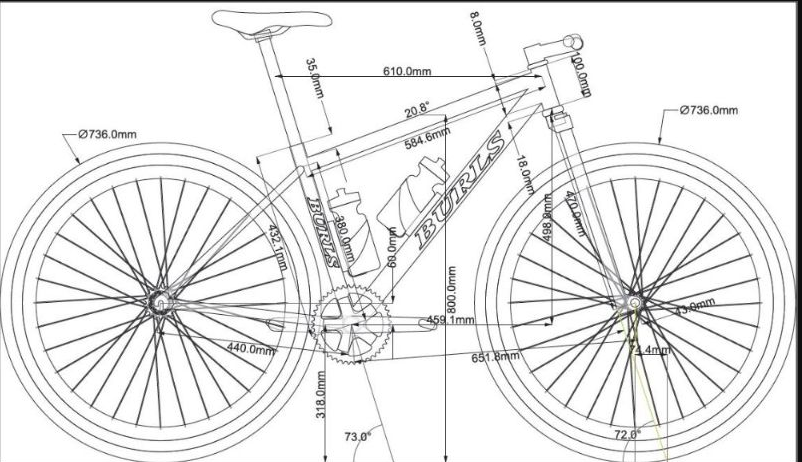
Hiya, suffering a bit of post Covid tiredness so have been reading up on bike/frame geometry as I've never really understood it. However, still a bit confused. So using this as an example (it matches the geo of my bike), be brill if someone had the energy to explain
- the key figures
- what that translates to in terms of rideability
- and then what riding this frame is designed for
Really for academic purposes!
Many thanks
That’s odd: the diagram shows reach and stack measured to the bottom of the head tube… they’re normally taken at the top of it, no?
A couple of links I have bookmarked:
https://www.bikeradar.com/mtb/gear/article/the-ultimate-guide-to-bike-geometry-and-handling-52778/
http://www.cyclingabout.com/understanding-bicycle-frame-geometry/
There are many parameters, all of them important and everything is inter-dependent so there's no way of briefly summarising.
A Slacker head angle, longer between wheels and lower bottom bracket = more stable, needs more 'effort' to turn.
A steeper head angke, shorter between wheels and higher bottom bracket = less stable, feels 'flightier'
lower bottom bracket = more stable
selective quote, but thats a bit of a myth. The lower the bottom bracket the less stable a bike is, as the more your the angle of your centre of gravity-contact patch is affected by the wheels moving sideways (over bumps whilst cornering etc). It feels faster, as you're lower to the ground, and its more agile (move the wheels less across the ground to move the angle of your COG-contact patch more)
try balancing a pencil on the end of your finger, then move your finger 1" to the side, and then try to keep the pencil balanced. Really hard right? now try the same with a meter long spirit level (or similar) - really easy.
lower = more stable is the case for things with multiple contact patches (cars) where the COG is between those things. its not the case for bikes.
The diagram doesn't show reach at all, unless I'm missing something?
Thanks, so reach is a key measurement?
I believe it's 615mm reach...
And historically for sizing, we looked at seat post, then moved to top tube then effective tt, and now reach? Is that fair? If so, what does the new perspective tell us that the previous ones didn't?
Cheers
what does the new perspective tell us that the previous ones didn’t?
It's all a compromise of multiple dimensions. Reach is the horizonal distance from the BB axle to the center of the head tube. This is relevant to the length of the bike when you are out of the saddle. Effective top tube (ETT) is relevant to your seated position.
Reach is normally measured at the top of the headtube, but it would be more useful to actually measure it to the bottom, IMO. This is because the effective reach should be measured to the height of the grips. The height of the grips will vary between different riders so the effective reach of the same frame will be different for riders who set their bars at different heights (the bike effectively becomes shorter if you raise the height of the grips). If two bikes with the same measured reach have different length headtubes, then their effective reach will be different.
Similar considerations apply to ETT - if you raise the height of the bars and saddle, the ETT will effectively become shorter. Moving the saddle back or forward will have the same effect as changing the seat tube angle so the actual geometry of your contact points on the bike will vary from the manufacturer's listed figures depending on how you set up the bike.
Your reach won’t be that long! More likely to be something starting with a ‘4’
A quick look at your geometry chart suggests it’s an old school ish xc hardtail with a short travel fork / steep headangle / slack seat tube.
The reach figure quoted looks like 469mm but that sounds quite modern / long for a bike with the rest of the geometry and short seat tube.
Edit, too slow
I think the reach on that diagram is the 459 mm number, but it looks to be measured to the bottom of the headtube, not the top, as Bez pointed out. With a 100 mm headtube, that would put the measured reach at about 410 mm, I think. That's pretty short for a bike these days, it would be a small sized frame, whereas the ETT of 610 mm would be a large frame from 15 years ago.
What bike have you got, @Aus?
I'm no expert on these things but that geometry looks a bit odd to me.
If I've got it right, this bike is a 17in frame with a 610mm ETT but a 73 degree SA and a 72 degree HA and 440mm chainstays.
For me the key figures are
ETT so I can ride seated comfortably.
Reach so I am not going over the bars
ST - so it's the right standover, it doesn't fee like a gate
SA - so I can climb
HA - so I can descend.
CS - for cornering, playfulness
WB - for stability
That's in really simple terms the main things I look at in geo charts. Other people will know a lot more than me.
Having said you can't really summarise it easily, ThePilot has done a pretty good job in terms of the practical effect of the key measurements. I would add BB height (/drop) to that - clearance/vs stability.
Another link for you: this site allows you to compare the geometry of different bikes in its database, and has a good diagram showing the key measurements (inc. reach to the top of the HT... I don't understand hols' assertion that measuring to the bottom of the HT makes more sense - yes, the height of the grips, and hence the headtube make a difference... which is a good argument for including them in the reach measurement no? Maybe I'm missing something):
https://geometrygeeks.bike/bike
That’s odd: the diagram shows reach and stack measured to the bottom of the head tube… they’re normally taken at the top of it, no?
I think those are jig setting figures - some jigs use the lower cup / crown position to set up.
– the key figures
The steep HTA (in relation t0 fork length + BB drop) jumps out
– what that translates to in terms of rideability and then what riding this frame is designed for
A geometry that would be better on fast, flat singletrack than anything steep and technical. Also looks to be specced for slim tyres - 736mm OD is approx 29 x 2.1
I missed the 459 measurement on the diagram, silly me 😐
selective quote, but thats a bit of a myth. The lower the bottom bracket the less stable a bike is, as the more your the angle of your centre of gravity-contact patch is affected by the wheels moving sideways (over bumps whilst cornering etc). It feels faster, as you’re lower to the ground, and its more agile (move the wheels less across the ground to move the angle of your COG-contact patch more)
This is an interesting one, and makes total sense from a cornering perspective. Lower bb bikes tend to corner better, so it feels intuitively reasonable.
But I wonder whether "stability" in this context relates more to rotation about the front axle when pointed downhill? So higher BB is more stable in one plane (when the bike leans side to side) but less stable in another (when the bike wants to rotate about the front axle).
Interesting to think about.
Anyway, I agree with @ThePilot -- it seems a good rule-of-thumb summary to be going on with.
And historically for sizing, we looked at seat post, then moved to top tube then effective tt, and now reach? Is that fair? If so, what does the new perspective tell us that the previous ones didn’t?
Cheers
sizing by seat post - idiotic. carried over from road bikes where geo was long established and you only needed the seatpost length to correspond to your height to tell you what size frame to buy.
even on 90's mtbs there is huge ability to adjust saddle height, and also the "ideal" seat height for off road was hotly debated in the pre dropper era.
toptube - made some sense and fairly easy to measure as long as the toptube was horizontal. mtbs were still very much road bike geo with off road tyres and components so the other measurements and angles stayed fairly constant between brands
effective top tube - as brands moved to non horizontal top tubes, ETT was a way to compare between them and keep the same size
TT/ETT is basically your size when seated. Reach is your size when stood up.
Obviously trail/xc bikes you want it to fit you for both aspects.
Reach is basically set by the BB and headtube, which are rigidly linked by the front triangle. Its quite difficult to adjust - so select this first
Getting your seated position right is a bit more challenging. Especially on modern full susses and some 29 hardtails, the seat tube is no longer a straight line down to the BB, so adjusting seat post insertion has extra unwanted effects.
This has caused issues on some bikes, especially for people either taller or shorter than average, or with non standard ape indexes.
It is at least easily adjustable to an extent by moving the saddle on the rails. A number of bikes have still got this wrong over the last decade though.
If I was picking a bike to replace my current one, I'd be looking at the following in order:
Reach - for stood up handling
ETT - for seated pedaling
Head angle - appropriate for intended application/level of gnarliness
I reckon I would enjoy any modern bike that fits the above 3 critera for my body. They could still be very different.
Things like BB height and chainstays will affect the ride feel, seems to be very personal preference and/or fashion
Everything else is basically going to be set by or affected by the above 5 things, so picking a number from 1 bike and trying to carry it to another is a minefield.
Look at the diagram posted above, see how many dimensions and angles are virtual or effective -measured to a theoretical point in space or a dashed line that comes from another measurement.
Thanks all, much appreciated and helpful in starting to understand stuff! And appreciate that a single number in isolation is a bit meaningless.
I've got a Niner MCR steel (medium) with broadly similar geo to the diagram, and a chance to buy a Torus ti frame that is based on the diagram.
Just interested in trying to work out what might be the real world difference, and how compares to a modern setup.
It looks far closer to gravel bike geometry than to any current MTB I know, even XC race bikes.
fashions come fashions go
but Geoff Apps has this to say
https://crosscountrycycle.wordpress.com/2013/11/14/stabilty/
https://crosscountrycycle.wordpress.com/2014/08/23/wheelbase/
https://crosscountrycycle.wordpress.com/2016/11/25/equal-and-opposite/
https://crosscountrycycle.wordpress.com/2016/12/02/repetition-makes-truth/
https://crosscountrycycle.wordpress.com/2015/09/17/castoration/
https://crosscountrycycle.wordpress.com/2013/11/02/design-focus/
thanks Paton, enjoyed those Youtube videos