Surely that’s just one of the pitfalls of selling on the ‘Bay?
Actually I think it is more of a pitfall of having an unrealistic selling price in your head. They are going for what I have seen others go for and what I would say it was worth, it just doesn't seem to be enough for the seller so they try again (usually with the same result)
Yep.
Argos used heat somehow to make the chainstays narrower by ovalising. It's not clear how hot they got it, which has implications... I'm still not particularly happy because whilst there is now more clearance there still isn't much and nowhere near what there was. There's also clearance for my 32T oval ring, but only barely, and again far less than there was. This means chainsuck could cause a jammed chain and hence ruin the stay again. I've given up with them, so I'm wondering what I can do myself.
After researching it a bit and getting great help from the framebuilder subforum of bikeforums.net I've learned that what makes 853 is a secret heat treatment process - it's otherwise the same as one of the other steels. Reynolds tell you not to shape the tubes yourself but they don't say why. And after long discussion we don't know how much heat was used and what effect this will have on the tube. It could end up harder (and therefore more prone to cracking during any crimp) or more ductile, meaning I could crimp away.
I'm tempted to crimp just a little (using a home-made jig, not just attacking it with pliers), give myself a couple more mm - this would probably satisfy me on the inside at least. But I don't think I can do much about the outside for chainring clearance.
I'm quite disappointed. 853 was clearly a terrible choice for a customer who was particular about clearance and needed shaped stays because there's very little you can do to work it. None of this was discussed at all when I went in. I wish I'd just had it welded up now, would have saved a lot of time, money and hassle.
Sounds like you really want the clearance so try crimping. Go steady and it shouldn't be a disaster....
If you cock up or it cracks later then I'll convert it to a plate yoke. I can get the plate laser cut foc, and can reuse / leave the majority of the stays in situ (just chop out the front bit). After this tale of disaster you can just cover postage.
Thanks mate, I really appreciate it but I would not let you do that without compensation 🙂
I think I will add a roll of FiberFix to my trail kit from now on 🙂
Sheared the chainstay on my Stooge last week.....also very gutted as it's my only bike and was out of warrantee but called Andy at Stooge and have come to a deal on a new MK4 which is lovely. Was going to get it repaired but couldn't resist a shiny new one. Still bloody waiting for 15mm wheel axle conversions off the internet though.
It's failed twice - would you every trust it again?
The new chainstays are different material / crimping and as far as I'm aware don't have any memory of what happened to the old ones.... Why should the rider trust them less than the chainstays on any other steel bike?
It’s failed twice – would you every trust it again?
The chainstays failed - but they were replaced, and the new chainstays are of a completely different construction. Why would they fail? Also the cause of the failure was chainsuck and a wrongly fitted chainset. The chainset is now correctly fitted.
Update:
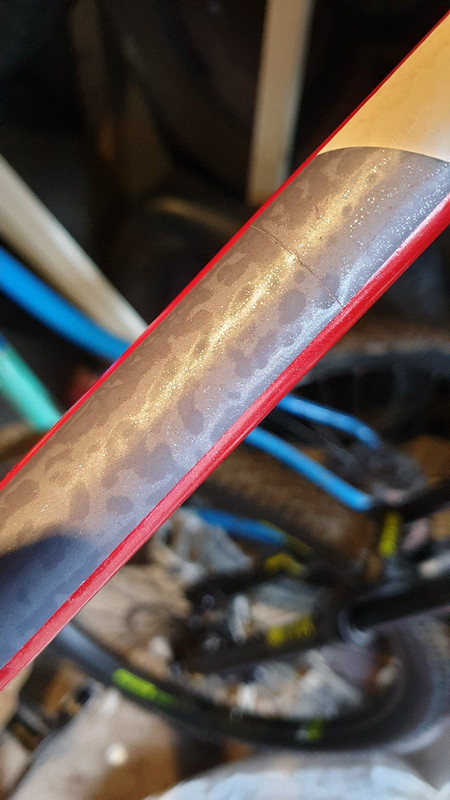
Build a jig to crimp or rather simply crush the chainstays. Those 853 stays are incredibly tough - I mangled up my jig and only moved the stays a couple of mm:
[img] 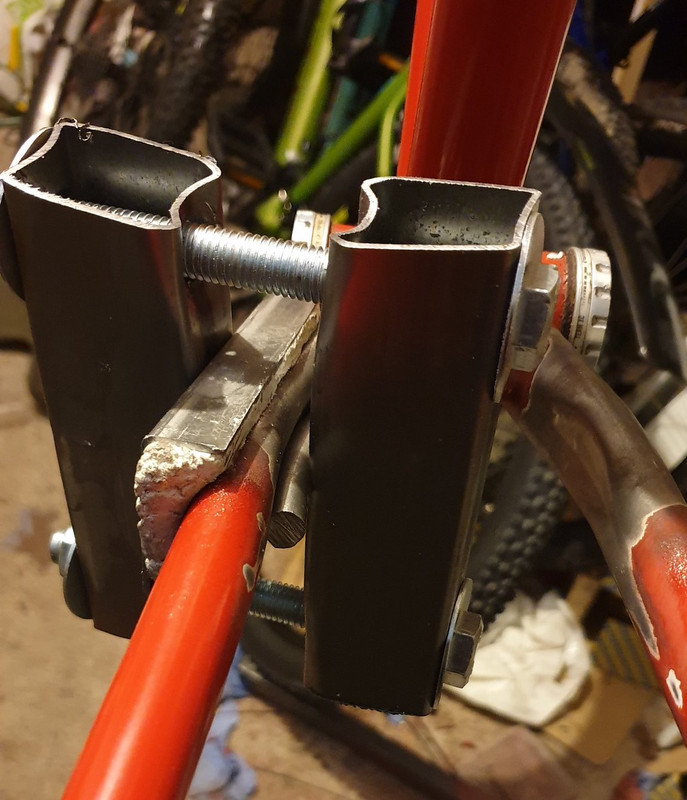 [/img]
The thing you can see on the outside of the chainstay is a U shaped section of metal that I filled with epoxy putty and moulded to the shape of the stay, to spread the load across as much area as possible. On the inside, the force was being applied through a shaped piece of steel rod so the pressure would be far higher on the inside this ensuring only the inside would deform. The rod was thinner than I'd have liked, so the crimp is more of a crease. Hope this isn't an issue.
[img] 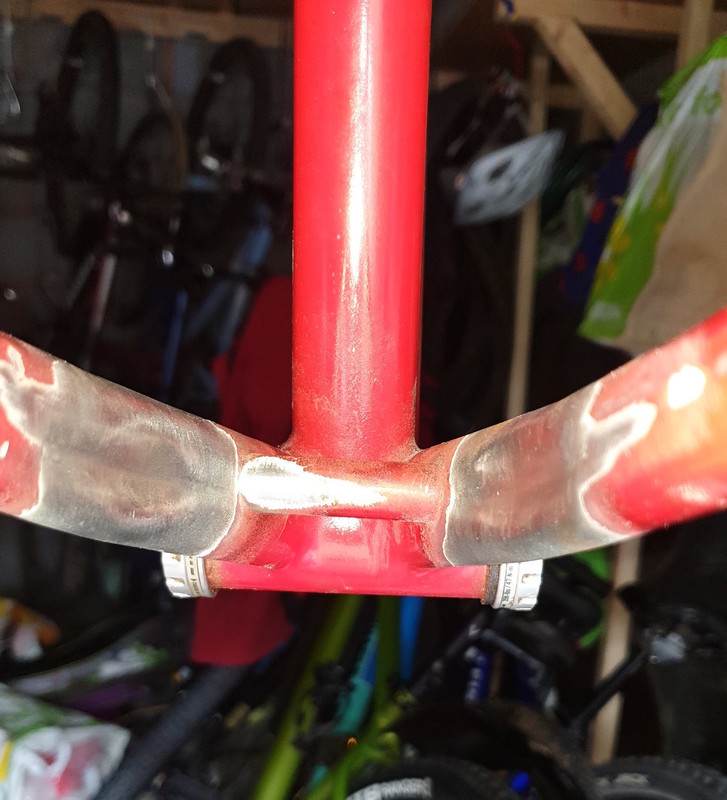 [/img]
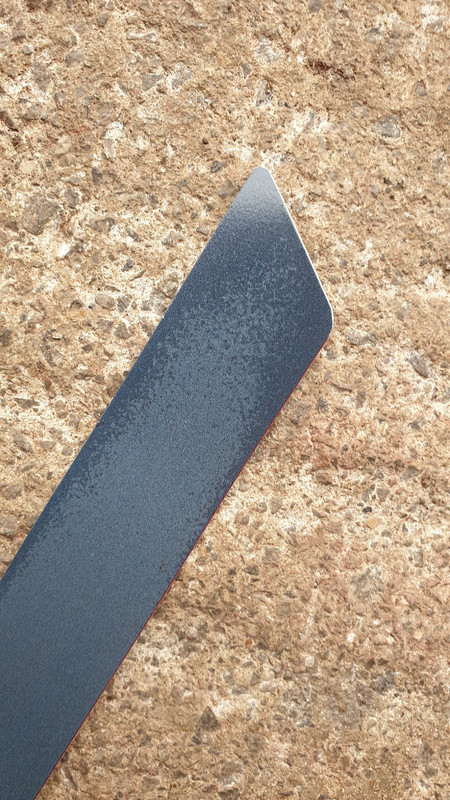
It seems to have worked - a couple of extra mm of clearance, and it seems comparable to the original if slightly less:

This is with the dropouts on the shortest position. I reckon I've gained myself a few more mm over previous, and it's quite usable in this position. I normally have the droupouts 2/3 of the way back and there's plenty of clearance there.
There's not a lot of chainring clearance now though. I think that a chain could get wedged in maybe, but given I'm going to use a single ring I'm not sure if it would simply ride up stop against the top chain i.e. remain in the same plane as the chainring, rather than get jammed. It's enough space for a 32T oval or 34T round. I might have gone for a 36T if I ever upgrade to 12sp but hey ho, that'll just have to do as I'm not farting about with it again.
A side effect of doing this is that I converted the frame to road spacing, I lost 5mm from the dropout spacing! So I just bent it back. What's interesting though is that in the past I'd noticed that it was pretty easy to flex the dropouts with the wheel not in the frame. Now though it's dead hard, it needed huge force to bend them back out to 135mm. I had to get my shoulder in there and push. So I reckon it's far stronger than it was before. Hopefully it won't be unpleasantly stiff to ride but then again I am using big tyres so I dunno if it'll make a difference.
Curious to know what rear tyre are you running? If I decide to keep my frame was hoping to run 2.4 Barzo or XR4.
It’s enough space for a 32T oval or 34T round.
That's interesting, Salsa only recommend a 32t round ring as maximum with the original chain stays.
I have Racing Ralphs 2.35 on it - tons of room on the original.
Salsa only recommend a 32t round ring as maximum with the original chain stays.
Hah, did not know this!
what was the paint like to remove?
They removed the paint, apparently with a grinder. I need to strip it back a bit more though and it's a total bastard to remove. I put it on thick, to be fair, but I'm impressed with its toughness.
I'm not sure i like it, i'm not sure i approve... but that's certainly interesting and informative work. Nice one.
You don't approve? Of which bit?
Of which bit?
DIYing bending chainstays 🙂
i’m not sure i approve…
@molgrips did you forget to ask for permission? 🤣
I love stuff like this. Sometimes it doesnt work out, sometimes it's more expensive but he had fun doing it.
@molgrips did you forget to ask for permission? 🤣
I love stuff like this. Sometimes it doesnt work out, sometimes it’s more expensive but he had fun doing it.
Not arguing that at all... I really hope it works and doesn't collapse and leave him stranded.
It is hardly going to collapse - at worst it will gradually crack over a very long period of time. At that point it can be repaired / modified.
"Professional" bending of the chainstays hasn't exactly worked out well for him so far......
Not arguing that at all… I really hope it works and doesn’t collapse and leave him stranded.
Given the amount of force I had to use to get that tiny dent, and how hard it was to spread the droupouts, I am not in the least bit worried. It's tough as boots now.
Having said that, I'm putting a sachet of fiberfix in my adventure pack just in case (or other failures - it weighs nowt and is great)
Must say, this has been a thoroughly interesting read, so thanks 🙂
Hope this all works out for you in the end 🙂
So after the crimping I had to clean up the burnt paint (this was hard - the cured spray.bike paint is tough as nails) and I gave it some more primer, then I had to buy another can of red cos I'd used the last one. I gave the rest of the frame another coat, and it came out much nicer than previously. A nice deep matte finish.


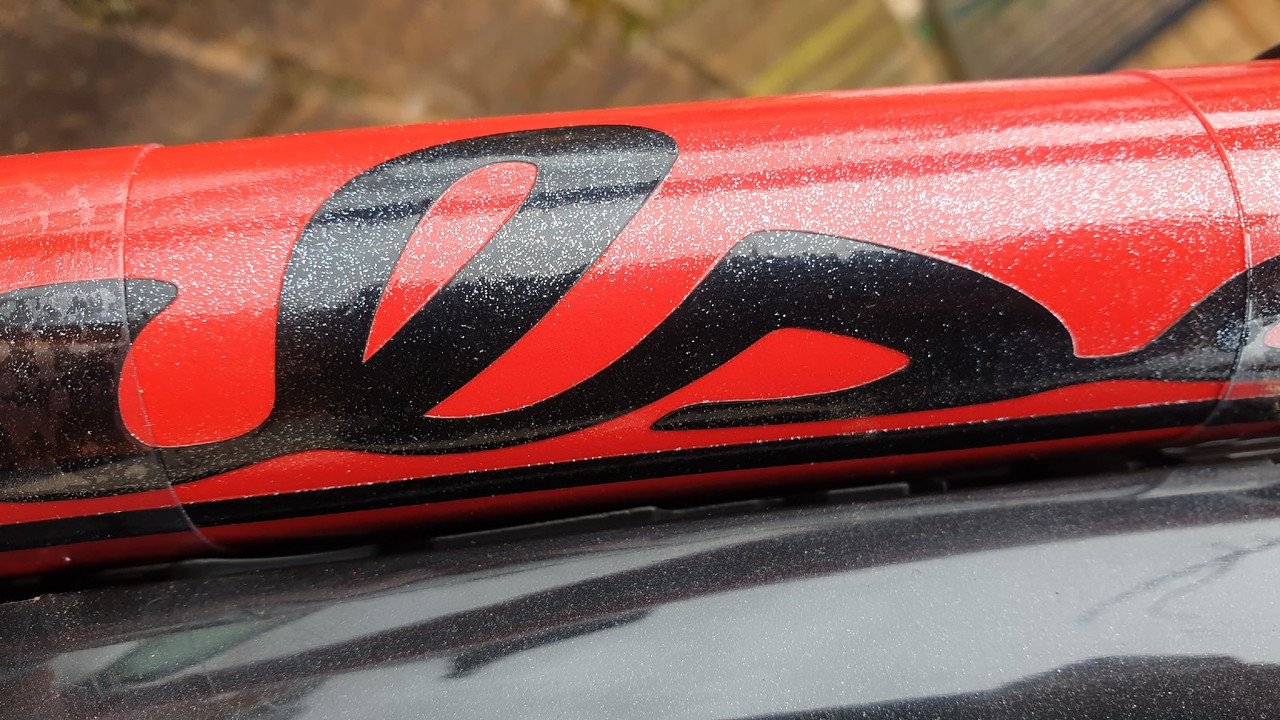
So now onto the stickers. I'd traced them before sending the frame to be fixed, and I scanned these in. After a few false starts trying to copy the lines by me and my mate, my wife had a go - she started with a font that was fairly similar, converted it to a shape in Krita and then modified it.
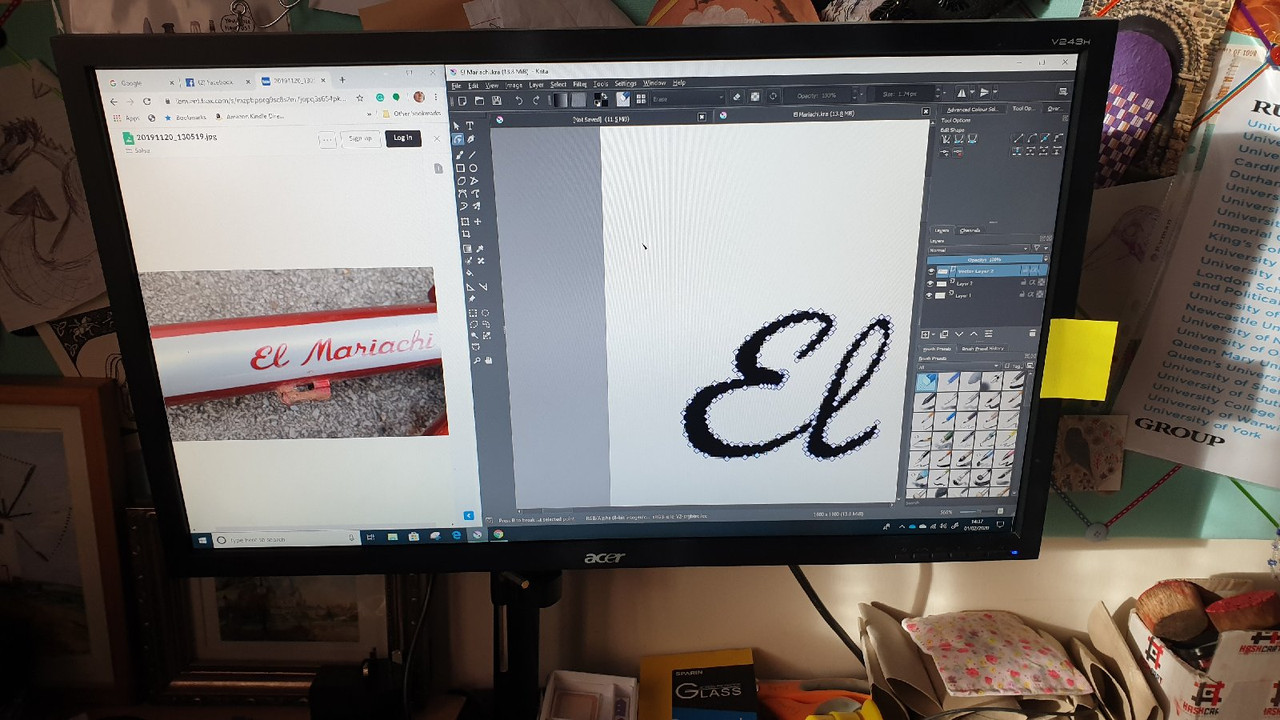
And did a brilliant job. Krita only saves as bitmaps though, but this shouldn't be a problem as I had a plan to print it myself on waterslide transfer paper. But then I realised that since part of the sticker is white, printing onto clear paper won't work! Fortunately you can get white vinyl sticker paper:
This took ages to sort out, but then there's a problem. I did a bit of testing and I found that the clearcoat soaked into the paper a bit and made it blotchy:
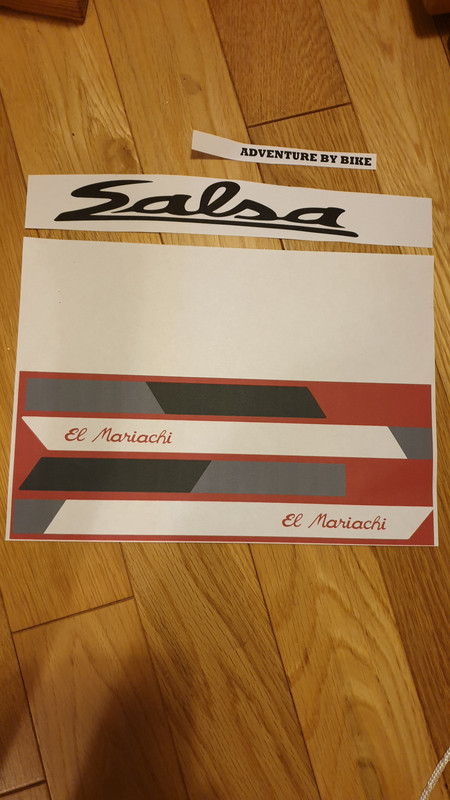
So, I gave up and rang around some local printers. Urban Monkey in Cardiff were the first ones to actually pick up their phone, so I went down there and they were brilliant. I had to vectorise my bitmap again, which went ok, but the guy opened up my images and smoothed them all out and tidied everything up - I've never seen anyone use software as fast as he did with Illustrator and something called Composer. I had the top tube stickers printed on white stuff which he laminated, and the black Salsa logo was cut out of black vinyl by his machine.
When I ordered new primer and red, I decided I wanted to try the sparkly topcoat. I thought it could add a bit of texture back to the frame, not the same as the original metallic paint but along those lines. However I realised that I'd made a bit of a logical blunder. You can't just keep on applying more sparkly clearcoat to thicken up the finish, cos you get more sparkles and it ends up looking like an enthusiastic 5 year old's birthday card. I should have used a light dusting of sparkles then applied a load of normal clearcoat. It's not the worst thing now, but it's a bit more fabulous than I wanted.
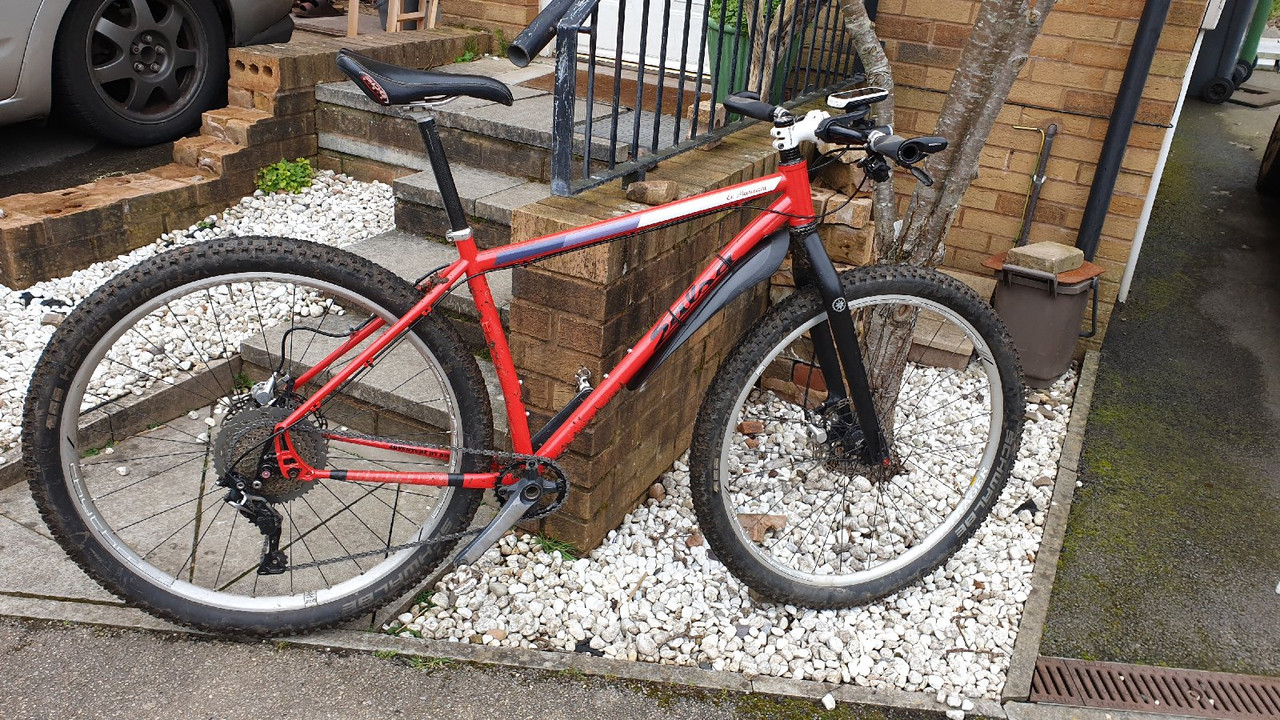

However as a practical finish it looks thick and tough as boots. I actually really like the red - much redder than before but rather striking with the white and black.
I've also given it a 1x upgrade with an oval ring which is quite nice too. It's only been ridden to the LBS so far but I'm quite positive. I'm hoping it'll be the ideal bike for the weather, I can get some miles done whilst in the shelter of the woods instead of being exposed out on the roads.
Awesome job you've done. Here's hoping no more cracking!
After the crimping, what's the clearance like? What size tyre did you squeeze in?
Thanks scotroutes.
Clearance is about 4mm or so with a 2.35 Racing Ralph on 25mm internal width rims. It's not as good as it was, there was tons of clearance, but the crimping gained a couple of mms to make it acceptable to me.
Looking very nice especially the fork, can’t quite stretch to carbon one yet and as this is my first rigid hardtail want to see if I like it before deciding on a carbon fork or a Reba
before deciding on a carbon fork or a Reba
Both?
I love the rigid fork. Ok so it's a pain on rough descents but the bike's not made to be a technical MTB, it's made to be a hybrid - 10 miles of road, then rough trails and singletrack over the mountain, then 10 miles back. Rigid forks are much better on the long climbs and on the road. I have a FS XC MTB with similar riding position, although with wider bars, and somehow it's just far less pleasant to ride on road or long climbs. The bar width is a big factor in this I think - narrow far better on everything except tech.
