- This topic has 372 replies, 66 voices, and was last updated 13 years ago by RustyMac.
-
Lumicycle Halogen to LED conversion with piccies and a step by step guide.
-
troutFree MemberPosted 14 years ago
Chucky those leds are still available if you want them I just had a mail from mikey saying he didnt want them
ConespannerFull MemberPosted 14 years agoChucky,
I've sent you a mail regards purchasing some bits for me
slowriderFree MemberPosted 14 years agothats a really helpful guide chucky, thanks for going to all that time and effort for the stw massive. personally im completely incompetent at anything like this so wouldnt dare butcher my lights but its great to have this kind of thread to balance out the negative ones (which i fully participate in, its all about balance, honest!)
poisonspiderFree MemberPosted 14 years agoThanks for the heads up Trout. The order's gone in so it may be too late.
Looking at the specs though, the viewing angle for the XPE is 115deg to 130deg, the XPG is 125deg, both are 2mm high etc, where does the change in beam angle come from?
troutFree MemberPosted 14 years agoThe change in beam angle come from the increased led die size
it doesnot look much but it does make a difference .it wont make your mods bad just a slightly wider beam for a given optic
Dr_UpGradeFree MemberPosted 14 years agoTrout,
If still free I'll take the LED and optics, how much were you expecting? I'll email you to discuss..Cheers,
Mark
fergusdFull MemberPosted 14 years agoI doubt you'll get 3 x XP-G's in a normal lumi can running at even 1 Amp, the heat output is quite significant aftet all the LED's are only 20 odd percent efficient so 70 odd percent of the energy does into heat, 3 x XP-G's at 1A consume 10Watts, so 7-8 Watts of heat into a small can . . . and there is your problem, however my intention is to do this in a lumi HID can which is another thing altogether, much more mass, much more surface area and handles 3 x XP-G at 1A no problems whatsoever . . . I don't expect problems even at 1.5A . . .
Also remember that, certainly from my POV, not everybody is using tiny wee 2.6Ah batteries . . . I have a number of 4Ah NiMh batteries so reduced runtime at full power reduces is to 2.5-3 hours rather than 4hours at full boot . . . 😉
The heat dissipation with these small cans is the killer . . . hence why the conversion here uses lower currents and hence produces lower amounts of heat . . . of course they could be brighter, but the heat will kill them . . .
I an planning a simple on/off 3 x XP-G at 1A in a lumi stock lumi case, but will be bonding some finned heatsink on the outside of the can to keep temps under control . . . I'll take the risk that it's the big rock or tree that will hurt me rather than a tiny wee lamp heatsink 😉 . . . a practical, small, 1000 lumen headlamp is what I am after to go with a big floody bar light . . . I don't like only one lamp on the bike, you can't see round corners 😉
When you look at the lumi cases designed for LED's (some pics of a LED 3 appeared at some point) they have quite a minimal case, certainly smaller in almost every way than a converted HID case . . . hence my choice to use HID cases . . .
Anyways . . . fun and games 😉
KaitsuFree MemberPosted 14 years agoI doubt you'll get 3 x XP-G's in a normal lumi can running at even 1 Amp, the heat output is quite significant aftet all the LED's are only 20 odd percent efficient so 70 odd percent of the energy does into heat, 3 x XP-G's at 1A consume 10Watts, so 7-8 Watts of heat into a small can …
I have used 3 x XR-E's in lumi can with 1 Amp. It works fine outside if you have bFlex temperature control turned on. While riding it keeps always high, if outside temp is below 10 degrees Celcius. If you stop then it turns lower.
Now we have here about 0 – +5 degrees Celsius outside. Even 7 x XP-G's with maxFlex @ 1 Amp runs high a couple of minutes. If set to 1A/L4 (= 0,64A), about 15W, it keeps going on singletrails. I think that is the power limit of Lumicycle can, about 66sqcm. I have a very tight press fit with the base plate and the can and temperature control is set to 60 degrees.
7 x XP-G Lumi upgradeSorry, it's slow to load.…but will be bonding some finned heatsink on the outside of the can to keep temps under control…
That would make it much more practical in higher outside temps. I would guesstimate surface area should be doubled? I would be keen to know how much square cm's Trout has with 7 x XP-G's.
troutFree MemberPosted 14 years agokaitsu
some very cool work there and excelent for getting alot into a little space
You have the advantage over us in the temperature stakes my 7 up case has a lot more surface and mass than a lumi can and stays on the hi power setting for 95% of the riding time at an ambient around 15 degreesand as they also get used in places like California and Dubai with ambients around 20/40 degrees I try to build in good cooling and use the Flex drivers to their full pontential. and a very rough calculation of 200 sq cm surface area
markydFull MemberPosted 14 years agoI posted the LUMI3 pics as I've just converted it to triple XPG.
squeekybrakesFree MemberPosted 14 years agoA bit confused as to ahich XRG to order as there doesn't seem to be an option for the triple mounted board. Is the bin R4 and then the board the MR11T?
squeekybrakesFree MemberPosted 14 years agoA bit confused as to which XPG to order as there doesn't seem to be an option for the triple mounted board. Is the bin R4 and then the board the MR11T?
squeekybrakesFree MemberPosted 14 years agoA bit of a numpty question…when ordering the XPG LEDs from cutter do I need to place 3 in the quantity box (5.95 dollars each) along with the MR11T board and the optic or does the board (22 dollars)include the LED's mounted on it?
VortexracingFull MemberPosted 14 years agosqueeky you ned to order these
http://www.cutter.com.au/proddetail.php?prod=cut781
Choose 3 way narrow for XPG
and
http://www.cutter.com.au/products.php?cat=Cree (plus) XPG
for some reason it won't put the plus sign in the link
choose R4 from the first pull down and cutter-XPGMR11T from the 2nd pull down.
Troutie i'll mail you tonight ref those LED's
just a small point troutie you mentioned an 8 deg increase when using a XRE optic does this angle expansion happen with the specific XPG optics?
squeekybrakesFree MemberPosted 14 years agoThanks! Now all ordered and I've already received the driver. I'll have to dig the soldering iron out…
nockmeisterFree MemberPosted 14 years agoI hope the XPG optic issue is sorted… Brilliant thread Chucky, nearly as much interest as the toutastic troutie thread!
PS just responded to ur email too 🙂troutFree MemberPosted 14 years agoChucky
the optic angles there are as yet no dedicated xpg optics just rebadged XPE optics and these are showing a much wider beam I mentioned it so you did not waste money on wide optics .
with the narrow optic you will still have a great light .The Xpg optics should start appearing soon
VortexracingFull MemberPosted 14 years agoThe Xpg optics should start appearing soon
are the ones on the site XRE's then?
they are listed as XPG specific.
woody2000Full MemberPosted 14 years agoChucky – did you get my email? Not sure they're leaving my outbox!!
Cheers
JunkyardFree MemberPosted 14 years agolet me know when you are going to order as well – you got my number e-mail etc
VortexracingFull MemberPosted 14 years agoyip got it woody.
tomorrow night John is when the order goes in.
What do you require?
JunkyardFree MemberPosted 14 years agowhatever I need to convert that lamp please
Was that a bit too technical for you?
e-mailed yaVortexracingFull MemberPosted 14 years agorighto Johnny. Speak to you tomorrow.
Update Gentlemen.
Just managed to sort the 200k resistor out. Dismantled the unit I made up and just basically soldered the resistor as per instructions that came with the driver.
It works a treat.
Drops the current draw down to 335ma.
I will have a go at fitting it properly over the weekend and post some more 'how to' piccies up.
As have mentioned earlier this mod should alleviate all of the concern over the heat. Just switch the lamp onto 1/2 setting when stationary for long periods.
'Simples'
 nockmeisterFree MemberPosted 14 years ago
Excellent! very worthwhile as there is no thermal cutout with the ebay drivers
fergusdFull MemberPosted 14 years agoAye . . . remember, however, that things (well the LED's) will still work at 150C . . . so while thermal shutdown is nice to have it may not be necessary . . .
A ever . . . there is no substitute for testing . . . or simulation if you can afford it 😉
Fd
troutFree MemberPosted 14 years agoNockmeister
The -thermal protection is controled be the best multitasking computer everwhilst riding along should be no issues but if you forget to dim and stand around too long on full they will get hotter and the as they get hotter the lumens drop and if the light turn blueish then you are near the killing zone and the light will be melting its way through your helmet in mounted there.
Those drivers from teapot are solid and work well
I never knew he was called archie 😳
VortexracingFull MemberPosted 14 years agoCheers Nige
he's not. Junkyard was being sarcy. BTW John is that your waterbottle cluttering up my garage?
here is Archie its our dog. who is half dog half kangaroo
Cheers for the pointer to teapot. those drivers are spot on.
I'll have those LED's BTW. I'll mail you back for payment detials etc.
ta again
Dave
smudgeFree MemberPosted 14 years agoWell done guys, This is what forums are all about.
You want to organize a singletrack 'homebrew light' nightride 8)
JunkyardFree MemberPosted 14 years agonot even that just sneezing/ cold — might just pull through.
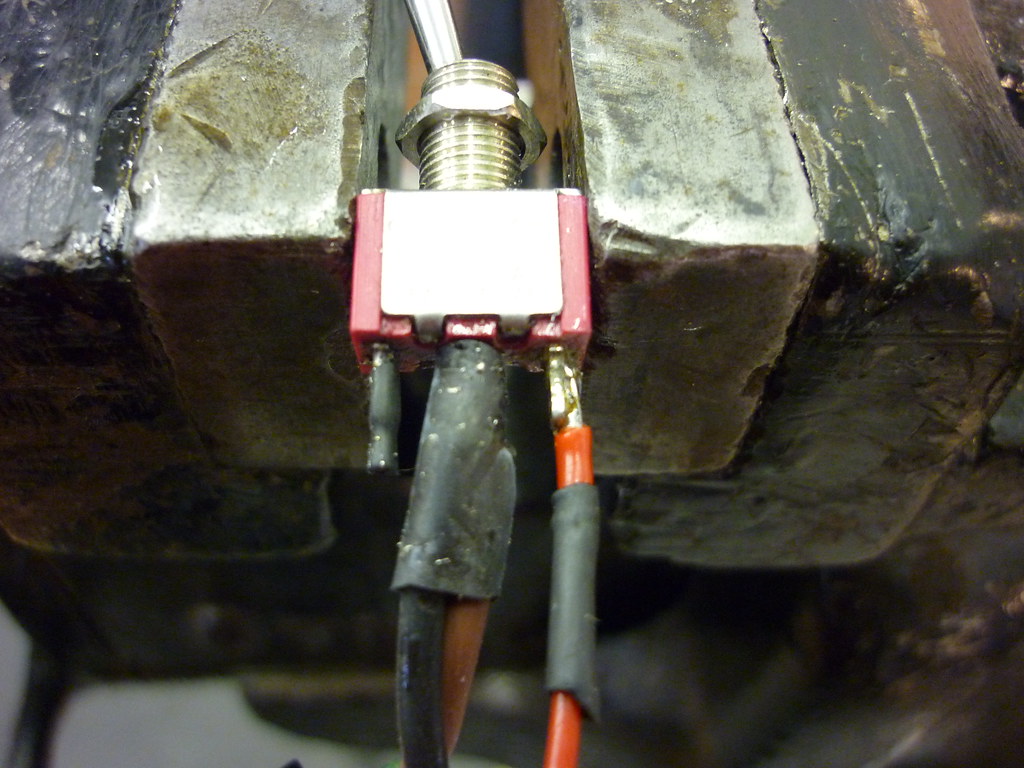
Best do riding lakes Sunday you free?VortexracingFull MemberPosted 14 years agoJust completed the resistor mod and it works a treat
Job 1
I soldered the very small resistor in line with two wire end like this
Job 2
Then you need a two postion switch (not sure if the std lumi is or not.)I got mine from Maplin
http://www.maplin.co.uk/Module.aspx?ModuleNo=2341
Type A
The instructions that come with the driver say you need to switch the resistor 'in' to get 1/2 power and switch 'out' to run the full 670ma.
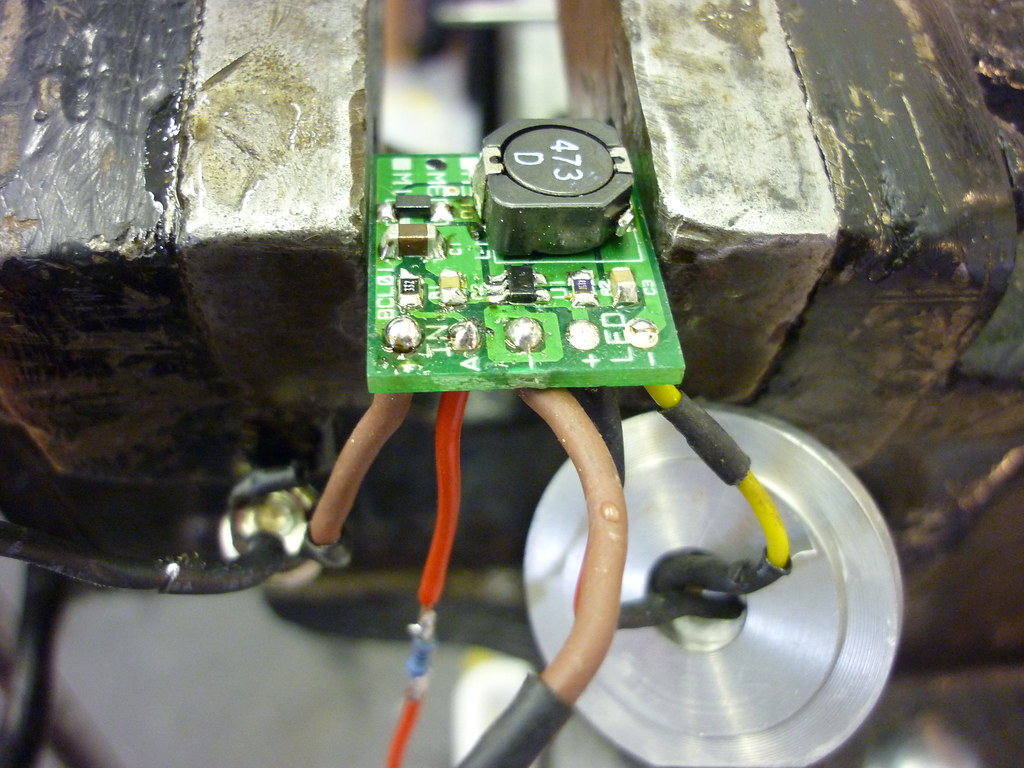
The solder connections when complete look like this
The connections from the input socket to the switch and from the switch to the board (the black and brown ones)provide a non interupted circuit when the resistor is switched 'out' Ie as though the resistor is not there.
Job3
then solder the resistor to 'A' on the board and .The best way to ensure the whole thing fits in is to have the longer length of the driver 'across' the lumi can. This will give about 2-3mm more room.
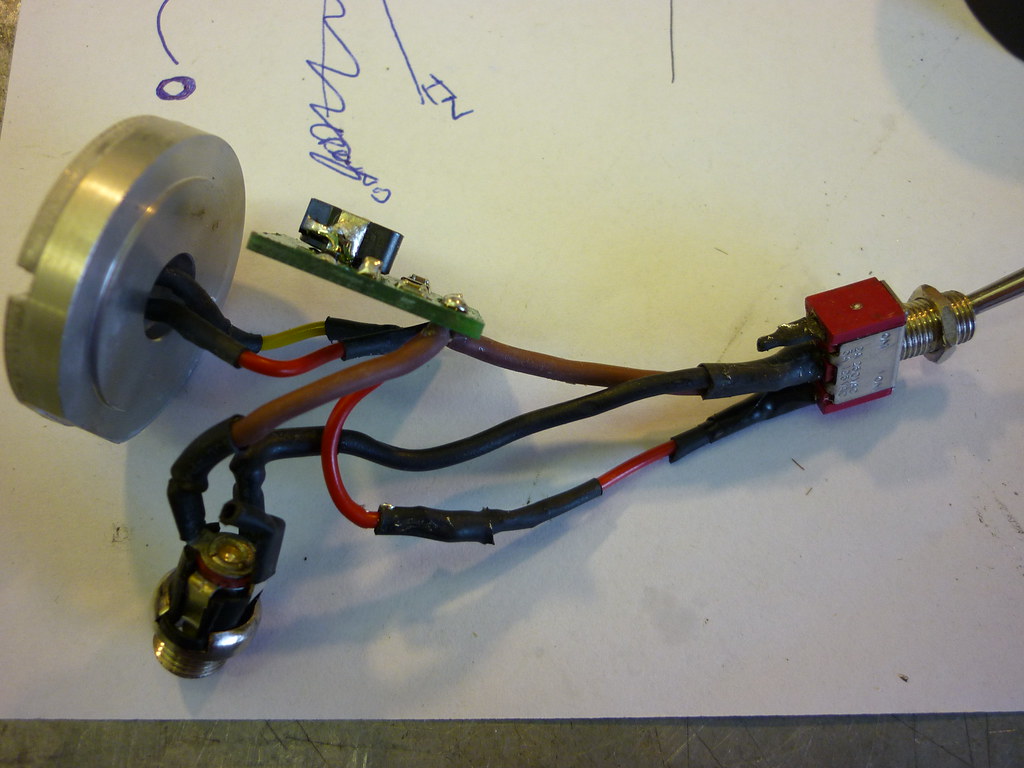
The finished set-up (before trial installation) looks like this
As with the original conversion at the front of this post I find it much better to try the whole thing first and get all the wires 'formed' and shaped the commit to using heattransfer paste and do the final assembly.
Don't forget to insulate EVERYTHING before powering up, this includes the resistor. This will stop anything shorting as it is quite a tight fit.
Hope this makes sense
cheers
Chuck


The topic ‘Lumicycle Halogen to LED conversion with piccies and a step by step guide.’ is closed to new replies.