I just bought a gopro hero2 and a chest mount.
I took them for a bit of a spin at the weekend, but I was having trouble getting the angle right.
With the camera mounted on the chest harness and pointed up as much as possible, it was still seeming too low (footage of bars and knees, but couldn't see forwards). If I mount it upside down on the chest mount, it looks too high (I didn't actually ride with it like that, it looked ridiculous).
I did try putting the extra swivel mount on between the chest harness and the camera, this let me point it at the right angle, but it was sticking out quite a lot, and seemed bulky.
Has anyone got a solution to this problem? How do you mount yours?
Dave
You need to go into settings and turn picture upside down, and then insert camera into mount backwards it gives you all the adjustment you'll ever need
By backwards, I presume you mean so the camera is dangling down from the chest plate...
when I did that, the door on the back of the housing fouled the black part of the mount (the bit sticking out of the chest plate) and it couldn't go any further down than about 45 degrees.
Should I be taking a file to it to allow more movement? feels a bit wrong on a brand new toy.
Dave
I had exactly this sort of problem on Saturday. You know the clippy thing that clips into the actual base plate on the chest mount? It's the thing that has the attachement for the camera on it? I had that on upside down and had exactly the same problem to you, i.e. either too high or too low.
Turn that the other way round and with the camera upside down you have all the movement you could ever want. You can swap the video orientation in the settings, or (like me) just do it in the editing software.
Give me a shout if what I've said isn't very clear and I'll put up a photo of it.
Like this:
[img]  [/img]
You shouldn't need to take a file to it, if you do, you're doing something wrong.
You actually run the camera/mount upside down, otherwise all you get is a great view of your TT, legs & feet.
Then when you process, use the software to flip it again.
The camera needs to be pointing ~45degrees upwards as here:
[img] 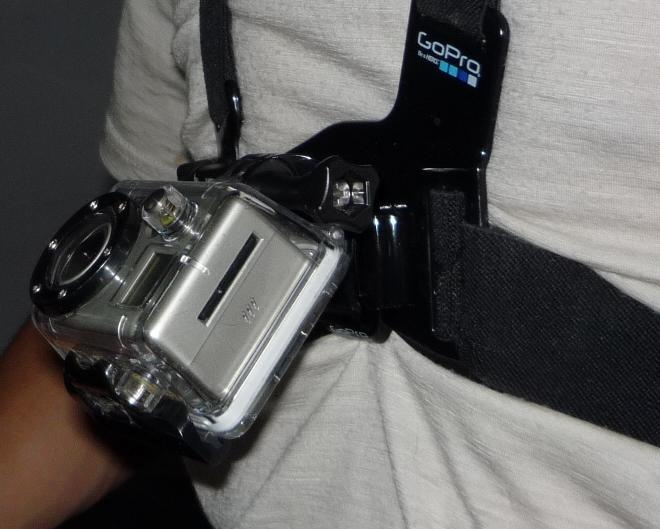 [/img]
I tried mounting it like that, but I couldn't get it to go as low as Milkie has, mine couldn't go lower than hob nob has his... I thought it looked like too severe an angle. Maybe it was right, I'll try filming like that.
I want the shot to include the bars and occasional top tube - I like the reference point and involvement they give you when watching, but I also want to be able to see what is coming. If the camera angle is too low, I find myself craning my neck to try and look up all the time 🙂
Cheers guys, I'll play more tonight.
Any other tips, while you're all here?
Dave
You know the clippy thing that clips into the actual base plate on the chest mount? It's the thing that has the attachement for the camera on it? I had that on upside down and had exactly the same problem to you, i.e. either too high or too low.
Just read this 5 times, and now I understand what you mean 🙂
The clippy thing on the base plate of my chest mount isn't removable, unlike the ones that go on the other mounts, it seems like I can't get it out; it doesn't have the pincers like the others do. Is there a knack to removing it?
Dave
It should be pointing up far more than you think it should , no file needed
On my chest mount there is a base plate and the "clippy thing" slides into that. It has a set of pincers to remove it. It's in the van just now but I can put up a picture later on.
The only mount I have which doesn't have a "clippy thing" is the one for mounting onto your head, like a head torch thing.
Other tip is to make sure you're filming in the widest angle resolution.
We ran ours with an angle similar to Hob Nob's up there. But it's always worth getting someone else to check it while riding along (preferably just out of the saddle as that's what you'll be doing when you want it to record the best).
Every now and then I have this problem, although i'm using the GP1 and I made my own chest mount. Trouble is you can't obviously see where you are aiming, some ride footage has been ruined by the fact the lack of horizon (it's quite horrible/disorientating to watch miles of track). I'm a photographer and so in my little tool box I've started to carry one of these
http://www.calumetphoto.co.uk/eng/product/calumet_twin_axis_90_level_with_shoe_mount/ck7014
Takes some of the guess work out.
Mine is set up like hob nob's and works good FWIW.
Don't sit down too much though.
I attach mine similar to Hob nob's photo and set the camera to upside down mode. Filming in 960p seems to get the best results chest mounted as it is the widest vertical angle of all the modes
I've found a couple of how-to videos online - it seems that I need to turn the clip upside down (like doug said), but I hadn't realised it could move - The clip looks different from the one I have with pincers, and I couldn't get it off when I tried before - there must be a knack to it; possibly some brute force required.
Dave
There is an extendable arm, if you run the camera with a normal clip it fouls the casing closure - there is an extending clip that came with mine that solves the problem.
Filming in 960p seems to get the best results chest mounted as it is the widest vertical angle of all the modes
960p or 720p gets the widest angle of 170° 😉
"Vertical Resolution" Milkie. The 170 degrees is width. And the 960 mode has a 4:3 aspect ratio, so you see more vertically.
I haven't tested this back-to-back, but I can see Mad Pierre's logic.
The problem being that 4:3 looks pretty old-fashioned now and you get a smaller image when viewed in YouTube as their player is now widescreen.
What Alex says. Peaks vids are good Alex.
One way around the 960 'old fashioned' look is to 'warm' the track with editing software. You do still lose out on frame rate and it looks a bit naff expanded to full screen.
Nobody ever seems to bother with 1080 for this kind of filming. Is that because of frame rate, file size, pain to edit and render, maybe all three?
billysugger - for me, it was mainly the Field of View that lead me to choose 720p. On the new Hero 2, you can choose thee field of view independently from the resolution, which is a nice option.
I use 1080 regulary. no probs with frame rate, file size etc but I do have a chunky PC built up especially to handle HD video editing and rendering.
It depends what your target is really - most internet HD is 720p but I like to make Blu Ray discs at 1080 too. Looks ace on the big telly then!
I have this exact same problem. It'd be great if anybody who's solved it could post close-up pics of how they get it pointing up more. This was the best I could get it but I'd still like it looking higher
@Steve77 : I refer you to Hob nobs picture above. You can point it right up at the sky if you want with it mounted that way!
This works for me. Allows me to keep the camera angle constant.
[img]  [/img]
Gary
www.pugsley-on-patrol.org.uk
Some tips and photos here:
http://www.pinkbike.com/news/gopro-mounts-part-1-2010.html
Worth noting, the GoPro comes with one pronged 'shoe' to click into the mounts. The chesty is supplied with another larger shoe, that has more stand off, allowing more tilt. Initially I was trying to use the smaller one and got confused until I realised the chesty one is larger and specific.
I now use the long shoe, mount the camera upside down and flip the video in the camera settings to save me doing extra work when editing.
The only problem is that you need to be aware of your torso position - I used it like this at the weekend for motocross and when seated, powering out of turns have mostly sky and when crouched, hammering braking bumps into a corner have mostly bar pad and fuel tank!
The only tip I can give is try to find the average - point it up more than you think - around 30-45 degrees off your chest.
@gravity-slave - how do you remove the chesty specific shoe from the mount? It doesn't have the same pincers as the smaller shoe.
Dave
I agree, hob-nobs got it right, works fine for me on the main settings. (I used to use r3 but now use r5 all the time).
I downloaded the patch to allow me to use the upside down (UPd)setting too. It's simple to rotate the footage in most editors but it's one less thing to do.
how do you remove the chesty specific shoe from the mount? It doesn't have the same pincers as the smaller shoe.
Chest mount has same insert / remove as all the other mounts. Well mine does anyway!
Chest mount has same insert / remove as all the other mounts. Well mine does anyway!
Mine doesn't have the pincers that you pinch together to remove it... seems an altogether much sturdier mount, but it is definitely a separate moulding, so it must be removable!
The mount with my chesty is just the same base as the standard mount, with the same sprung clips. Only difference is it's taller, giving clearance to allow the camera to sit flat.
At the risk of going off topic a little here - the two clips above are much better quality than i'm getting on my GP HD. I've not used it too much and am still trying to find the right compression settings etc to allow me to upload to YouTube / Vimeo with as little quality loss as possible.
The GP records in mp4 and i'm editing with the latest edition of Sony Vegas on a new i3 processor laptop with 3gb memory.
Can someone please give me an idiots guide on what settings to use, initial projects settings, final render settings. Any help would be appreciated.
alfabus - Member
Mine doesn't have the pincers that you pinch together to remove it
Yes it does, I was being an idiot 🙂
Dave
