Everyone loves packing lists. So I’d like to kick off what I hope will become a regular feature here on Grit.cx: Bikepacking Setups. It’s endlessly fascinating to examine what fellow bikepackers choose to carry and how they carry it, given the capacity constraints of a minimalist bag setup and the wide range of possible gear demands for an out-there adventure.
So here’s how I carry my stuff. I’m showing not just the whole pile of goods laid out, but which goods go in each bag, because sometimes it can be difficult to comprehend how a whole pile of goods will get stuffed into relatively small bags. At least it is difficult for me.
Of course, my setup is constantly changing, so this is just a snapshot of one particular setup at one moment in time. I call it “heavy ultralight”: I try not to carry extraneous things and pare down bulk where I can, but I enjoy a certain amount of comfort. Suffering is for on the bike, not in camp. I’m not trying to set FKTs or win races, just have a good time and see some cool stuff.
Framebag
Mine is a custom one from Eric at Revelate Designs. Revelate no longer makes custom framebags, so this one is precious. It is made to fit my main ride, a 2005 Mountain Cycle Stumptown…which is fitting, since both Revelate and Mountain Cycle were sued by a certain big US brand for copyright infringement, for having product or company names too close to ones owned by this brand. The names weren’t really close, or were too common to be infringe-able. But that’s another story. My bag is kind of an early version of a Ripio. Since my main ride is fairly standard in terms of geometry, this custom bag has, so far, been able to fit five or six other bikes as well.

I try to pack the heavier stuff, like the stove and spare tube, in the bottom, though my heavy toolkit only fits in the top portion.
1. Tool and parts kit (more on that below)
2. Waterproof bag for electronics
3. Pump with duct tape wrapped around the handle
4. First Aid Kit—bandages, needle, gauze, ibuprofen, etc. I added butterfly bandages and packets of medical iodine, which is a great combo for situations that probably would deserve stitches if you went to the doctor.
5. Headlamp that doubles as a handlebar light—being able to swap the light from one fitting to the other is handy, but ultimately, I’d want a dynamo light, because they’re cool.
6. Packets of tea and electrolyte mix—drinking plain water gets boring. On some special trips a flask of whiskey makes the cut as well.
7, 8. Stove wrapped in a mini-towel used for cleanup
9. Four-ounce canister of propane/butane fuel
10. Insulated pot with lid—holds the stove and fuel, and is just big enough for my favorite meal of rice noodles with sardines and dried kale.
11. Folding spork—it’s rather flimsy and I prefer a full-size one, titanium of course.
12. Spare tube #2
13. Small bottle of Dr. Bronner’s “Magic” biodegradable soap—this is a good all-purpose cleaner. I’ve even used it to brush my teeth. Just don’t use more than a drop or two or you’ll be foaming at the mouth.
14. Tooth powder and toothbrush—I confess, the Dr. Bronner’s doesn’t taste that great. Tooth powder takes up way less space and is lighter than regular toothpaste. I often put a smaller amount in a smaller container, as this little bottle is enough for six months or so.
15. Small camp towel—one of those weird ones that feels a bit oily but manages to absorb a lot of water and still dry fast.
Toolkit
This is one area in which I have a hard time paring down to truly ultralight status. I tend to include a lot of spare bolts, which seem so small, but then my toolkit ends up being a heavy little chunk… Still, it’s nice to be prepared.
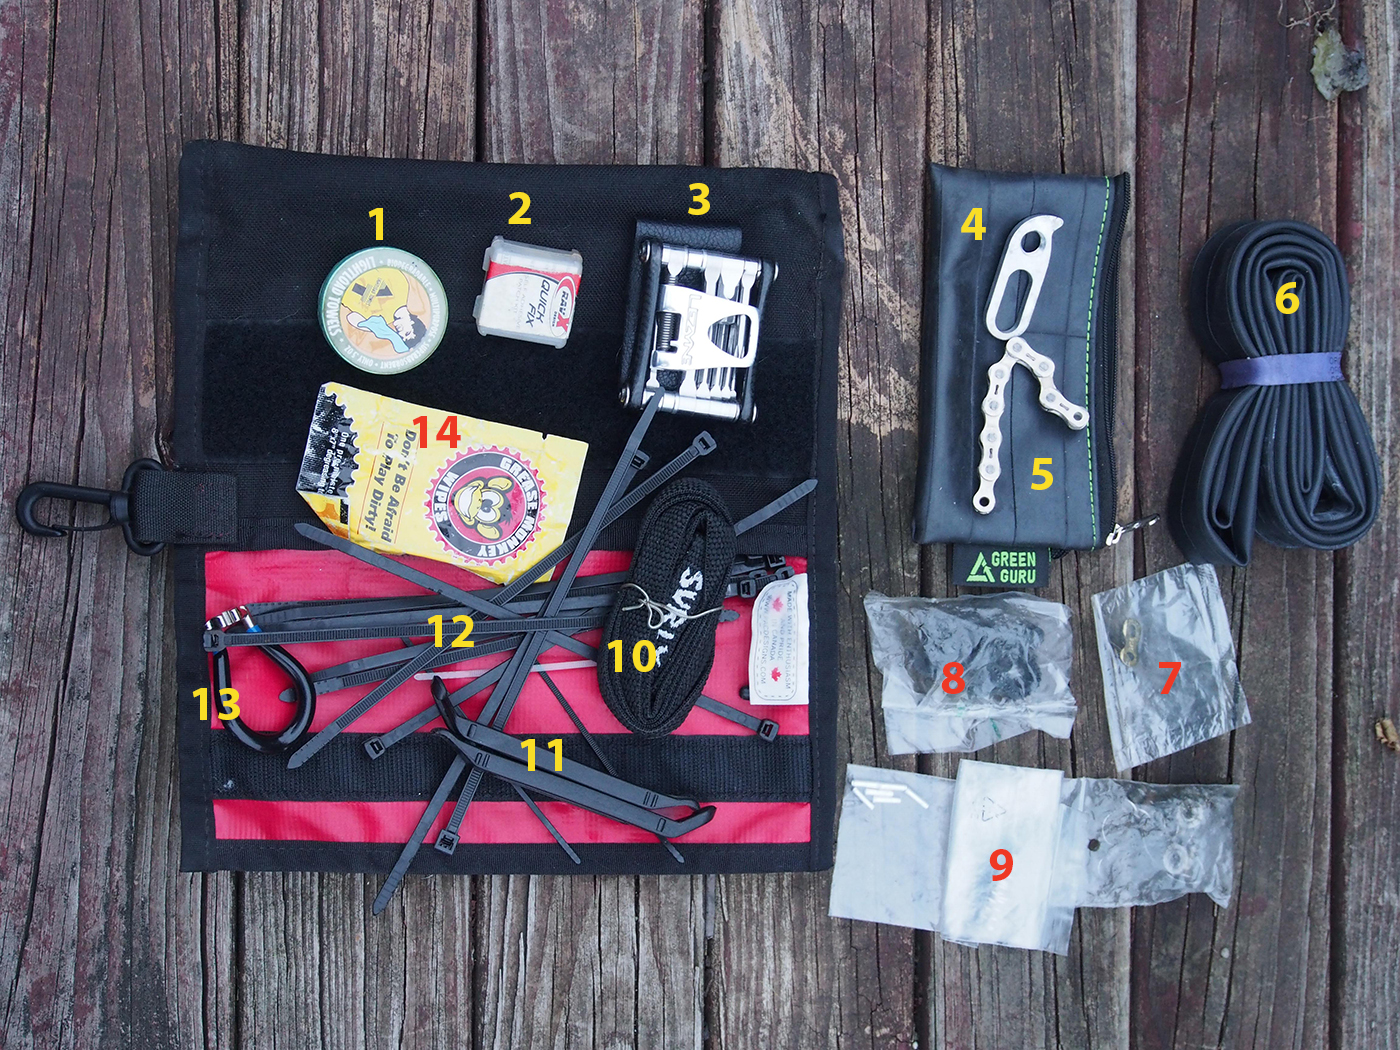
1. Absorbent rag shrink-wrapped into a small packet
2. Patch kit
3. Multi-tool with chain breaker
4. Universal derailleur hanger
5. Bit of spare chain (surely this could go…)
6. Spare tube #2
7. Chain quick-link (have to make sure to grab the right one for the drivetrain du jour)
8. Spare cleats with bolts
9. Various spare bolts
10. Surly Junk Straps—you never know when you’ll need to strap more stuff to your bike
11. Tire levers
12. Many, many zip ties
13. Spoke wrench
14. Degreaser wipes (also usually carry a pair of nitrile gloves, though I often forget to use them)
Seat Bag:
Pictured here is an early version of the Mr. Fusion seat bag/mini-rack combo by Porcelain Rocket, in sweet custom white cuben fiber fabric (reviewed for Grit.cx print issue #3). The latest version has a few improvements that look nice. I really like that the drybag is removable from the mini-rack—it’s very convenient for setting up camp. The mini-rack keeps the bag from swaying on chunky roads.
When I need to carry less, I use a Porcelain Rocket Charlene seat bag.
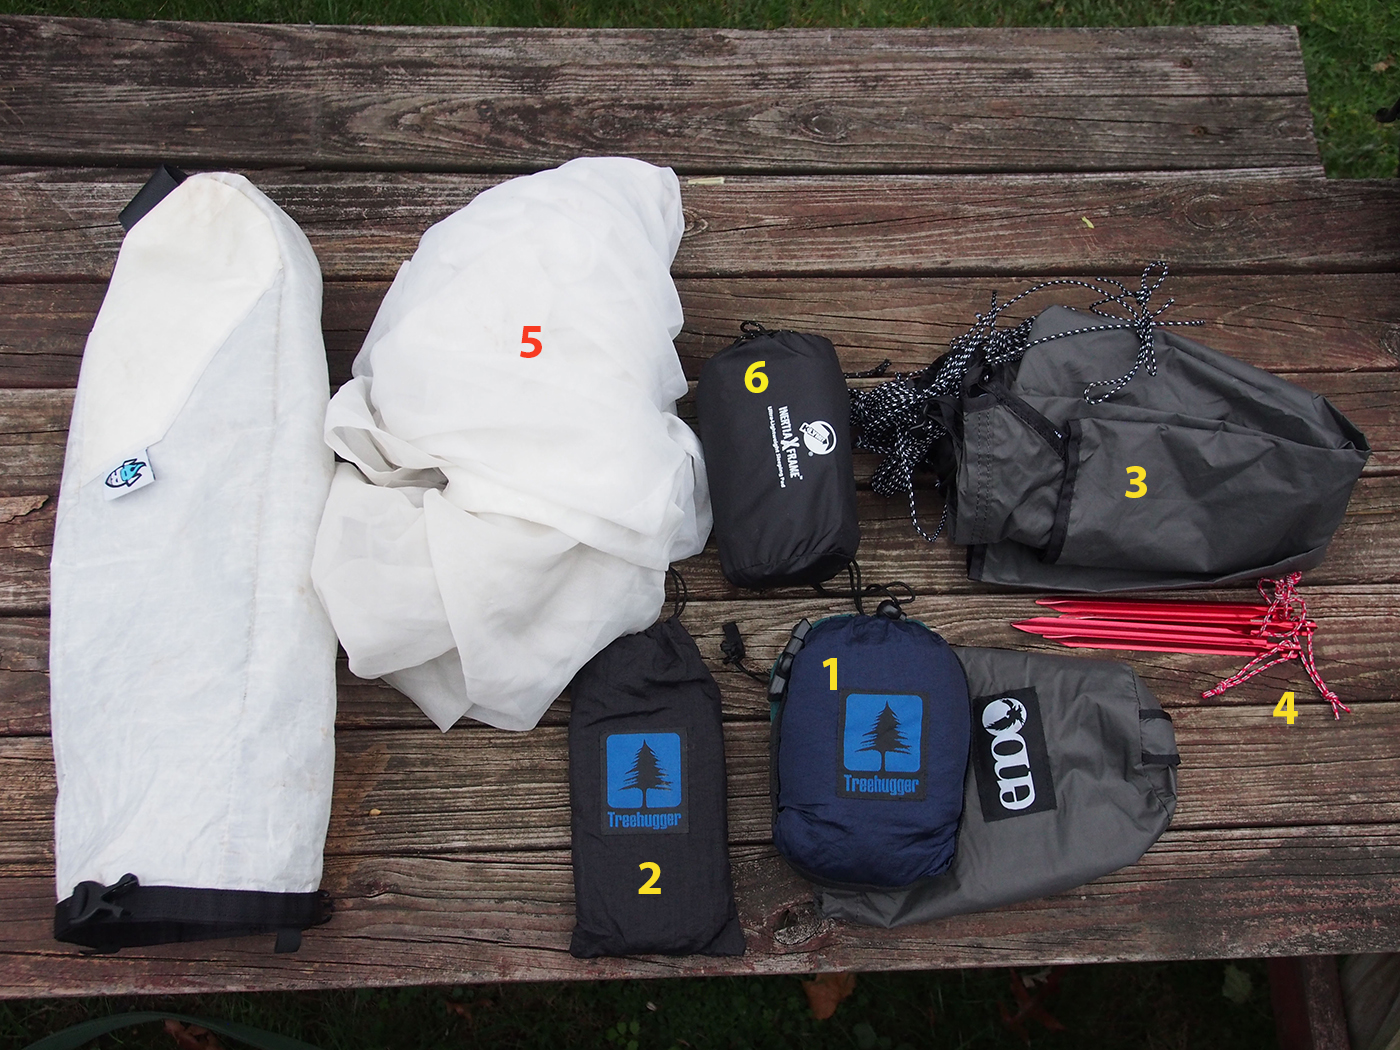
This is another area in which I stray from the ultralight path. I can’t stand to sleep in a bivvy sack, so I use a hammock setup. The (1) hammock and (2) straps don’t take up much room, but by the time you add in a substantial (3) tarp, (4) stakes, and (5) bugnet, it begins to take up as much space as a small tent. When it’s going to be dry, I use a much smaller tarp, which helps cut down on bulk. This is also where I carry my (tiny) sleep pad (6), necessary to prevent Cold Butt Syndrome caused by convective cooling in the hammock. (Read more about bikepacking with a hammock here.)
Handlebar bag:
Porcelain Rocket no longer makes this MCA handlebar harness, or the neat little accessory bag that goes on the outside…sorry. But similar systems can be had from Revelate, Oveja Negra, Blackburn, and probably others I’m forgetting. As with the seat system, being able to remove the bag without unstrapping all the straps is quite handy.
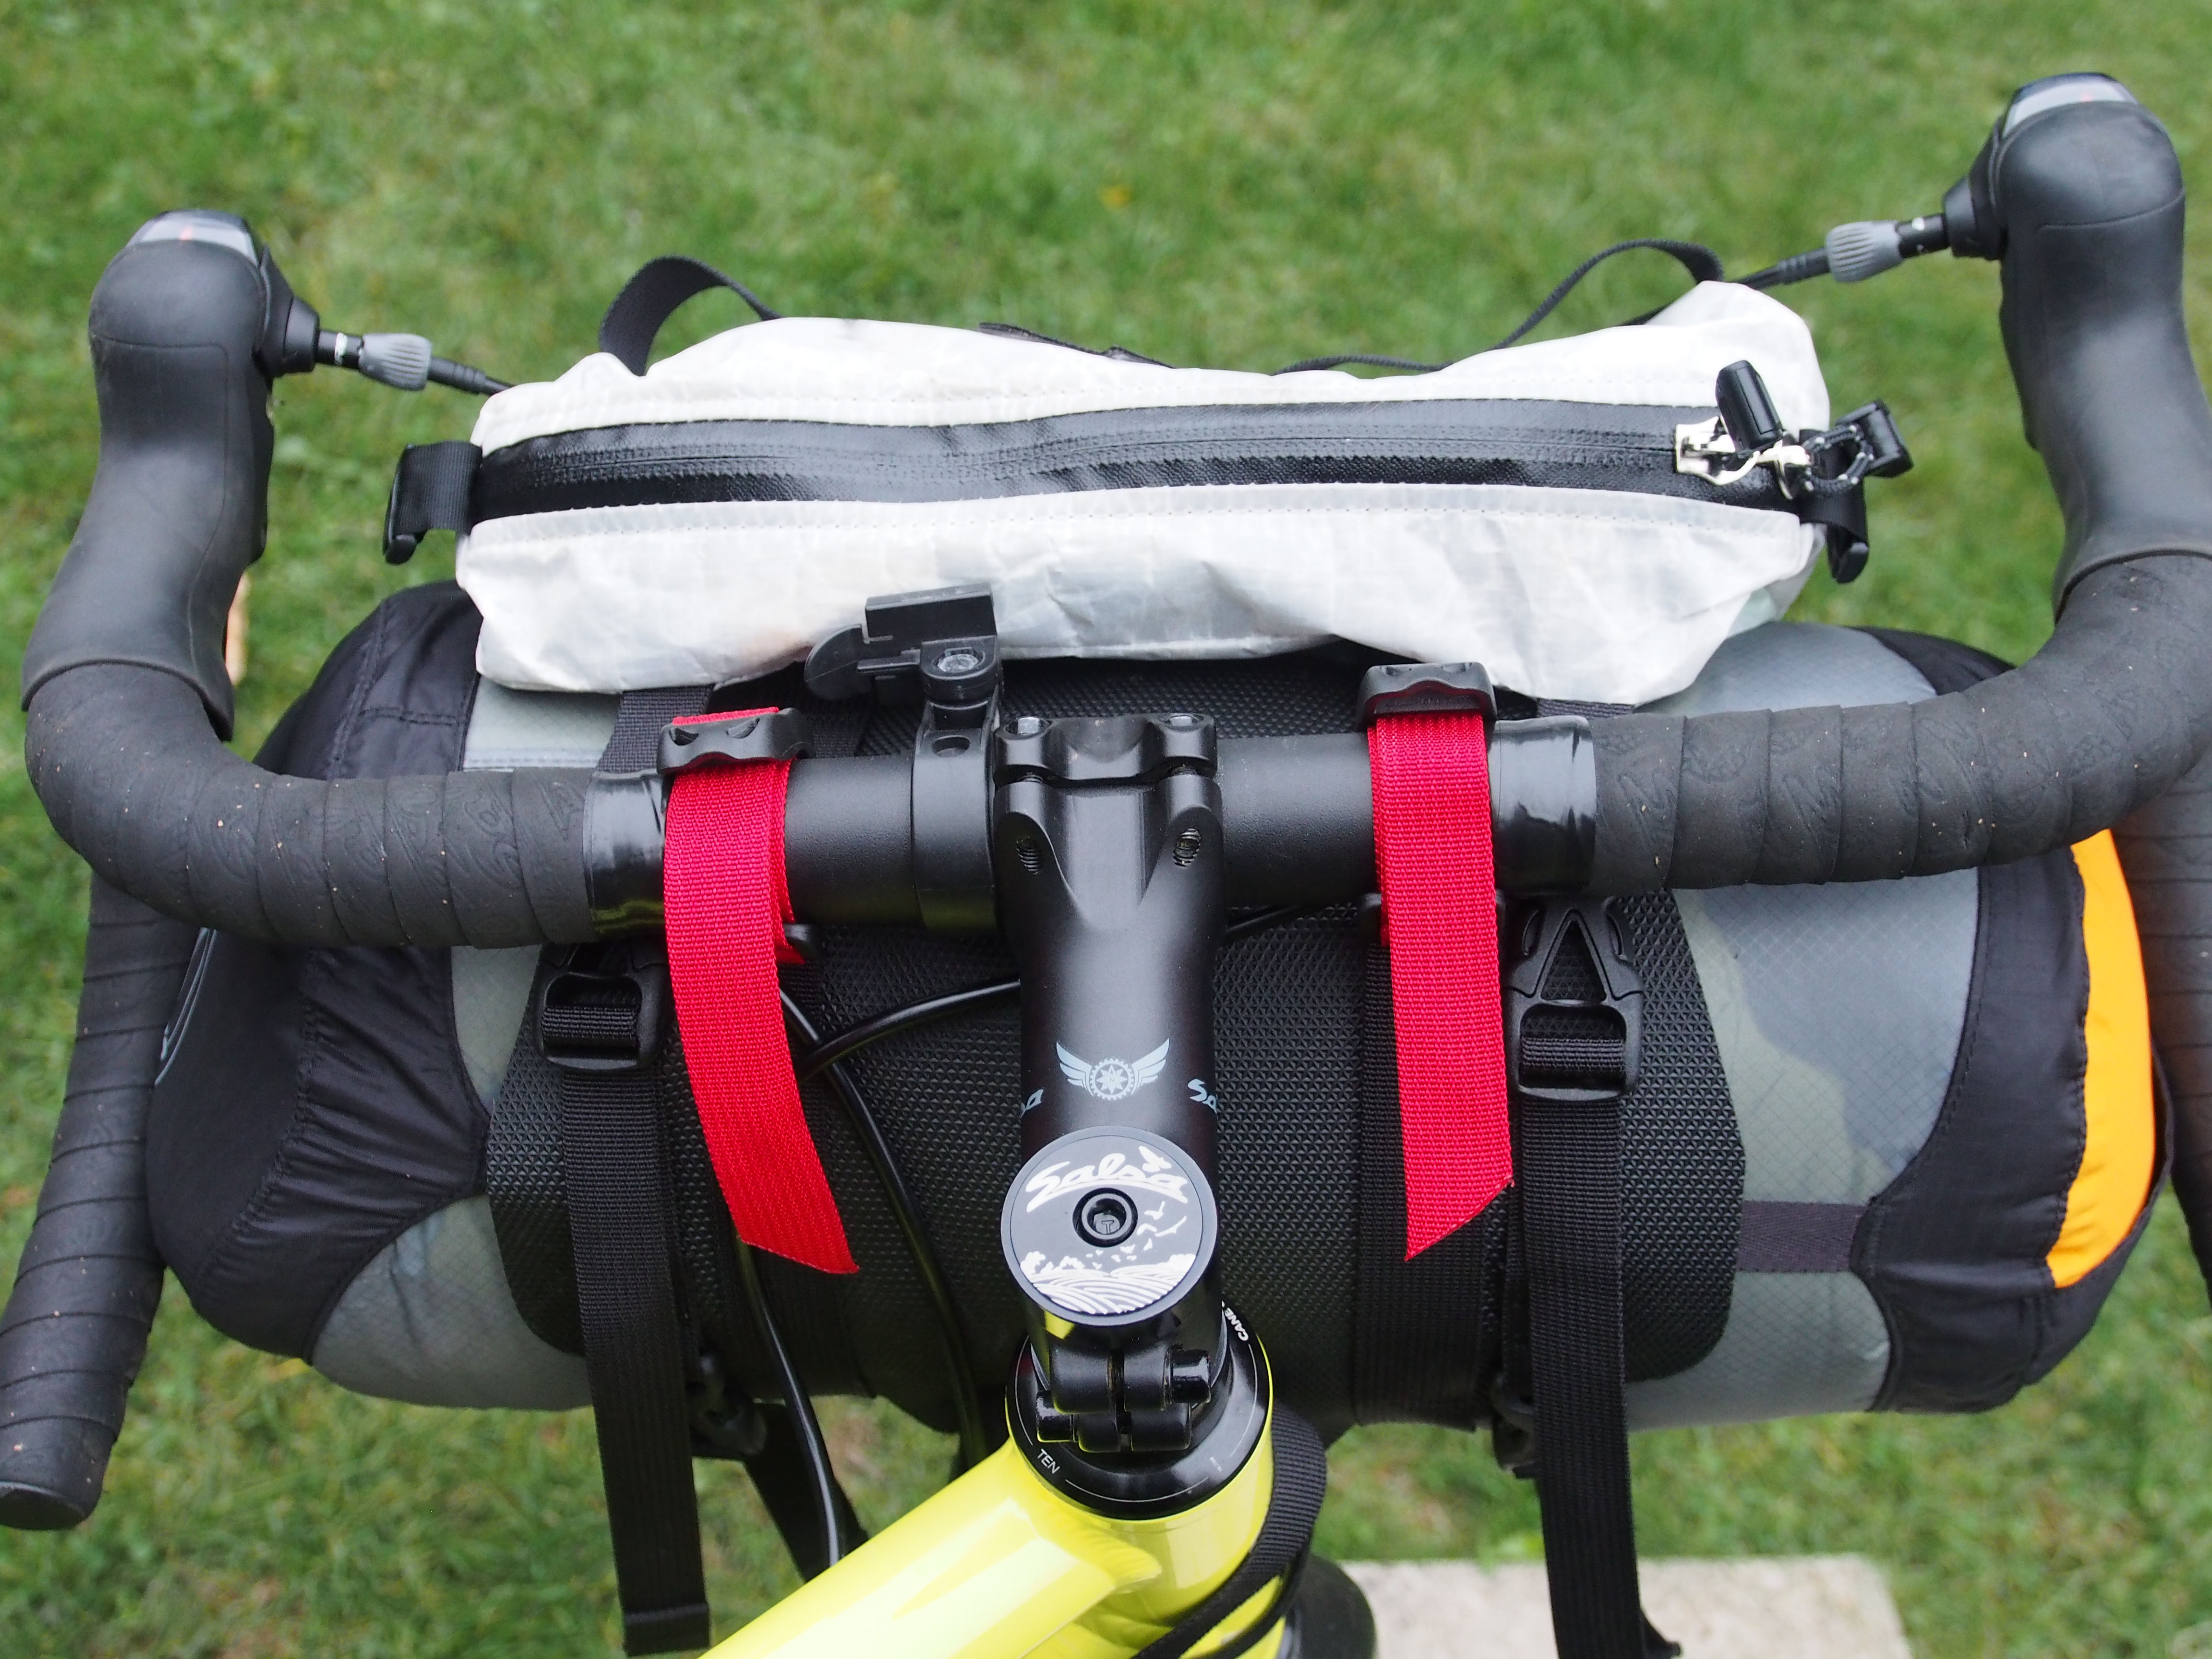
A Sea to Summit eVent compression drybag in 10L size goes inside the harness. It has held up to some abuse from chafing and gritty mud and is still waterproof, though I haven’t really tested it in an hours-long downpour. Yet.
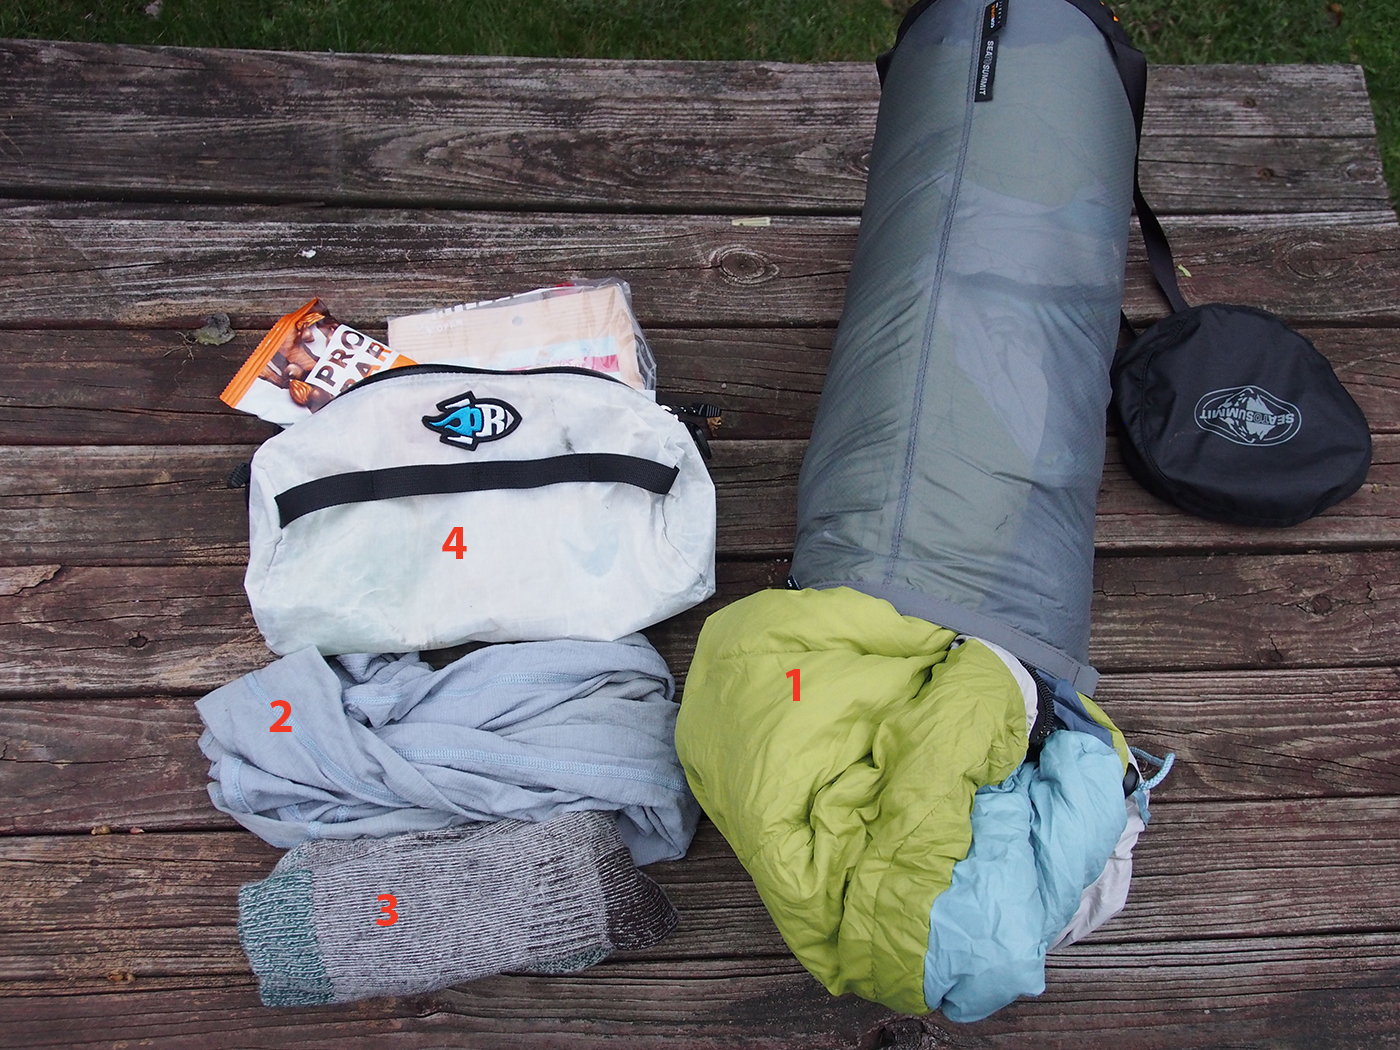
The handlebar is a great place to carry bulky but relatively lightweight stuff, such as (1) a sleeping bag. This is an old 25ºF (-4ºC) down bag…might be time to upgrade soon. Here also go (2) wool layers and (3) big socks to sleep in—I sleep cold. The external pouch (4) carries more food—often dehydrated dinners for camp—and a few odds and ends.
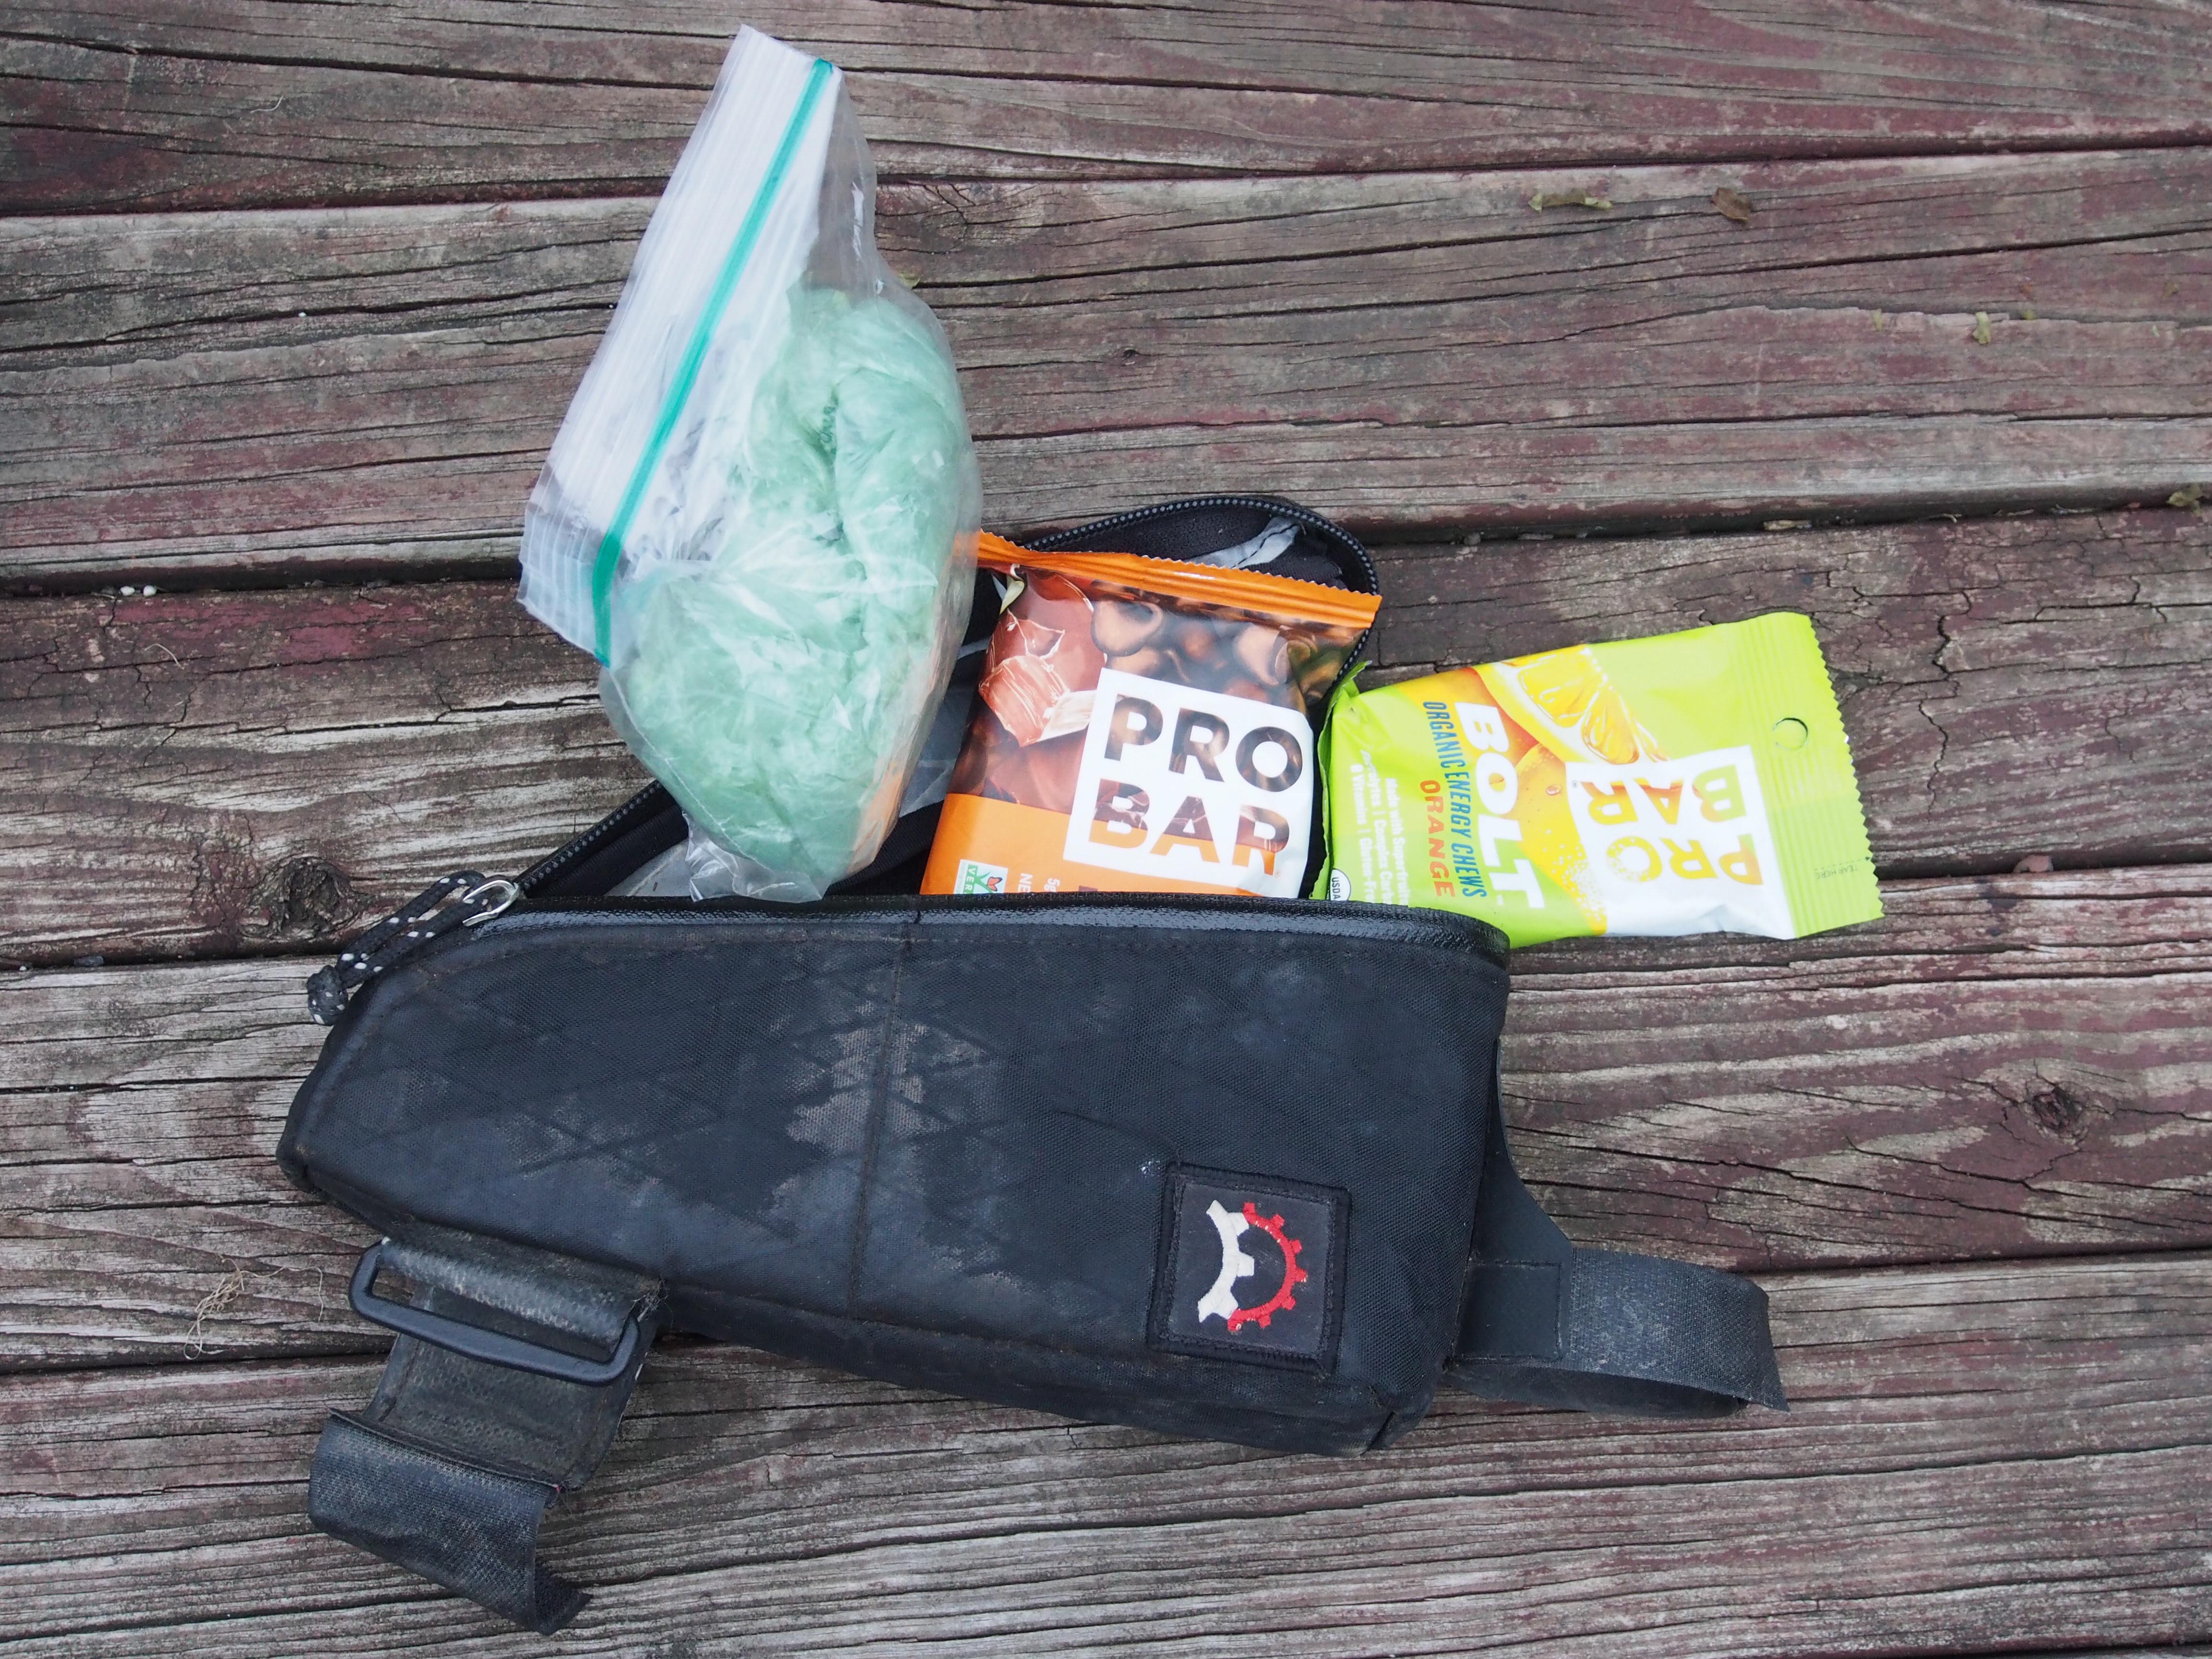
Gas Tank
My Revelate Gas Tank is my favorite spot for food, and sometimes often-needed items, like a map or phone. The yellow interior has been somewhat dimmed by a spill of very dark brown homemade energy gel.
Not shown: the pack
I left out one crucial detail…a hydration pack. Obviously there is little room left on the bike as-is for water or spare clothing. Someday, I would like to pare down my setup to the point that I don’t need a pack at all, but that will take more money for lighter, smaller gear and/or special training to not be so darn cold at night.
What do you carry on bikepacking trips? Tell us in the comments!

this is great Karen thanks
this is great Karen thanks