- This topic has 38 replies, 19 voices, and was last updated 14 years ago by Luminous.
-
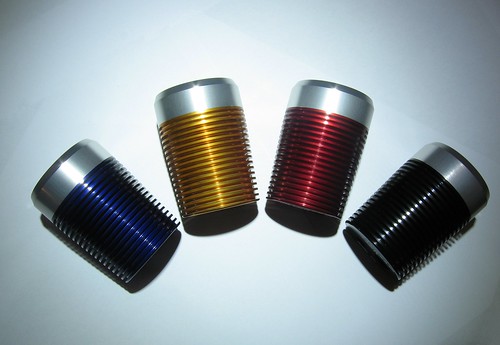
At last !
-
LuminousFree MemberPosted 14 years ago
Finally, my project nears completion. I have all the parts and equipment now to assemble, so no prizes for guessing what I'll be doing for some of this weekend.
Phew !.
😀

Luminous.
JamieFree MemberPosted 14 years agoI will selflessly put myself forward to test one out for you. I will even waive my normal fee
 willFree MemberPosted 14 years ago
They look very nice, although looking at the first picture I thought they were dustcaps…
LuminousFree MemberPosted 14 years agoT2.
Thanks. Its been a long haul and not an entirely smooth ride
🙂Details:
6 x Cree XP-G LED.
Taskled driver.
QR attachment, bar mount, adjustable for left-right beam direction.
Pocket sized.
High-Spec componentry.
2 hour, full power, runtime on a 2.6Ah battery.
Battery level indicator.Its a project that started out as a favour for some friends, but because a lot of the companies I went to operate minimum order quantities, I ve a few.
Cheers.
Luminous.
LuminousFree MemberPosted 14 years agoJamie.
Sorry, both test lights have just been returned to me, after being in the hands of the "testers". But thanks anyway. 😉
Will.
Yes, I should have put a scale object in the picture.
🙂I've not one to hand right now, but they're around 7cm long and about 5cm diameter at their widest point.
L.
LuminousFree MemberPosted 14 years agoLowey.
Thanks, I now feel as if I've made a light the way I always wanted to, but never had the drive to, before.
L.
BlackDogFree MemberPosted 14 years agoLooks nice enough in a salt shaker kinda way, nowhere near as nice as a TroughtLight though.
LuminousFree MemberPosted 14 years agoBD.
Thanks, all I can say is that beauty is in the eye of the beholder.
But its the brightest "salt shaker" I've ever seen.
Troutlight is ok, but I think my light has its good points too, and this light is a bit more of a, no compromise, approach.
Thank you Black Dog.
🙂L.
loweyFull MemberPosted 14 years agoLuminous, sorry mate, onyl just noticed that you cant publish prices.
Email in profile please matey. I think it looks shit hot.
BlackDogFree MemberPosted 14 years agoJust looks like any other light to me. If Troutlight is just ok, then what makes yours so special?
LuminousFree MemberPosted 14 years agoBD.
Well, if you buy one, you can take everything out of it and use it to dispense salt.
After all, it is nearly Christmas.
🙂Cheers.
L.
BlackDogFree MemberPosted 14 years agoNah you're all right I'd rather stick to what I know to be a quality product from a trusted supplier. Thanks all the same.
LuminousFree MemberPosted 14 years agoWors.
Hi, thanks, I'm just glad to be seeing the end result now.
BD.
Cool, you pays your money and you takes your choice. As for quality and trustworthyness ?, well you can judge if you wish.
Thanks for your posts.
Have a good Xmas.🙂
L.
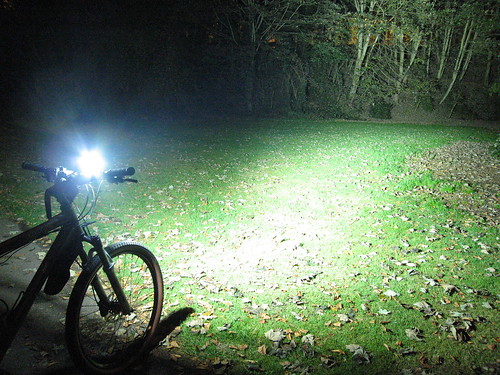
TravisFull MemberPosted 14 years agolooks nice, would like to see some pics of it, with light on etc, comparing spots/floods to (possible) other lights
LuminousFree MemberPosted 14 years agoTravis.
Hi. I don't have alternative lights to do comparisons with, but here is a picture of the first prototype of this light.
The light in the beam-shot picture above uses all the same components as the light shown at the begining of this thread.
The only exceptions being that the prototype used R4 BIN LEDs which are rated as slighly less brighter than the R5s I'll be putting into the lights in the post at the beginging of this thread, and the housing of the prototype was different.
The new light is much better finished, all anodized and lasered, etc.This beam-shot picture was taken to the unoffical beam-shot standard camera settings that others have used. I should really do a beam shot over the weekend though.
But when out on a ride, the light seems to make people really notice you and watch as you ride by.
Cars stop in junctions and wait for you to pass. Its plenty bright. I've even had other cyclists catch up with me to ask about the light.One of my testers commuted through and out of London, a lot of stop-start stuff as well as longer rides once he got out of the city. He actually only used the low setting in London, he reckoned the hi setting was too bright for city use. Hed come from using a P7 torch and said he preferred the extra width of beam, on the particular light I lent him.
My light uses what I consider to be good spec componentry and I can fit the 10mm, square Carclo optics which give a nice flood pattern, or, I can fit a narrower optic for a more focused beam. Ledil may be releasing an XP-G specific optic too and if they do, that will fit also.
I've designed the housing to be fairly flexible with respect to which LED and optics combinations I can put into it, to try to get either a flood or a narrower beam, depending on preferrance.
Ourkidsam.
Thanks mate, I'm pleased with the results in terms of both looks and performance.
🙂I'm using one of Smudge's 15v, 2.6Ah batteries wrapped in an old lumicycle battery bag, and on my test runs, I've managed about 2hours 15 mins on constant hi setting of 1A to the LEDs.
Ta.
L.
DimmadanFree MemberPosted 14 years agoLook amazing buddy. Build quality looks super and your engineering that went into it is second to none!
TravisFull MemberPosted 14 years agoLooks good, can you email me about cost etc when you're ready?
Thanks
LuminousFree MemberPosted 14 years agoDimmidan. Hi, thanks, I've been super busy getting the finishing sorted, but will mail you soon 🙂
Tails.
I'm just using the sort-of unofficially agreed camera settings, but for these LEDs I think the settings are a bit "generous", but seeing as the Troutlight beam shots are to the same settings ( I think ) I use them too. However, I'm going to try to get a light built up this weekend and get some more beam shots.Light building and Xmas shopping, Saturday and Sunday isn't long enough.
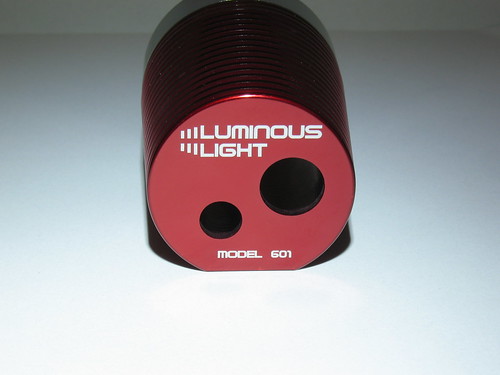
🙂SFB, hi, Its just a model code, but it does relate to that light specifically.
I'v e made a few lights over the years, but no where near 600.
Are you going to grace us with some snow pics on a thread on STW soon ?.
NM. Thanks, theres some work in that there light.
Thanks everyone.
😀Luminous
WallyFull MemberPosted 14 years agoI commute in with one of the testers (Ford) , quality item but at a price.
LuminousFree MemberPosted 14 years agoWally.
Hi, yes, the tester mentioned you, glad you postsed. The one you saw was the un-anodized, but final production version, prototype. It was still abit rough round the edges for me, but the main theme of the design was there in that particular light.
The fit and finish on the final light is better.
Yeah, I wish I could make the light for less, but about 95% of the price is costs for the parts. If I were to dial-in the costs I've incurred buying tools and equipment to make this light, it may turm out that I've only broken even, I hope…..
Thanks.
🙂Luminous
MostlyBalancedFree MemberPosted 14 years agoQuestion for Luminous:
I don't suppose you'd know how to wire up an early Hope Vision 2 to be either on/off or just hi/lo/off? I never did get on with 3 power levels plus flashing and now the swicth is playing up I'd like to make it a bit more user friendly (if possible) rather than send it back to Hope yet again.DaveGrFree MemberPosted 14 years agoLooks nice. Any piccies of part assembled shots so we can see how it fits together? To give an idea of sealing etc. And what power settings are you using via the driver – ie high/med/low with an idea of current draw to see the different run times possible. Tks.
LuminousFree MemberPosted 14 years agoMB.
I don't suppose you'd know how to wire up an early Hope Vision 2 to be either on/off or just hi/lo/off?
I've no experience of the Hope light, but if you're not interested in Hope refurbing it for you (assuming that they would and the price was sensible, etc), and as the light has issues possibly with the switch. Then perhaps a strip down and re-build could be the answer.
Perhaps along the lines of that thread by Chucky on here where some clever bods have converted their Lumicycle Halogens to use XP-G LEDs. Its a good idea and seems that people are enjoying the results.
Just put a new driver and switch in, perhaps even replace the LEDs ?.
DaveGr.
No part build shots I'm affraid.
There are only 3 potential water/dirt entry points on the light.
The 2 holes at the rear and the lens cap area.At the rear the light has the switch and the power connector. Each of these has its own rubber 'O'-ring seal which is compressed onto the rear surface of the light to seal it.
The switch is IP67 rated.
The power connector is IP68 rated.
So this takes care of the rear.The lens cap area uses 2 rubber 'O'-ring seals at the two possible points of ingress. The seals are in compression so I do not expect any ingress to occur there either.
The London based tester to whom Wally refers to above, had been caught in several down-pours in recent weeks and the light never allowed rain water, road grime or any other contaminant to get into the light, so this would demonstrate the integrity of the sealing on the light.
But over and above that, I have taken an extra measure so that even if a little moisture did get into the light, the electronics still stand a chance.Basically I've chosen and designed for conventional sealing techniques and materials and it seems to have worked out fine.
Thanks
Luminous.
genesisFree MemberPosted 14 years agoNice, but even one trillion lumens is boff all use in a fogbound forest like we've had the last few night rides.
LuminousFree MemberPosted 14 years agoDaveGr.
Sorry, I forgot to answer your other points. I set each light up to have just a Hi and low settings. Hi is 1A to the LEDs, Low is 500mA to the LEDs.
On high, running a 15v, 2.6Ah battery, I've achieved around 2 hours 15 mins, continous running. Call it two hours to be cautious.
Genesis.
Yes, I agree, Fog is difficult for lights, hence our cars have lights specifically for those conditions.
Its a tricky business riding the Fog. Its in conditions like those that having a low setting on your light can be useful.
🙂Luminous.
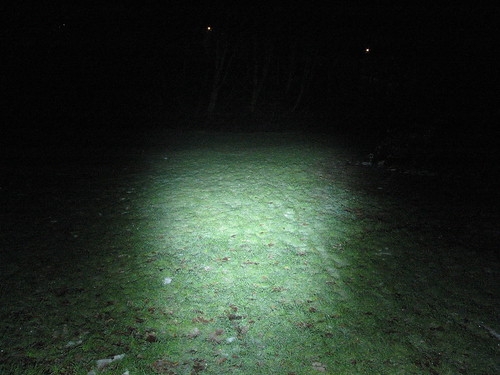
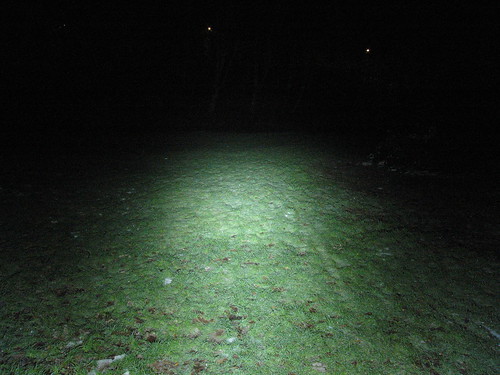
LuminousFree MemberPosted 14 years agoHi. Finally got the chance to take a couple of beam shots.
There would have been a few more, but some kids came along and all they wanted to do was jump around in the light, so no chance to continue with more shots.
Previous pictures have been taken on my light, using camera settings which "big-up" the beam a bit, imo. Settings of 6sec, F4, WB-day.
However, these settings just cause a "burn-out" at the centre of the beam.So, I've taken these pictures at the following settings as I feel these better represent the actual light and its pattern/intensity.
Camera set to 1.3 sec, F8, WB-day.Using Flood Optics:
Using a narrow beam optic
The light can use either a narrow optic/LED combination, or can be used to produce a wider, flood pattern result using a different combination of LED and optic.
Sorry its taken a while to get a few beam shots posted.
Ta.
Luminous
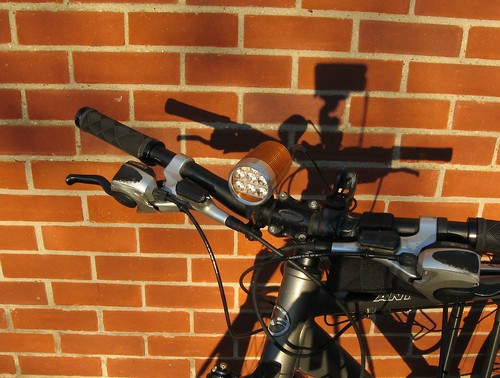
LuminousFree MemberPosted 14 years agoNow that I have some fully built up lights, I thought I'd take some pictures.
And, on the bike.
Went a bit long with the heatshrink on the battery cable
Luminous
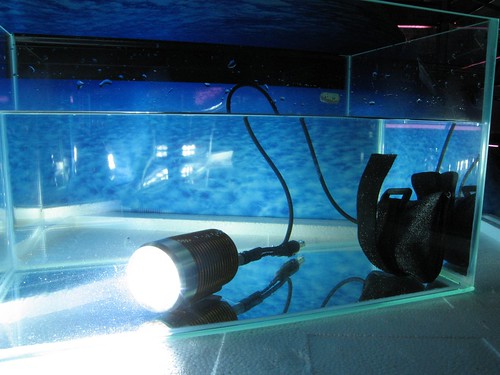
LuminousFree MemberPosted 14 years agoJust thought I'd share a picture I took this weekend. Been meaning to do this for ages. (take the picture that is)
EDIT: No fish were harmed during the making of this picture and there is no use of silicone grease, sealant or vasiline, etc.
Cheers.🙂
L.


The topic ‘At last !’ is closed to new replies.