Every day really isn’t a school day any more so I’m super happy to learn that trick. Just hope I remember it next time I need it
Be careful not to breathe the fumes! 💀💀💀
Garden trug with a broken handle repaired with an ancient piece of rope.

just replaced a broken spring in the wifes arm chair.
Our oven gloves, which are nowt special, were cracking on the palms where they get hot and the insulation was coming out and getting stuck to anything you touched with them. I had some bits of thick canvas spare, so decided to patch them. Frankly, I regret this now, since I used cotton thread so it doesn't melt, and it was a nightmare to get the sewing machine set up with this and a big enough needle to get through the canvas, then in the end I only hemmed one edge on the machine and had to hand sew round the outside because it was so thick, which took forever. Still, it's done now.

Fixed a leak on the boiler last week too - dripping out of the hot water pressure differential switch. £3 diaphragm kit an hour carefully taking it apart, cleaning the corrosion and re-assembling with new o-rings and silicone grease, and it's sorted.
In the process of replacing a ‘blown’ double glazing panel in a window. Cost of £40 + my labour. Actually quite easy to do.
Tell me more - I have one to replace that has cracked over winter
Oh, I need to do that with my trug.....
Car.
Threw a wobble a few weeks ago. Didn't start first time and was running rough. Had to drive back from Wales, and had no power the way back. Not until I was home did it throw the engine MIL. Popped in the ODBC II reader, crank sensor failure. Symptom's seemed right. Onto ebay and found a set of two (crank and cam) sensors, brand new in box Nissan ones for £45. Only difficulty was removing the crank sensor - suction alone, and position took an hour of wriggling whilst on my back, hand up between drive shafts. Both 'old parts' had serial numbers ending 0 and 1. New parts were 3 and 4. Hmm.
Replaced 0 with 3 and 1 with 4. Thinks about it, and my car should have had a sensor recall many years ago - never had it, so I'm guessing these two were the revised parts. Cam sensor was stiff to remove, same issue, but it was at the top of the engine and I could grip it properly.
Changed plugs too as it had come home on default settings and they were black. Car started fine but was a bit rough - reader said Cylinder 3 misfire. Ah - had the occasional misfire before on cylinder 3, so ordered a new ignition coil for £25. Fitted that and all tickety boo.
Blooming handy having an ODBCII reader just in case !
Oh, I need to do that with my trug…
Only took me about a year and a half. It was mainly still useful with one handle.
My car mending skills are no way up to yours mind!
Car battery change on the wife's car. As usual a 5 minute job became nearly an hour as the nut on the clamp holding the battery in had stripped and was just spinning freely. Ended up having to take the whole air filter box and hoses out to then remove the battery tray, cut free the clamp and replace with some random bolts found in the bottom drawer of my toolbox.
Then a headlamp bulb replacement that is accessed from the wheelarch but even with the wheel turned fully there's still not enough space to remove the access panel so I had to jack it up enough to drop the wheel out of the way.
2006 Smart Forfour, based on the Mistsubishi Colt so should in theory be fairly standard.
just repaired our teak garden table, the joints on the surround come unstuck after 22 yrs and needed tying together with metal straps screwed across the joints. Decided to sand and oil it as well mmmm linseed 🙂
LED downlighter. When I fitted them, I thought "all integral, no bulb to change if it goes... but it's supposed to last 15,000 hours so should be fine". After about 5 years, one went out, supplier no longer trading, units not available. So took it apart and realised there's nothing to it (the driver module is separate) just 3 LEDs soldered to a board with (failed) heat conducting glue on the back to transmit to the heat sink. Only 3W total. The LEDs were available on eBay at £2.50 for 10, so identify the dead one, solder a new one, new heat conducting glue and it's all fine.
Saturday night fun fixing punctures. Slightly trickier than a mountain bike tyre.
[img]  [/img]
[img]  [/img]
[img]  [/img]
Last thing I repaired was the annoying issue with my LG smart TV not connecting to WiFi. Back of TV off... clean WiFi module and reseat connector... reassemble... job done! 😎😆
I seem to remember there’s new legislation forcing white goods manufacturers to make spares available, and make fixing them easier without voiding any warranty. So there’s hope yet.
There is, most of the manufacturers are screaming and shouting and whining about it...
My washing machine failed before Xmas. Unfortunately getting a replacement drum assembly was impossible (the weld between the drum and the hub that carries the drivebelt etc failed).
That was only 18 months after the dishwasher controller turned its insides into its outsides.
Apparently a model that has an easily available and cheap controller (€30, about 10 screws and 2 connectors to change it).
Of course, that doesn't apply if your machines serial number ends with 7 or 9, in which case they were manufactured in a 3rd party facility, and the insides bear no resemblance to any other model in the range, or anyone elses range either and no spare parts are available, anywhere.
(I'm guessing the internals were from a manufacturer who usually only manufactures for their own local market. So i could have found a controller but it'd have taken 8 weeks to be posted and attracted a 500% import tax and cost £100 in shipping.)
So that's a couple of repair failures.
The deck lights are working now though.
Just completed the repair of all the verges and fascia boards round the roof of our house, 13 lengths, 32 corbels, about 40m of cast iron guttering and Christ knows how many brackets ground, refurbed and painted. Taken 13 months in between other jobs.
Nearest I've got to a before and after comparator but before the commander in chief decided she wanted MOAR CORBELS.
[url= https://i.postimg.cc/7L0phYpj/IMG-20210530-171934.jp g" target="_blank">https://i.postimg.cc/7L0phYpj/IMG-20210530-171934.jp g"/> [/img][/url]
https://photos.app.goo.gl/Q3zuWssrc27rKFcb8
@stevet1 It's really easy. Just get a decorators multi-tool and you can prise off the 45 degree angle which hold the glass unit in place. Then measure the glass - LxWxD and thickness of each pane.
Order the unit and when it arrives, cut the old one out by slicing through the neoprene seal and buy some kind of sticky neoprene gasket to refit it. I added a couple of screws and glue to hold the panel in place but that is it.
Repairing/restoring this Georgian bay window panelling.
It's the second bay I've done in the house, having done the first almost exactly a year ago.
Ripped out by the builders.
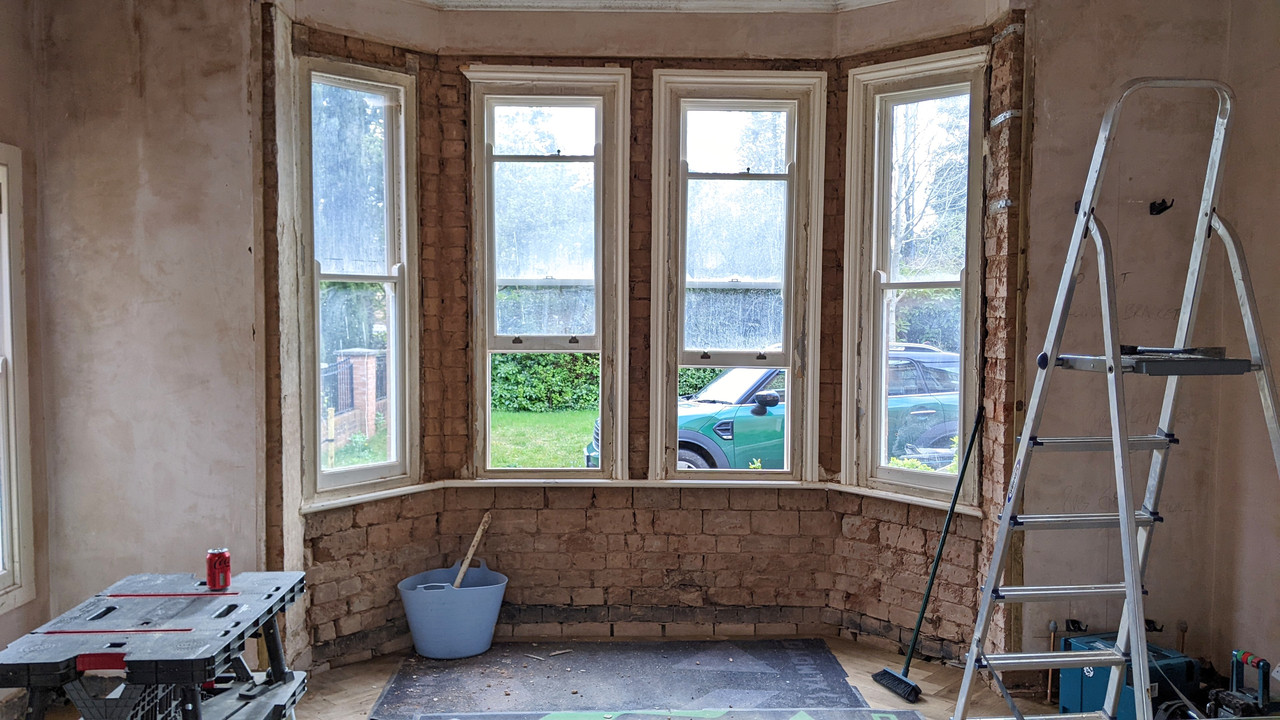
I can't believe the brickwork in some of these old houses. It's more like dry stone walling! Nothing was flat, nothing was square... Ughhh 😂
Lined, panelled and trimmed

This is on the left of the house what I done a year ago after painting.
Looks rad now it's got curtains etc.

Spent a chunk of time on Saturday fixing the rattly steering on a mobility scooter that my dad was given for free. Turns out they just use a threaded bike headset so no special parts required.
He had his first outing on it to the vintage vehicle rally at Carlisle Airport yesterday and got on pretty well with it 🙂
Next project will probably be acquiring and modifying a wee trailer to carry it as it's a heavy wee sod to lift into the boot of my car 😆
Repair? Restore?
Pool spent 8 weeks without power…
It was fairly simple to pump it out, chlorine wash and now refill, but satisfying compared to the $2000 quote for the work.
Replaced every stupid alu nipple on my rear wheel with brass ones (several had cracked). Used a bit of Lego to help true
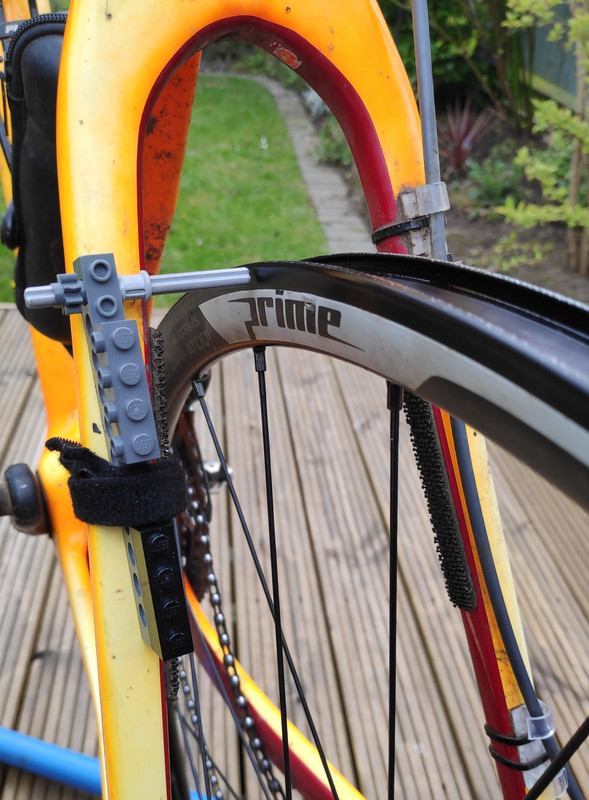
Nice tool! I have a similar non-Lego version.
next thing seems to be the electric shower which has developed an intermittant, 'keeps running' fault. suspect limescale build up in a valve somewhere 🙁
It's really not a problem that family and friends give me their broken Gaggias:

It means that when mine stops working there will be a part I can salvage to get it going again, and at the same time, inspires me to finally fix them all, like I've been promising for ages but never had the time.
There was somebody on this forum who wanted one. Maybe in a week or two...
The bottom of the garage door. Was/is pretty knackered so marine ply to the rescue. Not finished yet but the routing has ruined me. Front on it all lines up.
[url= https://i.ibb.co/t4D8hDh/PXL-20220502-150759696.jp g" target="_blank">https://i.ibb.co/t4D8hDh/PXL-20220502-150759696.jp g"/> [/img][/url]
On a much less grand note I did a neat bit of sewing (third repair) on my Brisker gloves a week or so back. They'll last at least another year.
my beerlingo stopped dead on the first corner.
I got recovered 500yards, the recovery guy said it could be cambelt slipped, so that was the first thing to check. That all lined up
Fusebox/es next, the 20A fuse for the ECU etc was blown. With a new fuse it started, but I got 5 yards and it blew. So with a few packs of fuses I tried disconnecting things one by one, removing the ECU, testing wires etc. I'm useless at electrics but the thought of driving along and losing the steering and brakes suddenly was too scary for me to try driving again without finding the real problem
Eventually I took out the battery box,there was the main ECU cable/s, rubbing against the battery tray,had worn through the wiring. Abit of tape and a connector, and its back to normal.
Took me a couple of lovely weekends searching the web for wiring diagrams, and trying different things. Couldnt have got to work if the neighbour hadnt lent me his car
Mini fix this morning. I bought some MTB shorts, but the poppers were a bit weak (nothing to do with my girth) and popped when I bent over.
I spread the male part of the popper a bit with a hammer and an allen key. Sorted!
Fixed our 30+ year old boiler today.
Domestic hot water escaping into radiator circuit, replaced the diverter valve as this was the cause a few years ago - nope still doing it.
Removed secondary heat exchanger / calorifier as this is the other potential cause.
Unable to remove fittings from H-EX so took it to work.
Applied heat but they still sheared from the metal casing. TIG welded a bolt to the sheared remains - heat plus vice = removed fittings.
Installed new heat exchanger - boiler working properly again.
[url= https://i.ibb.co/VQTgGMn/2-A789-BD7-3679-40-DF-BB9-A-387923081-DBB.jp g" target="_blank">https://i.ibb.co/VQTgGMn/2-A789-BD7-3679-40-DF-BB9-A-387923081-DBB.jp g"/> [/img][/url]
[url= https://i.ibb.co/ChmVQ8H/2-A60-CDA7-F89-B-415-E-93-A5-82601-B811957.jp g" target="_blank">https://i.ibb.co/ChmVQ8H/2-A60-CDA7-F89-B-415-E-93-A5-82601-B811957.jp g"/> [/img][/url]
[url= https://i.ibb.co/KWmhvML/ECFB7431-99-D0-4222-99-D8-9972577-AFC38.jp g" target="_blank">https://i.ibb.co/KWmhvML/ECFB7431-99-D0-4222-99-D8-9972577-AFC38.jp g"/> [/img][/url]
[url= https://i.ibb.co/02K1RTS/B4-CF833-C-073-F-4-D0-F-A3-E8-17-AF4464-AFBB.jp g" target="_blank">https://i.ibb.co/02K1RTS/B4-CF833-C-073-F-4-D0-F-A3-E8-17-AF4464-AFBB.jp g"/> [/img][/url]
[url= https://i.ibb.co/2NXnh0J/DE26-F68-E-3318-432-B-929-E-58-E725-D17-F43.jp g" target="_blank">https://i.ibb.co/2NXnh0J/DE26-F68-E-3318-432-B-929-E-58-E725-D17-F43.jp g"/> [/img][/url]
I have been doing a bit more wood work than usual in the garage and this has created a lot of wood shavings. My home made dust extraction was made from 40mm push fit plastic and coped fine with dust and small debris but was getting constantly blocked and choked by the wood shavings.
I upgraded the 40mm pipe to larger waste water pipes for the section leading to the main work bench but left the 40mm in place for the other extensions for dust collection elsewhere in the garage which don't get the wood shavings.
The difference is amazing with no blockages and no loss of suction event though the pipes are not permanently glued but just have blue painters tape keeping the joints airtight.
It only took a couple of hours to repair including 2 trips to B&Q but then another hour or so to clear up all the shavings that have accumulated over the last few days.
In an effort to get the electrical side of mum and dads decades long house renovation finally completed I've been getting a bit of workshop time in rebuilding this outside lantern for them...
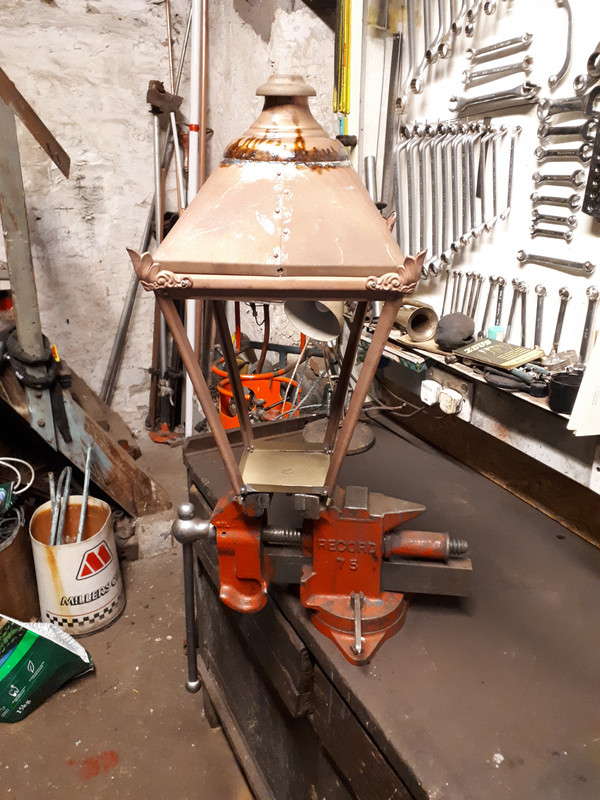
Record 75 bench vice for scale...
The sparky persuaded them to get the whole lantern and bracket powder coated... unfortunately the lantern is made of copper and was soldered together and disintegrated into myriad pieces when it went in the oven 🤦♂️
It's now partly held together with solid copper rivets (fiddly but interesting to do) with the top all re-soldered together.
Had to rig up a jig to hold everything straight-ish for soldering using The Daddy Of All Soldering Irons...

Pleased to get it done 🙂
Next on the hit list is a A901 Kenwood Chef that I rescued from the local tip some years back with speed controller problems 🙂
£38 for 6 meters x100mm
Power steering pump on the van. Turbo next, garage job that one though!
Hoofed the Dremel down the drive (by accident).
This it did not like and it displayed such feelings by removing the "rotary" from "rotary multitool".
Bit of YouTubing and it seems the winding (?) wires are a bit fragile.
Sure enough it was a broken wire to a connector. A bit of solder and a strand of wire from some old cable and it's working again.

Yea, i fixed my gas boiler too. Only required wd40 on the valve as it was sticky from previous owners love of fry-ups!
Recently sorted out the speed control on my mums Kenwood Chef A901 that's considerably older than me...
Got the same job to do on another one for my nephews mum that I rescued from a skip some time ago. Sadly its a bit later and a wee bit more tricky to do 🤔
Last couple of days have been dedicated to putting a new clutch in my mates mums Daihatsu Terios. Bit of a tedious job 😬
My wife decided that my ornamental painted bowls should become ornamental painted flowerpots. This was lovely but when it rained they behaved like bowls and filled with water.
Just drilled three holes in the bottom of each

Repaired is probably pushing it a little, but i sourced (which was actually pretty tricky) and fitted a replacement battery in my Garmin Edge 25 so I've now got 7 hours of battery life again rather than the 2 it had ended up at.
Feeling pretty smug as Garmin don't really do a newer version and its nice to keep this one going.
I think I’ve mananaged to repair my pir floodlight for the second time, as it had gone into random disco mode again. The previous fix was to pull out the old white sensor lens and to wedge/glue in a random eBay replacement lens (never was quite as good but it mainly worked). Anyway, after a few years, disco mode again, sensor lens all brittle and cracking and bits flapping in the wind. I managed to break out the old sensor unit fairly neatly, and then by cutting the light body where the pir unit was fixed I’ve managed to be able to screw in a replacement pir sensor unit that came with built in screw thread (with lots of uhu to help /water seal), rewired it all and it’s now back up on the wall, it worked in the garage so hopefully it’ll work in real.
Last thing I fixed: nerf gun for my neighbour's kid. Well I kind of cheated and replaced a bunch of inside bits with bits from another differently broken nerf gun of the same model, but he doesn't know that.
Next thing will take a little longer, sometimes finding gold flecks is a good thing, but not when it's in an oil filter!
[img]  [/img]
Recently sorted out the speed control on my mums Kenwood Chef A901 that’s considerably older than me…
Well get you, Mr Johnny Come Lately, with your A901 Kenwood Chef.
We're still using the A701 I fixed about 10 years ago.
Repaired my Mrs' hair straighteners after Jnr w2k dropped them on the floor. Heater plate had cracked, 5 mins on ebay found some replacements for £5, then it was a relatively easy repair. Everything that needed disconnecting was a small screw fitting instead of solder, just a bit fiddly. Maximum browny points for me 🙂
Went all in on this one. My old (>10 years at least) Black & Decker belt sander died, ironically while I was doing a job as a favour for a charity - karma, eh - but I knew it had been unhappy for a while. I thought the belt was just stretched, but then it seized solid.
Got it on the bench at home and started taking it apart. Obviously there was 10+ years of caked wood dust, despite the occasional blow out with compressed air. Things escalated quickly.

I thought one of the gears had stripped, which might have been came over (spare parts seem to have all been available at one point, but lots no longer stocked now) but it turned (no pun intended) out the end of the toothed shaft is just ground down to locate in a bearing:

There's actually a bearing under that clump of grease, bits of gearbox and wood dust above the gear on the left.
Then having extracted the rotor from the plastic housing, I realised the main problem was that this was all that was left of the main drive side motor bearing:

Fortunately there was enough left to identify it for replacement.
Checking the rest of it over, I realised that driven roller that holds the belt was turning pretty stiffly. I took a while to extract the aluminium base it's mounted into from the gearbox. It had two needle bearings inside, which were fairly shot but they proved a nightmare to extract. There was a spacer between them that had a slot in it, but I couldn't find anything that would fit in the slot and still give sufficient purchase to drift it out. Eventually I ended up drilling one out, and going a bit into the spacer which turned out to be plastic. Not ideal, but not terminal.
Bearings ordered, I cleaned everything out, and then couldn't resist doing one of those ****y flatlay pictures of all the bits. Those far too familiar with the B&D KA85E (Type 2) may notice that one of the rollers has furtively rolled off out of shot under the pizza oven.

About an hour of putting together, realising that bit should have gone in there first, taking apart, and then putting back together again (one screw I must have put in at least dozen times), and it looks like a belt sander again. Screws leftover: 0.

I reckon all the taking apart, cleaning up, trying to remove bearings, ordering bearings, and reassembling must have taken at least 6 hours all-in. A new one is about £50. The sound when it started back up: priceless (and much quieter than before!).
Auxilary belt tensioner on the van, only took an hour but was a git of a job, needed about 3 pairs of hands. No more squeeling racket when parking now though 😀
Bled the brakes on the full suss too.
Started renovation on my conservatory... much shout out to Neil who lurks on here for helping me. He's a joinery dude with skill and patience.
I'm a clot with a claw hammer...
Anyway I'm not overly enamoured with the build quality of the timber kit. The pick of the rusty stringer is the joint between top frame and lower frame, no step or sealant, just 2x beads to act as weather strips. Might be ok in Surrey but not up here.
Nothings in permanent were just cutting out rot and letting it dry out and treatment being applied.
Also have a pic of Geoff....
[url= https://i.postimg.cc/DmxkSg3y/20220629-174853.jp g" target="_blank">https://i.postimg.cc/DmxkSg3y/20220629-174853.jp g"/> [/img][/url]
[url= https://i.postimg.cc/jnxbG3VB/20220702-114915.jp g" target="_blank">https://i.postimg.cc/jnxbG3VB/20220702-114915.jp g"/> [/img][/url]
[url= https://i.postimg.cc/rKYkP9fY/20220702-114926.jp g" target="_blank">https://i.postimg.cc/rKYkP9fY/20220702-114926.jp g"/> [/img][/url]
[url= https://i.postimg.cc/RWTkKQj0/20220702-120751.jp g" target="_blank">https://i.postimg.cc/RWTkKQj0/20220702-120751.jp g"/> [/img][/url]
[url= https://i.postimg.cc/tsmLBC40/20220702-133746.jp g" target="_blank">https://i.postimg.cc/tsmLBC40/20220702-133746.jp g"/> [/img][/url]
[url= https://i.postimg.cc/MMcZ9FS5/20220702-152832.jp g" target="_blank">https://i.postimg.cc/MMcZ9FS5/20220702-152832.jp g"/> [/img][/url]
[url= https://i.postimg.cc/Xp2j0WYL/20220703-080747.jp g" target="_blank">https://i.postimg.cc/Xp2j0WYL/20220703-080747.jp g"/> [/img][/url]
[url= https://i.postimg.cc/McgJpZC0/20220703-080801.jp g" target="_blank">https://i.postimg.cc/McgJpZC0/20220703-080801.jp g"/> [/img][/url]
[url= https://i.postimg.cc/p9SR5JFF/20220703-080813.jp g" target="_blank">https://i.postimg.cc/p9SR5JFF/20220703-080813.jp g"/> [/img][/url]
Pretty pleased with my kid free Friday evening. Free to me pressure washer was always patchy firing up and a winter in the shed had killed it completely. Handy YouTube video showed a common problem with these so stripped it down. Cleaning the corrosion off the pressure valve bore was a bit tricky but a bodge with some wire wool wrapped round a drill seemed to have done the trick.
[url= https://i.postimg.cc/KzpjfnBx/IMG20230303215706.jp g" target="_blank">https://i.postimg.cc/KzpjfnBx/IMG20230303215706.jp g"/> [/img][/url]
