UPDATE: Reviews section refreshed, redesigned, searchable: Go take a look
My wife's Christmas present; the most challenging thing I have ever made - still far from complete with more grinding and cleaning up to do! Design is bought from Etsy (Joshua De Lisle, an arty blacksmith) and a friend plasma cut the twenty parts from 1.6mm cold rolled steel:
There is very little talent to crocheting soft toys from a pattern, you basically need to know one stitch and be able to count!
Creating patterns is probably where the skill lies. I've only ever made one thing without a pattern, but I prefer not having to think too much, it's my whilst watching tv activity (I'm incapable of just sitting and watching t.v. without doing something else as well these days). The Pterodactyl was made whilst binge watching Ozark.
Sale wise there are all sorts of hoops to jump through to be able to legally sell plus if you cost the time they take they'd be extortionate. At the moment I just make as gifts.
[i]Sale wise there are all sorts of hoops to jump through to be able to legally sell plus if you cost the time they take they’d be extortionate. At the moment I just make as gifts.[/i]
I sell my paintings. Not for very much but enough to cover the paint and materials plus a little drinking money.
If you sell you crochet "sculptures" with clear instructions that these are not toys and should be kept away from anyone under three then you should be legally covered and while it won't cover the time, it should cover the wool. I recently sold a picture for £220 and worked out I was getting paid about £2 per hour before I took away the costs of materials.
Having spent far too many hours watching carpentry videos on Youtube over the holiday, I decided to make a DIY MFT Table. Only had one sheet of Ply, so only made the top so far - have to wait for builders merchants to open on Monday before I can buy some more.
Peter Millard routed the top in 7 minutes using the Festool LR32 rail, however I didn't have one, so it was far more laborious, but I quite of enjoyed the whole thing and hand drilled - one hole caught the bit and is a bit gouged, but the rest are ok....
Spent ages marking it out...
[url= https://live.staticflickr.com/65535/50790247033_29ced68f51.jp g" target="_blank">https://live.staticflickr.com/65535/50790247033_29ced68f51.jp g"/> [/img][/url][url= https://flic.kr/p/2koahWn ]DIY MFT Table[/url] by [url= https://www.flickr.com/photos/brf/ ]Ben Freeman[/url], on Flickr
Really wanted a Forstner bit, but didn't have one, so just used a spade thing.
[url= https://live.staticflickr.com/65535/50791111722_c7f917ca00.jp g" target="_blank">https://live.staticflickr.com/65535/50791111722_c7f917ca00.jp g"/> [/img][/url][url= https://flic.kr/p/2koeHYN ]DIY MFT Table[/url] by [url= https://www.flickr.com/photos/brf/ ]Ben Freeman[/url], on Flickr
And then routed it a bit to clean up the holes.
[url= https://live.staticflickr.com/65535/50791111697_cd9b3ce212.jp g" target="_blank">https://live.staticflickr.com/65535/50791111697_cd9b3ce212.jp g"/> [/img][/url][url= https://flic.kr/p/2koeHYn ]DIY MFT Table[/url] by [url= https://www.flickr.com/photos/brf/ ]Ben Freeman[/url], on Flickr
Bench dogs arrive Monday / Tuesday, then I can see how good / bad it actually is in terms of being square....
A couple more paintings before I go back to work plus I have a 20" x 30" in progress in the studio which was looking promising when I left it last night. Will continue when it warms a bit.
Finished "As She Dives"

Irritated by Brexit, explanation on the website : "Borderline Madness"

This still needs final varnish and framing "Big Skies and Long Roads"

Anger at how we treat the planet and our resources : "Toxic - If it don't burn then dump in the Sea"

It is only when I list them that I realise how much time I have spent painting recently. Check out NickArtStuff.com for the approximate prizes and sizes. The newest ones aren't up there yet but will be similar to the rest.
Bench dogs arrive Monday / Tuesday, then I can see how good / bad it actually is in terms of being square….
That's the one thing that puts me off doing this, I would need to make a jig before I'd start.
That’s the one thing that puts me off doing this, I would need to make a jig before I’d start.
Yep, it's sort of an iterative process, but I figure it'll be good enough and I can always insert a CNC'ed MFT table clone (£30 off Ebay) into it, if it turns out crap and I need a super accurate section.
I've just bought a rail square for my track saw, so I'll probably be using that to make sure cuts are square rather than just relying on bench dogs etc.
I can see myself making another top in a few months. I quite enjoy the whole process of trying to make something, making loads of mistakes and learning how not to do it etc.
Made a simple clothes rack for clothes that'll be worn again tomorrow.
Nice geuben 👌
It's also a great idea. Might stop me getting shouted at for dumping stuff on the floor.
joshvegas- ditto.
That looks a good go at the MFT top.
I find you only need a few dog holes to be perfectly square. I often cut boards over 600mm wide so on my table I drilled (with a cheap Forstner) the 2 holes to position the rail very close to the edges. I have a Benchdogs Fence system MkII (which has improved my speed and quality) and there are 2 holes that I use to fix this and I spent a bit of time reassuring myself that these 4 holes are cock on. I use 2 tall dogs with UJK Rail Clips to keep the rail in place.
2 weeks ago I had a real awkward job: a very fussy client and some white MFC - the sort that chips out at the faintest opportunity. The only way I could get clean cuts was to score one face with my rail saw down to about 4mm deep; turn it over and score the other side, then set the saw depth to 16mm (2mm less than the board thickness) and cut through to meet the 1st 4mm cut. I was super pleased with the result for 2 reasons. First, they were the cleanest cuts I've ever, ever made. Second, there wasn't the slightest trace of a ridge on either the finished side or the waste side. Damn, that table's square!
Quite pleased with this, just in time to get all the kids stuff hidden away before homeschooling round 2:
[img]  [/img]
Left side is Gratnells trays for lego and the like:
[img]  [/img]
Right side plain shelves for the bulky things:
[img]  [/img]
Eventually will have make some shelves and cupboards above for books, board games and the like.
(edit: was also my first project with an MFT-type top and benchdogs - makes getting square panels way easier!)
I like that Simon
I made this....

Into this....

It's 2008 SWB low top Transit
It has:
Engine remap
12v system for the lights
12v water pump, sink & single hob
Chinese diesel heater
Garage for 2 bikes with one wheel off
Rock n roll bed
Toilet
Loads of charging ports
5 weeks work while working full time. Next time I'd like to do it in less but 5 weeks is about 18 months less than most seem to take 🙂
@chrisch777 Excellent. I'm in the middle of converting a Citroen Relay. Fingers crossed finished by March. I started in July....
Good luck Phil! I would have gotten a Relay or similar to avoid the rust issues I'll inevitably encounter but when I bought this in September there were literally no decent vans around!
Also did a whole load of these:


A few minutes on CAD and a couple of prototypes was all it took. Sold 100s on eBay before having to take them down before HMRC algorithms were triggered 🙂
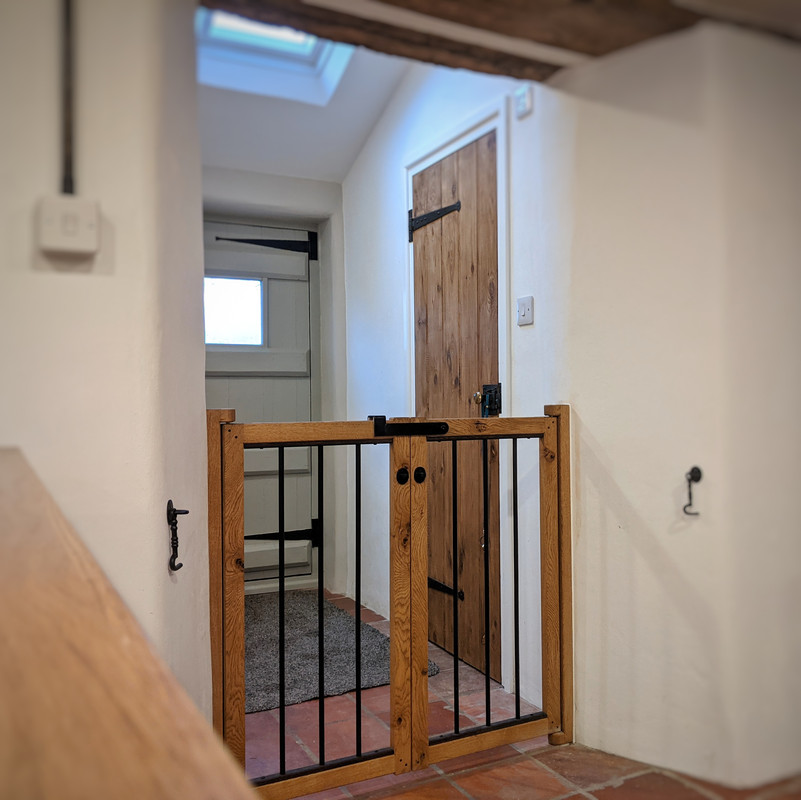
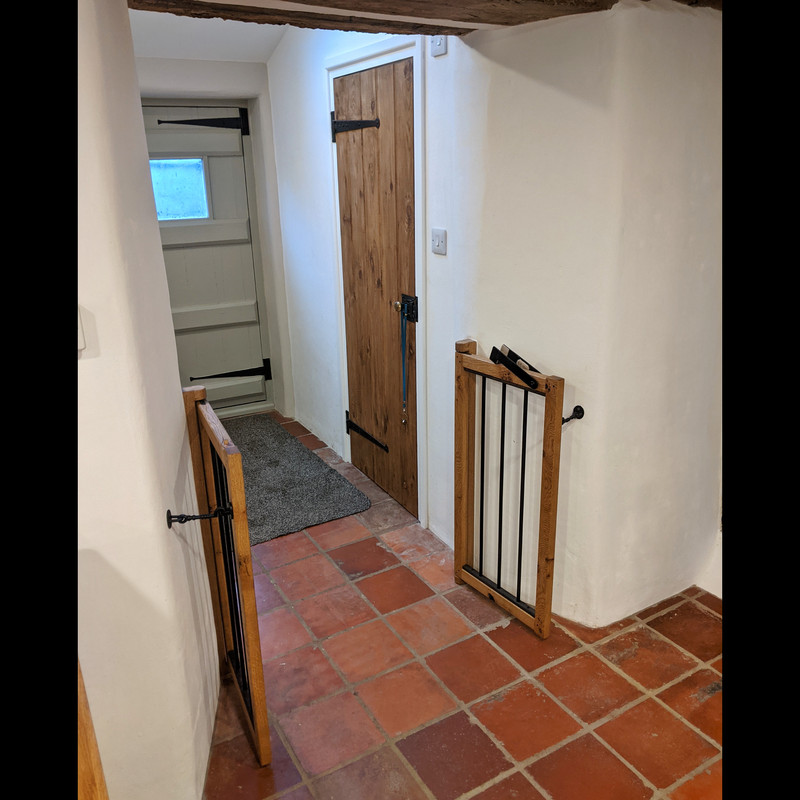
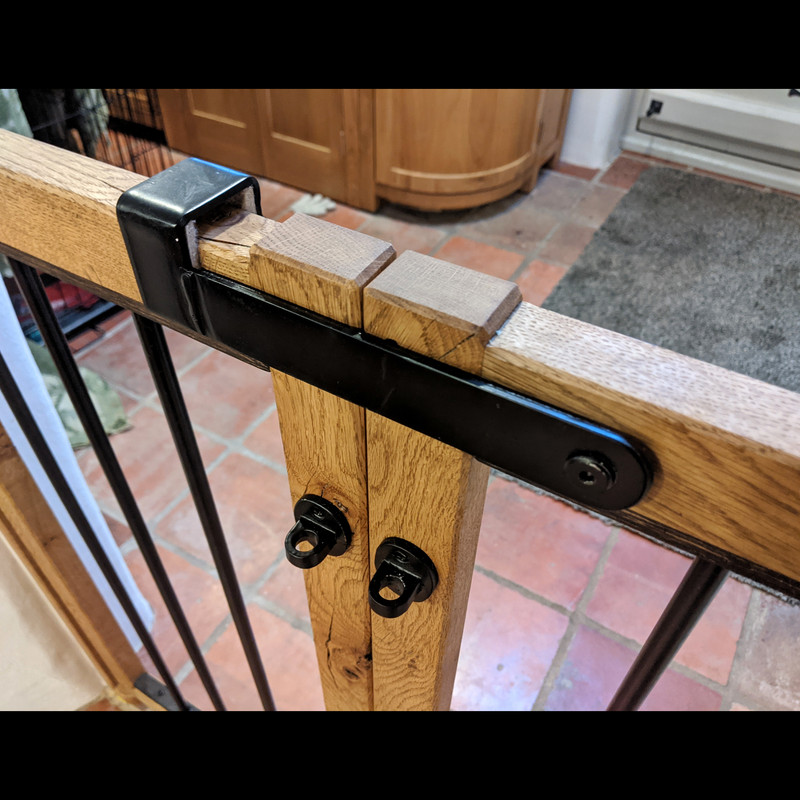
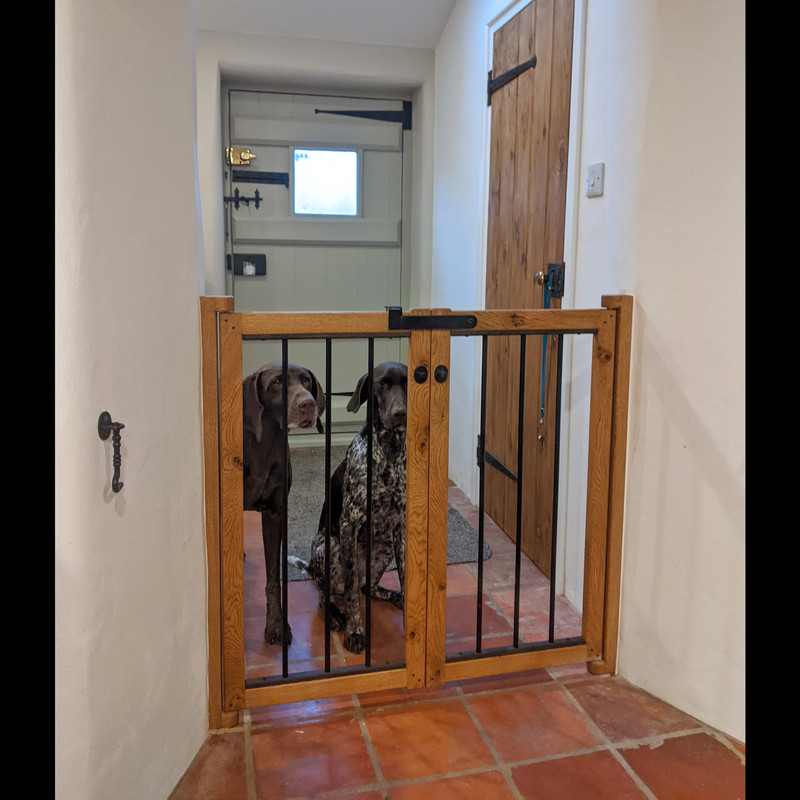
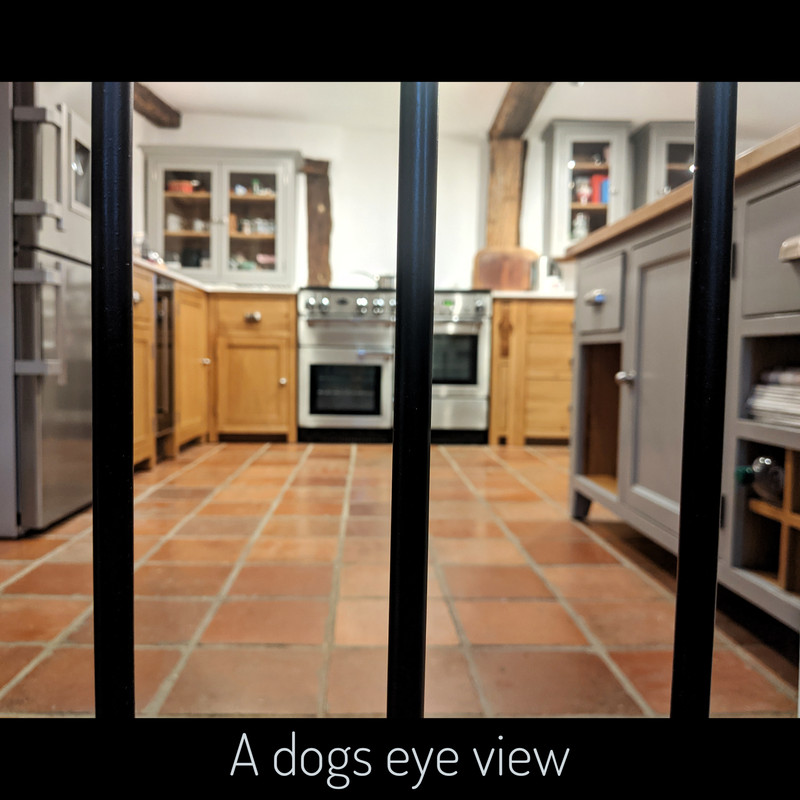
Made some prison gates for some Pointers.
Character Oak, wrought iron spindles and I made the mini field gate latch myself too.
Love getting me mig welder out (but don't judge my bead! 😂 )
I made another frame and built it up for use on the Frontier 300. I seem to have a thing for painting my bikes pink at the moment.

@jonm81
I really like that! Particularly the colour! Telemagenta? RAL 4010?
I made some tools for servicing a DVO rear shock.
[url=
Can you guess what I got with my tax return?


Took a bit of practice to get the 45º set up properly, I think it turned out ok. Now to tackle something bigger.
@simon_g - the cupboards are great! How did you get that paint finish? I’m confident with the carpentry but haven’t had much success with finishing...
Not so much made as restored, since we can't go out we've finally finished restoring an original Art Deco cinema seat so we can have the full experience at home!
[url= https://live.staticflickr.com/65535/50821426992_389808b4c6_b.jp g" target="_blank">https://live.staticflickr.com/65535/50821426992_389808b4c6_b.jp g"/> [/img][/url]
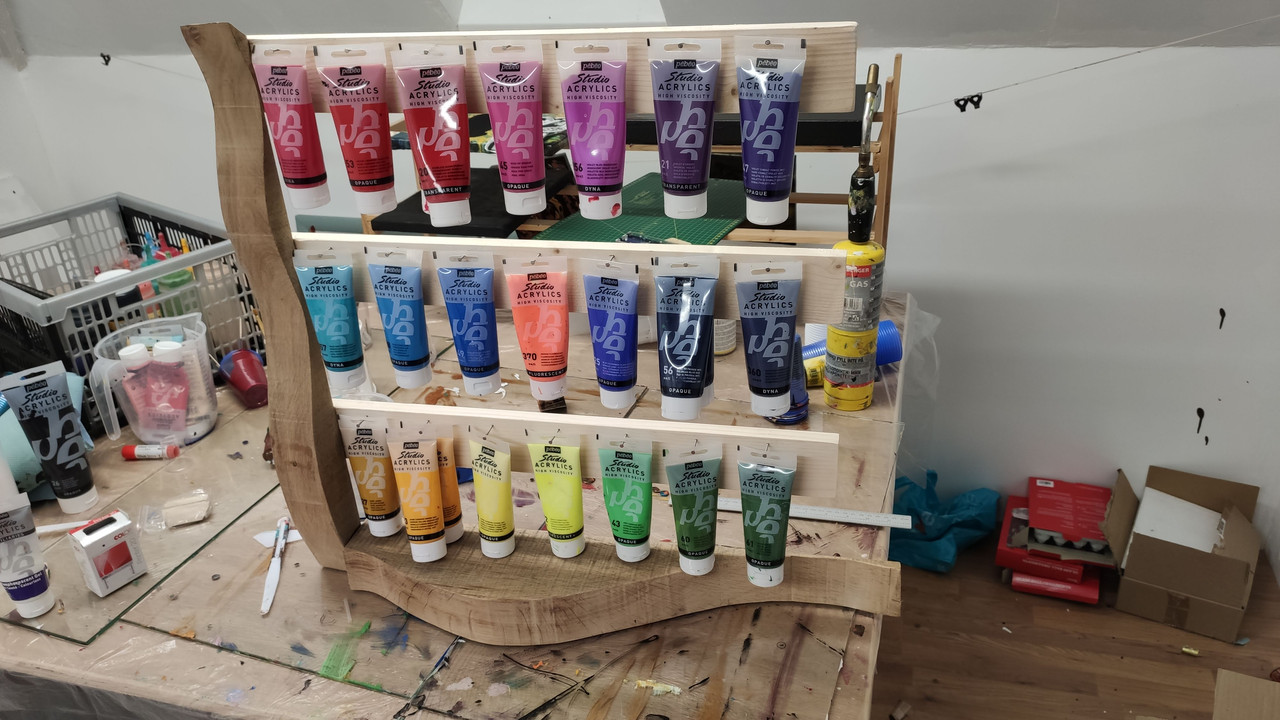
Used up the left over bits from the crocodile to make a paint rack. Now realise I will need hangers on the back as I have more different paint that I thought. Base and upright will be oiled and the arms painted in the different colours that they will hold.
Kiwijohn - I saw a mitre bit for a router that did self locking joints that I was so tempted to buy. Unfortunately they seem to either be <£10 so probably made of cheese or +£70 which is a bit much for something I have no immediate need for but still want.
Love that cinema seat 👌
@siwhite - thanks! A couple of coats of Leyland acrylic primer, then a few coats of Valspar eggshell (bought in a hurry from B&Q before last lockdown). Just brush for the fiddly bits and foam roller for the rest, light sanding in between.
Follow this and you won't go far wrong:
The MFT top is great. I keep thinking I’d like one!
Also I wonder how long before he pointers jump the gate? We used a baby gate for ours, gave up in the end after finding the gate shut. But kitchen raided!
I finished a steam bent lamp from Yew for my partners Christmas.
Ended up slightly twisted, but overall happy with it.

My first attempt at an airbrush illustration tonight...
[url= https://i.postimg.cc/X7vc3x3y/IMG-20210115-222348.jp g" target="_blank">https://i.postimg.cc/X7vc3x3y/IMG-20210115-222348.jp g"/> [/img][/url][url= https://postimages.org/ ]image storage server[/url]
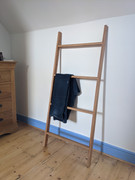
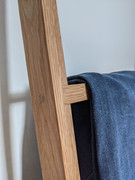
Got a table saw so as a practice project I made a little desk tidy for my other half's desk. Used the left over oak from the clothes ladder.
The base didn't turn out wonderfully, kind of winged it as didn't have a good idea what to do for a base.

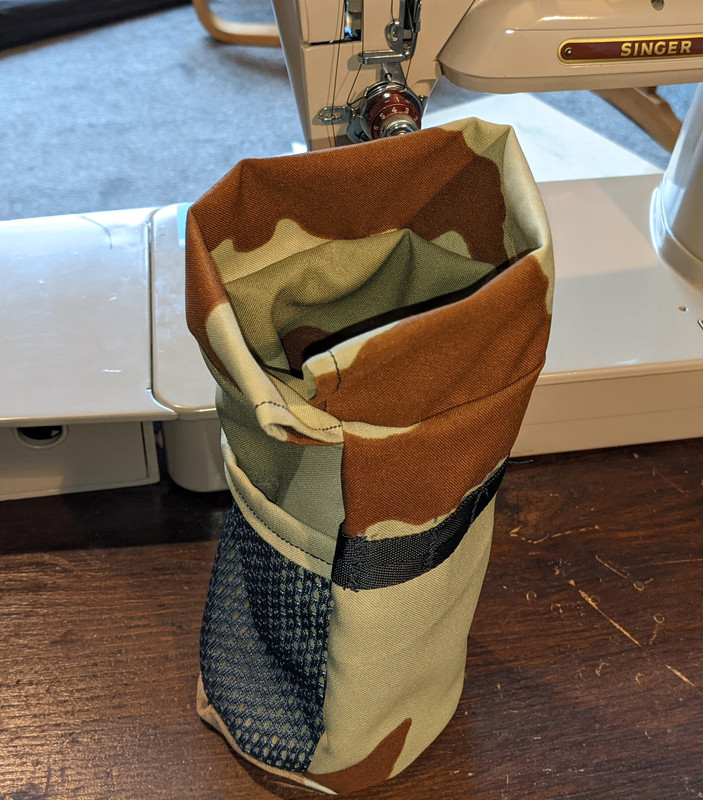
Don't really have the space for woodworking so sewing it is! Bar bag practise using cheap fabric to learn all the things not to do, such as sewing the bottom on inside out... Next iteration will be in vx21.
Workbench, in progress. My first workbench, designed after a few internet searches, it's the biggest thing I've ever constructed. Won't win any awards for fine workmanship, but hopefully will be robust enough to withstand anything I throw at it - although I'm not exactly sure what that will be.

More supports for the bottom shelf went in today, and wood was sawn for the middle shelf which I would have started but had run out of coach bolts.
In the picture, the left hand side is closest, a Record No3 vice will be mounted in the middle of the left hand half of the bench - need to decide how the rear bolt will be fixed as it will fall in the gap there.
Going to put some horizontal triangulation around the vice at the top, and vertical triangulation on the 3 leg pairs. But need to get the middle shelf sorted so I know how it will work as it will be bracing against that.
2 x 18mm MDF top.
Any comments/suggestions welcome!
Nice work @sirromj.
I've just finished my own work bench, though it's something you'll keep modding to fit your purpose.

Built around a 600x1800 pine laminate top. Screw in inserts to bolt down the mitre saw & feed support stands are all interchangeable.
That's lush that Kiwijohn.👍
Thanks Kiwijohn. I quite like that grey colour. Your bench is giving me ideas for a similar compartment on the bottom shelf of mine, maybe hidden. Though I can imagine putting things in there and forgetting all about it.
My bench is going in a wooden shed on a concrete base with wooden floor. Base laid around start of November, shed went up in December, and gets a bit of damp coming up through floor especially on metal objects laying on floor, it's not insulated at all. It's making me regret getting untreated CLS instead of treated to save a few ££ on this bench. Any recommendations for what to finish it with just to give it a little protection?
I made a Lego desk light from resin, a cake mold, some scrabble pieces and a usb light strip. I made a couple of other resin items too... if I can find photos.

Nice workbenches. I do all my work with a couple of Stanley plastic trestles and 2 lengths of CLS supporting my MFT. It has advantages of portability but it's not a thing of envy.
Sirromj - I would add a diagonal brace. If something heavy goes on top there doesn't look to be a lot to resist a sideways collapse. Otherwise, great!
I made a Lego desk light from resin
That's really cool, I looked at making something similar a few years back but the resin was going to cost a fortune. Any details on the resin you used and where you got it from?
Any details on the resin you used and where you got it from?
I used water clear casting resin, inc catalyst from ECF Composites
https://www.ecfibreglasssupplies.co.uk/product/water-clear-casting-resin-inc-catalyst
It is expensive, I took the 5kg option and made several things - the hand of fatima came out quite nice too, if I can find a picture. I got the mold off ebay. Learnt a few things, made a few cockups use old resin from some time ago and the wrong hardner - when resin does not go off, its a bugger to deal with.
It's all about the preparation, and having somewhere you can leave it. Also - fumes are *bad* - don't try and wing it - was ok once I started rigorously wearing a proper mask, but was very heady for a few days when I did not.
Sirromj – I would add a diagonal brace. If something heavy goes on top there doesn’t look to be a lot to resist a sideways collapse. Otherwise, great!
I had been planning to add diagonals in places, but started thinking I might skip that to save some time. Not really planning on putting anything massive on there. Confident my own bodyweight (<70kg) wouldn't be any issue currently. But maybe I'll get into making big heavy things in 5 years time! But certainly won't be plonking any V8s on it (never got into mechanics). If there was something heavy enough to collapse this bench I might need to worry about the shed floor too. I didn't check where the bearers are in relation to where the legs will go but guess I could slide a couple of bearers under. Need to decide where diagonals will go as didn't plan for them in the design.
Love that lego desk light, very cool
Cheers kayak23.
@sirromj the paint is left over from redecorating. This is living outside, so got 3 coats. Clear on top to stop wood glue sticking. Need to get something more waterproof for the bottom of the legs.
The shelves were ply I had lying around. Not long enough for one shelf, but the dropped centre gives you somewhere to throw offcuts or whatever without them rolling away.
Trying to think what else it needs.
