UPDATE: Reviews section refreshed, redesigned, searchable: Go take a look
Awesome! A shed thread.
Looks a promising start.
Things I've used for shed building that I've found invaluable.
Nails. Buy them in 25kg boxes.
An Estwing 20oz hammer.
A half decent spirit level.
A square
A sharp hand saw.
G clamps. I've got pairs 8,6 and 4 inch clamps. It's like having two extra pairs of hands on the job.
A mitre chop saw.
Tricks I've learned shed building.
I never really have a plan drawn out, but I do try to think of the processes to arrive at a solution. Where measurements are constants, make wooden spacers which are clampable, rather than constantly measuring gaps.
Clamping square cuttings below (to support)and alongside ( to keep square) say a joist or dwang, you can make consistently square joints again and again with limited measuring.
I'd always trust a taught string line more than a sequence of measurements.
I build much in the same way I paint, being adaptable is a virtue.
Good luck with your build, there is a lot of good advice to be found on here, don't be afraid to ask, no matter how trivial.
[b]properbikeco[/b] - yep that's in the next photo 🙂
brr - the wind has returned.
good stuff!
also if you have cresote type stuff paint this while you can and it should be fine for a long time so long as you have decent airflow underneath
As properbikeco mentioned, we then put a strip of damp proof course above all the concrete posts. These were wrapped and tacked to the frame as you can see on the photo below.
The floor boards weren't treated, so we bought a tin of Cuprinol Shed and Fence (two of the colours had far fewer health warnings, so we picked that) and coated what was to be the underside 2 coats including inside the groove and tongue.
This was when the snow came so it was a pain to keep protecting the wood whilst still allowing it to dry.
[img]  [/img]
[b]Something we learnt[/b]
Doing one side of wood with a staining product probably wasn't the best idea. Any crack, knot or imperfection sucks the stain through to the other side quite significantly.
So on the good side, we have a pattern of reddish knots and lines. Ah well. A sand will probably neaten it up.
After that dried, I laid the planks - the first 11 were all the correct length, then I had to overlap the corner and cut the last few in half to fit.
We just let them overhang the diagonal and sliced it all off with a circular saw later.
I really thought I was going to use nails here, but again opted for screws, just because I'm not used to nails, and didn't have access to a nail gun without borrowing a compressor and spending £100.
[img]  [/img]
There were a few planks where the groove wasn't deep enough at the end (the wood tapered), so I organised those to go on the first few diagonals (you can see them sticking out on the right.
There were also a few shakes, but the timber yard had thrown in a couple of extra planks as there were some bashes, etc. It all worked out fine.
Oh forgot to mention...
The reasoning behind using T&G instead of Ply or OSB.
Basically, because of the way this shed is built (walls on top of floor), access to the floor will be fairly impossible.
My joiner friend said that chipboard can swell and flake, ply can delaminate, but even though T&G may cup, it's not really going to go anywhere if I've got good air circulation underneath (which I have).
It made sense to me, even though it's much much more work than just slapping 6 sheets down!
This is awesome.
Im currently looking at buying a shed but seeing this has inspired to actually make one..maybe with some help 😀
Thanks bruders338. Something I learnt early on (it's in the other thread), was that building your own seems expensive compared to B&Q/Online shed sellers
[b]BUT[/b]
It's because you can't actually buy timber as crap as the stuff they use on those.
There's one online shed place that has 5 different levels of quality. ( http://www.gardenbuildingsdirect.co.uk)
I looked at the 'top of the range' one and it was still only 11mm thick cladding! with 1.2mm glass! I daredn't look at the lower spec ones.
So you may end up spending more, but you'll get something much better quality.
Great thread, been following shed builds for a couple of years on here now (!) Only thing holding me back from my own is the prospect of moving in a couple of years and having to leave my project behind....
That would be gutting, but then also an opportunity to build another!
Have you thought about something a little more secure door wise, than the usual shed type?
I picked up double glazed french doors & 2 large windows for under £800 for mine.
Hi tinsy - currently, the plan is to fit a standard 2'9 exterior house door. With a standard 5-lever lock.
That's if funds allow, etc. The diagram at the bottom of the previous page, shows an opening large enough to fit a standard door frame kit. The current plan is to make the linings myself though (same with windows).
With the base done, it was time for the exciting bit - building the walls.
The back was the easiest so I started there.
Studs on 600mm centres.
Two 5x100mm screws in from the ends per joint. Drilled pilot holes.
My rule of thumb for pilot holes on this build is if I want the screw to pull the joint tight, drill pilots. If the joint is already tight (with noggings for example), then these fancy screws can be driven straight in.
[img]  [/img]
I mentioned before that I planned to split the back wall, but in the end, we could fit the whole thing on the base, so I just did it as one.
At this point we were considering cladding the whole thing in ply, so the centres were positioned with that in mind (i.e. 600mm from outside edge to centre of first stud).
However, we also wanted to allow for cladding the inside, so I added studs just inside (visible here leaning against the wall):
[img]  [/img]
Once all the studs were in place, I measured by 3/4/5s to make sure everything was square and screwed on a temporary piece of scrap across the corner.
I decided to leave noggings until I'd got the frame up. So that I could use offcuts, and also so the frame was still slightly flexible for getting all the shed corners lined up.
Standard door would be OK, but why not a non standard door that takes up the whole of that side?
You are making a very nice job of it though.
I just drew mine & had it made (bought windows & doors first & drew it to accomodate them), but I did make the concrete base myself, all 27 x 8ft of it.
Pretty standard shed, just a bit longer.
[img] 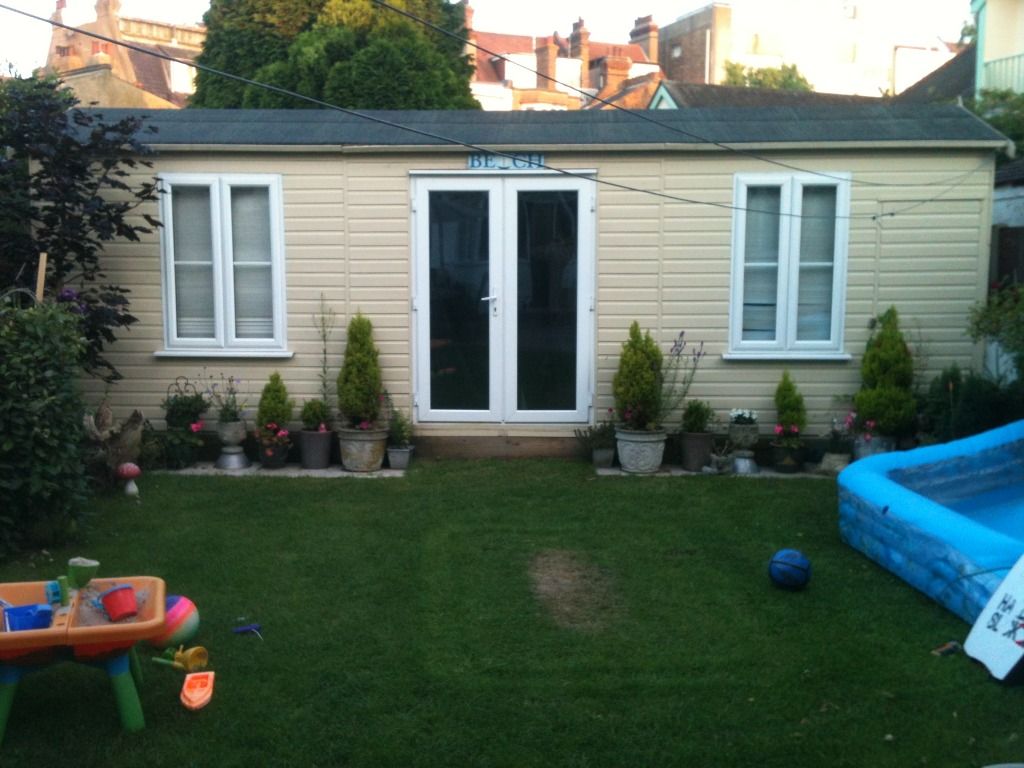 [/img]
Only thing holding me back from my own is the prospect of moving in a couple of years and having to leave my project behind....
Sounds ideal, given the first one you build is just a learning experience and the second one will be much better and quicker as you'll know what matters and why....
I remember seeing your ages ago tinsy - one of the many on here that have inspired me to do my own.
Next stage:
I steadily worked my way through all the walls over Friday and Saturday last week and stood them all up against the house.
[img]  [/img]
Where you can see doubled-up timber is where I just want to create a bit of room to attach thin bits of cladding between the windows/doors/etc.
It's easier just to whack another stud in in these areas.
Now for the Pièce de résistance!
Timelapse video of us erecting the frame.
It was only at this point I realised what a monster I'd created. Quite intimidating actually!
The height of the door wall is really quite tall, especially as there's quite a gap to the ground.
No wonder it costs so much to clad! 🙂
Good stuff, keep the posts coming!
We're nearly up to date now, so everything will slow down massively 🙂
I'm going around putting the noggings in on evenings this week.
Just to echo what [b]mcmoonter[/b] said above - I totally agree about using things to help with spacing instead of measuring.
For example, this is my nogging installation setup:
[img]  [/img]
Two equal-length supports with the clamps holding it flush with the studs. (note the screw going in diagonally, so that I can have the visible noggings all lining up - unlike the base).
With all noggings I worked from the corners towards the middle, so that I got a tight fit, without transferring errors along the whole wall.
[b]Then it's decision-time on the roof and cladding.[/b]
Still don't like felt, still can't think of anything better in terms of value, noise, ease of installation, etc. A friend is recommending cheap ply boards covered in best-quality torch-on felt. Any better suggestsions?
metal roof every time
if you want deluxe, board roof with planks (like slate roof) then drop breather membrane then tin roof. There are some very nice flashings you can get to finish it off.
You can then insulate underneath easily if required and board over with material of choice
[b]properbikeco[/b] - everyone I've spoken to sucks their teeth at metal roofs. The shed roof is only 3m from the neighbour's bedroom window.
I like it from every other point of view, but I'm worried about rain and hail annoying the neighbours.
I do like those one handed quick grip things, pricy but very handy....
[quote=footflaps ]I do like those one handed quick grip things, pricy but very handy....
dead cheap in aldi 🙂
I'd suggest a rubber roof for ease of application, very easily fitted and looks good. I used a company called Permaroof when I built at the end of my garden and have also rubber roofed a couple of small sheds / wood stores in the garden. Your sheds looking good and makes me think I should post a few picks to the shed threads at some point. Just gotta figure out uploading photos to Flikr first!
footflaps - MemberI do like those one handed quick grip things, pricy but very handy....
We even had a thread for them 🙂
http://singletrackworld.com/forum/topic/carpenters-what-quick-clamps
Another roof I don't really like, but am considering:
[b]EPDM rubber[/b]
Just priced it up as £400 including ply.
(torch-on felt £200 including ply)
(metal approx £250 without ply)
Anybody else want to throw their 2p in?
We're currently looking for a new house and while my wife has been looking at furnishings for our new home, I've been looking into what type of shed I'll build.
The efforts of people on STW have inspired me to build my own rather than get a pack.
Keep the updates coming.
McHamish - yes, this time last year, I was in a similar position!
Just noticed your efforts at 0.12.
Concentrate...there's a shed to be built.
McHamish - MemberJust noticed your efforts at 0.12.
Concentrate...there's a shed to be built.
I wondered if anyone would spot that!
Just found a great price for siberian larch, so I think that's what I'll use for cladding.
Wait 6 months then coat with Osmo UV protecting oil.
http://www.artisantimberandflooring.co.uk
Fantastic thread. This has really inspired me - my next shed will have to be self-constructed.
I'm currently building a large log store so I'm getting some practice at timber construction. It does seem ridiculously expensive buying timber but I'm convinced it's better to build something solid with a bespoke design rather than cheap stuff off the internet.
andyecc - My budget is growing all the time. Currently at about £1300 not including any internals.
(I never really added up screws/etc beforehand, but they are actually quite expensive - stainless nails required for the larch too).
edit: remember mine is 14sqm though. The same as a standard garage.
Nice build look like it going to be a quality shed .
I also have a tendency to spend more time planning than doing , the internet a dangerous thing for this . Now try to jot idears down and then get on with making it.
Have you considered felt shingles , lots of different styles and fairly easy to install . Iam thinking of using them to re do the roof on my shed and wood store near the house , get grey felt shingles to tie in with the slate roof on the house .
Chris
Re: Felt shingles. I was told that my pitch wasn't enough i.e wind would blow the rain up the shingles.
I can't remember where I read that now though. I've only got a 6-degree pitch.
Ah sorry you are correct , your roof is prob going to be a bit of a shallow pitch for shingles . Not exactly sure but I think most shingles need to be on 15 deg pitch or more . Oh well worth a suggestion !
Chris
Now I've overspent by choosing larch, I'll probably stick to the cheap torch-on felt option.
without beign too nosey how much did larch set you back?
did you consider loglap or anything like that?
and what fixings did you use (plan to use) for timber framing and cladding?
The larch is a PTGV profile finished at roughly 19mm.
It's working out at £17 a square meter. Far cheaper than anywhere else I've tried.
I'm going to match the window linings, sills and other details too, so today I'm going to get it all written down for a final quote. Should be under £600.
Re:Fixings. I'm using Concept KTX Locking Drive Professional Woodscrews - they seem to be really cheap from my local timber yard (cheaper even than online prices). Mostly 5x100mm.
For the cladding I'll be using stainless nails. Doing it by hand if I have to.
For the roof joists, I'm going to use truss clips like this:
[img] http://www.cwberry.com/ProductImageHandler.ashx?ItemNumber=03212401&Size=Display [/img]
But probably on the inside.
At the moment the walls are connected together with just the above screws (8 per corner). I can't decide whether I should use coach bolts, brackets or anything else at the moment. Ideas welcome.
[img] http://s1291.photobucket.com/user/sargey1/media/shedhouse002_zps14930be1.jpg.html ][IMG] http://i1291.photobucket.com/albums/b542/sargey1/shedhouse002_zps14930be1.jpg [/IMG][/URL][/img][img]http://[URL= http://s1291.photobucket.com/user/sargey1/media/shedhouse001_zpsfa278336.jpg.html ][IMG] http://i1291.photobucket.com/albums/b542/sargey1/shedhouse001_zpsfa278336.jp g" target="_blank">http://s1291.photobucket.com/user/sargey1/media/shedhouse002_zps14930be1.jpg.html ][IMG] http://i1291.photobucket.com/albums/b542/sargey1/shedhouse002_zps14930be1.jpg [/IMG][/URL][/img][img]http://[URL= http://s1291.photobucket.com/user/sargey1/media/shedhouse001_zpsfa278336.jpg.html ][IMG] http://i1291.photobucket.com/albums/b542/sargey1/shedhouse001_zpsfa278336.jp g"/> [/IMG][/URL][/img]Ihave more or less finished my shed just a few bits to finish off
Very nice sargey! - any tips to share?
Anyone ever charred wood?
Charred cedar is a traditional building material in Japan and it interests me a lot.
Don't know whether I would have the patience to do all the cladding, but I might be tempted to do some details (capping, window frames, etc).
Extreme charring:
[img]  [/img]
Less extreme charring:
[img] http://www.greenbuildingforum.co.uk/newforum/extensions/InlineImages/image.php?AttachmentID=1430 [/img]
They charred wood cladding on an episode of grand designs. Cant remember what wood, but it looked great+ no nees to ever coat it
