I’ve been lurking around the shed threads for a while and been planning my own build for a while.
I finally started it a few weekends ago (with a break for the snow).
There was a thread from way back, where I devised a plan to fill a fairly unused part of our garden. An awkward triangular space where a crumbling 8x6 shed, gloomy rockery and compost bins lived.
Following on from this thread:
http://singletrackworld.com/forum/topic/spec-me-a-shed
The general idea was to go for this:
[img]  [/img]
Even though I’m a product designer by trade, and have built a fair amount of furniture, product models, etc and know my way around tools, this is my first outdoor project. There was a lot to learn.
I thought I’d put down on the forum some of the things I’ve learnt along the way, so that others may save time, gain confidence, or avoid my mistakes 🙂
[b]Things I learnt before I even started:[/b]
1) There are lots of different ways to build a shed
2) Looking online mostly gets you lots of people throwing in loads of ways to do it, rather than settling on one good way.
3) Timber is quite expensive these days, especially if you want something nice/unusual.
[b]Planning[/b] says that maximum floor area can’t exceed 15sqm and as it’s within 1m of the boundary, I can’t go above 2.5m.
So I started looking at how best to maximise this.
Pics of getting started to follow…
pfft shedsdead you wanna try building one that has an engine, wheels and a commercial kitchen!
Planning says that maximum floor area can’t exceed 15sqm and as it’s within 1m of the boundary, I can’t go above 2.5m.
You mean without requiring planning permission?
It's no big deal applying for planning - costs about £75, takes 8 weeks (nominally) and you need to spend a couple of hours to sort all the paperwork. Pretty easy, I've done two applications myself.
Yes, footflaps - sorry.
We're not in a conservation area, so I can build without planning permission to these specs.
I could have pushed past the specs and applied for planning, but now that I've seen how big the shed it, I wouldn't have wanted it any bigger at the door end anyway.
I've got ideas for another project and that wont require planning permission either. I like the freedom to be able to change my mind at any point 🙂
[b]Things I learnt very early:[/b]
1) Starting something and doing it wrong is probably quicker than researching the very best way to do something and taking ages to get going.
2) It’s a lot of work.
3) My ambition knows no bounds. I have to work hard to avoid over-complicating everything and biting off more than I can chew.
4) What I like and what I can afford are two entirely different things.
5) A diagonal wall makes the whole thing twice as complicated.
6) Having 36 steps up to our house, might provide great views, but is a pain in the arse when it comes to earth moving.
Some of the things above, led me to decide to make this building pretty conventional, so that I can learn the basics, make some mistakes and move on to more creative projects down the line.
Our first requirement was to relieve some of the storage problems we’ve got, desires for aesthetic beauty, cedar/larch/oak, recycled materials, garden office, etc were going to have to wait for another project.
I didn’t really have a budget in mind (although I knew it was going to be around £1k).
I modelled a rough plan in sketchup, so that I could order the timber and get a rough idea of costs.
I could get away with 5.1m length, but settled at 4.8m to make timber lengths/sheet material straightforward.
[img]  [/img]
As you can see, I split the back wall in two, because I wasn’t sure I’d have the room to build the full wall in one go.
Roof pitch is 6 degrees so that the front is under 2.5m and the back still has headroom.
Based on some rough price lists on the internet I broke it down as follows:
Foundation of blocks and concrete fence posts
£100
Timber for all framing (tanalised 2x4 floor and untreated 2x3 (scant) walls):
£400
25mm Tonge+groove for floor:
£150
Cladding (approx 28sqm):
£350 for cheapest tanalised softwood all the way to £800 for cheapest Cedar
Glass:
Toughened 4mm at approx £100
Roof options:
Ply + Felt at <£180
Metal at £250
Opal thick box section polycarbonate £600 (took a while to get prices for this and I really wanted it, but too expensive).
So cheapest at £1200 – luxury materials at £2k and fully insulated and boarded at another £600
(So far I was thinking the £1200 option was plenty dear enough).
I'm just about to embark on the same journey.
Using an bit of 'dead space' behind my garage, i've managed to squeeze in a 'shed' around 11'x13'- which works out at a bit over 14 square metres.
I'm going to keep it under 2.5 metres in height as it is right up against my borders.. So as far as I can work out - there is no need for planning or building regs approval.
I put a 12" deep concrete slab down last year (has loads of steel reinforcing in it) and this weekend i've got a brickie coming in to put up the walls using 7nm concrete blocks.
I might start a build thread with some pics...
Planning says that maximum floor area can’t exceed 15sqm and as it’s within 1m of the boundary, I can’t go above 2.5m.
You mean:
The maximum floor area can’t exceed 15sqm and as it’s within 1m of the boundary without either making it from non combustible material or getting building regs approval.
Only the 2.5m high bit is a planning issue.
Also see if you can find 'tommy's ultimate workshop' being repeated on Quest (freeview 38). You might find a few useful tips and I'm sure you'll find it interesting.
nickjb - is that right? That isn't mentioned on that planning portal video I watched.
So you can go above 15sqm if it's brick built? Without planning permission? That doesn't sound right.
Pathetically, this is the only 'before' shot I can find. It's from the original estate agent photos when we bought the house 12 years ago.
[img]  [/img]
The overhanging bushes, make the space look a bit smaller than it really is.
nickjb - is that right?
I believe so. It can be up to half the size of your garden and still not need planning. You may have had permitted development rights removed or restricted so you still need to check. National parks, conservation areas, some new estates are all areas where this can happen.
If you build in brick you can go up to 30sqm without building regs. Have a look here:
http://www.planningportal.gov.uk/permission/commonprojects/outbuildings/
You will still need regs for drains and electric if that is in the plan
Blimey, some serious planning and drawing there! We are expecting some progress pictures on a "rate my shed build" thread.
I'm part way through building a "shed" and I just did it with timber, no drawings, directed by the ever changing requirements from the missis.
It was going to be a pergola, but then she wanted a roof, then she wanted a green living roof, then she wanted doors, then she wanted full length glass doors, and power and lighting........ 😈
And yes, the costs mount up.
Progress so far......
[img] 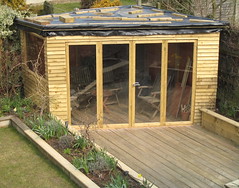 [/img]
Try and get some second hand upvc windows and door(worth ringing round double glazing fitters). I got given a French door which I put in mine... dead easy to build a wooden frame to hold them. Worth a look on eBay for kingspan seconds if you are thinking of some decent insulation. I also used a semi permeable membrane stapled round the frame before cladding to keep it totally dry.
Are you planning a flat roof?
I don't think you have a choice if you want to stay under 2.5m 🙂Are you planning a flat roof?
I imagine that all of this is the stuff that swills around in McMoonters head. There is a section of his brain full of shed CAAD drawings and calculations just like those the OP has posted.
Looking forward to seeing the photos.
So, we started out with the foundation.
Several weekends of digging out the rockery, chopping bushes, approx 8 trips to the tip and much aching of backs later we ended up with this.
[img]  [/img]
The hardcore was already there, mostly piled high under the old shed (above the damp course in the wall in fact and prone to trapping leaves). It ranges from about 3" thick at the back corner to 10" thick next to the slabs.
The slabs were already there - mostly in the stepping stones you can see in the 'before pic' but also a couple from other places in the garden.
The fence posts are bought from a local yard. 6 for £75. The blocks were £2 each from Wickes.
The string you can see is the outer perimeter of the base.
[b]Things I learnt up until this point:[/b]
1) Unlike Footflaps - I'm scared of concrete, mainly because I've never used it, and also because of the 36 steps up to the house.
2) I'm fairly confident with timber - if the posts sink a little, I'll just chock them up.
[b]Knowing what I know now, would I do anything differently:[/b]
Yes, my wife is worried about the foundation now that we've seen the size of the shed frame. I would probably have brought in some more smaller grade of hardcore to put on top and not had as much overhang at that corner you can see at the bottom left of the photo.
Maybe one extra fencepost. Or maybe poured some pads of concrete around the ends of each post.
It's a bit late now, (the base is finished and the wall frames are up), but if you have any retro-fittable ideas, let me know.
I'm still not overly worried, but my wife is more so.
Mary Hinge - that looks great!
I'd be interested in hearing about the green roof. My next project might feature one. I bet those doors were expensive!
1) Unlike Footflaps - I'm scared of concrete, mainly because I've never used it, and also because of the 36 steps up to the house.
You get very fit - I must have shifted 20+ tonnes of material 60m to the back of my house.
As for the toughened glass, when I next re-build my shed I'm replacing all the glass windows with Polycarbonate - almost unbreakable so more secure (but is does scratch more than glass).
Yes, polycarbonate is on my list too. Local place does it for £50 a sqm at 4mm, but it's quite bendy. I don't really like that 'bent glass' look, so I'd probably have to go for 6mm.
Another option is laminated glass. 3mm+3mm roughly the same price as 6mm polycarbonate
I put 8mm in my back door to replace a double glazed unit so I could fit a cat flap. It was flipping hard cutting out the cat flap - it just melted back together after the jig saw blade passed! Took several attempts to cut a decent sized hole!
So, the next job was to order the timber.
Quite a commitment and a bit scary.
Rang around a load of places.
I had an accurate cutting list due to the sketchup model.
[b]Things I learnt buying timber[/b]
1) It's expensive (did I already mention that!)
2) prices vary wildly, and lots of places have an inflated normal price so they can offer trade discount.
3) £400 of timber is quite a lot for some people, not so much for others.
4) Being slightly flexible about your requirements can bring discounts as they might have stuff lying around, or specialise in 1 thing, etc, etc.
[b]
Everything suddenly changed![/b]
A local timber yard (macc timber) offered me 2x4 tanalised at the same price as the 3x2 scant (untreated), just because it was their most common product. They were also going to supply it mostly in 4.8m lengths which was perfect for me (it's usually dearer in longer lengths). I also suspect some of it isn't the absolute best quality, but I figured that overall thickness and tanalising was more important than a few knots and a few banana-shaped planks.
WIN!
They also had some 22mm untreated tongue and groove flooring super-cheap, so I went for that too.
So, for £400 delivered, I got all the timber for the floor, walls and roof framing and floorboarding.
(2x4s worked out at £1.35+vat/m)
They also gave me a few extra to make up for the bent/chipped ones. I was especially pleased with the 4.8m flooring as it meant I could have no end joints at all.
At the same time as this, I also treated myself to one of these:
[img] http://s7g3.scene7.com/is/image/ae235?$p$&layer=0&size=281,281&layer=1&size=281,281&src=ae235/60839_P [/img]
http://www.screwfix.com/p/evolution-rage3-s-210mm-sliding-compound-mitre-saw-240v
So far it's proved absolutely perfect. A joy to use.
Edit: sorry for the wordiness!
Here's what the £400 worth of timber looked like:
[img]  [/img]
Thankfully, our lovely neighbours helped carry it up the steps!
check the 2.5m thing with your local council - when I phoned mine they interpret it as no part of the the building WITHIN 1m of the boundary can exceed 2.5m height i.e farther than 1m from boundary you can go above 2.5m up to a max of 4m
now I might be wrong but thats what I was advised
I think worrying about the shed is a bit rich when you have a pink house! 😉
[b]properbikeco [/b]- that's not how I read it, but I guess if you get someone to say something like that, you need it recorded/in writing or something.
It would actually be useful to know, because I keep considering changing the spec of the roof joists to 2x6 (or even 1x6) which would raise the tall end above the 2.5m
samuri - MemberI think worrying about the shed is a bit rich when you have a pink house!
I know! I actually don't like our house at all, but we're stuck here for the foreseeable and part of feeling more 'settled' in it, is by building stuff.
Oh hang on - you haven't seen the front. That is actually pink! (Cheshire pink stone - that's what you get for living on the wrong side of the derbyshire/cheshire border.)
AlexSimon its now how I read it either but I phoned them and asked about the 2 interpretations and they told me that was the one that applied.
Best ring your local planning office about it though, they are usually very helpful.
The difference it makes means you can do an apex instead of "flat" type roof and gain storage space
edit. I am in scotland but see pages 43 and 44 of this
check the 2.5m thing with your local council - when I phoned mine they interpret it as no part of the the building WITHIN 1m of the boundary can exceed 2.5m height i.e farther than 1m from boundary you can go above 2.5m up to a max of 4mnow I might be wrong but thats what I was advised
I'd get that in writing as it's an unusual way to interpret the law. You should be able to apply for a 'certificate of lawful development'. It's within 2m of the boundary, BTW, the 1m rule is for building regs
[i]Maximum height of 2.5 metres in the case of a building, enclosure or container within two metres of a boundary of the curtilage of the dwellinghouse.[/i]
Missed that bit. Different rules up there.edit. I am in scotland
So - knowing that I've got a load of 2x4 timber, I re-did the sketchup drawing.
At this point we locked down the window and door positions and also decided to put box-section polycarbonate under the angled front and side eaves.
I also decided that 600mm centres for the walls should be plenty.
[img]  [/img]
Still not totally sure about the roof span being do-able in 2x4.
[b]Things I know now, that I didn't then:[/b]
1) Sketchup deceives! The real thing looks much more imposing/intimidating to work on.
2) As each stage goes by, I get more precious about everything because of the time and money already invested.
just make sure you do it right, don't skimp on the essentials - you can always insulate and board out the interior afterwards.
When I build mine it'll be done like a timber framed house
"When I build mine it'll be done like a timber framed house "
whys that then ..... no need.
i'll batten out the fascia board on top of osb siding so it weathers better and ensures internals remain dry from driving wind/rain
in this part of the country it is a big problem, esp with my existing shed being reclad and still moisture can slowly work through
Timber is amazingly expensive to the consumer, can't work out how they justify it considering what we get for the raw product.
When we mill and treat timber ourselves for in house work it works out as roughly 75% cheaper than trade. We supplied timber for a guy at work to build a garage and a half sized shed, think it worked out as £120 and with 7m long wavy edge larch boards, he didn't have any joins.
Hi Timber - so how do I cut out the middle-man?
Find the man with the trees or his sawyer.
Have a dynamic design approach to use up what is in his yard.
Seems like you got close to this with your deal anyway.
At our end of things, £400 would get you around 15 ton of sawlogs roadside. This would take the mobile mill about a day to process to your sizes at about £200/day. Pressure treatment was around £30/m3 last time I think.
Thanks timber - the cladding is still going to be the single biggest purchase. I really fancy Larch or Cedar, but I can't get it below £600 for larch or £800 for cedar.
(30sqm required).
I once tried to work out what percentage you'd get as raw product from a bit of 2x1 in B&Q. My head nearly exploded with the maths, the sticky label probably cost more.
Larch is more readily available and is far more likey to be in a sawmill stock pile = cheaper.
If they aren't particularly automated, wavy edge should be cheaper as it requires less handling.
Try and find a small sawmill that deals with timber in the round is the best bet. Lot of big timber merchants are just re-cutting/re-selling someone elses sawn timber.
Mary Hinge - that looks great!
I'd be interested in hearing about the green roof. My next project might feature one. I bet those doors were expensive!
Cheers 😀
[url= http://www.sedumgreenroof.co.uk/ ]Green Roof[/url]
I made the doors myself. Some planed tannalised timber, mortice and tenon the corners, rebate cut with table saw and router. Ripped the glazing strips down with table saw. Glazed with 4mm polycarb from Screwfix, it's actually not wobbly/bendy as it is fairly narrow for it's length. I used standard sized glazing to avoid cutting, and got lucky with the spacing as it suited the aperture.
I tried to get some patio doors but they all worked out too expensive. Also I can open all 4 doors to fully open up the space, which I wouldn't be able to do with sliders.
Plenty still to do to finish off the inside (insulation and boarding etc.), and hopefully the green roof will go on May/June.
It's good fun this building lark, but can be time consuming and expensive, but look at what you will have at the end. Didn't help that my missis kept changing the scope every time I got to the next stage, so I have to improvise as I go along.
It's good fun this building lark,
Definitely - I can seem myself slowly filling every corner of my outside space with various structures.
I've already got a plan for a tiny garden office and a treehouse!
Mind you - that's a problem since I've got so much to do on this one yet!
You should be out there now, not wasting time on here! 😉
Tooing ad froing with work today, so have to be in to get the emails and get stuff out the door.
I'll be out there this (blustery) evening though.
Because the front two perimeter sides of the base aren't supported, I decided to do a belt+braces approach and as well as screwing from the ends, I put brackets on all the insides.
[img]  [/img]
[b]Things I learnt while doing the base:[/b]
1) That the diagonal really is a pain
2) I had plans to use a nail gun and framing nails (compressor type), but in the end just felt happier with screws. It'll take me longer, but I like them (potentially reviving the idea for the cladding).
3) Modern cutter screws with waxed tips are fantastic. Gone through boxes of the things at a fair old price, but they are a joy.
[img]  [/img]
get some dpm down between the joists and where they contact the blockwork - otherwise that is one place they could wick moisture and rot
Awesome! A shed thread.
Looks a promising start.
Things I've used for shed building that I've found invaluable.
Nails. Buy them in 25kg boxes.
An Estwing 20oz hammer.
A half decent spirit level.
A square
A sharp hand saw.
G clamps. I've got pairs 8,6 and 4 inch clamps. It's like having two extra pairs of hands on the job.
A mitre chop saw.
Tricks I've learned shed building.
I never really have a plan drawn out, but I do try to think of the processes to arrive at a solution. Where measurements are constants, make wooden spacers which are clampable, rather than constantly measuring gaps.
Clamping square cuttings below (to support)and alongside ( to keep square) say a joist or dwang, you can make consistently square joints again and again with limited measuring.
I'd always trust a taught string line more than a sequence of measurements.
I build much in the same way I paint, being adaptable is a virtue.
Good luck with your build, there is a lot of good advice to be found on here, don't be afraid to ask, no matter how trivial.
[b]properbikeco[/b] - yep that's in the next photo 🙂
brr - the wind has returned.
good stuff!
also if you have cresote type stuff paint this while you can and it should be fine for a long time so long as you have decent airflow underneath
As properbikeco mentioned, we then put a strip of damp proof course above all the concrete posts. These were wrapped and tacked to the frame as you can see on the photo below.
The floor boards weren't treated, so we bought a tin of Cuprinol Shed and Fence (two of the colours had far fewer health warnings, so we picked that) and coated what was to be the underside 2 coats including inside the groove and tongue.
This was when the snow came so it was a pain to keep protecting the wood whilst still allowing it to dry.
[img]  [/img]
[b]Something we learnt[/b]
Doing one side of wood with a staining product probably wasn't the best idea. Any crack, knot or imperfection sucks the stain through to the other side quite significantly.
So on the good side, we have a pattern of reddish knots and lines. Ah well. A sand will probably neaten it up.
After that dried, I laid the planks - the first 11 were all the correct length, then I had to overlap the corner and cut the last few in half to fit.
We just let them overhang the diagonal and sliced it all off with a circular saw later.
I really thought I was going to use nails here, but again opted for screws, just because I'm not used to nails, and didn't have access to a nail gun without borrowing a compressor and spending £100.
[img]  [/img]
There were a few planks where the groove wasn't deep enough at the end (the wood tapered), so I organised those to go on the first few diagonals (you can see them sticking out on the right.
There were also a few shakes, but the timber yard had thrown in a couple of extra planks as there were some bashes, etc. It all worked out fine.
Oh forgot to mention...
The reasoning behind using T&G instead of Ply or OSB.
Basically, because of the way this shed is built (walls on top of floor), access to the floor will be fairly impossible.
My joiner friend said that chipboard can swell and flake, ply can delaminate, but even though T&G may cup, it's not really going to go anywhere if I've got good air circulation underneath (which I have).
It made sense to me, even though it's much much more work than just slapping 6 sheets down!
This is awesome.
Im currently looking at buying a shed but seeing this has inspired to actually make one..maybe with some help 😀
Thanks bruders338. Something I learnt early on (it's in the other thread), was that building your own seems expensive compared to B&Q/Online shed sellers
[b]BUT[/b]
It's because you can't actually buy timber as crap as the stuff they use on those.
There's one online shed place that has 5 different levels of quality. ( http://www.gardenbuildingsdirect.co.uk)
I looked at the 'top of the range' one and it was still only 11mm thick cladding! with 1.2mm glass! I daredn't look at the lower spec ones.
So you may end up spending more, but you'll get something much better quality.
Great thread, been following shed builds for a couple of years on here now (!) Only thing holding me back from my own is the prospect of moving in a couple of years and having to leave my project behind....
That would be gutting, but then also an opportunity to build another!
Have you thought about something a little more secure door wise, than the usual shed type?
I picked up double glazed french doors & 2 large windows for under £800 for mine.
Hi tinsy - currently, the plan is to fit a standard 2'9 exterior house door. With a standard 5-lever lock.
That's if funds allow, etc. The diagram at the bottom of the previous page, shows an opening large enough to fit a standard door frame kit. The current plan is to make the linings myself though (same with windows).
With the base done, it was time for the exciting bit - building the walls.
The back was the easiest so I started there.
Studs on 600mm centres.
Two 5x100mm screws in from the ends per joint. Drilled pilot holes.
My rule of thumb for pilot holes on this build is if I want the screw to pull the joint tight, drill pilots. If the joint is already tight (with noggings for example), then these fancy screws can be driven straight in.
[img]  [/img]
I mentioned before that I planned to split the back wall, but in the end, we could fit the whole thing on the base, so I just did it as one.
At this point we were considering cladding the whole thing in ply, so the centres were positioned with that in mind (i.e. 600mm from outside edge to centre of first stud).
However, we also wanted to allow for cladding the inside, so I added studs just inside (visible here leaning against the wall):
[img]  [/img]
Once all the studs were in place, I measured by 3/4/5s to make sure everything was square and screwed on a temporary piece of scrap across the corner.
I decided to leave noggings until I'd got the frame up. So that I could use offcuts, and also so the frame was still slightly flexible for getting all the shed corners lined up.
Standard door would be OK, but why not a non standard door that takes up the whole of that side?
You are making a very nice job of it though.
I just drew mine & had it made (bought windows & doors first & drew it to accomodate them), but I did make the concrete base myself, all 27 x 8ft of it.
Pretty standard shed, just a bit longer.
[img]  [/img]
Only thing holding me back from my own is the prospect of moving in a couple of years and having to leave my project behind....
Sounds ideal, given the first one you build is just a learning experience and the second one will be much better and quicker as you'll know what matters and why....
I remember seeing your ages ago tinsy - one of the many on here that have inspired me to do my own.
Next stage:
I steadily worked my way through all the walls over Friday and Saturday last week and stood them all up against the house.
[img]  [/img]
Where you can see doubled-up timber is where I just want to create a bit of room to attach thin bits of cladding between the windows/doors/etc.
It's easier just to whack another stud in in these areas.
Now for the Pièce de résistance!
Timelapse video of us erecting the frame.
It was only at this point I realised what a monster I'd created. Quite intimidating actually!
The height of the door wall is really quite tall, especially as there's quite a gap to the ground.
No wonder it costs so much to clad! 🙂
Good stuff, keep the posts coming!
We're nearly up to date now, so everything will slow down massively 🙂
I'm going around putting the noggings in on evenings this week.
Just to echo what [b]mcmoonter[/b] said above - I totally agree about using things to help with spacing instead of measuring.
For example, this is my nogging installation setup:
[img]  [/img]
Two equal-length supports with the clamps holding it flush with the studs. (note the screw going in diagonally, so that I can have the visible noggings all lining up - unlike the base).
With all noggings I worked from the corners towards the middle, so that I got a tight fit, without transferring errors along the whole wall.
[b]Then it's decision-time on the roof and cladding.[/b]
Still don't like felt, still can't think of anything better in terms of value, noise, ease of installation, etc. A friend is recommending cheap ply boards covered in best-quality torch-on felt. Any better suggestsions?
metal roof every time
if you want deluxe, board roof with planks (like slate roof) then drop breather membrane then tin roof. There are some very nice flashings you can get to finish it off.
You can then insulate underneath easily if required and board over with material of choice
[b]properbikeco[/b] - everyone I've spoken to sucks their teeth at metal roofs. The shed roof is only 3m from the neighbour's bedroom window.
I like it from every other point of view, but I'm worried about rain and hail annoying the neighbours.
I do like those one handed quick grip things, pricy but very handy....
[quote=footflaps ]I do like those one handed quick grip things, pricy but very handy....
dead cheap in aldi 🙂
I'd suggest a rubber roof for ease of application, very easily fitted and looks good. I used a company called Permaroof when I built at the end of my garden and have also rubber roofed a couple of small sheds / wood stores in the garden. Your sheds looking good and makes me think I should post a few picks to the shed threads at some point. Just gotta figure out uploading photos to Flikr first!
footflaps - MemberI do like those one handed quick grip things, pricy but very handy....
We even had a thread for them 🙂
http://singletrackworld.com/forum/topic/carpenters-what-quick-clamps
Another roof I don't really like, but am considering:
[b]EPDM rubber[/b]
Just priced it up as £400 including ply.
(torch-on felt £200 including ply)
(metal approx £250 without ply)
Anybody else want to throw their 2p in?
We're currently looking for a new house and while my wife has been looking at furnishings for our new home, I've been looking into what type of shed I'll build.
The efforts of people on STW have inspired me to build my own rather than get a pack.
Keep the updates coming.
McHamish - yes, this time last year, I was in a similar position!
Just noticed your efforts at 0.12.
Concentrate...there's a shed to be built.
McHamish - MemberJust noticed your efforts at 0.12.
Concentrate...there's a shed to be built.
I wondered if anyone would spot that!
Just found a great price for siberian larch, so I think that's what I'll use for cladding.
Wait 6 months then coat with Osmo UV protecting oil.
http://www.artisantimberandflooring.co.uk
Fantastic thread. This has really inspired me - my next shed will have to be self-constructed.
I'm currently building a large log store so I'm getting some practice at timber construction. It does seem ridiculously expensive buying timber but I'm convinced it's better to build something solid with a bespoke design rather than cheap stuff off the internet.
andyecc - My budget is growing all the time. Currently at about £1300 not including any internals.
(I never really added up screws/etc beforehand, but they are actually quite expensive - stainless nails required for the larch too).
edit: remember mine is 14sqm though. The same as a standard garage.