
MegaSack DRAW - This year's winner is user - rgwb
We will be in touch
Do I screw them on or use no-more-nails?
Builder recommends no-more-nails. I think that sounds a bit shoddy, but it is definitely quicker and would be neat. and can't think of a reason that I would want to remove them. So am tempted....
What do people think?
It depends.
If your wall isnt perfectly straight no more nails will not work. If it is comepletly straight then no reason why you cant, except if you ever need to take it off it might pull half the wall away...
Traditionally nails are used, worked for me.
Size skirting?
Lengths?
Mitres?
What's the wall? Stud? Plasterboard? Brick?
I believe traditionally they're nailed in, but I've used gap-filling adhesive and they seem to be fine. It also allows you to keep the skirting board reasonably flat when the wall isn't.
Nails, but then none of our walls are dead straight. Stating the obvious, if you are nailing into plasterboard walls, make sure you hit the studs
It's allplasterboartd and plaster wall. longest length is about 2.5m, will mitre it and skirting is 150mm wide.
🙂
These buggers
[img] 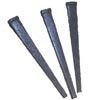 [/img]
Buggers because I had to try to pull some out last week.
Pic was found here, which could be useful: http://www.home-dzine.co.za/home-Improvement/improve-replace-skirting.htm
It's allplasterboartd and plaster wall
So plasterboard onto stud? i.e. is it hollow when you tap it?
lashings of gripfill and a nail gun. that'll keep those f****** there!
🙂
stud+plasterboard shoudl be ok with no more nails as they're pretty flat and you don't need to worry about hitting studs/pipes/wires.
lashings of gripfill and a nail gun. that'll keep those f****** there!
Tut!
Actually, if you can borrow a nail gun, then yep, a few (just a few mind) dabs of gripfill and nail into the studs. Studs will be ~400 mm centres. If you use too much gripfill onto plasterboard, and they ever need to come off, half the plasterboard will come away with them.
If your wall isnt perfectly straight no more nails will not work.
Yes it will. And it fills the small imperfection gaps you can see from the top at the same time. I cut ours to size, painted them, then stuck them to the (Already painted) wall and ran a bead of the adhesive along the top to neaten it up. It's so crisp and neat it looks like a pro job, if not better.... 🙂
yeah plasterboard on stud.
Builder recommends no-more-nails.
Hahaha........"No more Nails" is for DIYers, girls, and gay men 😀
Proper geezers use Gripfill.........what Stoner said.
yeah plasterboard on stud.
Nails (gun or lost heads) into the studs, gripfill too if you want - no need for screws.
Are the skirtings softwood or pre-primed mdf?
If pre-primed mdf, you might find that gripfill alone will do the job - might leave some large gaps at the top though - which you will then fill with caulk, which will then crack as it dries if the gaps are large.
If it's softwood, make sure and prime the back of the boards before you put it on. And use knot solution!! Otherwise you'll have little yellow circles where the knots are in a few years.
Proper geezers use Gripfill
Make sure you get the size gripfill tube to fit the gun you have.
dd/ee do either of you know of a very good quality caulk that wont crack. I havent yet caulked the skirting/architrave in the barn because from experience find all the caulks Ive tried eventually sink and crack looking worse than the small even gap that would be there without it.
Gripfill only comes in Man Size.
*sniff sniff" gripfill highs... mmmmmmmm *sniff sniff*
I didn't know caulk could crack 😕 But then I'm not a decorator.
Get Painters Mate
[img]  [/img]
There are better makes - I'll have a look in the van in a bit - just can't remember the manufacturer.
On the sinking thing, there is a solution (of sorts). Do you have a foam gun? i.e. expanding foam cartridges with a gun that's removable? If so, you can set it to a very small flow and fill the gap to just below the top of the skirting. Wait for it to cure and then caulk. Gives the caulk less room to sink.
If you're not experienced using foam, then have some of those citrus wipes handy for accidents...clean up straight away. If you don't have wipes and mess up, let the foam go off before removing 🙂
If you're not experienced using foam
You kidding? I've got load-bearing foam in this barn 🙂
will have a go at painter's mate. Havent tried that one before.
I've got load-bearing foam in this barn
I've become convinced that half of the UK is held together with foam. It is indeed magnificent stuff.
could you imagine what an accident in the foam factory would look like though 😯
i was in DIY shop when a guy complained that the spray foam had blocked his sink as when he had finished doing what he needed he got rid of it by emptying it down the sink 😯
an accident in the foam factory
I pushed a table saw a little too far in the back of my old work estate. Heard a horrible hissing sound - I'd punctured a can of foam. I had one of those sit-com moments where I'm running around holding this thing in the air spraying foam everywhere. It was not pretty.
slight hijack - but how do those of you using nails in masonry walls get the buggers to go in? when I try to do it they've destroyed a chunk of 80-year-old plaster then stopped dead when they hit some brick, bending when you whack them.
Sadly, gripfill doesn't work for me cos my walls are too bendy (once stuck they're fine but holding them on in the interim is a bugger). I use rawlplugs and screws now, then touch the heads in with some calk
but how do those of you using nails in masonry walls get the buggers to go in
I've had to use them a few times - I hate them. Depends on the bricks really - and they're expensive.
Time for a builder's foam baldy haircut? An old friend of mine builder's foamed a new window above the porch and was happily foaming away until his wife turned up and started hitting him with a metal rule - he had a wonderfull frozen waterfall out through the gaps and down the fron of the house. Took him ages to cut it away.
I think the preferred way for the sophisticated gentleman to stop cracks showing is using shadow gaps...
crappy old brick and plaster and you might as well just shoot at the wall. Explosions of brick flakes and gypsum everywhere. I hate masonry nails.
Once had to put a short run of skirting on a very bendy wall in an alcove in the old house. Gripfill and screws, and a length of 2x1 as a wedged prop from the other side of the alcove. All went in fine setting until I took the prop out and *bang!* the skirting bounced off the wall bringing everything with it 🙂
So I mitred the skirting in shorter lengths and just followed the wonk 😉
those frame fixing things where you drill a hole through the skirting and into the wall then hammer the rawlplug and nail through in one go are great on older walls (as is using skirtign board 2 inches taller than what came off so that it hides the ragged edge made by removing the old boards). You do have to fill the heads afterwards, though.
how do those of you using nails in masonry walls get the buggers to go in?
Use masonry nails ? Careful though, because they don't bend it can make them rather dangerous. If hit at the wrong angle they can be sent spinning into your face, so wear goggles. They also tend to split timber, so if you are fixing one near an edge, drill a pilot hole first.
gripfill doesn't work for me cos my walls are too bendy (once stuck they're fine but holding them on in the interim is a bugger).
Temporarily spike some nails on just to hold in position and then pull them out later. Or if you have a timber floor, temporarily fix off-cuts to the floor to hold the skirting against the wall. Or just drill plug and screw.
So I mitred the skirting in shorter lengths and just followed the wonk
The answer is to do a series of saw cuts half way through the skirting, that will make it very bendy. Either on the front of the skirting if the wall is curving inwards, or the back of the skirting if it's curving the other way.
I think you probably misunderstood him, he actually said:
"No, more nails"
tried that one once Ernie. Didnt really work very well and didnt have the patience to stick with it. Proper bodgin'
OK fair enough. What did you do, a series of bastard mitres ? Did you "bisect the angles" ? Or just slap a load of filler in the gaps ? 😀
i've got one of those angle finder tools
[img] 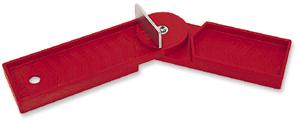 [/img]
sadly, I don't have the ability to cut skirting at that exact an angle, so I normally do it to the nearest 45 degs and just calk the gap 🙂
Your preferred brand of sticky gunk with some nails to hold it while it dries and manage small wobbles in wall. Simples.
Sliding mitre saw is the best tool for doing skirtings - I did the ones in our hall with a mitre box, and it took forever, whereas I bought a power mitre saw for the lounge/dining room and did it in about half a day. I'm still a bit crap at cutting outside mitres, but the inside mitres and joins are all pretty near perfect - one of my mates who is an architect wanted to know who'd I'd got to do them!
Saw in question was one of these:
[url= http://www.screwfix.com/prods/22424/Power-Tools/Compound-Mitre-Saws/Evolution-210mm-Sliding-Mitre ]Evolution Rage 3d[/url]
I've seen some reviews complaining they're not very accurate, but I got good advice from a friend about taking the time to set the saw up with a set square so that the blade was exactly 90 degrees to the wood, and that the laser guide was also set properly. Took me about 20-30 mins of fiddling with all the various adjusters, after which it seemed pretty much spot on and hasn't moved about in use.
the inside mitres and joins are all pretty near perfect
I was always told not to mitre skirting in a corner but to cut one piece to fit the other with a fret saw. Could be the old fashioned way?
As nailing into brick has come up may I just mention my most hated job, fixing conduit to old brick. Capping nails are, are, I can't even find the words 👿
so gripfast and a few nails to hold it is the stuff then?
gripfast
Can you take a picture of the guy in the builders merchant when you ask for some please 🙂
5lab - Memberi've got one of those angle finder tools
sadly, I don't have the ability to cut skirting at that exact an angle, so I normally do it to the nearest 45 degs and just calk the gap
That tool is designed to set the angle on your compound mitre (chop) saw 5lab. Once set, the saw should do the cutting for you. Although TBH I don't find the angle finder to be much practical use - despite it being made by a reputable company - Trend.
I was always told not to mitre skirting in a corner but to cut one piece to fit the other with a fret saw. Could be the old fashioned way?
No, scribing the skirting at the internal corners is still how it should be done - internal mitres are very naughty. Although using a "fret saw" is probably a little old fashioned 😉
Can you take a picture of the guy in the builders merchant when you ask for some please
I like asking for Pinkgrip 🙂
[img]  [/img]
It's actually pretty good stuff.............and it's pink 8)
ernie_lynch - MemberThat tool is designed to set the angle on your compound mitre (chop) saw 5lab. Once set, the saw should do the cutting for you. Although TBH I don't find the angle finder to be much practical use - despite it being made by a reputable company - Trend.
I think my problem is my mitre saw was cheap and sh*tty. It has 'stops' for 22.5 and 45 degrees, and its really difficult to get it to 'stay' in a different angle. its a handsaw, and doesn't clamp the wood to be mitred upright very well. all in all, a crappy tool.
its really difficult to get it to 'stay' in a different angle
I'm surprised you can't lock it in-between 22.5 and 45 degrees, you should be able to - there should be something to tighten up. I agree that hand mitre saws aren't a lot of good, other than for small mouldings and beads. Try clamping it down onto a solid surface, that's more important that clamping the wood imo. And don't force the saw - just let it follow its own line slowly through the wood, the weight of the saw itself should be sufficient to do that.
I had some skirting fitted by a joiner last month, and he did the internal joint that way.
Butt the first piece right into the corner.
Cut the next piece to fit the next run plus the thickness of the previous board.
Cut off the bottom (straight) piece of the end of the second run, leaving the moulding part intact.
Cut through the moulding part at 45° - to give a matching edge.
Cut away the bit left with a fret saw - not so old fashioned it seems!