now that is a very nice Boulton Paul Defiant John_Drummer!
I'm liking the 'spinner' very much!
Freehand 🙂
Freehand
Seriously? No masking at all?
Nope, no masking. I painted the whole spinner white while on the sprue, then used a small flat brush to paint the black part. When dry I cut it from the sprue & attached it to the prop assembly and touched in the black again where necessary
Nice model. I always thought the Defiant looked a bit cumbersome. Bot sure that I'd have wanted to be sat in either seat.
My Heinkel He111 is coming on nicely, but slowly. Masking the glazing took an age.
Argh. How good is Aitfix's Customer Service?
I've got a fuselage half missing. 😕
I've dropped them an email.
Sent it back to Amazon and ordered a replacement. Can't be arsed faffing about with it.
Quite pleased with this as I got it primarily as a painting exercise. Spent ages on the interior and even bought aircrew figures for almost as much as I paid for the plane itself.
Went off-piste with the colour scheme too as I wanted it to be Battle of Britain, but Revell GmbH didn't offer that as one of the 5 options with the kit.
[img] 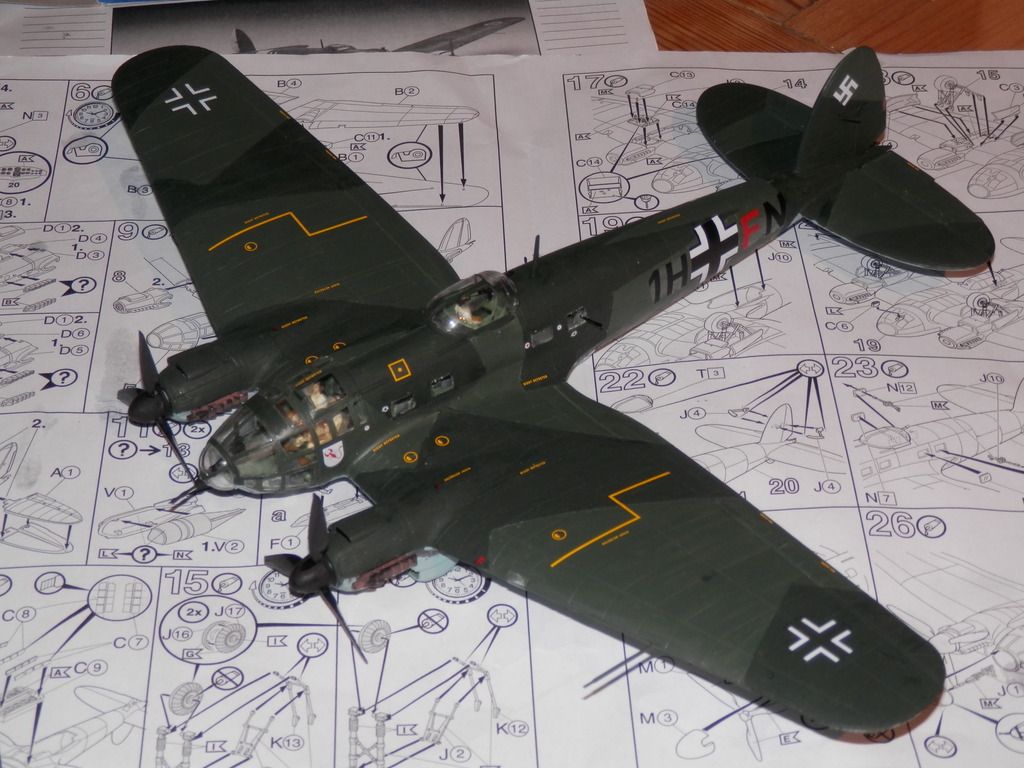 [/img]
[img] 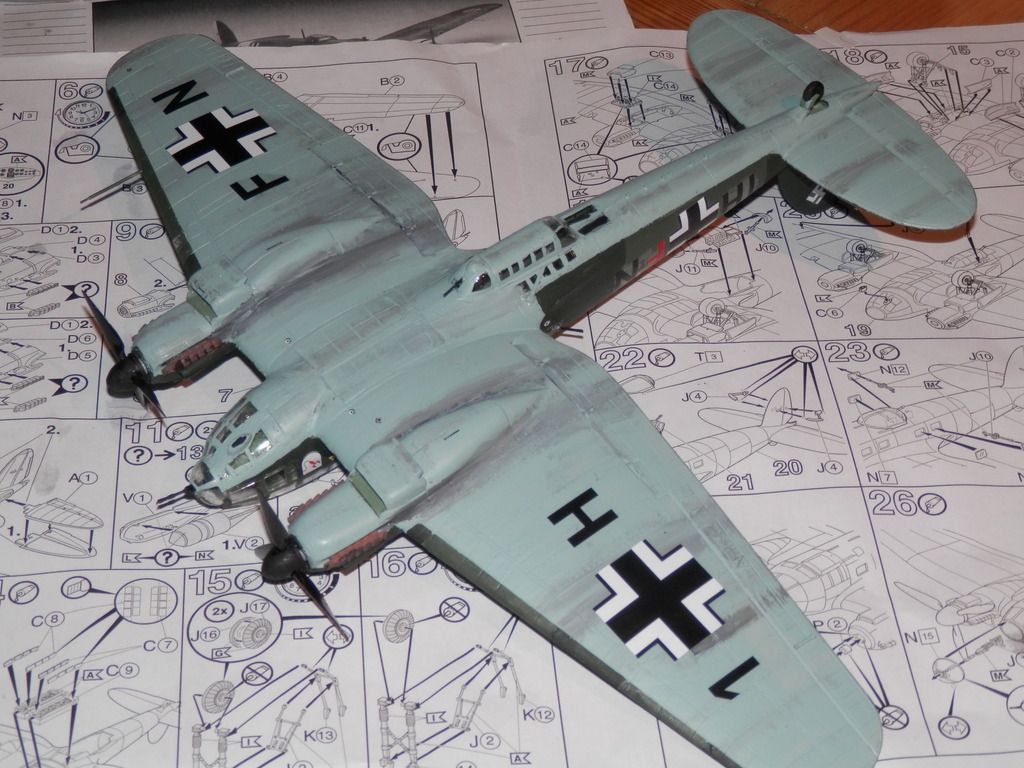 [/img]
Nice work 🙂 especially the exhaust stains
stain after decals...
I used to have a dozen (badly painted) planes hanging from my bedroom ceiling when I was a kid
🙂
I'll probably add a bit more staining over the decals now that I'm confident that I won't mess it up. Errors on a bare painted surface are easy to rectify.
Got a Stuka and a Mosquito on the go also. Will probably finish the Mosquito first as I'm bored of German green on green linear cammo painting.
not strictly airfix but has a weird scale thing going on
Don't know how I missed this thread, but here are some of my completed models
[URL= http://i177.photobucket.com/albums/w201/geordieboy_2007/Modelling/20140220_121635-picsay_zps7mro3d3x.jp g" target="_blank"> http://i177.photobucket.com/albums/w201/geordieboy_2007/Modelling/20140220_121635-picsay_zps7mro3d3x.jp g"/> [/IMG][/URL]
[URL= http://i177.photobucket.com/albums/w201/geordieboy_2007/Modelling/20140220_121656-picsay_zpsupnazx8m.jp g" target="_blank"> http://i177.photobucket.com/albums/w201/geordieboy_2007/Modelling/20140220_121656-picsay_zpsupnazx8m.jp g"/> [/IMG][/URL]
Tornado Gr4 made from Revell GR1 and Airfix kit
Zero
[URL= http://i177.photobucket.com/albums/w201/geordieboy_2007/Modelling/20140301_180510_zpstheax03x.jp g" target="_blank"> http://i177.photobucket.com/albums/w201/geordieboy_2007/Modelling/20140301_180510_zpstheax03x.jp g"/> [/IMG][/URL]
Mustang
[URL= http://i177.photobucket.com/albums/w201/geordieboy_2007/Modelling/20140428_163508_zpslfdiiu5n.jp g" target="_blank"> http://i177.photobucket.com/albums/w201/geordieboy_2007/Modelling/20140428_163508_zpslfdiiu5n.jp g"/> [/IMG][/URL]
Hasegawa Phantom turned into F4j UK
[URL= http://i177.photobucket.com/albums/w201/geordieboy_2007/Modelling/20140927_122459_zpsijfhbeip-picsay_zpsyqurortk.jp g" target="_blank"> http://i177.photobucket.com/albums/w201/geordieboy_2007/Modelling/20140927_122459_zpsijfhbeip-picsay_zpsyqurortk.jp g"/> [/IMG][/URL]
[URL= http://i177.photobucket.com/albums/w201/geordieboy_2007/Modelling/20140927_122619_zpscbzuyp1r-picsay_zpsjz3uar4h.jp g" target="_blank"> http://i177.photobucket.com/albums/w201/geordieboy_2007/Modelling/20140927_122619_zpscbzuyp1r-picsay_zpsjz3uar4h.jp g"/> [/IMG][/URL]
Nice stuff Nairnster. Is the Fantom a 1/48th?
I've got 4 or 5 of the 'Phantom Family' in the loft just waiting.
Thanks. They are all 1/72. I don't have the space for anything bigger unfortunately.
Currently working on an Italeri Sr71, but that has needed lots of filling and sanding joining the fuselage halves.
I am interested in the new Airfix Phantom. The one above was the Blue Angels boxing originally
[URL= http://i177.photobucket.com/albums/w201/geordieboy_2007/Modelling/20140405_191242_zpskwsh4loz.jp g" target="_blank"> http://i177.photobucket.com/albums/w201/geordieboy_2007/Modelling/20140405_191242_zpskwsh4loz.jp g"/> [/IMG][/URL]
Nice Phantom. I’ve got a soft spot for them after I built one when I was about 10. My Gran bought it for me from Woolworths in Blackpool and I made a proper good job of it. I bought a Matchbox one too in RAF colours. That was a nice kit but the panel lines were raised rather than recessed. Weird. Whatever, it looked good on my Cold War diorama with a [url= http://www.linkaworld.com ]Linka[/url] and papier mache blast pen and NATO ground force figures.
In other news the quality of the Airfix 1/72 Mosquito that I’ve got on the go is rubbish compared to the Revell Heinkel. Large amounts of moulding flash and really poor detail (the cockpit interior is two seats, a “lump” and a massive void that leaves the wing roots visible through the canopy). The pilot is supplied without any legs below the knee. Either he is Douglas Bader or they just couldn’t be arsed making a proper job of the instrument panel. The decal sheet is very basic too. Hopefully I can make a good job on the paint and use some of the decals left over from the various options on the Heinkel, specifically the red “no step” lines that need to go over the radiators.
My Gran bought me one of these too from John Menzies on Salford Market. A distant recollection is that it wasn’t that great 38 years ago either. Time for the kit to be retired.
The Revell Stuka that I’m doing looks way better in comparison. I just wish that Revell would supply the aircrew.
Just seen that I can get an Airfix English Electric Lightning for 8 quid! Will it be old and crap or a new tooling with better decals? Hmmm…
It is the new moulding with the detailed decals.
It's been a while since I last didn't complete a model, (a VW Microbus, which was costing quite a lot in terms of paint) so I just bought one of those Lightning's as a starter kit.
Go on, you're going to tell me that the cheap paints and brushes mean I'll make a rubbish job of it aren't you? I reckon artistic ability and patience may be the more limiting factors.
Have one of those in the stash. Need to get started but its coming to biking weather, not modelling weather.
The paints in the starter set in my limited experience were a bag of shit. HTH.
The brush isn't much better iirc. But they are a useful clue as to which colours you do need in their Aquacolour range
recently completed: Tamiya 1:12 Honda CBR1100XX Super Blackbird:
[img]  [/img]
[img]  [/img]
[img]  [/img]
current WIP: Tamiya 1:24 1955 Mercedes Benz 300SL
[img]  [/img]
[img]  [/img]
[img]  [/img]
Wow. They look real. Especially the brake on the bike.
I've just ballsed up the cockpit on a Mosquito be accidently melting it under a white spirit soaked rag. I'm now at the mercy of the Airfix spare parts dept or it is going to cost me the price of a new kit for one bit.
Got a Stuka on the go too. Will post pics.
Which part of the cockpit? If it's the instrument panel you could scratch build one quite easily from a sheet of plasticard of the right thickness.
Which part of the cockpit?
The canopy. I frosted it.
Ah. You'd have a job on scratch building a replacement for that 🙁
You could genuinely mistake that blackbird for the real thing, except that it needs massive chicken strips.
What do you use for the metal effect on the exhaust?
Ffs northwind, I've just looked back through the whole thread, looking for pics of an ace looking SR-71...
The exhaust came like that - built very much out of the box
The wonderful people at Airfix have sold me a new canopy for £3 including delivery. I shall endeavour not to destroy this one with chemicals.
Also, I take back what I said earlier about the kit, but if you are building the undercarriage I would ignore the instructions and try different methods of assembly before committing yourself to glue and finding that A) It won’t fit inside the nacelle without a bit of trimming, and B) If you are going to follow the instructions to the letter you need to grow an extra hand.
Some tremendous looking aircraft there nairnster! Very impressive!
And liking the the Honda JD! 😉
I'll have to do some more photos. There's a Honda CB750 (Superdream shape), '67 Ford Mustang and numerous others that I haven't got round to photographing yet.
BTW I am never ever doing another sailing ship. Fr**ging in the rigging indeed 👿
I have an SR71 on the go didn't take many pictures as I went though.
It's the Italeri 1/72
[URL= http://i177.photobucket.com/albums/w201/geordieboy_2007/Modelling/20150103_210945_zpsbpz0mghe.jp g" target="_blank"> http://i177.photobucket.com/albums/w201/geordieboy_2007/Modelling/20150103_210945_zpsbpz0mghe.jp g"/> [/IMG][/URL]
Needed loads of filling and sanding on the fuselage joins
[URL= http://i177.photobucket.com/albums/w201/geordieboy_2007/Modelling/20150103_211056_zpslewowfbb.jp g" target="_blank"> http://i177.photobucket.com/albums/w201/geordieboy_2007/Modelling/20150103_211056_zpslewowfbb.jp g"/> [/IMG][/URL]
Its languishing in need of the rest of the decals and then some weathering
[URL= http://i177.photobucket.com/albums/w201/geordieboy_2007/Modelling/FB_IMG_1489652297199_zpsfku8vepr.jp g" target="_blank"> http://i177.photobucket.com/albums/w201/geordieboy_2007/Modelling/FB_IMG_1489652297199_zpsfku8vepr.jp g"/> [/IMG][/URL]
No pictures, but my lightening is coming along. Getting the front fuselage with the air intakes and cockpit assembled was a right bastard, but it's done now.
Anyway, painting. Any tips for getting the best brush finish I can on large flat parts like wings? I'm not going the airbrush route. Obviously normal rules of painting apply, thin coats and strokes in the same direction. What about a very light sand before the final coat? Anything else?
Make sure you wash all the parts/sprue in soapy water before building the model. This definitely helps with paint adhesion I have found.
I brush paint all of mine, good quality brush makes a huge difference. I don't do any sanding specifically for paint prep. Brush strokes in direction of airflow, lighter colours first etc. It takes practice and you will get better with each model.
Tamiya 1:12 Honda CB750F:
[img]  [/img]
[img]  [/img]
[img]  [/img]
Nice^
I've just spent the last hour messing about with the weathering on a Mosquito. Will post up a picture when it is done.
Indeed, that's brough back a load of memories @john_drummer. I had the same kit (cos I had the bike) and never quite got round to doing it. The bike decided that it didn't like oil in the 3rd lane of the M40. We spent rather a long time stood right by a Cadbury's World sign waiting to be rescued. Mssed a wedding in the process...
I tend to do cars & motorcycles in showroom condition straight OOB. AFVs do get some weathering and ideally some crew, possibly even a diorama. I have a nice WWII France street scene involving a Churchill MkVII, some Tommies and a local farmer with a bottle of wine in 1:35
Grubby Mosquito.
[img]  [/img]
[img]  [/img]
Went a bit OTT with the filth. I'll have to tone it down on the next one.
Nice spinners 🙂
Thanks. The cockpit was a little nerve wracking at the second attempt too.
I'm doing a BF109E, Spitfire MKII and finishing the Stuka for my lad's Battle of Britain ceiling thing, then I'm doing an EE Lightning. I need to sort out my weathering technique for that as general smears of crap won't look great and i'm wary of using silver paint, as experiences with it so far haven't given good results. .
I put dirt around the fuel fillers on the Mosquito. I was quite pleased with that in a sad sort of way.
For the Lightning I'd use Tamiya XF16 Flat Aluminium. It's an acrylic so thinned / cleaned with water if necessary, and quite thin so use a big brush and load it up well
