Tracks finished 🙂
Primer next
Once again my contribution to this thread is not a proper scale model, but a converted tank for a game of plastic toy soldiers. Specifically this is Gerti, an Imperial Guard armoured recovery vehicle that I converted from Warhammer 40,000 Chimera APC and Galvanic Servouhauler kits:

I have a Flickr album containing more photos, including WIP shots.
I think that I am less bothered about getting everything "right" when I paint gaming stuff than when it was taking me months to finish even the smallest scale model. It's nice to actually be finishing things!
Progress.
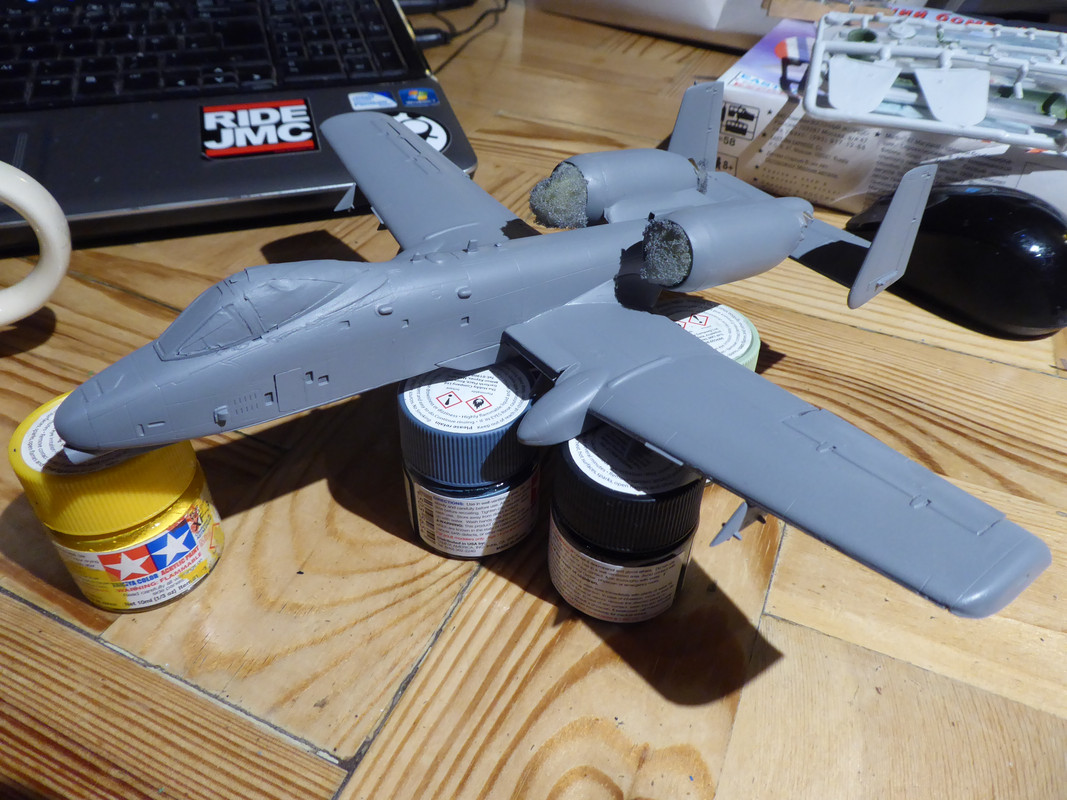
I'm doing the Revel version but brush painting. Having trouble with the decals though. Soaked in DecalFix and brushed the paintwork first but on the engines they have bits round the edge that don't stick and form ridges. Tips please!
Did you give it a coat of gloss before doing the decals?
That’s the only other thing I can think of
Yep. Gloss and and perhaps an application of diluted PVA.
Hmm. Sometimes you have to be very careful with a very sharp blade
No gloss, it's a matt finish. Is there some clear varnish I should be using?
No gloss, it’s a matt finish. Is there some clear varnish I should be using?
Yes. The gloss coat gives the decals something to purchase onto that'll prevent air bubbles from causing the silvering that you often get by applying decals onto a matt surface. I swear by ordinary Pledge floor polish, followed by a second coat of pledge to seal the decals in. After that you apply a matt varnish to get the finish that you're after.
I use either Tamiya or Revell gloss clear acrylics as a base for decals & pin washes, then another coat on top, followed by a Matt or satin coat if it’s a military vehicle/aircraft/boat.
I’ve started using Ammo by MIG and Vallejo acrylics too. No gloss or Matt varnish from them yet.
Tamiya thinners tend to work with everything except Humbrol, for which you need their own brand. So I try to avoid
I use Alclad. It works for me.
Whilst on this subject... Does anyone use Pledge with an airbrush? If so, how do you clean the airbrush afterwards?
No, but if I did I’d first soak it in warm water , then clean it as normal with airbrush cleaner
Whilst on this subject… Does anyone use Pledge with an airbrush? If so, how do you clean the airbrush afterwards?
Yes. I usually thin with either Tamiya thinner or water, as Pledge will puddle and dry quickly. Afterwards, I disassemble my airbrush and soak in soapy water before reassembling and blasting it through with a tiny amount of Humbrol cellulose thinner.
If Pledge is approximately the same stuff as the Johnson's Klear or Future everyone swore by a few years ago then ammonia is your full-on option for cleaning it up. Preferably in a form other than neat ammonia, unless you have a lot of filtering and ventilation on the go.
In an attempt to do something different during dark evenings, I've a kit on the way.
I've helped my kids do a few, I've done a few as a kid. We've got knife, paintbrushes, glue, some random spare colours from Warhammer and airfix kits...
However, top tips and sources of any extra items I need, without investing lots of money on case I'm a dufus at this.
Filler, sanding sticks, a tin of primer and reading glasses!
What kit did you get?
I've got in to the habit of reading books and making associated kits.
Tempest V and The Big Show
Lancaster BIII Special and Dambusters/Enemy Coast Ahead
Martin Maryland/Macchi 205/Spitfire Vb Trop' and Fortress Malt/Warbutron's War
Sea Harrier / GR3 and Hostile Skies
However I read faster than I build so my book about the Falklands is accompanied by a WWII Martin Maryland.
And an A10. And a Victor K2. And an SU35.
Playing catchup, sorry.
Harry the Spider I remember the cartoon but had to google what it was called though.
Science Ninja Team Gatchaman
It was Battle of the Planets in the UK (and US). And that model is awesome.
The original Gatchaman had some pretty dark themes. The reason BotP was bookended with those awful 7-Zark-7 segments in a clearly different (and terrible) animation style obvious even to 8-year old me was to backfill all the bits they had to crop out to make it child-friendly. Notably in the original story Jason had a brain tumour, in our sanitised version it closed with an 'and then he had a nice cup of tea and a sit down and it was all OK' sort of handwave.
However, top tips and sources of any extra items I need, without investing lots of money on case I’m a dufus at this.
And some Microsol decal setting solution.
What kit did you get?

That's going to be tricky, building and painting all those trees.
I'm probably one of the least experienced on this thread. I'd say be patient, don't compare yourself to some of the guys on here (seriously good!) and be prepared to toss a few finished and part finished models out. Avoid planes with rigging and helicopters, especially small ones. That said I find it enjoyable and some of the results have been pretty good.
#edit: Reasonably good is very subjective...
That’s going to be tricky, building and painting all those trees.
Particularly when the view is blocked by some plane or other...
Aldi are doing their cheap Airfix kits again - thats how this whole thread started!
Ooh! Which ones this time or same old, same old?
think so, Spit, Hurricane, JP, 109 and 190 and Mary Rose i think it was as well.
I’ve been looking to do my Airfix TR4 kit for years now. Haven’t completed any kit since was a kid. But this box sits on the shelf! Maybe it’s time.
Meanwhile, this is beautiful (and not sure if motivating or demotivating!)
Picked up an Aldi Hurricane as I wasn't happy with my last one.
^ like.
Nice
Here’s a handy tip. Don’t use plasticine to mark off your camouflage patterns:


It’s a Hasegawa A-7D Corsair II in 1/48
Oh crap!
I've used Blutac without issue.
Saw a guy using some kind of Blu-tack type stuff on a You Tube video earlier that seemed to work quite well. I've been free handing my camo (brush not air) which I think is ok on 1:72 but might look a bit underwhelming on 1:48.
I am only a relatively quick bodger compared to you lot but the ace thing is that my two boys are really enjoying it so we can do many hours on a wet day with no blooming electronics. We have a Handley Page Jetstream, FW190, MK1 Spitfire, Vampire and Jet Provost currently in build between the three of us.
If anyone has any suggestions on starter air brushes or basic air brush tutorials on YouTube etc would be interested in a link or three. 🙂 Kids seem keen to give them a go and I can see some advantages.
I have this airbrush and compressor setup.
It works pretty well and if you knacker up the airbrush, as I did by not cleaning it properly, you can replace it for £15ish.
No, water based acrylics. I’ve got the bulk of the plasticine off now but the paint is not sticking where the plasticine was. I’m going to give it a wipe down with glasses cleaning wipes, see if that shifts the crap without damaging the plastic or the existing paint.
Otherwise it’ll need a wipe down with either enamel thinners or white spirit. I have no idea what that’ll do to the acrylic paints already there
Blu-Tac next time. I really don’t want to ruin that lovely SAM system.
Btw , re airbrushes - I use a Neo by Iwata double action gravity feed airbrush (it’s my third...) and a budget-ish compressor. You can start with a cheap Revell airbrush kit, single-action with suction feed, and a canister of compressed air. It’s a cheap way to get started with airbrushing but those canisters soon add up to the price of a reasonable compressor.
I’ve tried doing camouflage freehand - works ok on say 1/35 late war German armour,
For example:

(1/35 Panther)
less good on smaller scale aircraft:

(1/72 Me262)
I’ve used Maskol masking fluid on 1/48 & 1/72 aircraft, but when you peel it off, it leaves less than perfect edges.
I believe a paper mask gives a reasonable result but you need to get your sizes right. For example:

(1/48 Spitfire mkI)
@johndrummer that Corsair is going to take some saving, I feel your pain!
I usually cut Tamiya tape into thin strips (so they go round corners) for the edges, then fill the middle bit with low tac painters masking tape. Tesa pink is my weapon of choice at the moment, it's about 7 quid a roll but lasts ages and cuts well.
@garage-dweller look for a cheap compressor on Facebook marketplace, there's usually a fair amount on there, then buy a couple of 15 quid airbrushes off ebay to practise with. When you start spraying thin your paint more that you think, most people have it too thick to start with and it splatters everywhere.
I'm still fighting the Albatross, I nearly put it on the floor and stamped on it tonight! I superglued the wing struts on backwards and had to cut them off, then glued them on backwards again! 😂
I haven't really enjoyed this one but I'm going to finish it even though its getting right on my tits now. I couldn't be bothered to airbrush it and just brush painted it, it didn't turn out to bad, Vallejo is great for that.
[url= https://i.postimg.cc/L8KXxzr3/IMG-20201108-230906.jp g" target="_blank">https://i.postimg.cc/L8KXxzr3/IMG-20201108-230906.jp g"/> [/img][/url]
One other thing...
Tamiya fine primer is good for 1/24 car models, but I don’t recommend it for aircraft or military vehicles. It fills all the recessed panel lines!
Use Whitetac rather than blutac.
On the subject of camouflage finishes - Spitfires etc were spray painted using large rubber masks to give a standard camo pattern which would have a hard edge. Late war German tanks were delivered to theater in overall sand (or even red primer sometimes) and the crews would spray the patterns on in the field so you get a soft edge.
I think the Corsair is beyond saving 🙁
The layers of paint are already so thick I can barely see the recessed panel lines. Unless I can strip it back to bare plastic, I don’t see how it can be saved. Looks like another trip to modelhobbies.co.uk.
Real shame as I’d already added some aftermarket detail to the cockpit & canopy
Do Kingkit have a second hand one? You may be able to butcher your current one to save the interior.
I’ve ordered some paint remover, I’ll try that first.
Next up - check that the primer hasn’t filled any detail in on my big SAM system. Then a 1/35 BMD4 to finish the tracks for.
A couple of Tamiya 1/48 tanks to finish off
