Yep.
It wasn’t easy, but I think it’s better result than the old-fashioned rubber band tracks
Looks real!
Toying with the idea of getting an M48 US tank and building a Checkpoint Charlie diorama but I fear it’ll take up too much space. Maybe do it in 1/76 instead 😉
I’m going to leave the turret lid and the engine hatches loose. And the hatches open, I have a 4 man crew for it
Amazing work - pretty cosy for a crew of 4 in there. Later Soviet tanks had mechanical autoloaders to reduce the crew to 3. But they did have an annoying habit of ripping limbs off the remaining crew members apparently 😳
Yeah, it’s a cosy turret. Driver has the front of the tank to himself but turret has 3 seats - commander, gunner & loader. From the interior of this model, it definitely looks a wee bit cramped
Next up - Airfix 1/35 T34-85. Or maybe something [s]else[/s] easy.
Actually, no, I need to get back into learning guitar. Purple Haze and/or All Along The Watchtower. That’ll make plastic kits seem easy again
Ok I’m calling this finished. T-54B (early) in 1/35 by MiniArt


It’s only taken me a couple of months
I’m working on an Airfix 1/35 T34/85 , started on Wednesday & all I have left to build are the turret and the wheels . Plus the paint job
T34 is fully built now apart from the wheels & tracks. Need to paint them first but I’ll be I can’t be bothered right now.
It’s a nice kit (better than I expected from Airfix, must be a new tooling!), apart from them giving you two different turret options (WWII and Korea) but the two sets of markings they give you both refer to the WWII turret. I’ve built the Korea turret so I now need to find some Korea era decals for it 🙄
Quick question. Whilst I am improving and building up some pretty decent efforts by my standards* I am having a problem with getting glue smears on clear plastic. Not so much canopies but more side windows in helicopters etc. Any tips for avoiding this apart from getting someone else to do it or is there a compound I can use to clean off the residue. Revell Contacta if it helps.
Thanks in advance.
*my standards do not reflect the excellence shown on this thread.
You cannot clean Contacta off as it’s a solvent type glue so it’ll actually dissolve the plastic. pVA is your best bet but you need to be super careful as it’ll not hold as strongly as other types so watch out for accidentally pushing the windows in as you are working.
Yep. PVA is what you need.
Been stuck in Decorating Hell™ for too long. Not done anything since my Lancaster back in May apart from about 30 minutes on the cockpit of my A10.
However, I have read the Excellent Fortress Malta by James Holland and as a result have a Macchi 205 and Martin Maryland in the post.
My stash is now officially MABLE (Models Acquired Beyond Life Expectancy).
Future or Klear floor polish is what I use to stick canopies on (if you can still get it). They also benefit from bing dipped in it and left to dry.
Regarding your T54 John - as Oddball would say ‘it’s a mother beautiful tank’!
Glad you like it 🙂
I’ve got an Airfix FW190 in Braille scale on the go. Humbrol acrylic paints don’t take well to Tamiya acrylic thinners; the FW190 is headed for the shelf of doom 🙁
I can’t see to work in anything smaller than 1:48 anyway
"Braille" scale??? Please explain?
1/72. So called because it makes you go blind 😉
Yea ah, some of it was too small to do, never mind looking ok visible, thankfully some too small to even bother with
There’s a 1/35 M3 Lee next up from MiniArt, also with full interior.
After the Airfix T34/85 and Tamiya M48
Ha! I get what you mean. My latest three projects have been 1/72 helicopters. All have been extremely fiddly especially the Italeri Bell AH1. Not really got the space for anything bigger so busy wrecking my eyesight!
Great tank @johndummer
Just the right amount of ageing/dirtying for my tastes.
2 weeks spent on a 1/72 Night Fox helicopter. Gone in the bin, far too fiddly. I see what you mean JD!
Blimey! Plasmo has been busy in 1/72 with a snap together kit to boot...
I have a few on the go at the moment, in various states of completion...
Tamiya 1/35 US 6x6 truck. Finished, waiting for a diorama
Mini art 1/35 city/barn diorama - in progress
Tamiya 1/48 Crusader MkIII. Painted, needs a second coat
Tamiya 1/35 M48A3 Vietnam era. Painted, awaiting decals. To go with the T54 I built earlier. Needs a Checkpoint Charlie diorama.
Airfix 1/35 T34/85, painted, awaiting decals (Hungarian uprising Oct 1956)
Airfix 1/72 Focke Wolf 190A8. Shelf of doom
Zvezda 1/48 Lavochkin La-5FN. Painted, decals on, fiddly bits to add
Revell Victor K2 - Stalled / Shelf of Doom
Italeri SU-34 - Primed but not painted
Another Italeri SU-34 - Finished apart from the weapons
Italeri A10 - Started the cockpit but had to pack it away because we are decorating the house
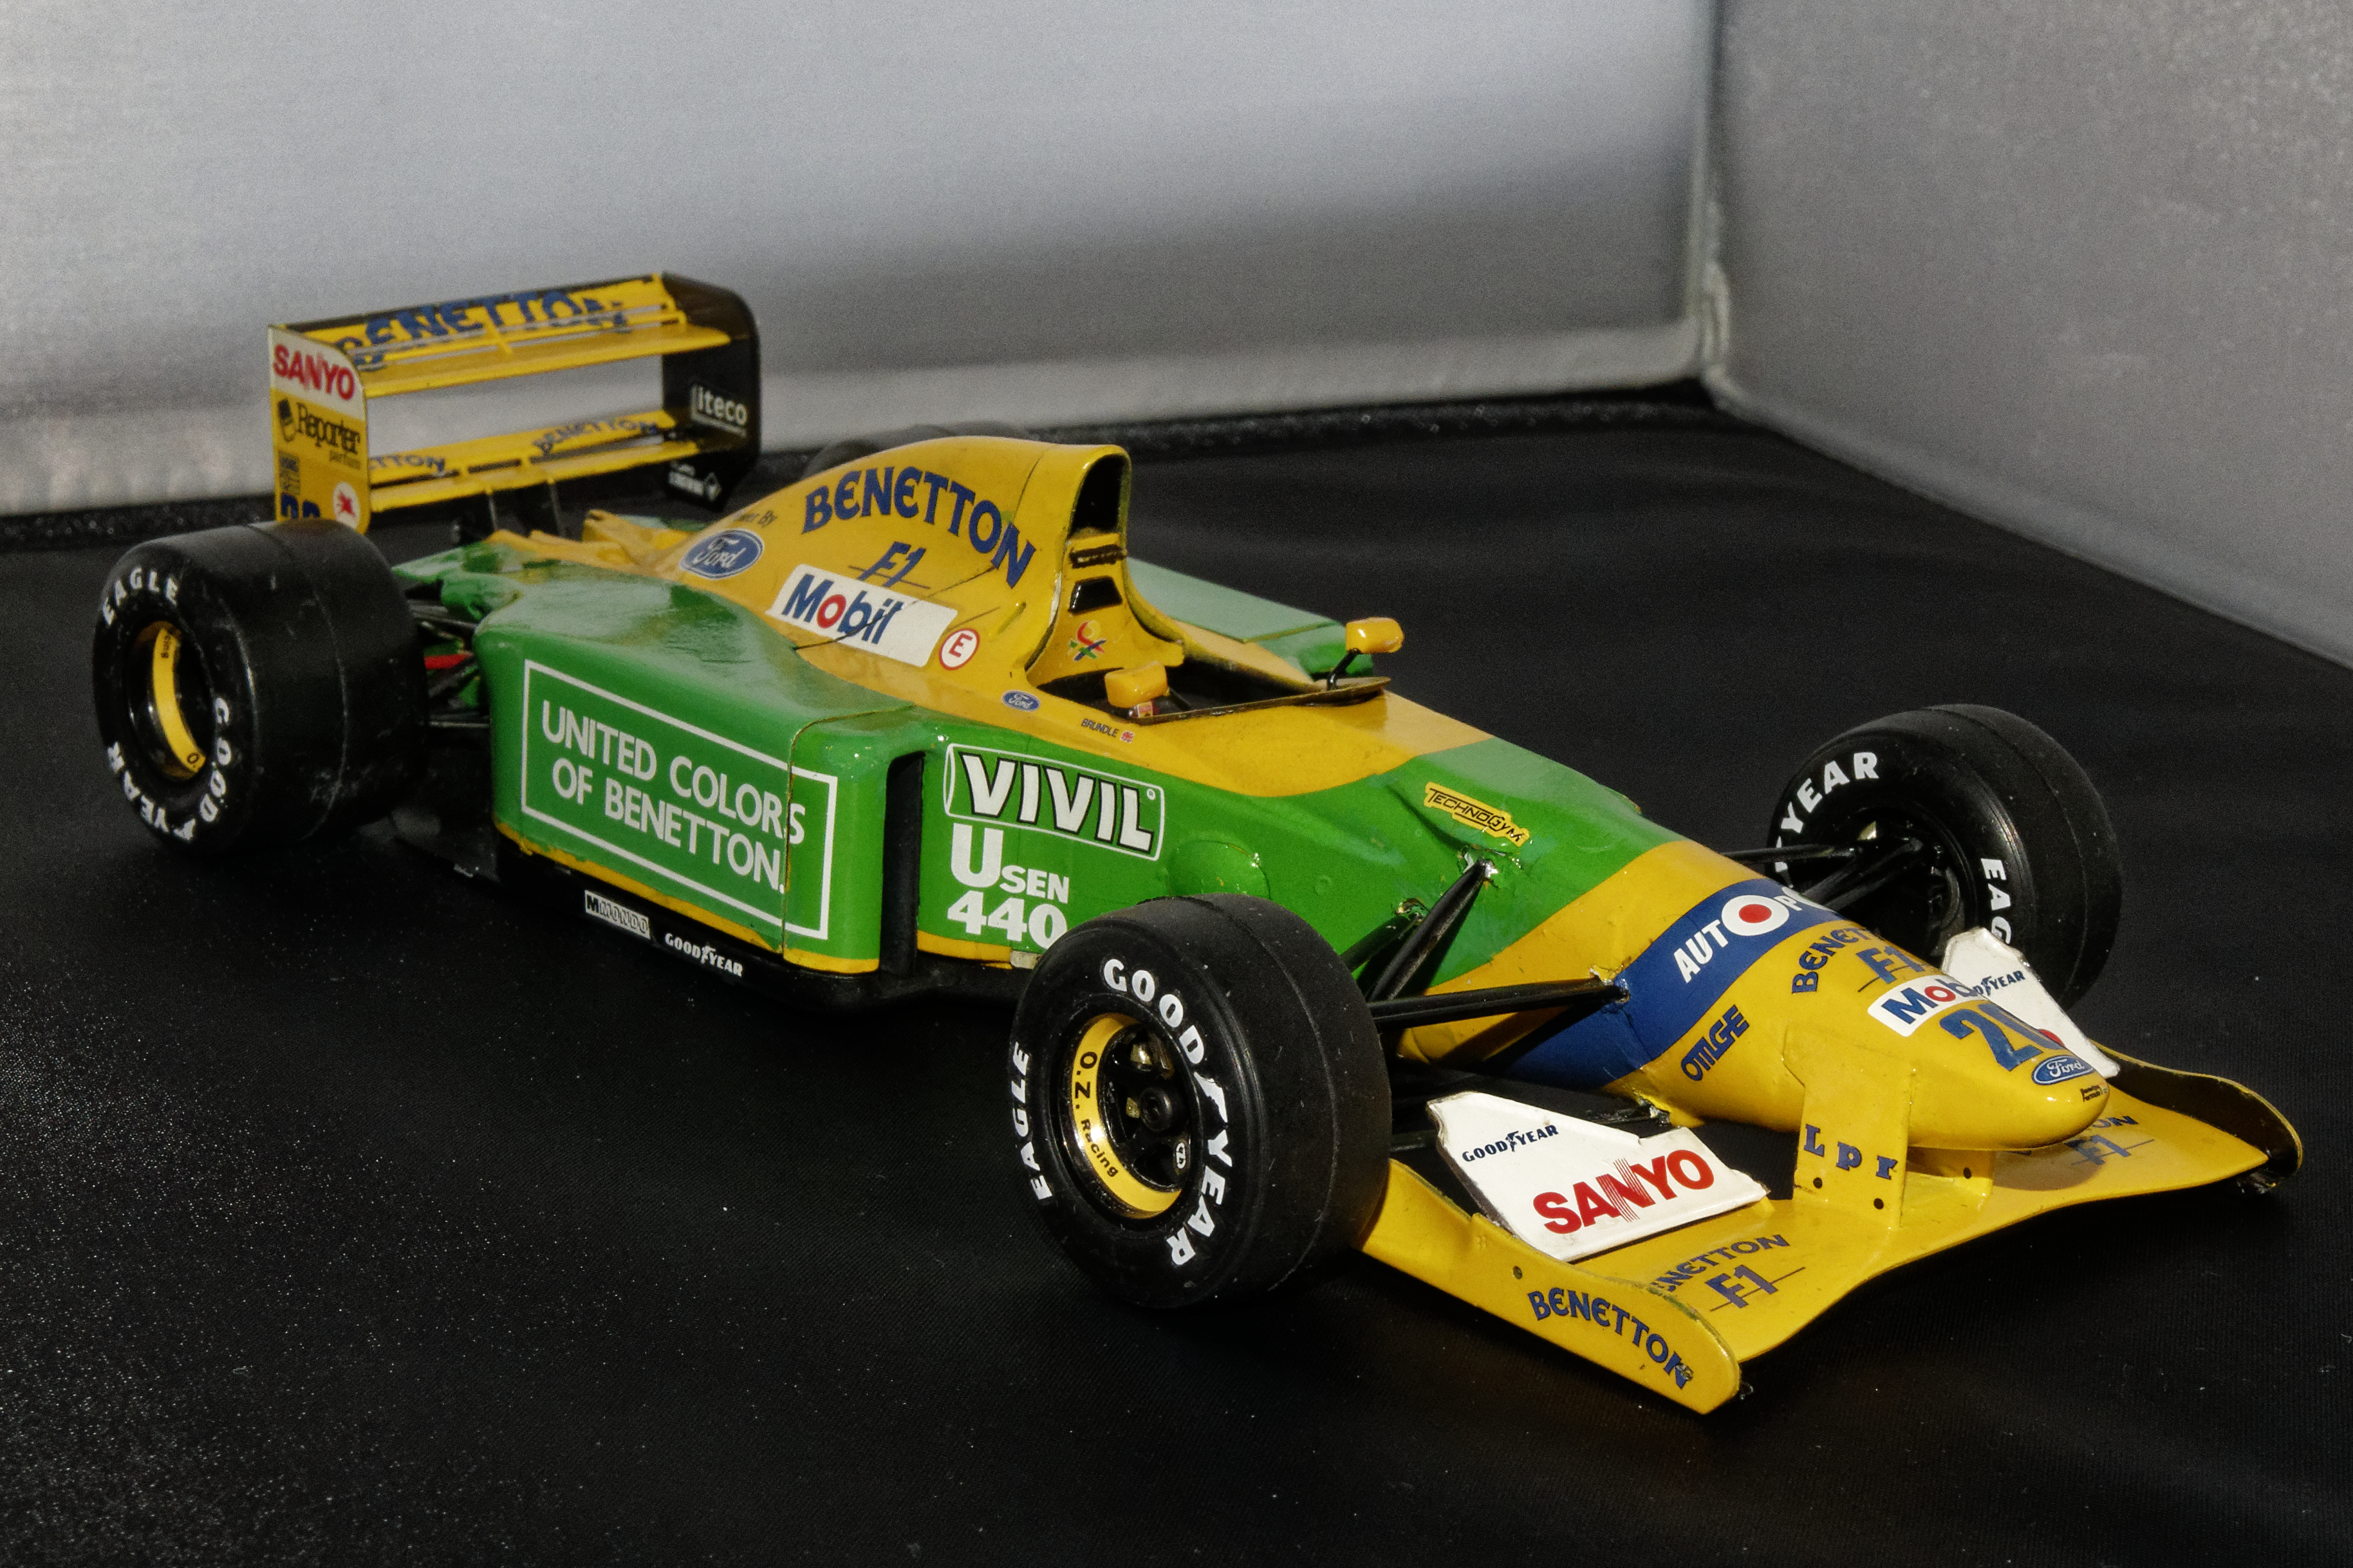
I was well into modelling when I was a kid but bult my last kit when I was around 14 or 15. I did buy a Tamiya 1/20 Benetton B192 though when I was 17 or 18 with the intention of building it but never got round to it. I kept hold of the kit though so during lockdown and because a dozen or so existing hobbies didn't feel like quite enough of a time sink I decided to dig it out and give it a go.
This time though I wanted to learn to use an airbrush and as a kid I could never afford all the paints - you know the ones; that dull flat brown you need for one tiny bit so I always used to make do with just the main colours. So off I went, bought an airbrush, every single colour on the colour chart and gave it a go.
Finally got it finished and whilst it is far from perfect and I had to fight the kit (and myself to push to get it done) overall I am pretty happy with the end result. Got a couple more kits lined up now so will be starting them soon. Really enjoyed getting back in to it...
Tamiya 1/20 Benetton B192 in Brundle's scheme


Nice work on that dbg, especially after a long layoff.
A quick tip to make cars look better, sand the tread on vinyl tyres to make them look worn.
After what seemed like ages I've finally finished (I think) my Bronco Stug III ausf E. The figures have all been modified to the poses that I wanted from a Miniart artillery crew, I'm enjoying doing figures more and more lately! The scene is supposed to be just after a summer battle in 1941 in Russia.
[url= https://i.postimg.cc/L6fgsNzg/IMG-20200916-212046.jp g" target="_blank">https://i.postimg.cc/L6fgsNzg/IMG-20200916-212046.jp g"/> [/img][/url]
[url= https://i.postimg.cc/WzqjXY2G/IMG-20200916-212115.jp g" target="_blank">https://i.postimg.cc/WzqjXY2G/IMG-20200916-212115.jp g"/> [/img][/url]
[url= https://i.postimg.cc/Cdy0tC1W/IMG-20200916-212127.jp g" target="_blank">https://i.postimg.cc/Cdy0tC1W/IMG-20200916-212127.jp g"/> [/img][/url]
[url= https://i.postimg.cc/Y2vm5p03/IMG-20200916-212201.jp g" target="_blank">https://i.postimg.cc/Y2vm5p03/IMG-20200916-212201.jp g"/> [/img][/url]
[url= https://i.postimg.cc/05hJxLJq/IMG-20200916-212336.jp g" target="_blank">https://i.postimg.cc/05hJxLJq/IMG-20200916-212336.jp g"/> [/img][/url]
[url= https://i.postimg.cc/DZMnQ3Kf/IMG-20200916-212420.jp g" target="_blank">https://i.postimg.cc/DZMnQ3Kf/IMG-20200916-212420.jp g"/> [/img][/url]
Very nice.
I like the look on the face of the guy watching his mate barf up.
Fantastic!
Heads up!
New tool 1:72 / 14" MPC Eagle Transporter going cheap(ish) due to a ding on the corner of the box. No good if you are collector, very good if you are a builder!
I've just bought one, but there is another.
Nice little diorama with that StuG
Thanks chaps, I was quite happy with the way the Stug turned out.
@timbog160 'track bashing' 😂
He's supposed to be puking up after a tough day!
I bought an Eduard 1/48 Me109 G-4 profi pack last Saturday and got straight into it, I'm halfway through painting it at the moment. This has got to be some sort of a record for me as a quick build is usually 6 months! It's a great kit as it just falls together, this would be really good for someone who is getting back to modelling as it has no vices whatsoever.
Earlier today I put a coat of rlm78 blue over some preshading, I feel like I'm actually getting somewhere with this technique now. I tried using some Mr Hobby acrylic thinned with their Levelling Thinner, I thinned it much more than I usually thin paint and it went on really well, I'm going to use this a lot more from now on.
[url= https://i.postimg.cc/rw6QbKtP/IMG-20200921-143804.jp g" target="_blank">https://i.postimg.cc/rw6QbKtP/IMG-20200921-143804.jp g"/> [/img][/url]
[url= https://i.postimg.cc/8PfZthsv/IMG-20200925-154135.jp g" target="_blank">https://i.postimg.cc/8PfZthsv/IMG-20200925-154135.jp g"/> [/img][/url]
[url= https://i.postimg.cc/9QGJjCdF/IMG-20200925-154144.jp g" target="_blank">https://i.postimg.cc/9QGJjCdF/IMG-20200925-154144.jp g"/> [/img][/url]
[url= https://i.postimg.cc/PfR6W6fh/IMG-20200925-154256.jp g" target="_blank">https://i.postimg.cc/PfR6W6fh/IMG-20200925-154256.jp g"/> [/img][/url]
I still haven’t figured out how to do that pre-shading thing. Think I’m giving it too much of the top coat
I did the same with the upper sand colour, totally obliterated the shading. The lower blue colour turned out really well but its not that clear in the pic.
Next time I'm going to try it with a darkened version of the topcoat instead of the rlm66 (black grey) I used this time.
[url= https://i.postimg.cc/SsMqp2tX/IMG-20200925-230913.jp g" target="_blank">https://i.postimg.cc/SsMqp2tX/IMG-20200925-230913.jp g"/> [/img][/url]
[url= https://i.postimg.cc/d3RYhMFw/IMG-20200926-180230.jp g" target="_blank">https://i.postimg.cc/d3RYhMFw/IMG-20200926-180230.jp g"/> [/img][/url]
For spraying over preshade I’m generally diluting the paint 50/50 for the first few coats, then even thinner for the final ones. Very easy to go too far. I’ve mostly learnt to stop and leave it overnight when I’m thinking “one more coat…?”, then look at in daylight with fresh eyes.
I also usually do a “highlights” preshade in white, as well as the usual “shadow” one in black/grey/brown. Seems to give a bigger margin for error!
I’ve been doing a lot of armour lately, Andy’s Hobby Store YouTube channel has a number of ‘how to’ videos. He tends to paint the tank overall in NATO Black, then the panels in white before a top coat. I’ve tried that too but I don’t think it really works as soon as you spray Tamiya XF61 Dark Green all over it. Time for some desert colour tanks I think...
Or some aircraft that are not RAF WWII bombers.
Hasegawa A-7D Corsair II in 1/48 in progress
I quite fancy having a go at this beast...
https://www.emodels.co.uk/meng-model-1-35-russian-9k37-m1-buk-missile-system-014.html
Preshading can be very difficult to get the right balance with. What I have found is that by the time you’ve added paint, clear coat, washes and filters it is surprising how much it will tone down the underlying shading. For this reason I always thin my first couple of coats more than I think is necessary, and leave more of the shading visible than I think I should. This seems to be the easiest way to get a good result.
The advice above about walk away for a while then come back to it is really good! I find this works well with Luftwaffe mottling too..
When everything works well, pre-shading can be quite effective, but as soon as you need to build multiple layers of contrasting colour (like Luftwaffe mottling for example) then you lose the bleed through. One answer is to post-shade using very thin paint at a very low pressure, which is probably what you're going to be doing anyway if you're painting a mottled luftwaffe scheme.
My Eduard FW190d has been WIP for a couple of months and I'm almost finished. The colour scheme was enough to induce dread - the underside of the wings were painted in contrasting colours of RLM 76 and RLM 66 with some panels in NMF. The fuselage mottling obliterated the preshading, so I post shaded the panel lines over the mottled areas with a darker tone thinned to something like a 30/70 paint/thinner ratio and sprayed at a very low pressure. After that I post shaded with a lighter tone, again at low pressure and with a 30/70 mix, to add some tonal variation. The results are okay, not amazing but far better than any luftwaffe subject that I've painted in the past.
Has anyone got any experience with lighting for kits?
I think I’m going to do my Eagle Transporter on a landing pad with a crew access gantry. Lighting that will be easy as I’ll use battery powered LED fairly lights through holes drilled in the base. Lighting the kit however will be different as I don’t want it wired to the ground. I want some lights in the cockpit and a couple of navigation lamps on the external frame.
Is there a kit available with a small battery pack and switch that I can use to power up to a dozen LEDs? For different colours I’ll use gels (sweet wrappers).
There are a small number of lighting kits available from a company called Tyridium Models, iirc. Let me do a search...
Here we go: https://www.tirydiummodels.co.uk/
Thanks. Found an eBay site that does them for boats. I may get a set or two of those.
Something like this?
https://www.smallscalelights.co.uk/
Led's aren't difficult to use from scratch and are cheap components. You'll need a battery holder (2032 battery?) wire, led's, and resistors.
The only issue with making it yourself is the resistor value, but there's plenty of info on the net.
Years ago before led lights on vehicles were a thing I made a LED rear light for a lambretta, a Maplins (I miss Maplins) boffin worked out the resistor value for me and I bodged the rest. If you can solder a wire it should be fairly simple.
