UPDATE: Reviews section refreshed, redesigned, searchable: Go take a look
To those of you who keg, am I right in thinking that all I need initially isCO2
Regulator
Reinforced hose
Gas Disconnects
Combined tap/disconect
Regulator - keep an eye out for an old Coca Cola gas management board, they are just perfect for kegging. Multiple regs and tons of connections. They come up regularly on ebay.
Buy all new seals for your kegs (lid, post and dip tubes). They are cheap and depending on what has been stored in them, essential. For the sake of a couple of quid, replace them and start from a clean slate.
Get some PBW or bar keepers friend and a toilet brush (new) and give them a really good clean or three. I dumped my first kegged batch because even though I'd scrubbed and soaked for days, it still had residue from the syrup that was previously stored in it. Get a dip tube brush for the same reason.
And (after initially pressurizing the keg to 10psi to seal the lid) I can leave it to secondary ferment and carbonate naturally in the corner of the kitchen, put it in the garage to cool and only hook upto the CO2 to serve? The full on Keezer setup with secondary regulators will have to come later, as paychecks allow.
You could do that, but you'll need to have a think about your temperatures. co2 is more readily absorbed at lower temps so your carbonation will vary depending on where you put it.
You could do that, but you'll need to have a think about your temperatures. co2 is more readily absorbed at lower temps so your carbonation will vary depending on where you put it.
I was thinking for fermentation rather than carbonation, if the beer's in the keg with just enough to seal the lid, then most/all the CO2 from fermenting will stay in the liquid (like bottling)?
Might give forced carbonation a go for a very hopy IPA, but I'd rather do things 'right' rather than copy commercial methods to speed things up for brews that don't need to be so fresh.
Kegs are coming from a homebrewer, so should be clean.
I've got 3 demijohns of wine on the go, they've been in secondary for 2 months now, primary for wine is a bit different, the grapes stay in the barrel for ~5 days to release the sugar/flavours and begin fermenting, then you syphon and strain it into demijohns to finish fermenting. There was still more un-fermented sugar in there when it went into secondary than in most wort's (and the yeast was in suspension). Leave it in primary too long and the grapes begin to impart off flavors (apparently they rot, but given the amount of Campden tablets that go into wine I'm not so sure that's possible!).
Me too: one grape, one apple and one rhubarb, all from the garden. The rhubarb was a bit different - left to macerate dry in sugar for a few days, then the leached juice was transferred to a demijohn with the yeast added to start fermentation. The grapes were pressed to release the juice, then transferred to a demijohn with sugar, yeast & nutrient. Apple was fermented on the chopped fruit in a clean bucket before transferring: it's the least successful of the three, as I don't think I left it in primary long enough to get the flavour out of the fruit.
All three had grape concentrate and pectolase added, though the rhubarb has still thrown a haze and will need finings. I'll be bottling in the next week or so - I sampled them last night and the grape and rhubarb taste pretty good, with the apple probably heading for cooking wine.
I was thinking for fermentation rather than carbonation, if the beer's in the keg with just enough to seal the lid, then most/all the CO2 from fermenting will stay in the liquid (like bottling)?Might give forced carbonation a go for a very hopy IPA, but I'd rather do things 'right' rather than copy commercial methods to speed things up for brews that don't need to be so fresh.
Triggering that second fermentation in the bottle (by priming with additional sugar) [i]is[/i] carbonating the beer, so I just mean that you'll need to [url= http://www.brewersfriend.com/beer-priming-calculator/ ]adjust for temperatures[/url] when priming (e.g. the priming sugar addition is very different depending on whether you cold crashed or not).
Force carbing is a breeze though and you'll end up with a much clearer beer (particularly if you fine). I just hook mine up at serving pressure and leave for two weeks.
Now that you've got co2 and kegs, you can do closed co2 transfers from the carboy to the keg, meaning that your beer won't come in to contact with oxygen from when you start fermenting to the moment you pour yourself a glass. This has a HUGE impact on lighter styles...they all just taste so fresh and incredible! Basically all you are doing is using your co2 to push the beer from the carboy into the keg. I can post some pics of my set up. It's super easy and there's no faffing around with siphons etc.
Pics would be good, I presume that means you ferment in pressure barrels rather than buckets?
Do you oxygenate the wort before it goes in the fermenter then, or do you have to go mad with the yeast starter?
Just put a cheeky offer in on a Britvic gas management board on ebay and a post on freecycle for a chest freezer.............
I've worked my way through cheap kits + sugar, through brewing sugar, DME and various extracts and dry hopping to the point where my brew tastes good enough that if I give a few bottles away or serve it in a glass no one can guess which is home brewed and which is bought. But it still has a distinct (but not as strong as it was with Geordie/John bull style kits) homebrew 'tang', trying to figure out if it's the yeast being stressed or oxygen getting in during bottling.
But it still has a distinct (but not as strong as it was with Geordie/John bull style kits) homebrew 'tang', trying to figure out if it's the yeast being stressed or oxygen getting in during bottling.
What water are you using? I've seen suggestions that the tang is due to chlorine in mains water... half a crushed campden tablet being the solution. I tried that with my last brew and I can't detect a tang, but not exactly a scientific trial.
I've worked my way through cheap kits + sugar, through brewing sugar, DME and various extracts and dry hopping to the point where my brew tastes good enough that if I give a few bottles away or serve it in a glass no one can guess which is home brewed and which is bought. But it still has a distinct (but not as strong as it was with Geordie/John bull style kits) homebrew 'tang', trying to figure out if it's the yeast being stressed or oxygen getting in during bottling.
I'll post a few pics of my set up tonight.
If I'm using liquid yeast then yes, I oxygenate/aerate the wort before pitching. Nothing fancy, so I'm getting no more than 8ppm (the target is closer to 10ppm, but I'm not yet convinced by blasting with pure o2 since too much can be just as harmful as not enough).
Those gas management boards are great, I managed to pick one up for £50 and it has been faultless.
Re the homebrew tang, there are a few things that could be causing it, but most likely it's all of them together. I've heard that DME can produce a distinctive taste and depending on the yeast you use (and how you use it!), that could exacerbate it.
Everyone knows about temp control being important, and it is, but equally important is pitch rate and yeast health.
If you're using dry yeast it's not so difficult, since it's far less reliant on good aeration. But unless you're properly hydrating the yeast before pitching you are losing up to half of the viable cells...meaning that even in a 1.050 beer you'd be underpitching, leading to stressed yeast. The companies who make the kits and the yeast don't like to make too big of a deal about the efforts you need to go to to ensure good yeast health because part of their marketing strategy is ease of use.
For liquid yeast you almost always need a starter and you definitely need good aeration. It's much more fickle than dry yeast, but you get an incredible amount of choice.
But above all, IME, it's absolutely everything together that makes a "flawless" beer. I've brewed beers with simple ingredients, simple process and a single pack of rehydrated US05 that have been judged in the high 30's and low 40's by BJCP...so it's nothing fancy that makes the difference.
For me, the key things to focus on are:
Proper pitch rate (using an online calculator) of healthy yeast
Solid temp control during fermentation, with the ability to ramp up the temp after the end of active fermentation to allow the yeast to finish up
Limited exposure to oxygen after fermentation
Fresh ingredients (ie try to avoid using grain that was crushed a month ago)
Basic attention water chemistry really helps, particularly with light/hoppy beers (this was the thing that took my IPAs from good to great IMO)
Fast chilling times
Cleanliness obviously
+1 to rehydrating dried yeast prior to use. This also has the advantage of allowing you to verify that the yeast is "good" prior to pitching i.e. it's showing some signs of life. Otherwise you won't know until 24 hours or so later.
I brewed an attempt at a Tring "Sidepocket for a Toad" clone on Saturday, fermenting away like a good un in my temp controller brew fridge* currently.
* in heating mode with a 45w tubular heater controlled by an ebay temperature controller unit.
Might have to give this a go. In the SE, so seriously hard water, although we've just moved house and supplier from Southern to Thames which seems to be much softer (Southern would completely block a showerhead in a matter of weeks).Basic attention water chemistry really helps, particularly with light/hoppy beers (this was the thing that took my IPAs from good to great IMO)
Might have to give this a go. In the SE, so seriously hard water, although we've just moved house and supplier from Southern to Thames which seems to be much softer (Southern would completely block a showerhead in a matter of weeks).
If you want to make it easy for yourself (balancing water yourself isn't that easy), pay Murphy and Sons £20 and have them analyse your water.
You'll get a proper report back (so no guessing from out of date water company reports) and they provide suggested adjustments for different styles.
On top of that, the lab manager is a home brewer and wonderfully helpful if you have queries.
Water makes up the main ingredient in your beer, so it's a good place to start!
For the beer/DIY geeks...I've attached a screenshot of my home made Brewpi.
Basically, my fermenting fridge is not at my house, so being able to monitor and control it remotely was a bit of a challenge.
I put together a brewpi, which lets me monitor temps and control both the heating and cooling elements in the fridge. I had to remove the internal thermostat in the fridge to allow for crash cooling.
I also hooked up a webcam so that I can check krausen etc. I originally tried to get a webcam working with an IR LED array, but it just wasn't working at all. So instead I bought a regular LED USB light and hacked the cable, sticking in a relay and hooking it up to the pins on the Pi. I then wrote a bit of script that turns the light on, takes a photo, then turns the light back off. Works well!
Beer temp is measured through a thermowell, so is the actual temp of the fermenting beer. I can keep the beer within 0.1 degree. The fridge has it's own sensor to let the PID do its thing, then I installed a third sensor to keep track of temp in the outhouse, mainly to make sure the 60w heater I have in there will be sufficient as winter approaches.
It's all completely automatic now, I don't lift a finger other than to adjust the profile.
I originally had it hooked up to a mifi device, but it wasn't very reliable, so I'm not poaching my mum's internet connection through a couple of powerlines and it has been faultless.
🙂
[img] 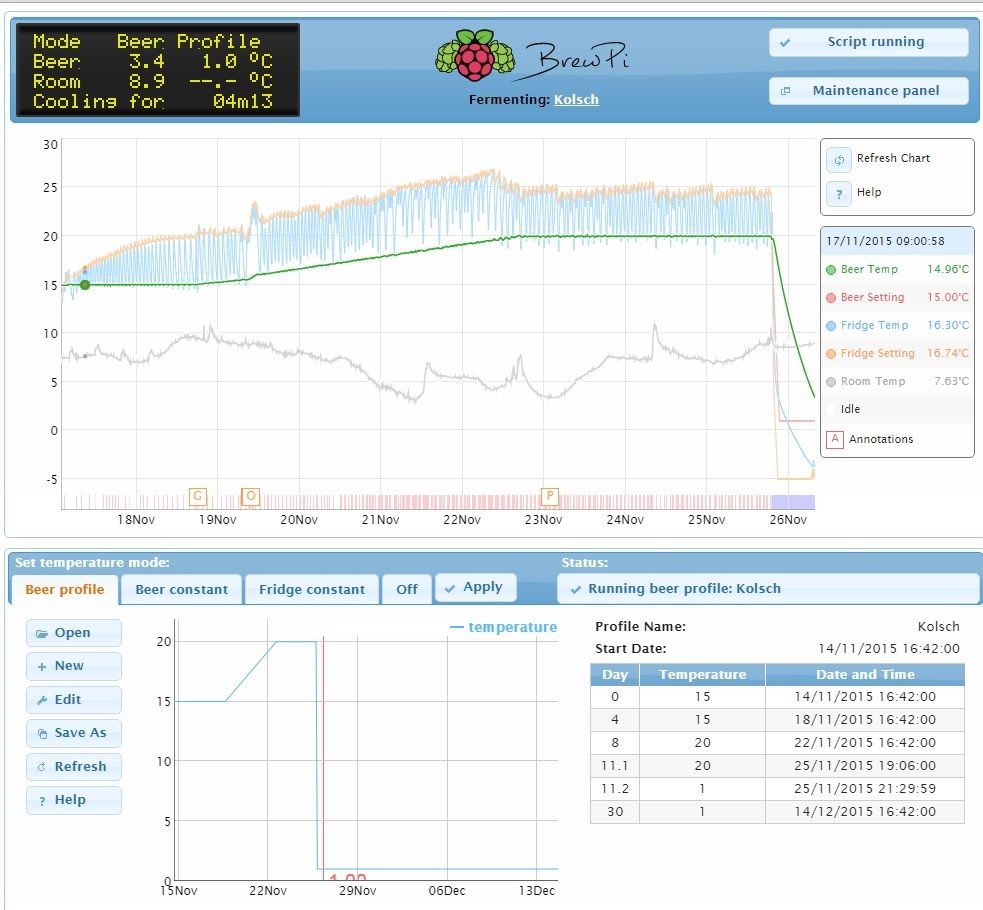 [/img]
[img] 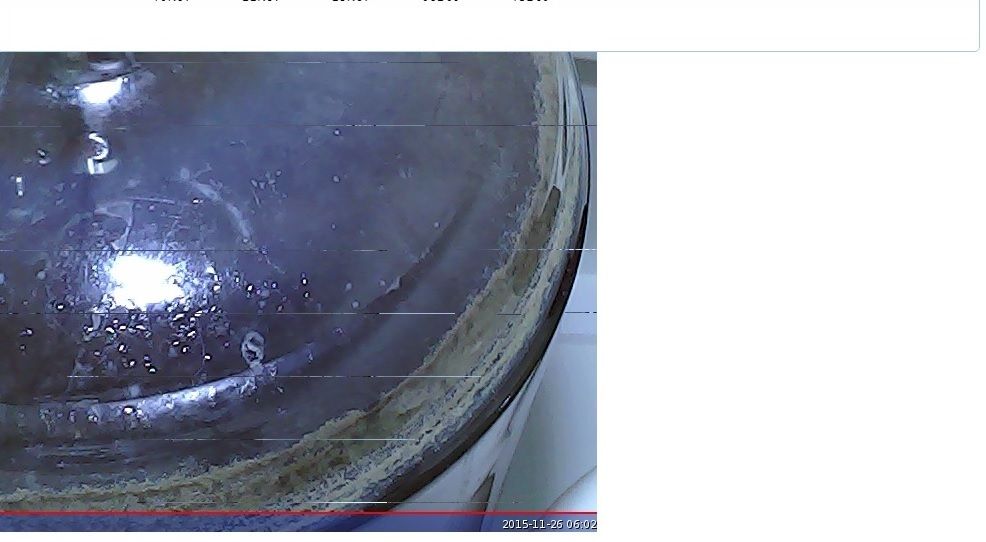 [/img]
Now that is geeky!
*appluads* As someone who escalated from 10ltrs to 1600 I applaud your escalation of tech !
That is legend!!! Want,
Can you do me one, I'm currently looking for a fridge...
Clobber, cost wise you'd be looking at:
Raspberrypi = £20
Arduino Uno = £10
Relay board = £5
4.7k resistor = £0.01
DS18B20 sensors (min 2) =£8 total
Thermowell = £10
Wifi dongle = £10 (subtract if you can use ethernet)
Total = £63
I'll assume you have a spare SD card, power supply and a couple of USB cables, along with a couple of sockets and wire (I used old extension cables).
A 60w greenhouse heater will set you back about £10. If you want to add a webcam and light for taking photos, add another £7 total. You might want to add a case for the pi etc, but I just use tupperware tubs.
So you're looking at about £60 for full automation and/or control of your fermentation. Not bad!
I'd consider doing another, but flat out at work at the moment. In all honesty though, you'd enjoy doing it yourself. I'd never done any of the stuff needed to put it together, but with only a couple of head scratching moments I managed to get it done in an evening.
Excellent guide [url= http://www.homebrewtalk.com/showthread.php?t=466106 ]here[/url].
OK, thanks for the links PF
Would one of those pi zero 's be good for this pf?
I'm not sure. I used the old style Pi (i.e. not a Pi 2) and it runs perfectly.
Interesting how different people escalate in completely different ways.
I'm planning a cut price (eBay/China) version of the electric brewery which with upgraded relays would happily run a comercial brewery. Everything pumped, controlled etc. Then connecting it upto some 6 gallon PP buckets. Why? Because Im a process engineer and like the idea of dumping in a few kg's of grain at one end and not touching it untill beer comes out the other 😀
TINAS, you could be in luck...there's a guy on ebay at the moment who is trying to sell an aborted build of the panel (he bought all the parts but didn't put it together). I wouldn't be surprised if he would take an offer, it's be relisted a couple of times.
[url= http://www.ebay.co.uk/itm/Electric-Brewery-Control-Panel-KIT-240V-UK-electrics-parts-for-home-brew-REDUCED-/262129069517?hash=item3d081c2dcd:g:XYwAAOSw4HVWE9UU ]Linky[/url]
Tempting, although his price is over double what I'd budgeted. Although he has used a lot of probably better quality bits than i'd been intending to. Might need to sit down with a spreadsheet and do some maths.
Antique geekiness on the topic of forced carbonation.
http://onlinelibrary.wiley.com/doi/10.1002/j.2050-0416.1925.tb04942.x/pdf
Summary for anyone struggling with long sentences:
Forced carbing is fine, and if done cleanly with a carbonation stone (they're experimenting with assorted pipes wrapped in cloth, but ultimately it's the same apparatus) produces a very stable beer, very quickly. It also covers the advantage Peterfile mentioned, that it works well not just for carbonation but for eliminating contact between fermented beer and air.
But it doesn't mimic secondary fermentation. Unfiltered, or secondary fermented beer is better in every way apart from clarity, but they accept this won't work commercially as people have grown up to expect completely clear beer.
The exception is in particularly dry styles where forced carbonation gives a dryer palette (or rather it's natural carbonation, or brewery gas that imparts a fuller/sweeter flavor).
On a homebrew level, you tend not to filter anyway, so it's entirely possible to achieve the same benefits of conditioning when you transfer to the keg.
I've got a saison currently conditioning at room temp in the keg, which I'll then drop to about 1 degree when it's ready, fine it and then force carb it. So perfectly conditioned, perfectly carbed and perfectly clear!
Raffle here for a home brew setup
http://www.jimsbeerkit.co.uk/forum/viewtopic.php?f=6&t=74000
only a fiver a pop
Thought Saisons were supposed to be a little cloudy ?
They are, but this one has been brewed for someone and they wanted it clear! No telling some people 🙂
Gelatin is fab for when you're planning on handing the beer out since there's no sediment or haze (other than occasional chill haze), so it tends to get better reactions for regular beer drinkers who, as TINAS says, seem to think clarity means a better beer.
I've got a saison currently conditioning at room temp in the keg, which I'll then drop to about 1 degree when it's ready, fine it and then force carb it. So perfectly conditioned, perfectly carbed and perfectly clear!
When you say conditioning in the keg, do you mean you've transferred from primary to a keg (with some yeast still in suspension), added sugar for a secondary, and now you're going to clear it and transfer it to a 'clean' keg (or bottles)?
It's worth having a read at the end of Section of of Chris White's "Yeast" if you can get your hands on it (great book), specifically the sections on bottle conditioning and cask conditioning.
For bottle conditioning, the benefit is cited as the scavenging of oxygen (a problem for small scale breweries and home brewers). Disadvantages are results that vary, sediment, potential autolytic destruction of yeast cells releasing unpleasant flavours.
Secondary fermentation/bottle conditioning generally does not contribute any flavour, it simply adds co2.
For cask conditioning things are slightly different. When talking about casks, the term conditioning does not mean the same as condition. In this sense conditioning means the maturation process (rather than just the addition of co2).
I transfer from primary to the keg without filtering, so plenty of yeast still in suspension. I then leave to "mature" at whatever temp suits the yeast/beer (i.e. my focus here is allowing the beer to develop rather than carbonate). Some beers don't benefit from any maturation (e.g. a pale ale), but something like a robust porter does well sitting at cellar temps for a couple of months. I prefer to do it in the keg rather than a fermenter because I it's less oxygen permeable, easier to store and move around and I can immediately hook up to carb and serve.
When I'm happy that the beer has reached peak flavour, I crash cool and fine with gelatin in the same keg. Then the first pint I pull is filled with all the gloopy yeast and sediment that the gelatin has dropped out. After that it's all good 🙂
Ahh now I understand.
I think I'm going to need a bigger circle of beer drinking friends and more kegs!
You'd be amazed at how quickly your beer goes once people (colleagues, friends, neighbour) hear that you're handing out free beer!
It's the same effort to brew 2 litre or 20 litres and the cost difference isn't much, so I prefer brewing more and giving more away.
My drinking has stayed pretty much the same throughout my brewing adventures...usually zero through the week and then 8 beers spread between Friday to Sunday. So I've got a lot to give away!
The irish place I get my kegs from does them super cheap whenever they get a container in. Works out at around £27 a keg including delivery.
PF, Group buy on kegs from your Irish Place?
Thehomebrewstore.ie were doing them for £90 for 3 plus postage if that's where you mean?The irish place I get my kegs from does them super cheap whenever they get a container in. Works out at around £27 a keg including delivery.
We probably have a half with dinner most evenings and a couple of pints at the weekend.
My only worry with kegs is keeping lines clean etc. Fine in the summer for BBQ's etc, not so useful if the lines need cleaning every other pint over the winter. Have you tried those taps that mount onto the disconnect? I presume you could pour a pint from any keg and then have a keg of star-san to flush out the tap afterwards.
PF, Group buy on kegs from your Irish Place?
It's easier just buying separately, since their postage is actually surprisingly cheap (much cheaper than it would cost to bring in loads and then send them out to each other here).
Thehomebrewstore.ie were doing them for £90 for 3 plus postage if that's where you mean?
That's the one. I preordered and got them for 33 euro each I think?
My only worry with kegs is keeping lines clean etc. Fine in the summer for BBQ's etc, not so useful if the lines need cleaning every other pint over the winter. Have you tried those taps that mount onto the disconnect? I presume you could pour a pint from any keg and then have a keg of star-san to flush out the tap afterwards.
I had the same concerns. The way I've dealt with it for now is easy...I don't actually drink any beer "on-site", so have to take it all away with me, so taps were a bit pointless.
Instead, I've got a cobra/picnic tap attached to beerline and a disconnect. I simply fill up bottles from that to take away with me. A beergun is on the xmas list. I purge the growler of o2 first.
When I'm done filling from one keg, I put the disconnect on a keg I keep full of starsan and give it a squirt (as you mentioned), which cleans out all the previous beer, then I just move on to the next keg and fill.
How does that look for a shopping list?
[img]  [/img]
I've already got a raspberry Pi (and a spare fridge). Would I need a thermowell if the probes are waterproof? I'm assuming I would as they'd be a bugger to keep clean without.
Looks good scaled.
I'd definitely go for a thermowell. It also means if you need to move the carboy you can just pull out the probe.
I would suggest getting longer probes if you want to have your pi/arduino anywhere other than right beside the the fridge.
Also, pick up some jumper cables. I've got some spare if you want me to send over a few.
Are you connecting via ethernet? If you want to use wifi you'll need a dongle.
Once you've got the basics set up, let me know and I'll direct you to some other scripts which are really handy (like auto reboot when connection lost etc). I'm not sure how computer literate you are, but you'll probably want to set up dynamic dns to ensure you can always get to the webserver (quick and free, but requires an additional script on the pi and a bit of setting up)
Any problems or queries, give me a shout. It's quite straight forward, but not without challenges. In particular, you'll need to work out the colour coding on your probe...they're all different! Google is your friend here.
Oh, also...are you planning on connecting a socket to the relay and then just plugging the fridge into that? If so, rip out the thermostat on the fridge and bypass it completely by connecting the wires that previously went through the stat. 2 minute job, but absolutely essential if you want to cold crash or lager (which is one of the best bits of having a dedicated fermenting fridge with full control!)
Yeah, i was going to have the heater and the compressor running off the relay so i can cold crash before bottling, my crappy little bucket with a tap in the fridge, do all the fermenting, cold crash (with gelatin from the sounds of it!) then bottle up once it's done and do secondary in the bottle.
It's a double fridge/freezer, i don't see why with therm controlled heating/cooling the freezer section shouldn't work as well, the algorithm should just learn to blast the cold for a shorter length of time. For starters i'll probably just bang another heater in there and use that for some wine.
For me the Pi bit will probably be the easiest, compared to the shite that i have to work with all day...
UI[9]=A problem caused the application to stop working correctly. Windows will notify you if a solution is available.
UI[10]=&Close
FriendlyEventName=Stopped working
double fridge/freezer, i don't see why with therm controlled heating/cooling the freezer section shouldn't work as well, the algorithm should just learn to blast the cold for a shorter length of time
Not sure how this would work? Am I missing something?
The cooling circuit and compressor is common. So when the fridge temperature is above your setpoint it will kick the compressor in.
Unless you intend to just run the freezer at a lower temperature and have the main fridge take priority?
I think it'll depend on the way the cooling is configured, i'll have a good look at the weekend.
I know that there's a fan in both the fridge and the freezer so i'm hoping that it's an evap unit with two independent cooling circuits off a common compressor. I know that's how Mille do it, but i'm not going to butcher one of those 😛
If not then i'll have to have two heating chambers and a manual (cold) crash override
Does anyone have advice on corking wine bottles? I tried using a twin lever corker, straight uncoated corks (grade 2 apparently), but they will not go all the way in, regardless of the pressure applied. Corks were tried both soaked in sanitising solution and dry, it made no difference - about 1/4 of the cork would remain out of the bottle.
I see that you can buy coated corks - do they go in easier?
A rather ignominious first post on the brewing thread 🙁
Brewed up a gallon of IPA today, my second ever batch. Mashed in OK, mashed out OK, Sparge fine, did the boil, added the hops, put the brew pot in ice bath to cool and when I went to check the temperature, noticed weird reading. Then noticed that this was because the thermometer had broken. It had broken before I put it into the brew, so hardly any contamination - maybe one small drop of red dye on the surface. Filtering it into the demijohn seems to have removed it.
2 questions:
1. worth carrying on, or bin the lot? I can't smell it off the mix that is in the demijohn (see below).
2. Answer to 1 may depend what it was. It was a food thermometer, but I'm unsure what the fluid is (or was..). I don't think it was ethanol as it floated in top of the water and had a slight smell, reminiscent of paraffin.
So advice please. Many thanks 🙂
Probably fine, it's not mercury.
Amazed you could smell it over an IPA TBH, not enough hops!
I have a good nose (I'm a chemist) so could pick up the odour in the kitchen after it broke, despite the hops. Definitely not ethanol (and I knew it wasn't mercury! 😉 ) Other option was paraffin, which I was wild about drinking but its such a tiny amount and I think its probably trapped in the filtrate that I've gone ahead.
Will play it safe and let Mrs M try it first when it comes round to drinking 😆
Drink it. You will be fine. IANAC but you are.....
My cousins a circus act (and a stuntman), so he get's to gargle paraffin for a living, and he's not dead yet, although it's only a matter of time.
Thanks for the feedback guys. Will report back in due course on palatability (or otherwise)
Well, my brewing has been coming along nicely.
Got the Grainfather to brew in, built a temperature controlled fermentation chamber with a chest freezer and a STC-1000 controller and got some cornie kegs powered by some old fire extinguishers.
Easy to keep the beer cool: [img]  ?oh=682460c2303cda62d59f487f36d049ad&oe=5736C203[/img]
Also got Mikkeller's beer book which has some great recipes in it.
Currently have a keg of Monk's Brew (to which I added some Carafa III for more roast flavours) on the go. 19 litres of 10% dark Belgian ale - dangerous times!
have some Czech pilsner lagering in the freezer at the moment, should be ready just in time for me and the boys' annual Easter MTB piss up weekend in Dumfries
