And I can't remember who! My search-fu is weak today as well.
So, here goes!
Not my wall!
[img] 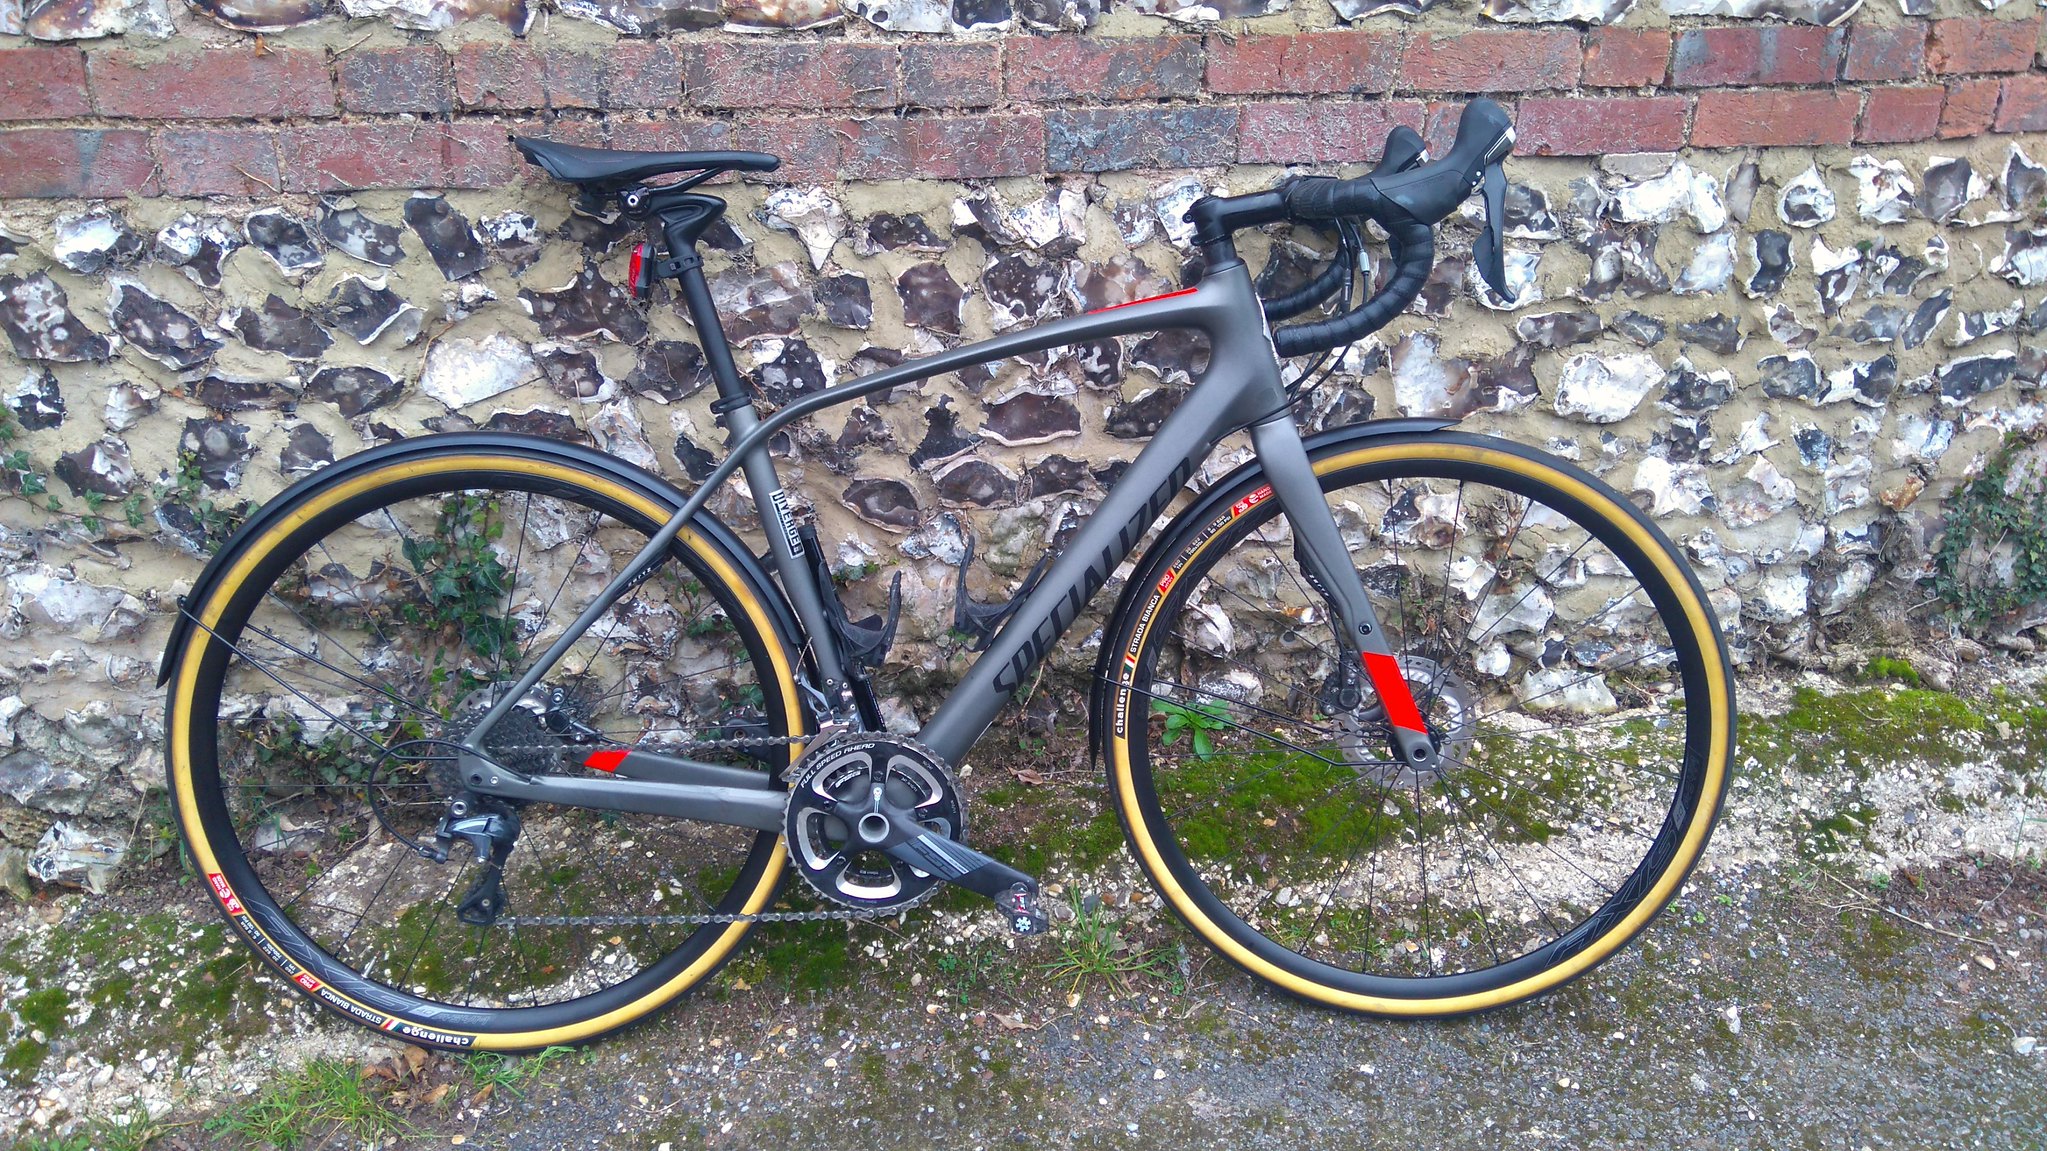 [/img]
Clearance over 30mm Challenge Strada Bianca. Skinwalls, natch.
[img] 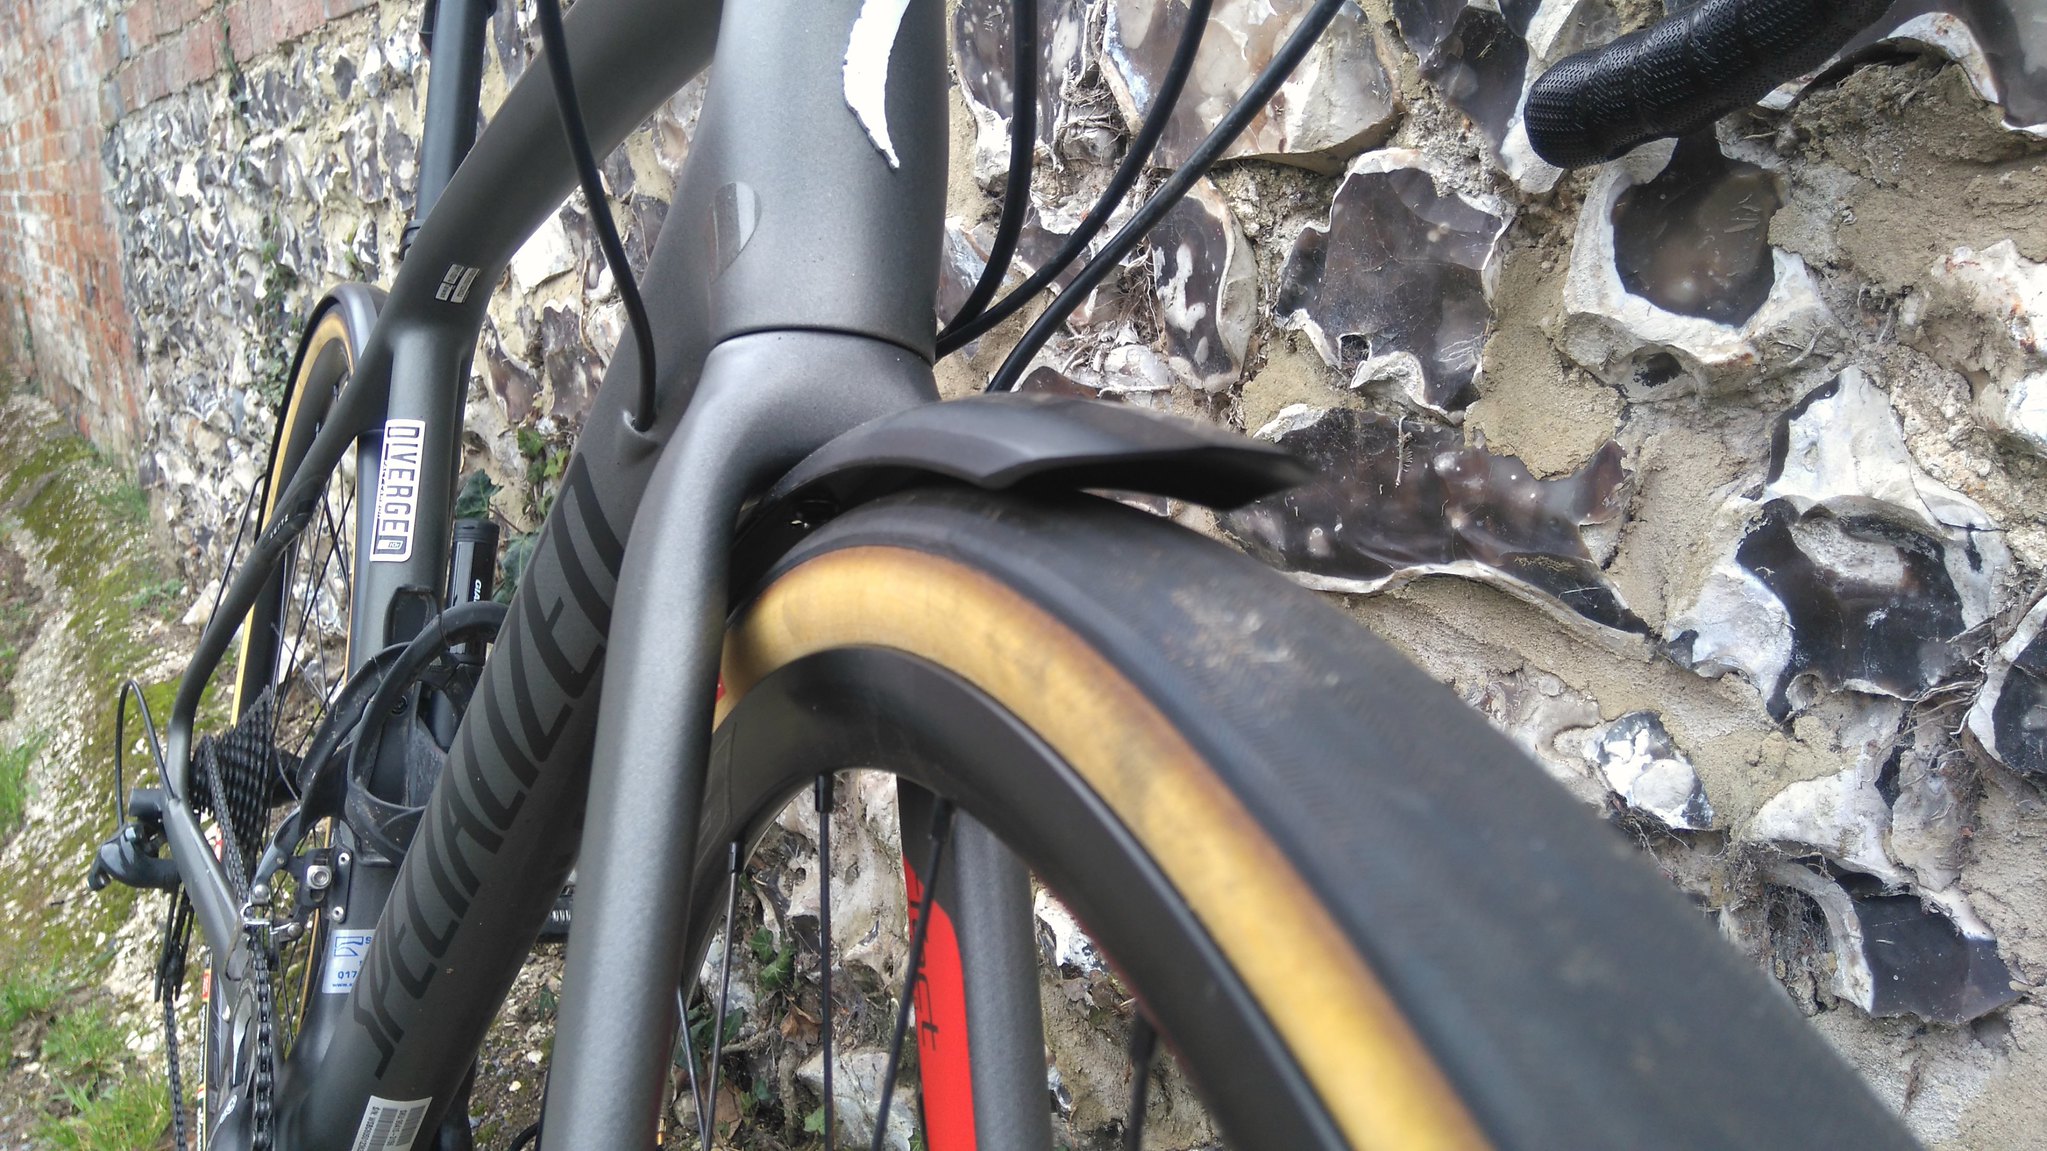 [/img]
[img] 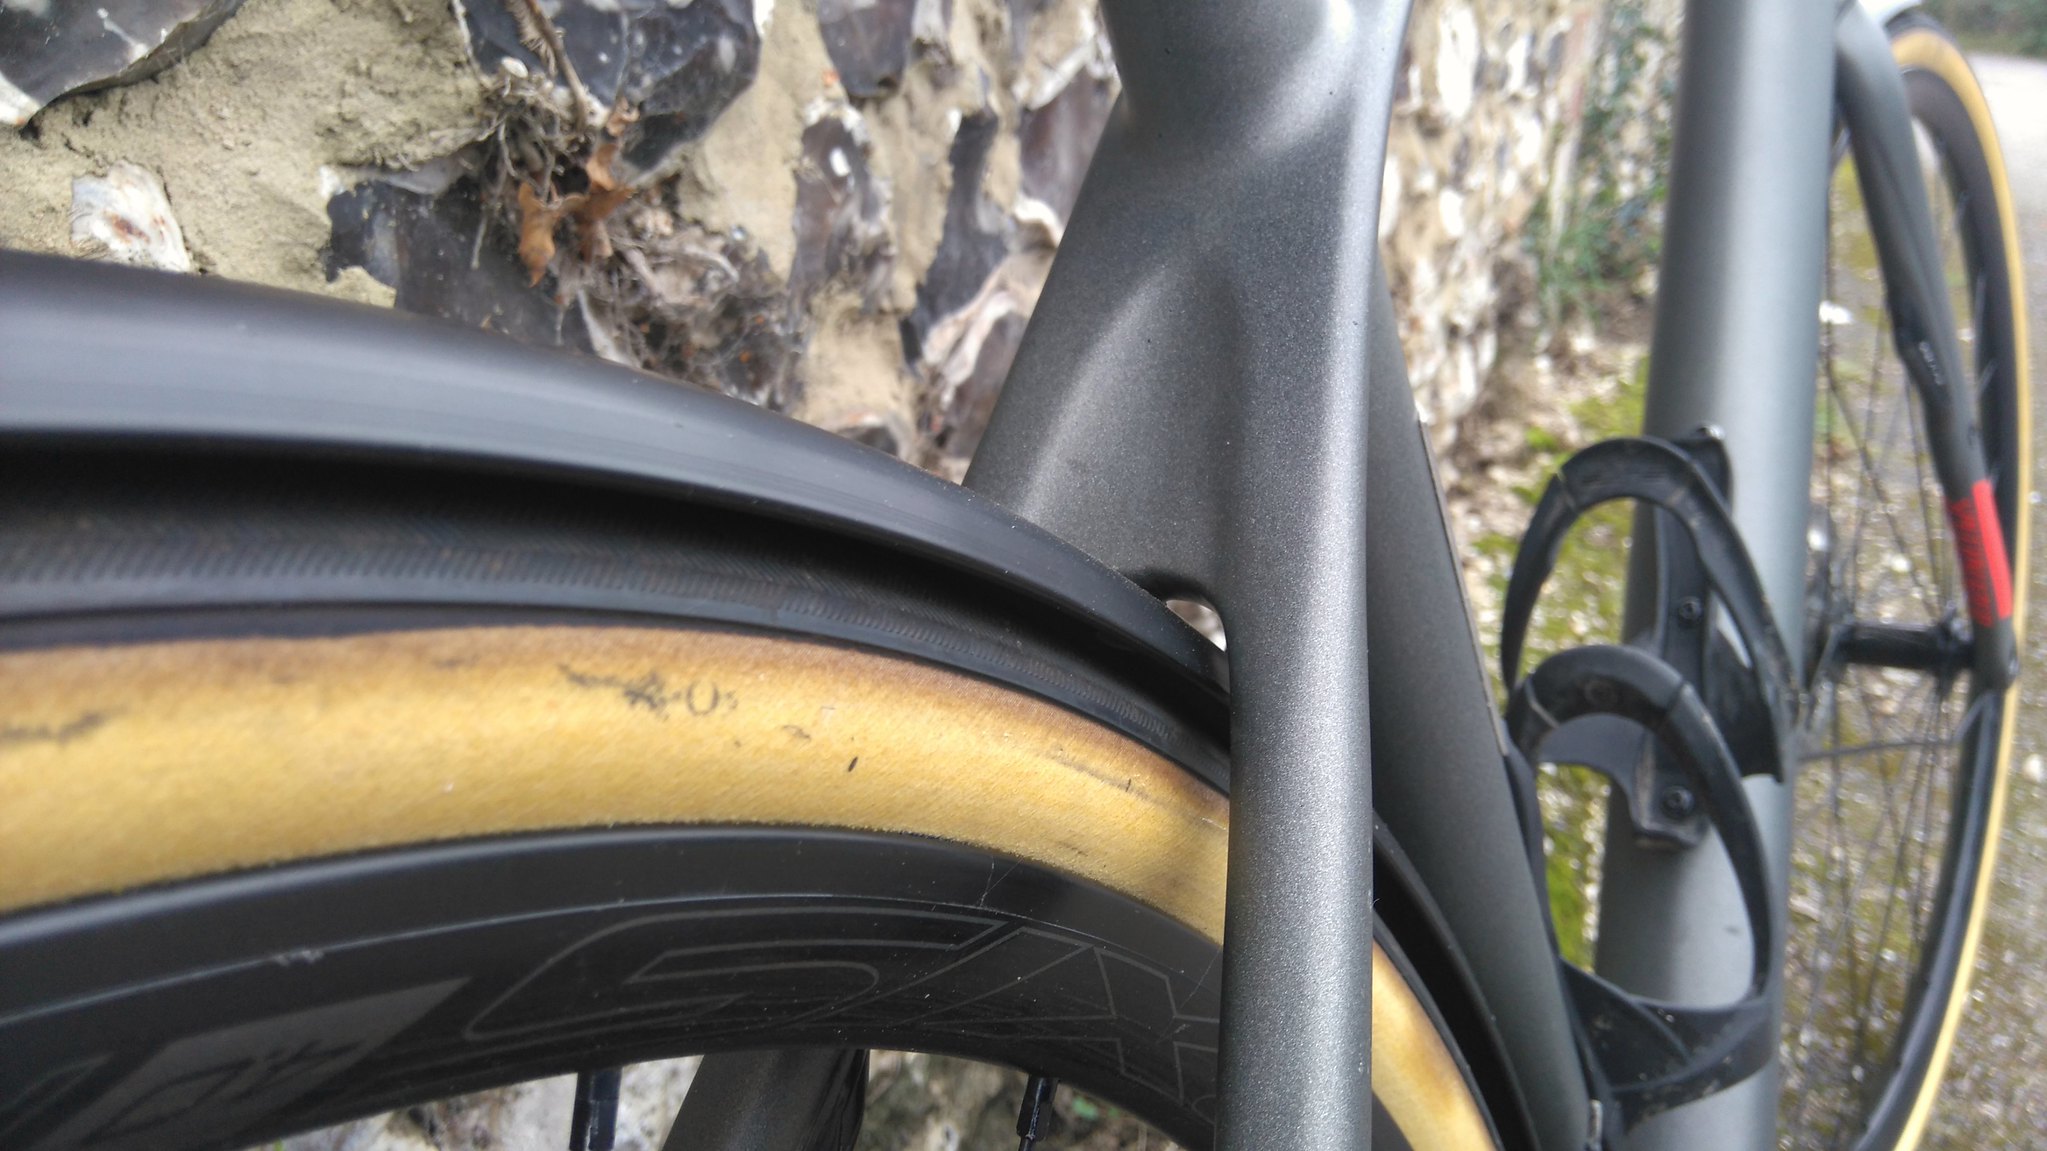 [/img]
Front again. The fitting over/under the discs is really neatly done on the other side.
[img] 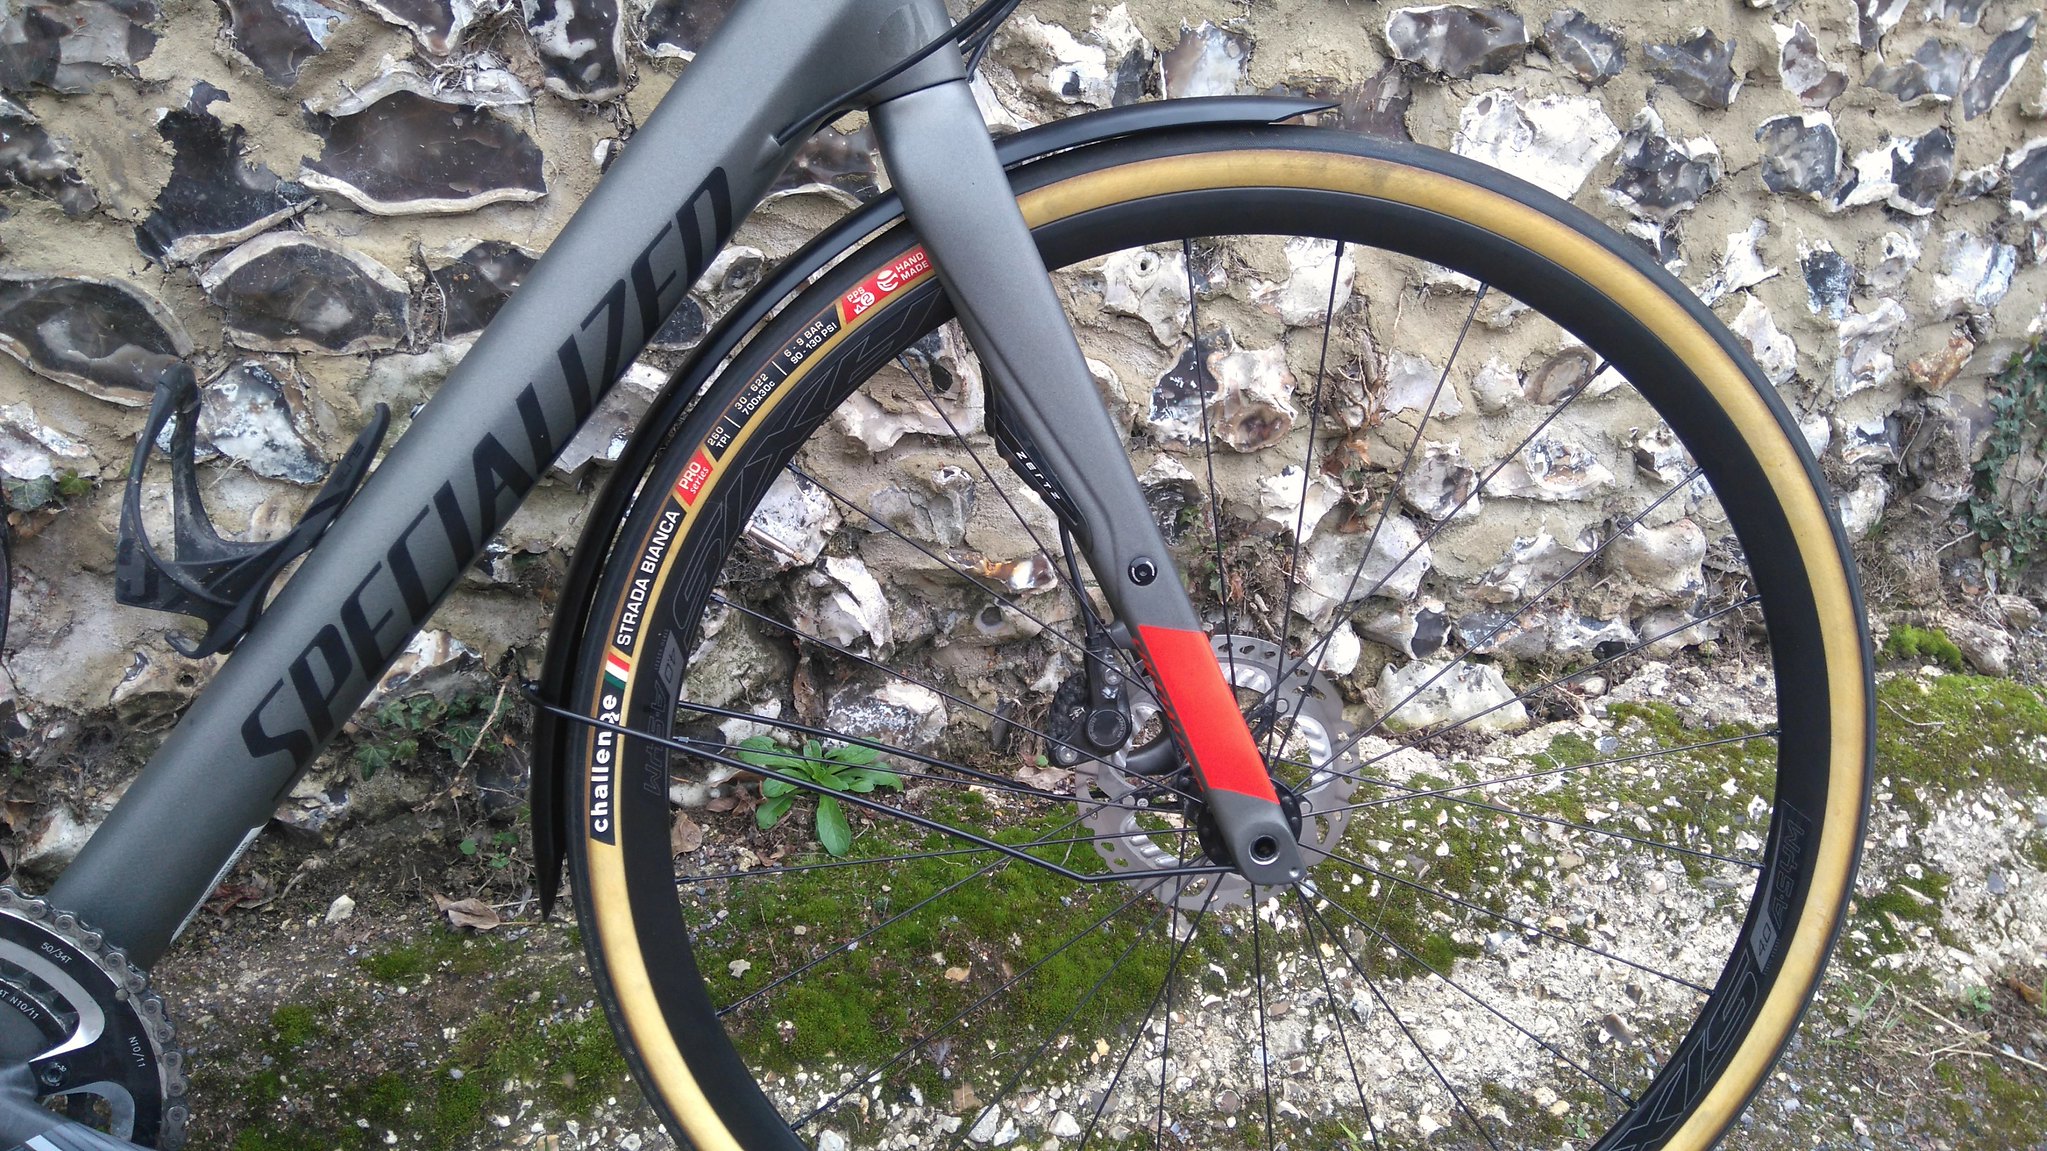 [/img]
Front mounting. Super neat and tidy!
[img] 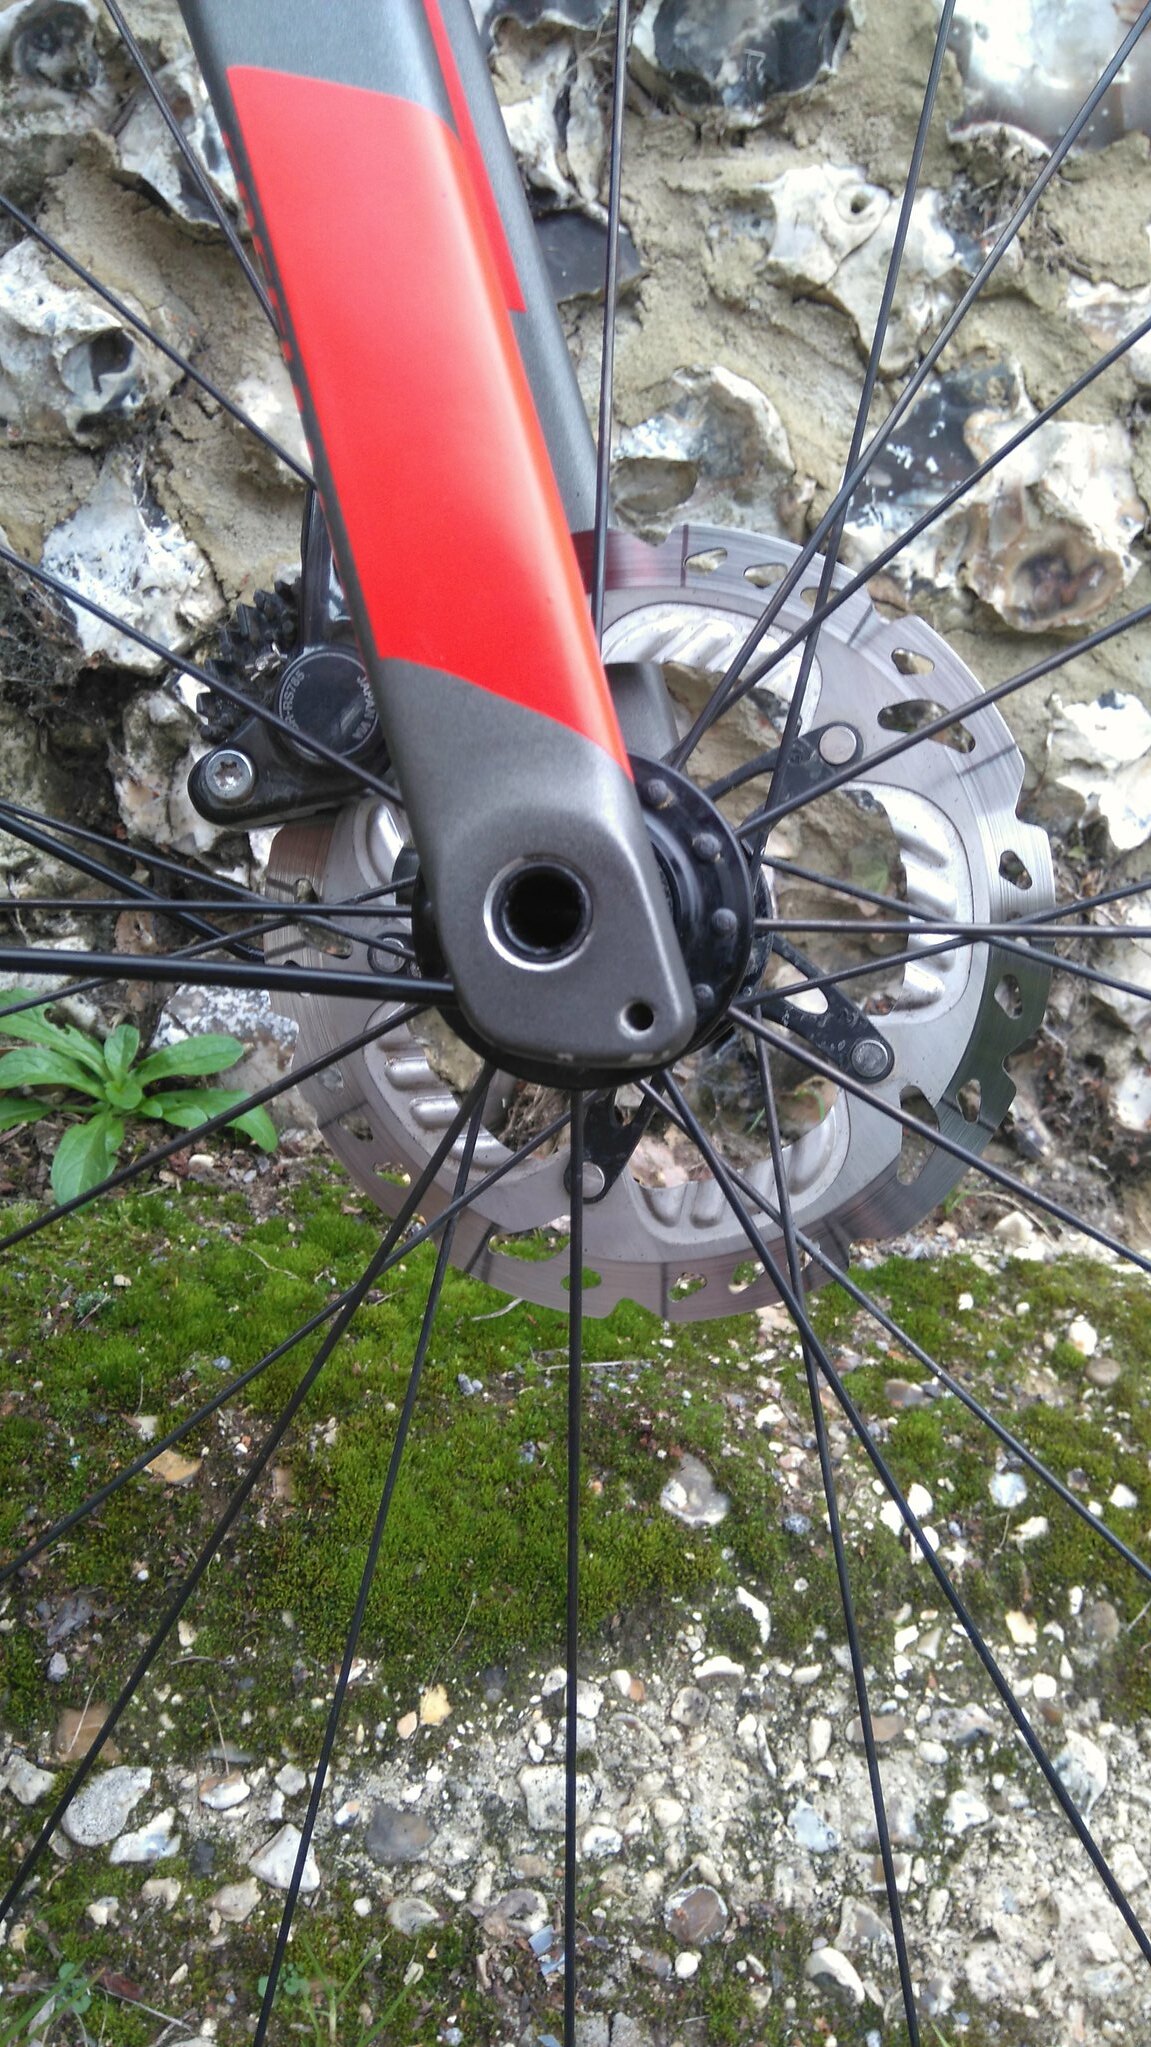 [/img]
That looks really nice.
Not the thread you wanted but seeing as you did ignore my capital letter shouting 😉 I thought I'd post it anyway Sir!
http://singletrackworld.com/forum/topic/diverge-owners
What guards are they CFH?
[s]Are they the Specialized plug and play ones? if so - which version? V1 or V2?[/s]
[s]The "look" similar to my Specialized plug and play ones but at the same time look different??[/s]
EDIT - just managed to get the photos to load properly on my phone - definitely Spesh P&P ones, V2. (where did you get them from?)
Mine are the V1's that the rear stay doesn't have a kink in it so runs virtually horizontally backwards. V2 looks like it will be a bit stiffer and have less "bounce" with the kinked stays.
EDIT 2 - how have you mounted the front at the crown? any chance of some more pics? Mine use the L-shaped bracket, but yours look super neat......is the bracket inside the crown or have you fettled the guards somehow? Looks like it could be a Daruma bolt?
Cheers,
A
Smart that. Love the skin walls.
They look pretty good on there.
I think I'll have to get a set ordered for mine before the winter.
Looks like I've got some replying to do!
On here first,
Andy, they were from my LBS, Stonehenge Cycles and yes, V2, with a better cut away for the front mech. The front has a bolt up in to the steerer tube Base for neatness and feels v sturdy. Looks clean too!
Now, on to the other thread!
Cool - thanks CFH!
I had to dremel a bit out of my V1's to clear the front mech arm - good to see they've fixed that this time!
Is that Stonehenge Cycles in Salisbury?
They look a lot cleaner than the V1's - might get a set and put the V1s on my wife's bike (that doesn't get ridden as much......)
Cheers,
A
Yep, Salisbury. They've got plenty in stock still as far as I know.
[img]  [/img]
Cool - I'll give them a call in a bit!
The SKS Bluemels fit too with a hole drilled in each one. That's what I have on mine with 28s fitted. Generally. I don't think they look as good as the Specialized guards but then with only 28s they look a better fit.
Oh and quick tip. Use screw lock on the grub screws.
Thats gonna need a hell of a front flap. Could you get a cut down rear to fit the front, get it a bit lower?
Whats appened to your seatpost!! Does it actually work or do you just pop it on for stw photos to mess with our heads?
Ignore the guards, this thread is further proof that all road bikes look better with skin wall tyres. Lovely bike that (bar the seat post, obviously!).
I was wondering when the seatpost comments would start!
It ain't pretty, but it seems to work!
Really skinwalls, yes. They're just betterer.
Thanks, Zippy!
Likes that, likes a lot.
Nice that. I fancy me something along similar lines
All bikes look better with Skinwalls 8) OP, how are you finding the strada's? Pretty sure I'm gonna get a pair for my Genesis Datum frame when it turns up, but not seen many user reviews.
Picking up my Diverge tomorrow, but already have the plug n play mudguards.
Quite surprised how substantial they feel compared to chromoplastics!
Pffh
Would look so much better with black walled Tyres
Would look so much better with black walled Tyres
It didn't! 🙂
how are you finding the stradas?
Mini review coming up!
Pros;
They really brought the bike alive! A cliché, I know, but they did. They made the whole thing feel lighter, sprightlier and faster, while staying comfortable.
Grip is very predictable, which is always good. Especially good under braking.
They look all of teh orsumz!
Cons;
I'd ideally have liked them a teeny bit wider.
They're not cheap.
They are the hardest tyres to fit that there have ever been when fresh out of the box. Really, really hard to fit! Seem OK now they're bedded in, though.
On the fence;
Toughness/puncture protection. Only one puncture to date, a blackthorn which would have punctured a bullet proof vest. However, I'm not convinced they're as tough as I'd like for winter riding. Local rides include a lot of thorned bridleways, which are one thing, but also lots of flint. So, tyres take a beating. Will be interesting to see how these pan out.
How does that front guard attach to the fork at the bridge ? The only hole I can see on mine is in the middle facing the tyre. Is that threaded ?
They do look great. Personally, I'm waiting for summer before fitting pretty tyres...
Been using those stradas on and off for 18 months as winter tyres or when away and not having both road and roughstuff bikes. Great ride, no punctures except thorn but they do cut a bit.
Tan wax on the sidewalls before you fit, let it dry first. They stay tan for that little bit longer. I use tans on all my bikes and its the only way I've found of keeping them staying tan, even on grifos in mud.
Tan wax on the sidewalls before you fit
Do you mean tan shoe polish Bikebouy? Or some other product I don't know of?
CFH - any chance of a pic or two of how your front guard is mounted at the crown?
I picked up some V2's from Stonehenge cycles earlier (awesome sevice and shop!) but they've got exactly the same L-shaped bracket as my V1's?
Cheers,
A
I use Tan shoe polish, make sure it's the really light Tan stuff, not mid 😐
Or, I have been told that Nik Wax is good too but I've not tried that..
Then I really dry the tyres out, I hang a new set out once waxed for about 3-4 weeks before using them.
I picked up some V2's from Stonehenge cycles earlier (awesome sevice and shop!) but they've got exactly the same L-shaped bracket as my V1's?
Me too.
Fitted them today which involved drilling out the L shape bracket rivets and other bits of general faffage.
Specialized supplied some 4mm grub screws that have a hex cutout of homoeopathic proportions. Luckily I already had some proper 4mm stainless grub screws . God knows how your meant to tighten up the ones they supply.
Although the guards are now fitted, they really need to change the name from "plug n play", to "drill, saw, replace crap bits n play"
Ian - ha ha, that's a spot on description!! Totally agree on the supplied grub-screws too! Luckily have a plentiful supply of stainless bolts from work......
At least after all the tinkering and setting up they are pretty much plug-and-play when you remove/refit them!!
How have you mounted the front guard at the crown then?
My V1s are destined for the wife's bike now, and the V2s are going on my diverge.
A
Here you go-
[img] 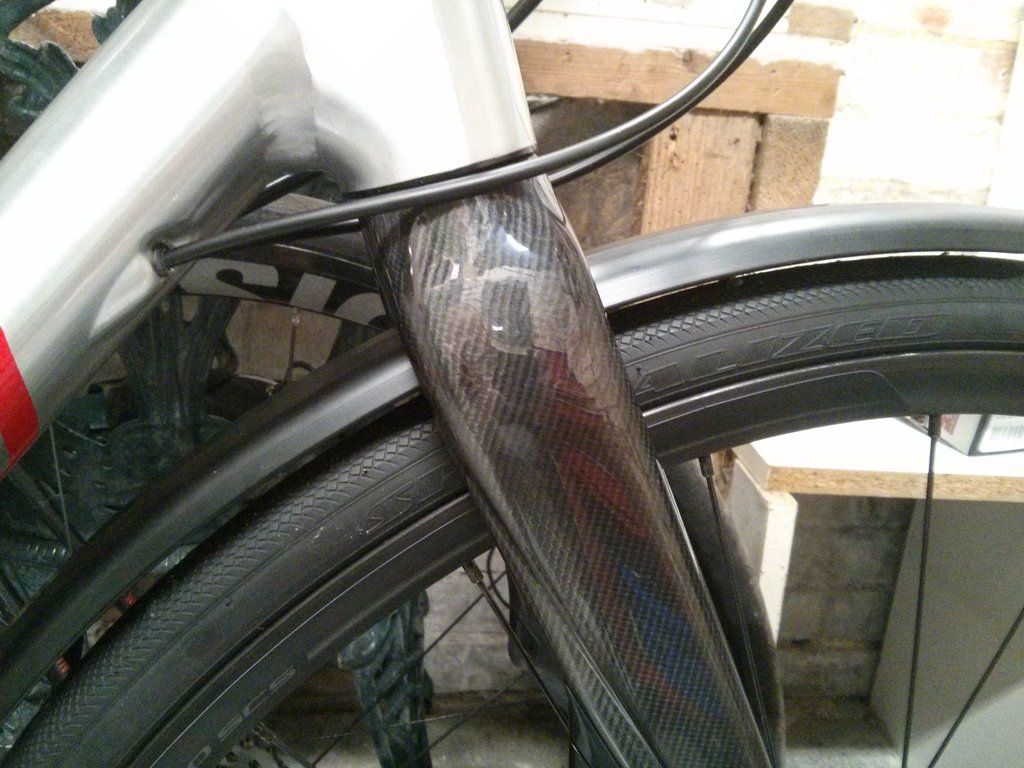 [/img]
[img] 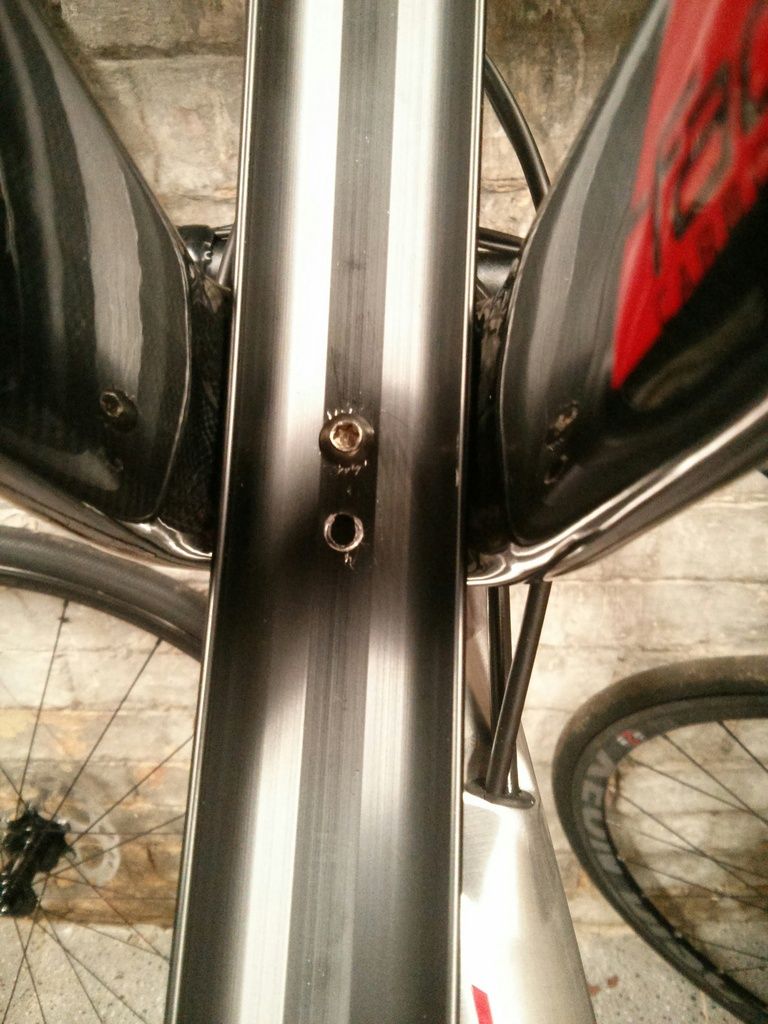 [/img]
Drilled out the bracket rivets and bolted it on through the front hole using an M5 torx screw with a bit of thread lock.
I forgot to mention, the forks come with an M5 hole in the bottom of the crown specifically for this.
Ian - cheers!
I take it the fork crown on yours is solid with a tapped hole in it then?
My alu diverge has a carbon fork with alu crown (so hollow)
Thinking a star fangled nut in the bottom of the steerer might be the way to go!
A
Ah, yes solid, now I understand your problem!
No worries! It's an easy fix - a long bolt with a SFN will do the trick!
Off to rummage in the spares box......
A
Has anyone had any issues with fitting the Plug and Play guards to the alu Diverge?
I ordered a set from Stonehenge Cycles, they appear to be the only place with them in stock, and having tried fitting them I can see what people say about them not being plug and play!
The front guard when fitted doesn't look particularly tidy due to the size of the L shaped bracket which mounts at the fork crown so it looks like a SFN may be needed to sort that out.
The rear guard looks like it's been made for a completely different bike!
With everything in place the front of the guard is touching the seat tube and the rear stays almost needed forced into place. As a result the guards have a huge gap at the rear of the rear wheel. Just to add to the fitting issues, there are no markings showing where to drill the rear stay to mount it on the seat stay bridge.
The grub screws that are supplied with the kit are a joke, really cheap rubbish. the first one I fitted rounded off which wasn't ideal. Looks like I'll have to get some replacements from somewhere.
Another problem with them is that the instructions that are included with the V2 kit appears to be for the V1 kit. I'm starting to with that I'd saved my money and went for a set of the SKS guards that are about half the price 😕
Ali diverge owner here. V2 guards fitted.
Drilled out the rivets holding the L shaped bracket on the front. Star fangled nut in steerer - had to bend lugs in a bit to get SFN started in steerer due to size of steerer at base/crown. Had to make a spacer to go between SFN and guard to get height right. (About 18mm from memory) - just used some metal tubing from work.
Rear guard fitted fine - very close to seat tube, stuck a small foam pad between guard and seat tube to prevent fretting/rubbing. Took time to get stays set to right length by slowly cutting them down to get guard even all way round the wheel.
Not plug and play (initially!) but very quick to remove and refit once you've got them set up first time round and they do look clean.
Used some stainless grub screws from work - plenty of good ones on eBay tho!
Hope that helps - happy to answer further questions!
A
Thanks for that Andy, looks like I'll be needing a trip to the nut and bolt shop tomorrow followed by a couple of hours with the Dremel to try and get them to fit properly.
It's just a shame that they don't fit like CFH's straight out of the box like I was expecting.
No worries.
Email in profile if you want any advice or for me to ping some pics across etc.
New Diverge fanboy here 🙂
Currently sat in waiting for a set of V2 plug and plays and had noticed a bit of chatter on the net about Diverge specific bodging, predictably the best threads for this subject via Google are on STW.
Whats interesting is that CFH's fitted without any obvious hassle - is that because he/you has/have a full carbon fork and the trouble is with the ones that have alloy steerers?
It would be good to know if I have to charge up the Dremmel and get some new nuts and bolts before fitting them later
Cheers
Easy peasy, something has gone my way today 🙂
I had mine fitted by a highly trained and experienced, and ever so slightly OCD spanner monkey.
🙂
I had mine fitted by a highly trained and experienced, and ever so slightly OCD spanner monkey.
Or "butler", as you normally describe them....
I recently fitted v2 plug and play (or 'drill and saw and saw and saw and plug and play') mudgards to my smart-weld diverge, which has the carbon fork. The fork has a threaded hole at the bottom of the steerer which required the bracket on the front mudguard to be removed by drilling out the rivets, and enlarging one of the rivet holes to allow it to be bolted directly to the bottom of the steerer.
The rear needed a hole drilling through the guard to attach to the brace between the seat-stays, although whereas the instructions tell you to drill through the marked location for your frame size, mine had no markings so I had to work it test-fit the guard and work it out for myself.
The stays for both mudguards needed trimming down which took a little while to get the fit right. Now they are fitted they are great though - look very neat, with no rattling. Only thing is that there is a gap of around 1mm between the rear guard and the frame, so I've put a frame-protector patch here to make sure it doesn't rub.
All simple enough if you ignore the instructions completely and take your time.
[url] https://drive.google.com/file/d/0B6kWpja-xDXSM043RHFvaWltN2s/view?usp=sharing [/url]
(OCD alert: it now has two matt-black bottle cages rather than the aluminium one I had lying round at the time, and has lost the wheel reflectors!)
Can anyone tell me the diameter of the plug'n'play support rods. I'm interested to see if i can mount Portland Design Works Full metal fenders instead?
They're 4mm.
(The bike comes with adaptors which have a conventional eyelet, in case you weren't aware.)
Yep, as above, you can fit PDW with the screw in eyelets.
I'm working from a frame set that has no extra bits and bobs. By screw in eyelets, do you mean the tiny grub screws in the frame, or external p-clip type attachments on the externally visible mounting holes?
Also, do any of you have a front rack recommendation for the carbon forks?
The adapters are like little metal letter 'P's - the leg of the P goes into the hole in the frame/fork and is clamped by the grub screw. The eye of the P is tapped like a normal mudguard lug.
Available for stupid money here:
https://www.bike24.com/p2133533.html
IIRC, Tubus Tara is the front rack of choice.
Awesome adaptor gizmo, looks ideal but WTF kind of money is that?
OK, so i'm good to go with these little dudes and my current guards.
Any photos you wish to share would be great to see
I was astonished at the price being charged for those adapters! I don't know if a Specialized dealer could get them cheaper - you sure they're not supposed to come with the frame?
Any photos you wish to share would be great to see
OK then, just for you...
[IMG] 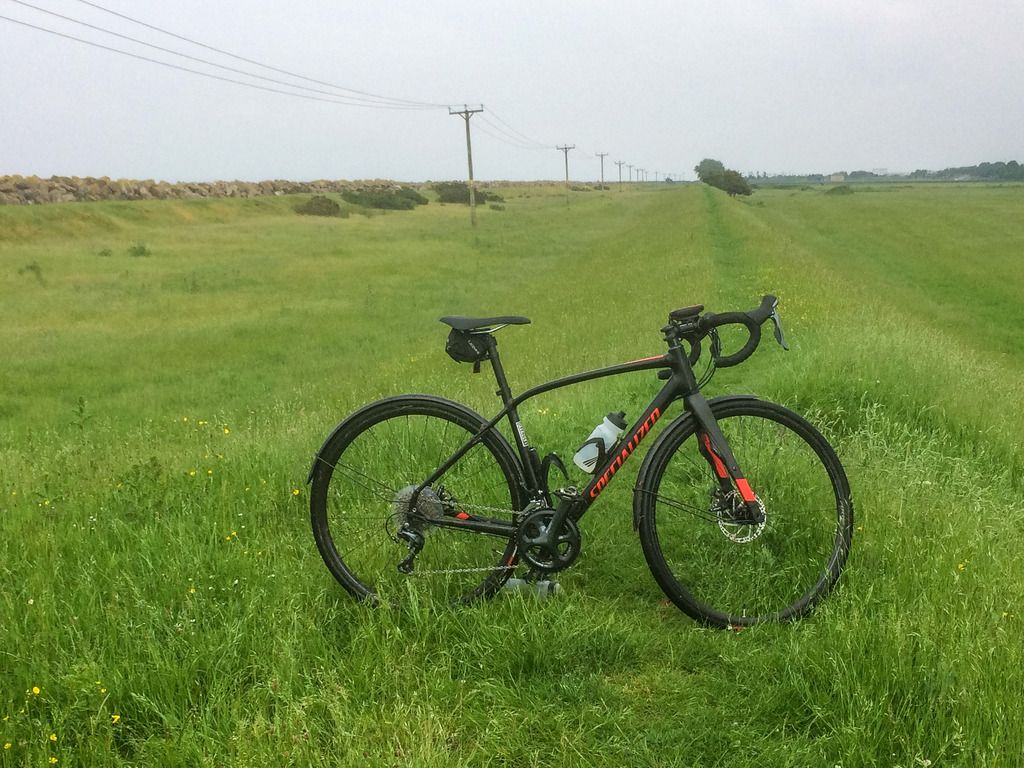 [/IMG]
BQ failed to get the Tara's to fit.
For my recent Wales off-road coast to coast I used Gorilla cages. They didn't fit either so a mate printed up some custom adapters, which to everyone's amazement held up to 5 days of abuse. I used Alpkit 8 litre tough dry-bags in the Gorilla cages, about 2 kilos rammed into each.
Tillydog - Member
I was astonished at the price being charged for those adapters! I don't know if a Specialized dealer could get them cheaper - you sure they're not supposed to come with the frame?
Any photos you wish to share would be great to see
OK then, just for you...
Snap
[URL= http://i178.photobucket.com/albums/w248/wiggles_p/IMG_20160523_194732.jp g" target="_blank"> http://i178.photobucket.com/albums/w248/wiggles_p/IMG_20160523_194732.jp g"/> [/IMG][/URL]
I read the BQ review where Jan states that the angle on the Tubus sloped down to far to work, due to the eyelets being a non standard spacing.
I suspect someone who knows what they are doing could relocate the mid fork leg mount on the tubus and get a level bar. If you are such a person, please get in touch as I'd love to get a low rider working well.
Or if anyone's happily running lowrider alternative, zap up some pics please.
Could you get a close up shot on how the guards are attached - is this with the expensive little gizmo's?
BTW: You can source these little fellas for £10 for Specialized UK.
My mudguards (and wiggles' by the look of it) are the Specialized "Plug and Play" ones. Cut, drill and pray would be a better description. They [s]fit[/s] can be made to fit directly into the holes in the frame, no adapter needed. Rack mount eyelets are separate.
YWIMC:
Smartweld Elite aluminium frame.
Front:
[IMG] 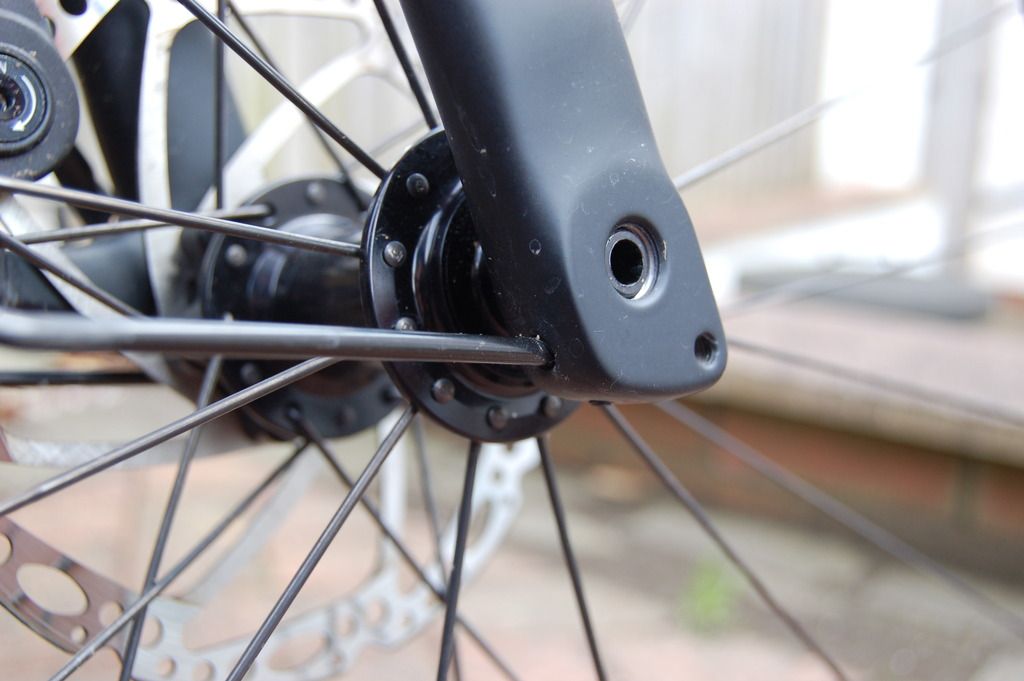 [/IMG]
[IMG] 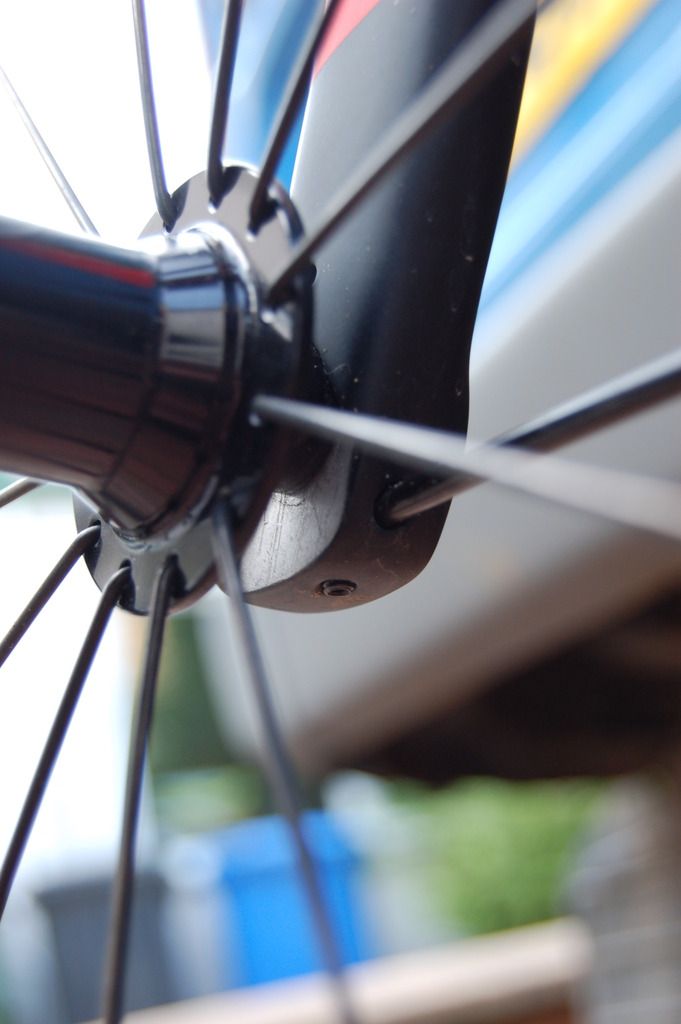 [/IMG]
[IMG] 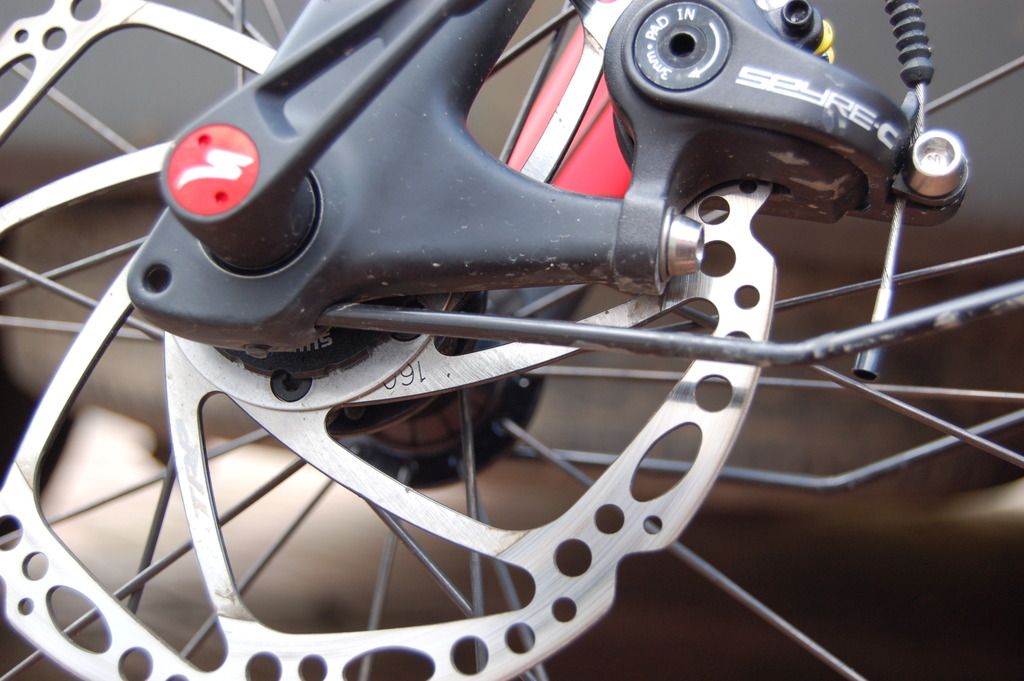 [/IMG]
Fitting at fork crown, after drilling out the rivets to remove the bracket and enlarging the rear hole:
[IMG] 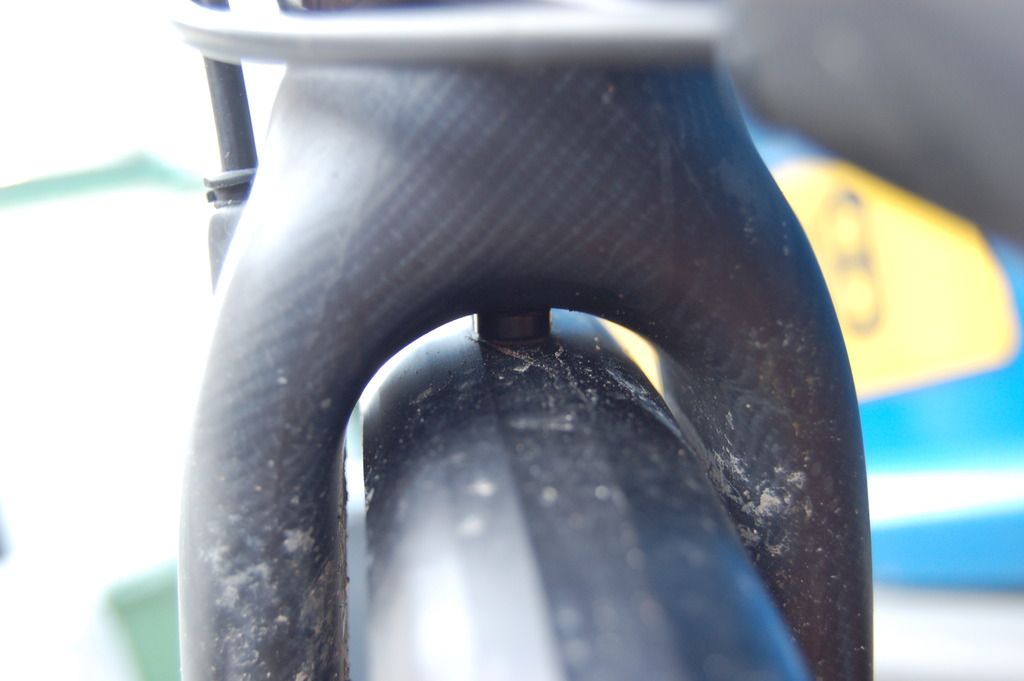 [/IMG]
Rear:
[IMG] 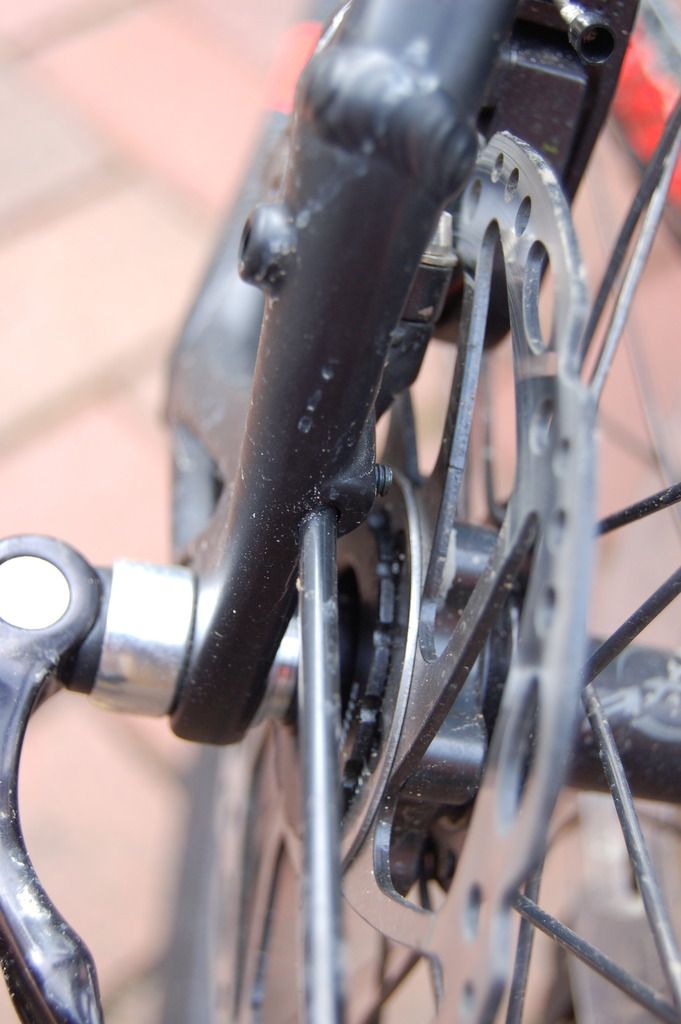 [/IMG]
[IMG] 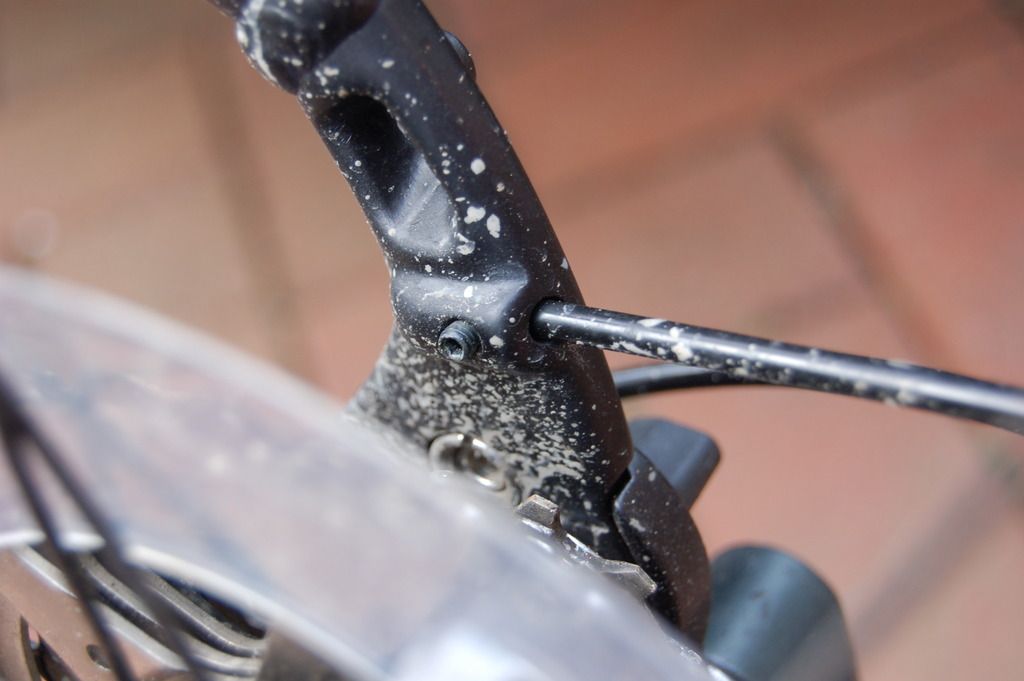 [/IMG]
At seatstay bridge (it is done up tight, even though I've just noticed the daylight in the photo):
[IMG] 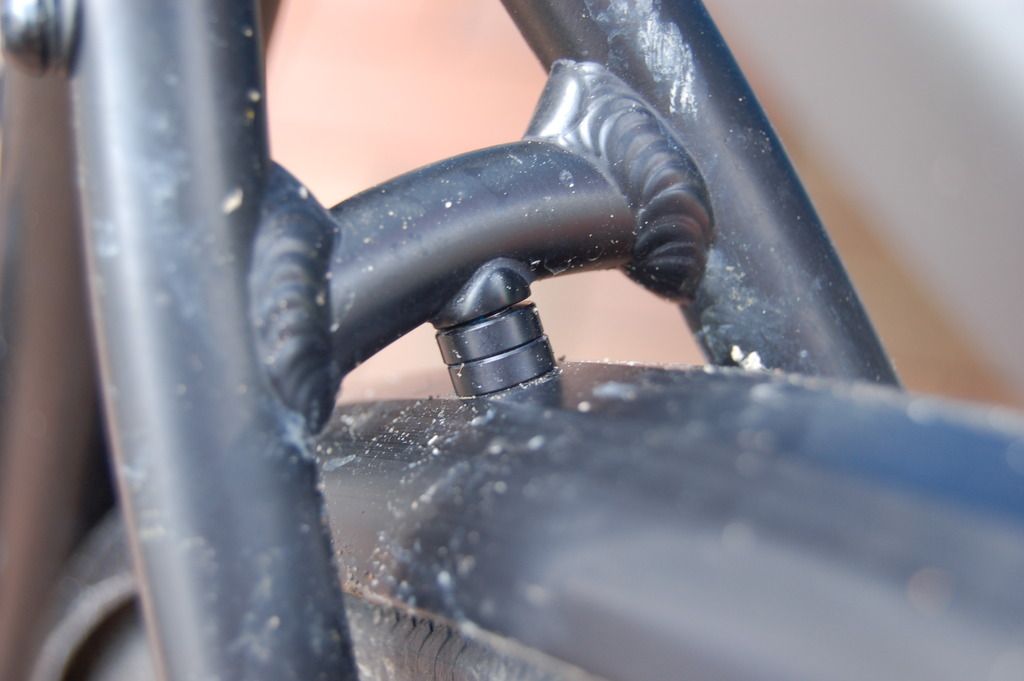 [/IMG]
[IMG]  [/IMG]
[IMG] 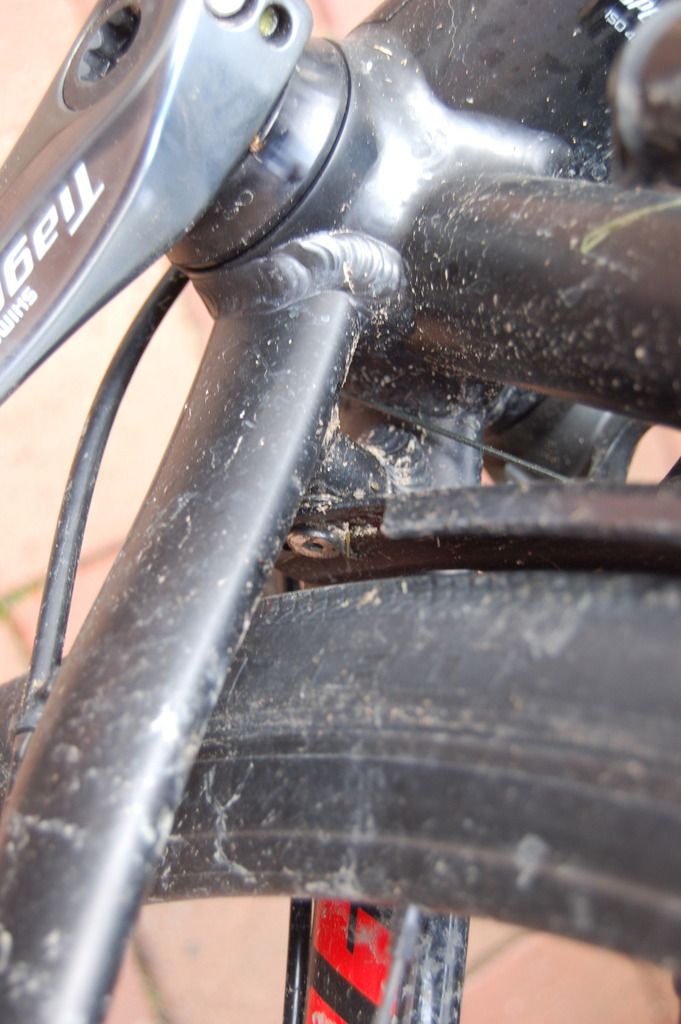 [/IMG]
'Scuse the mud - it's been raining.
Alternative front luggage mount:
[url= https://s5.postimg.org/nbs2a2rzr/IMG_2020.jp g" target="_blank">https://s5.postimg.org/nbs2a2rzr/IMG_2020.jp g"/> [/img][/url]
and with luggage:
[url= https://s5.postimg.org/ypella2if/IMG_2017.jp g" target="_blank">https://s5.postimg.org/ypella2if/IMG_2017.jp g"/> [/img][/url]
And in use...
[url= https://s5.postimg.org/3wlvupo3b/IMG_2262.jp g" target="_blank">https://s5.postimg.org/3wlvupo3b/IMG_2262.jp g"/> [/img][/url][url= https://postimage.org/ ]imgur[/url]
Those luggage mounts are great!
Tillydog, Thank you for the extensive photos. Very clear and very well done. I'm going to try the PDW Full Metal Fender option first. If that fails to work out then I'm following your lead with these Specialised guards.
As I don't have any of the little grub bolts to secure the guards in my frame. Can anyone tell me what size I need or even better offer a link to purchase some?
I need to know if it's M4 / M3 grub screws and what length you recommend?
I need to know if it's M4 / M3 grub screws and what length you recommend?
From memory, they're 4mm grub screws.
I'm pretty sure that I've got some spare stainless steel ones from when I fitted the guards to my Diverge. They were much better than the cheap rubbish supplied with the guards.
I'll have a look for them when I get home and you can have them if I can find them.
They're M4 by either 5mm or 6mm long (probably 5mm, but can't tell without taking one out) - either would work.
I'd suggest ebay if you need to buy some - plenty of sellers offering small quantities in stainless.
Great thank you.
Did you ever try the tubus tara low rider on your diverge?
What sort of maximum tyre size can you run - would a diverge take 38mm tyres?
Those fork mounts are fantastic
- No, sorry.Did you ever try the tubus tara low rider on your diverge?
What sort of maximum tyre size can you run - would a diverge take 38mm tyres?
I understood that it will take 35mm tyres without mudguards, or 32mm with, but [url= http://specialized.desk.com/customer/portal/questions/16247006-diverge-expert-2-16-35c-tires- ]this[/url] from Specialized suggest that 38mm will fit (maybe just on the carbon frame?). I'm still using the 28c tyres it came with.
binno, I've found the spare grub screws.
Email me your address and I'll stick them in the post for you.
Mine above has 36mm Clement Xplor. Really quite close.
30mm Challenge Strada Bianca on mine. Good clearance.
Ive got Vittoria XN pro tyres in 31c and they fit under the mudguards. I swapped a wheel off another bike with 38c trigger and it fitted (no mudguards obviously)
What is that mount for the luggage flapjack?
EDIT just seen your post about them being custom printed
Big thank you to notmyrealname, email sent.
Hi all, new Diverge Comp Carbon owner here (YELLOW!). Went the SKS Chronoplastic route (after previously having Giant branded guard issues on a Giant Defy), I also love SKS customer service & support!
Rear is perfect after some fettling (drilling larger holes & cutting down stays). Front is an utter nightmare. On the rear I was able to mount fitted directly to the frame mounting holes. Due to the mounting points on the front fork being infront of the thru-axle I can't mount them there, as the SKS fittings will not clear the thru-axle on the drive side.
Thankfully my Diverge came with the Spesh adaptors from the shop! BUT... Fitting them, the grub screw point (in the bottom of the fork) is too far 'forwards' so the 'tail' of the adaptor is only held by a fraction of a mm on 1 side, the other side it won't grab at all! Gah! Grub screws are also made of cheese so will be swapping them out for something more sturdy.
I notice several of you have fitted the 'Specialized Fenders' V1 & V2 which have solid stays fitting directly into these adaptors mount holes rather than using the adaptors themselves. I might end up replicating this idea 'as a last resort'. The Chromoplastics have 2 stays on the front guard, making it nice and stable and avoiding lots of noise. So I'm trying to figure out how I can keep them... I have many bits of previous mudguards and an extensive range of bolts, screws & fittings. Have a feeling I'm also going to need a new hacksaw and a long weekend's worth of patience!
Will post up pics to help others! 🙂
Finished off fitting my guards on saturday, SKS Chromoplastics 'Narrow' (35mm Width 700x20-28). Clearance over the 25x28mm Roubaix tyres and the 28mm Pro4E's I also fitted. Tempted to try 32mm Pro4's/GP4 Seasons next.
[IMG]  [/IMG]
Rear went on well, just had to remove 2 rivets to remove the L bracket & fitted to frame mount points (at seatstays & bb), very firm (for a nice quiet guard!). Had to drill out a couple of the holes larger and fitted guard with bolts, washers and spacers (used some old plastic nuts from crud guards & drilled them out).
Front was more tricky, easy fit into the frame mount inside the forks (with similar fittings to the rear), I need to add some rubber to dampen some of the vibration. The stays which came with the Chromo's were not long enough to fit to the frame mount points (and I had big problems fitting the Spesh mounts - see above!). I had some spare 'Y stays' left over from some previous Giant guards which were the same width & longer, but due to where the frame mounts were placed (other side of the thru-axle) I couldn't use 2 stays each side. I cut them down as 1 half of each stay had an extra bend near the mounting point (due to being a double stay) which helped them avoid the thru-axle (without me having to bend them manually to shape).
[IMG]  [/IMG]
Just enough clearance to go under the thru-axle handle too (even with my spacers to protect the frame)!
[IMG]  [/IMG]
Did notice something else 'odd' with my Comp Carbon... My FD hits my frame when in the smallest chainring! Anyone else noticed similar? Unsure if it's fitment on mine, or a more generic design flaw.
[IMG]  [/IMG]
Feedback: Tubus Tara (current model with 14mm main rail) fits the Diverge carbon fork perfectly. Gives you 8 inches of ground clearance from the base of the rack. I'm currently looking for suitable panniers to fit, ideally roll tops, if anyone has any recommendations?
[b]RoadyUK:[/b]
Front mech wise, my 105 11 speed does not touch the frame. However, have you used the mechs frame grub screw to frame plate feature, there to make sure it's firmly placed when mounted? Check the Shimano fit instructions if you not sure what I mean. There's a tension screw to further secure the longer reach / pull of the mechs lever action that sits against a small metal backed sticker on the frame.
On a different note, i'm having a lots of issues with my 105 Disk brakes.
Thanks for mech info binno, will take a look this weekend.
What issues with your brakes?