And I can't remember who! My search-fu is weak today as well.
So, here goes!
Not my wall!
[img] 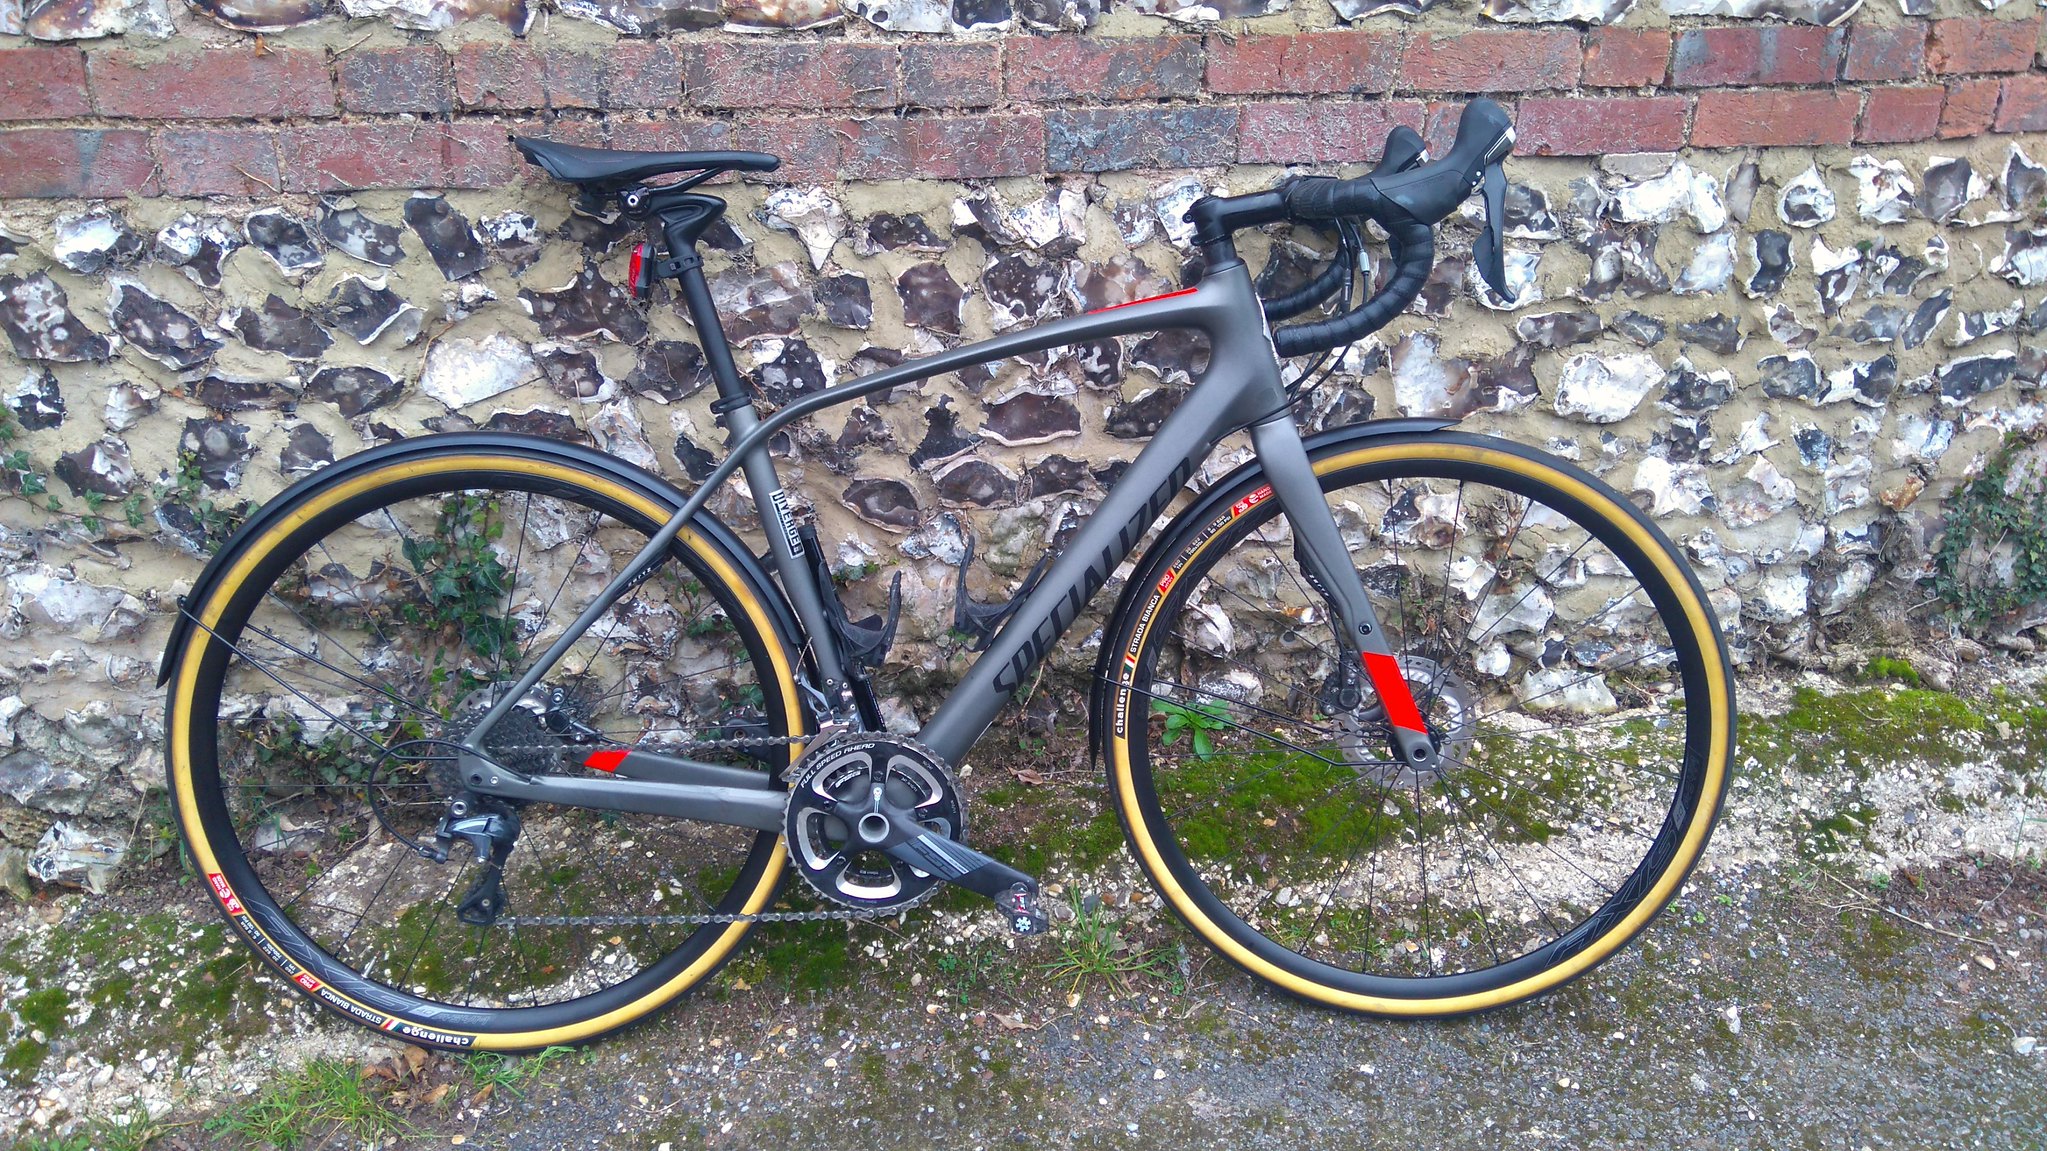 [/img]
Clearance over 30mm Challenge Strada Bianca. Skinwalls, natch.
[img] 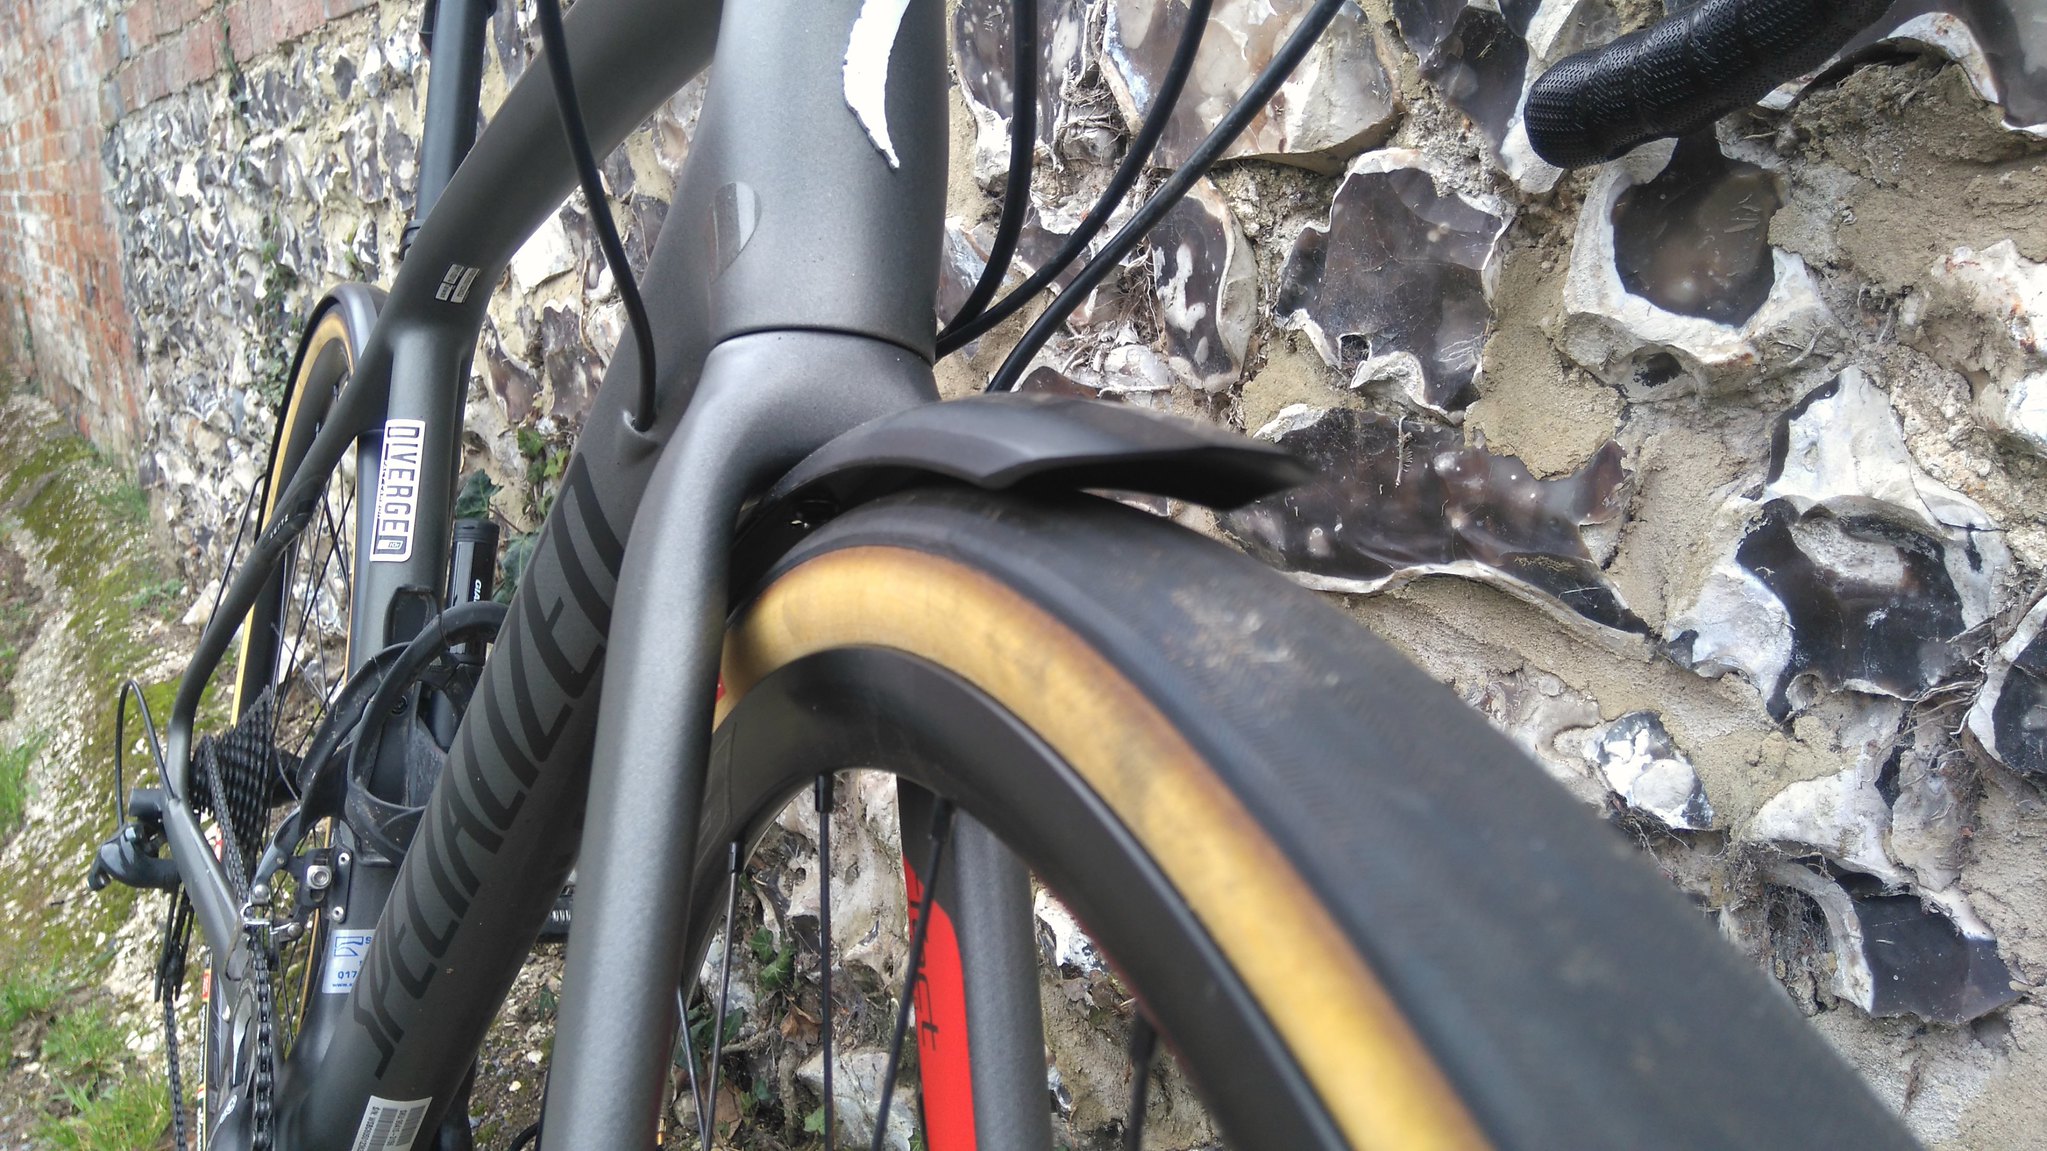 [/img]
[img] 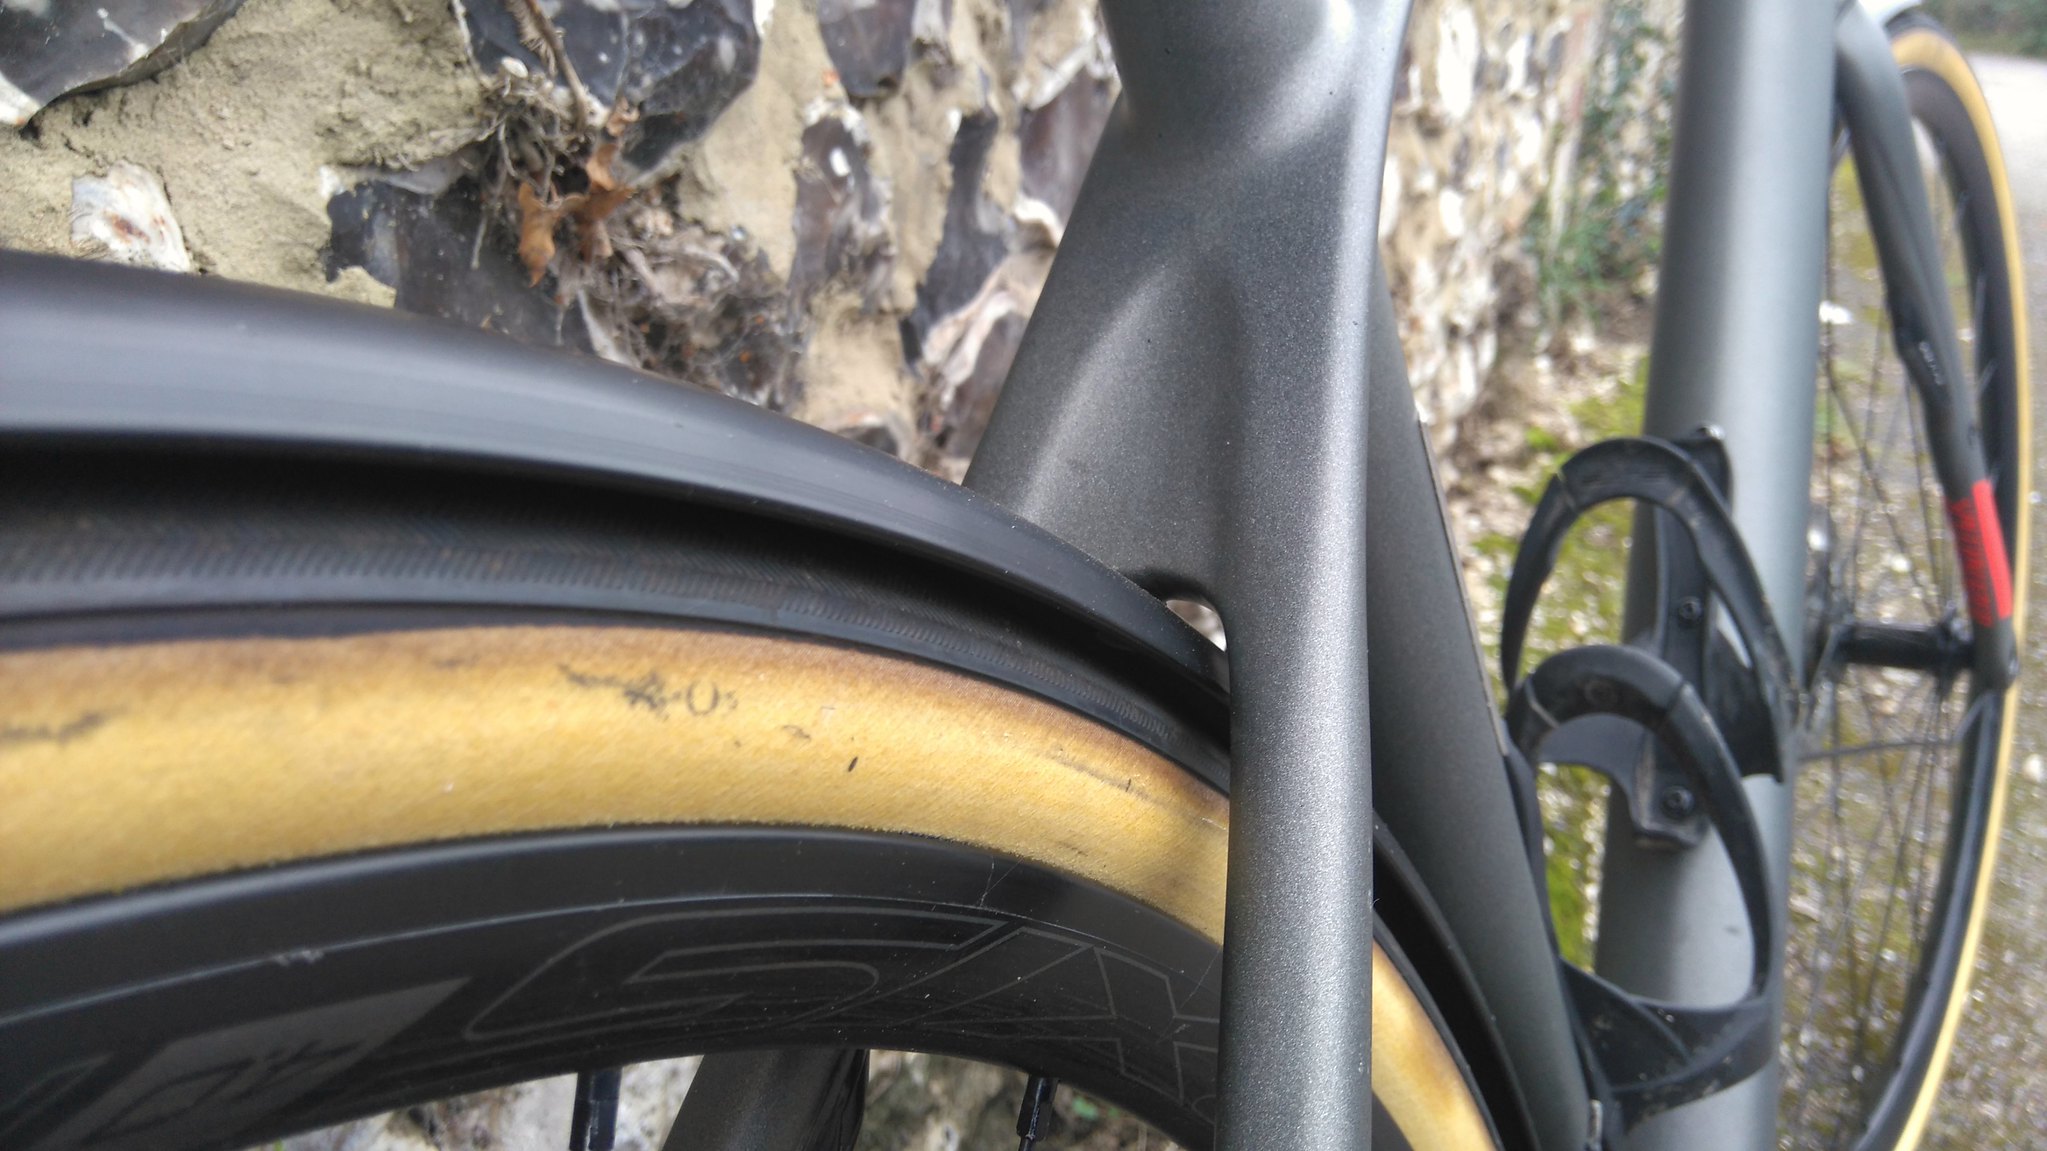 [/img]
Front again. The fitting over/under the discs is really neatly done on the other side.
[img] 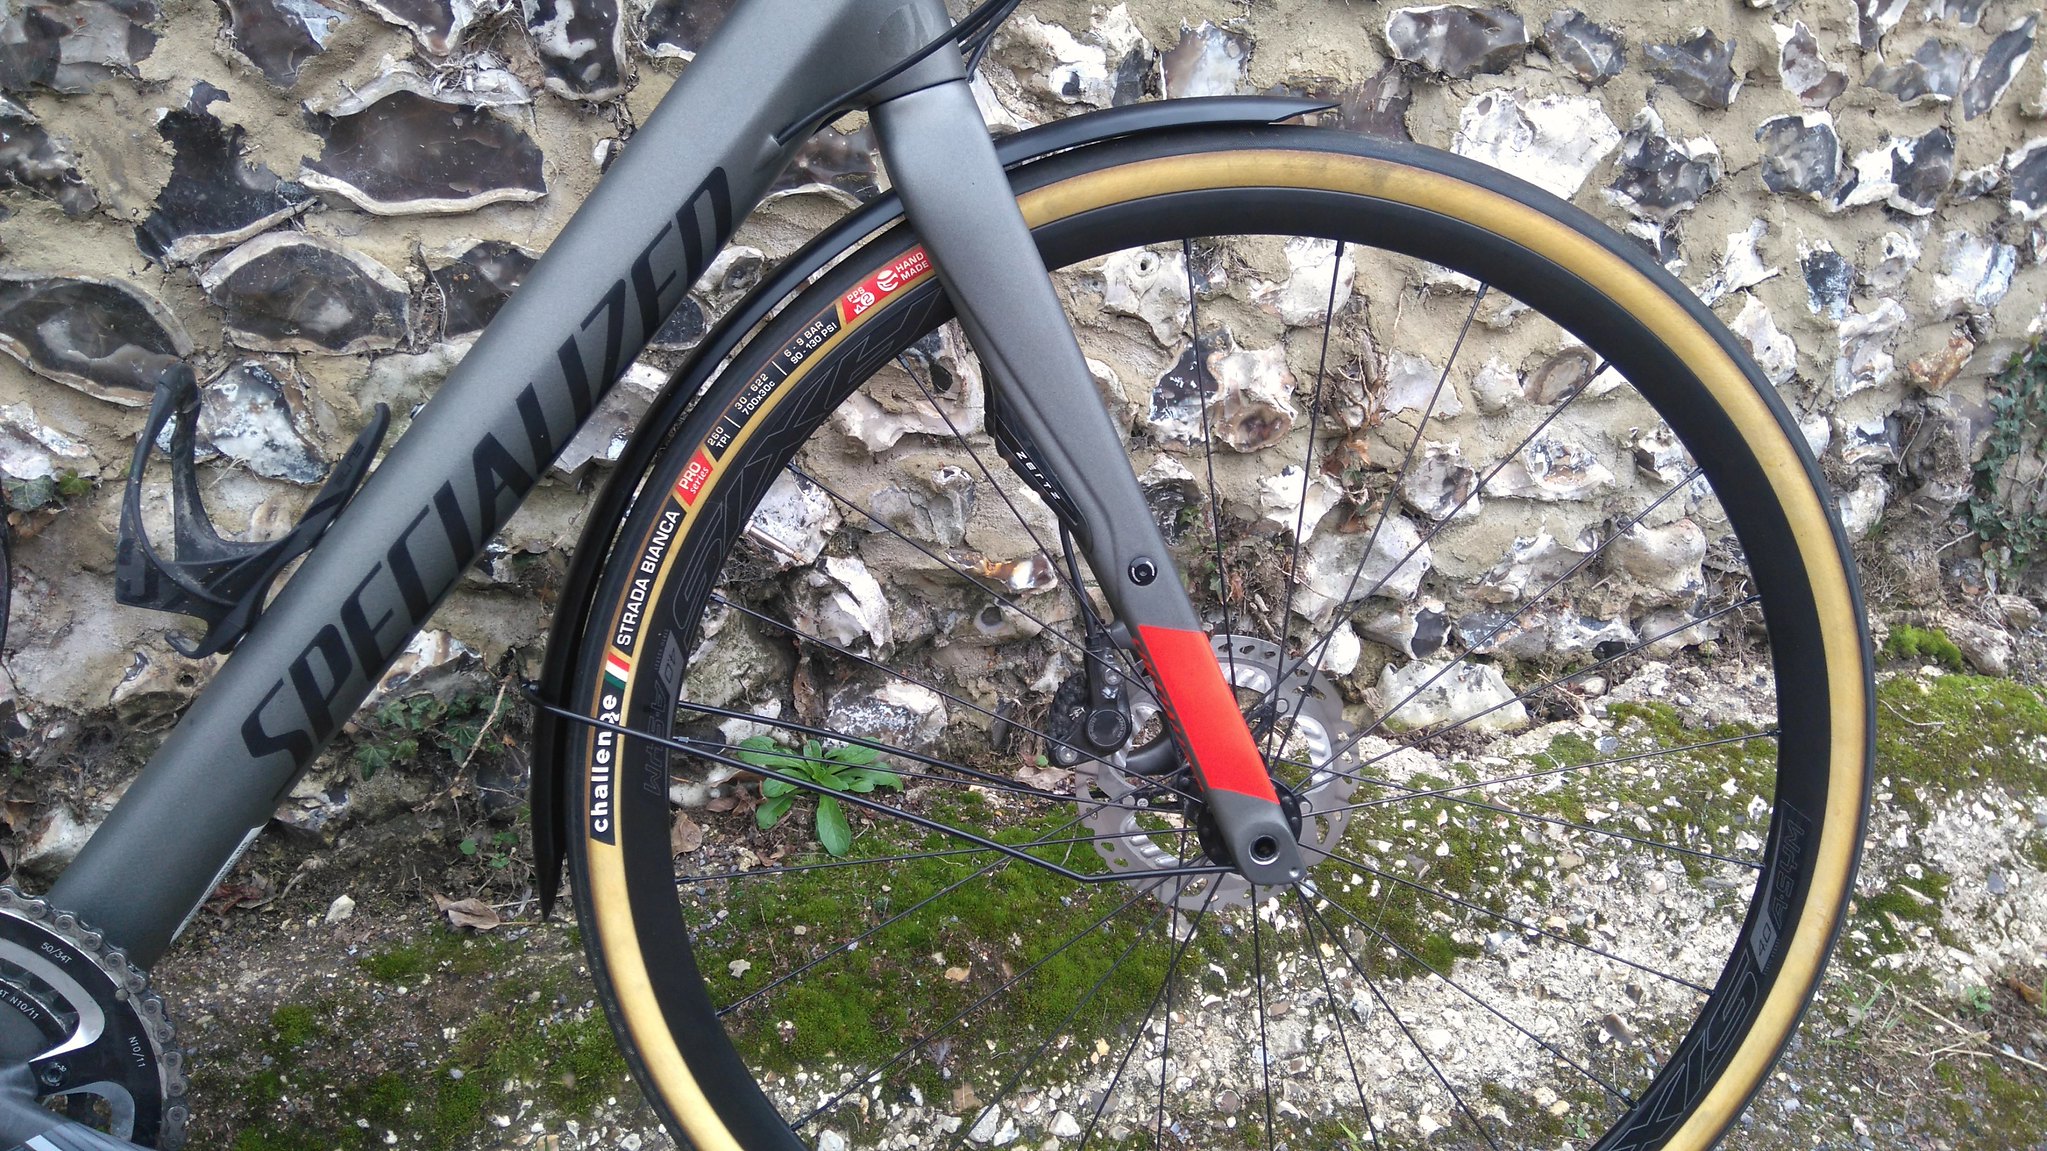 [/img]
Front mounting. Super neat and tidy!
[img] 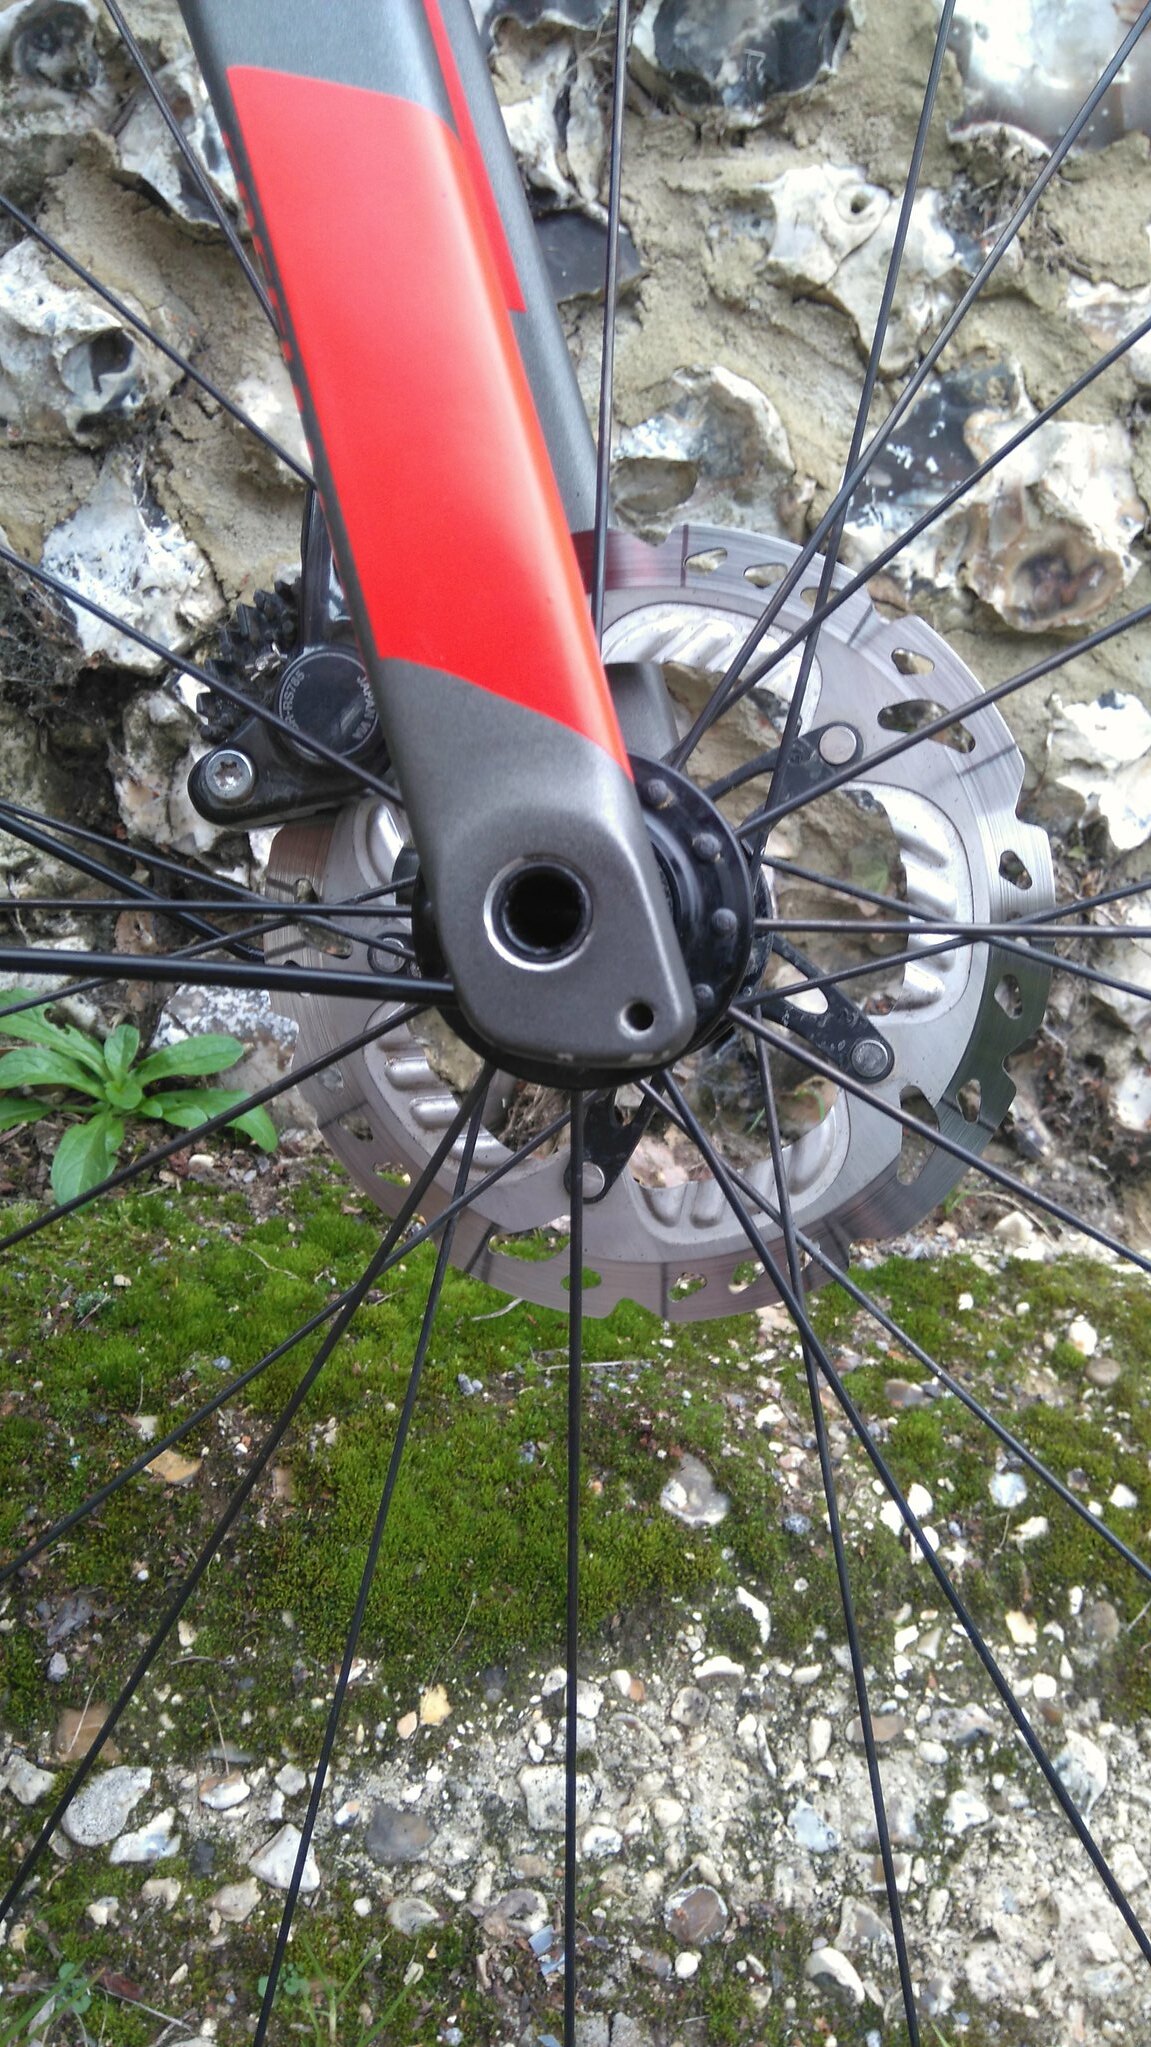 [/img]
That looks really nice.
Not the thread you wanted but seeing as you did ignore my capital letter shouting 😉 I thought I'd post it anyway Sir!
http://singletrackworld.com/forum/topic/diverge-owners
What guards are they CFH?
[s]Are they the Specialized plug and play ones? if so - which version? V1 or V2?[/s]
[s]The "look" similar to my Specialized plug and play ones but at the same time look different??[/s]
EDIT - just managed to get the photos to load properly on my phone - definitely Spesh P&P ones, V2. (where did you get them from?)
Mine are the V1's that the rear stay doesn't have a kink in it so runs virtually horizontally backwards. V2 looks like it will be a bit stiffer and have less "bounce" with the kinked stays.
EDIT 2 - how have you mounted the front at the crown? any chance of some more pics? Mine use the L-shaped bracket, but yours look super neat......is the bracket inside the crown or have you fettled the guards somehow? Looks like it could be a Daruma bolt?
Cheers,
A
Smart that. Love the skin walls.
They look pretty good on there.
I think I'll have to get a set ordered for mine before the winter.
Looks like I've got some replying to do!
On here first,
Andy, they were from my LBS, Stonehenge Cycles and yes, V2, with a better cut away for the front mech. The front has a bolt up in to the steerer tube Base for neatness and feels v sturdy. Looks clean too!
Now, on to the other thread!
Cool - thanks CFH!
I had to dremel a bit out of my V1's to clear the front mech arm - good to see they've fixed that this time!
Is that Stonehenge Cycles in Salisbury?
They look a lot cleaner than the V1's - might get a set and put the V1s on my wife's bike (that doesn't get ridden as much......)
Cheers,
A
Yep, Salisbury. They've got plenty in stock still as far as I know.
[img]  [/img]
Cool - I'll give them a call in a bit!
The SKS Bluemels fit too with a hole drilled in each one. That's what I have on mine with 28s fitted. Generally. I don't think they look as good as the Specialized guards but then with only 28s they look a better fit.
Oh and quick tip. Use screw lock on the grub screws.
Thats gonna need a hell of a front flap. Could you get a cut down rear to fit the front, get it a bit lower?
Whats appened to your seatpost!! Does it actually work or do you just pop it on for stw photos to mess with our heads?
Ignore the guards, this thread is further proof that all road bikes look better with skin wall tyres. Lovely bike that (bar the seat post, obviously!).
I was wondering when the seatpost comments would start!
It ain't pretty, but it seems to work!
Really skinwalls, yes. They're just betterer.
Thanks, Zippy!
Likes that, likes a lot.
Nice that. I fancy me something along similar lines
All bikes look better with Skinwalls 8) OP, how are you finding the strada's? Pretty sure I'm gonna get a pair for my Genesis Datum frame when it turns up, but not seen many user reviews.
Picking up my Diverge tomorrow, but already have the plug n play mudguards.
Quite surprised how substantial they feel compared to chromoplastics!
Pffh
Would look so much better with black walled Tyres
Would look so much better with black walled Tyres
It didn't! 🙂
how are you finding the stradas?
Mini review coming up!
Pros;
They really brought the bike alive! A cliché, I know, but they did. They made the whole thing feel lighter, sprightlier and faster, while staying comfortable.
Grip is very predictable, which is always good. Especially good under braking.
They look all of teh orsumz!
Cons;
I'd ideally have liked them a teeny bit wider.
They're not cheap.
They are the hardest tyres to fit that there have ever been when fresh out of the box. Really, really hard to fit! Seem OK now they're bedded in, though.
On the fence;
Toughness/puncture protection. Only one puncture to date, a blackthorn which would have punctured a bullet proof vest. However, I'm not convinced they're as tough as I'd like for winter riding. Local rides include a lot of thorned bridleways, which are one thing, but also lots of flint. So, tyres take a beating. Will be interesting to see how these pan out.
How does that front guard attach to the fork at the bridge ? The only hole I can see on mine is in the middle facing the tyre. Is that threaded ?
They do look great. Personally, I'm waiting for summer before fitting pretty tyres...
Been using those stradas on and off for 18 months as winter tyres or when away and not having both road and roughstuff bikes. Great ride, no punctures except thorn but they do cut a bit.
Tan wax on the sidewalls before you fit, let it dry first. They stay tan for that little bit longer. I use tans on all my bikes and its the only way I've found of keeping them staying tan, even on grifos in mud.
Tan wax on the sidewalls before you fit
Do you mean tan shoe polish Bikebouy? Or some other product I don't know of?
CFH - any chance of a pic or two of how your front guard is mounted at the crown?
I picked up some V2's from Stonehenge cycles earlier (awesome sevice and shop!) but they've got exactly the same L-shaped bracket as my V1's?
Cheers,
A
I use Tan shoe polish, make sure it's the really light Tan stuff, not mid 😐
Or, I have been told that Nik Wax is good too but I've not tried that..
Then I really dry the tyres out, I hang a new set out once waxed for about 3-4 weeks before using them.
I picked up some V2's from Stonehenge cycles earlier (awesome sevice and shop!) but they've got exactly the same L-shaped bracket as my V1's?
Me too.
Fitted them today which involved drilling out the L shape bracket rivets and other bits of general faffage.
Specialized supplied some 4mm grub screws that have a hex cutout of homoeopathic proportions. Luckily I already had some proper 4mm stainless grub screws . God knows how your meant to tighten up the ones they supply.
Although the guards are now fitted, they really need to change the name from "plug n play", to "drill, saw, replace crap bits n play"
Ian - ha ha, that's a spot on description!! Totally agree on the supplied grub-screws too! Luckily have a plentiful supply of stainless bolts from work......
At least after all the tinkering and setting up they are pretty much plug-and-play when you remove/refit them!!
How have you mounted the front guard at the crown then?
My V1s are destined for the wife's bike now, and the V2s are going on my diverge.
A
Here you go-
[img] 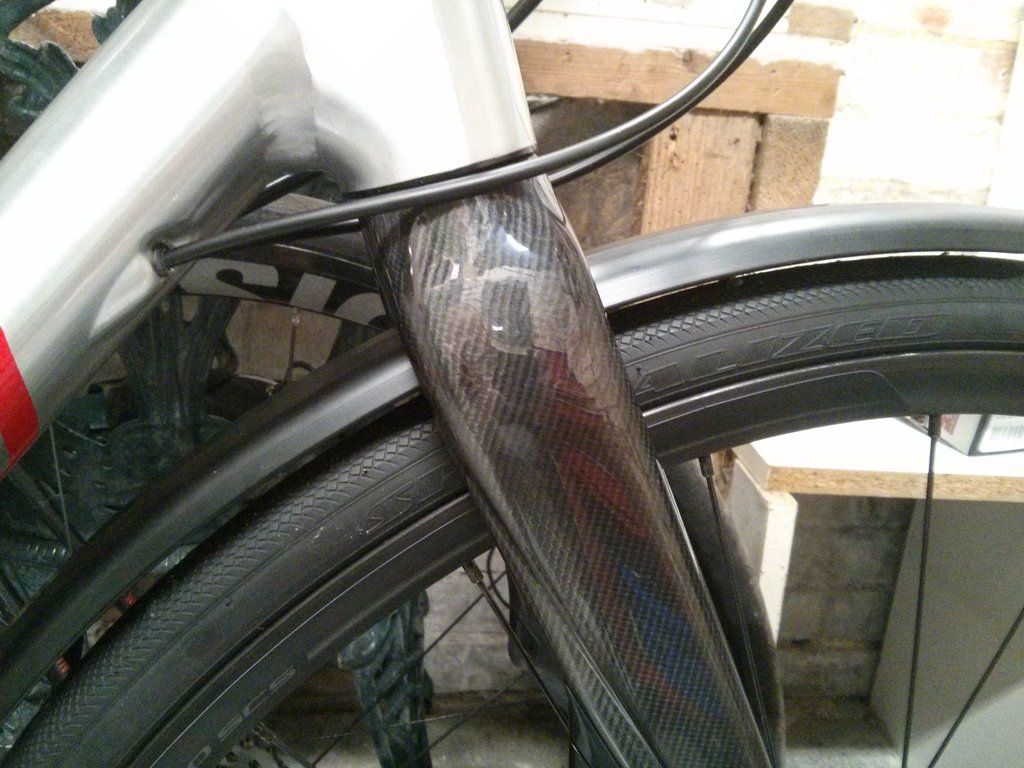 [/img]
[img] 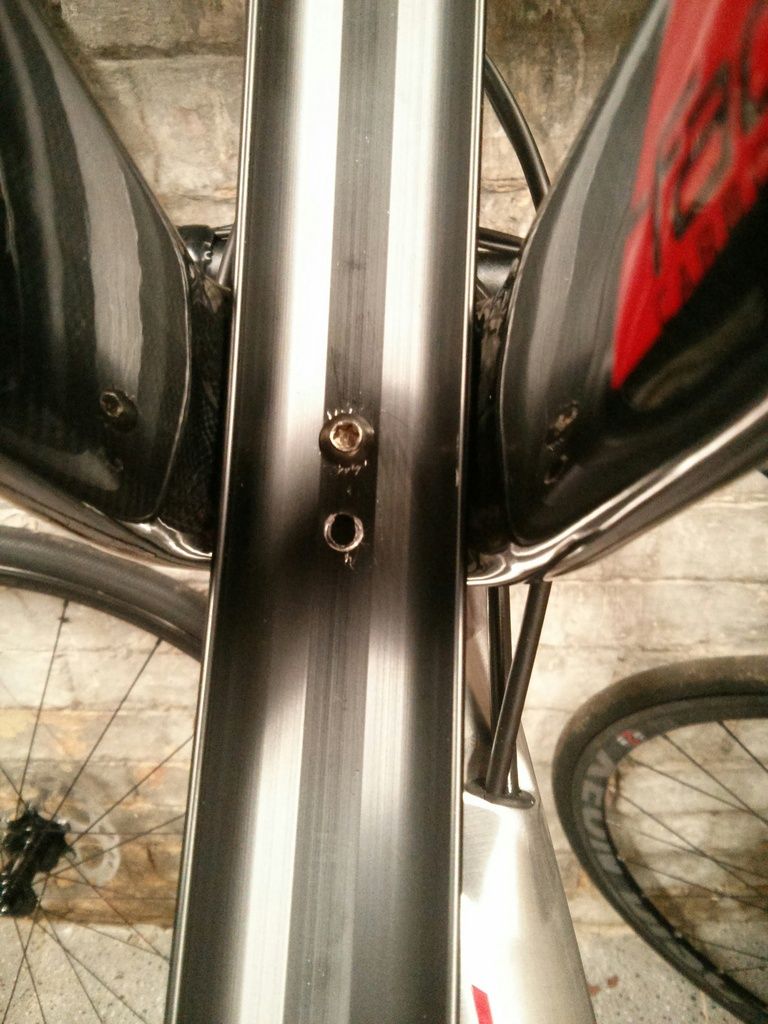 [/img]
Drilled out the bracket rivets and bolted it on through the front hole using an M5 torx screw with a bit of thread lock.
I forgot to mention, the forks come with an M5 hole in the bottom of the crown specifically for this.
Ian - cheers!
I take it the fork crown on yours is solid with a tapped hole in it then?
My alu diverge has a carbon fork with alu crown (so hollow)
Thinking a star fangled nut in the bottom of the steerer might be the way to go!
A
Ah, yes solid, now I understand your problem!
No worries! It's an easy fix - a long bolt with a SFN will do the trick!
Off to rummage in the spares box......
A
Has anyone had any issues with fitting the Plug and Play guards to the alu Diverge?
I ordered a set from Stonehenge Cycles, they appear to be the only place with them in stock, and having tried fitting them I can see what people say about them not being plug and play!
The front guard when fitted doesn't look particularly tidy due to the size of the L shaped bracket which mounts at the fork crown so it looks like a SFN may be needed to sort that out.
The rear guard looks like it's been made for a completely different bike!
With everything in place the front of the guard is touching the seat tube and the rear stays almost needed forced into place. As a result the guards have a huge gap at the rear of the rear wheel. Just to add to the fitting issues, there are no markings showing where to drill the rear stay to mount it on the seat stay bridge.
The grub screws that are supplied with the kit are a joke, really cheap rubbish. the first one I fitted rounded off which wasn't ideal. Looks like I'll have to get some replacements from somewhere.
Another problem with them is that the instructions that are included with the V2 kit appears to be for the V1 kit. I'm starting to with that I'd saved my money and went for a set of the SKS guards that are about half the price 😕
Ali diverge owner here. V2 guards fitted.
Drilled out the rivets holding the L shaped bracket on the front. Star fangled nut in steerer - had to bend lugs in a bit to get SFN started in steerer due to size of steerer at base/crown. Had to make a spacer to go between SFN and guard to get height right. (About 18mm from memory) - just used some metal tubing from work.
Rear guard fitted fine - very close to seat tube, stuck a small foam pad between guard and seat tube to prevent fretting/rubbing. Took time to get stays set to right length by slowly cutting them down to get guard even all way round the wheel.
Not plug and play (initially!) but very quick to remove and refit once you've got them set up first time round and they do look clean.
Used some stainless grub screws from work - plenty of good ones on eBay tho!
Hope that helps - happy to answer further questions!
A
Thanks for that Andy, looks like I'll be needing a trip to the nut and bolt shop tomorrow followed by a couple of hours with the Dremel to try and get them to fit properly.
It's just a shame that they don't fit like CFH's straight out of the box like I was expecting.
No worries.
Email in profile if you want any advice or for me to ping some pics across etc.
New Diverge fanboy here 🙂
Currently sat in waiting for a set of V2 plug and plays and had noticed a bit of chatter on the net about Diverge specific bodging, predictably the best threads for this subject via Google are on STW.
Whats interesting is that CFH's fitted without any obvious hassle - is that because he/you has/have a full carbon fork and the trouble is with the ones that have alloy steerers?
It would be good to know if I have to charge up the Dremmel and get some new nuts and bolts before fitting them later
Cheers
Easy peasy, something has gone my way today 🙂
I had mine fitted by a highly trained and experienced, and ever so slightly OCD spanner monkey.
🙂
I had mine fitted by a highly trained and experienced, and ever so slightly OCD spanner monkey.
Or "butler", as you normally describe them....
I recently fitted v2 plug and play (or 'drill and saw and saw and saw and plug and play') mudgards to my smart-weld diverge, which has the carbon fork. The fork has a threaded hole at the bottom of the steerer which required the bracket on the front mudguard to be removed by drilling out the rivets, and enlarging one of the rivet holes to allow it to be bolted directly to the bottom of the steerer.
The rear needed a hole drilling through the guard to attach to the brace between the seat-stays, although whereas the instructions tell you to drill through the marked location for your frame size, mine had no markings so I had to work it test-fit the guard and work it out for myself.
The stays for both mudguards needed trimming down which took a little while to get the fit right. Now they are fitted they are great though - look very neat, with no rattling. Only thing is that there is a gap of around 1mm between the rear guard and the frame, so I've put a frame-protector patch here to make sure it doesn't rub.
All simple enough if you ignore the instructions completely and take your time.
[url] https://drive.google.com/file/d/0B6kWpja-xDXSM043RHFvaWltN2s/view?usp=sharing [/url]
(OCD alert: it now has two matt-black bottle cages rather than the aluminium one I had lying round at the time, and has lost the wheel reflectors!)
Can anyone tell me the diameter of the plug'n'play support rods. I'm interested to see if i can mount Portland Design Works Full metal fenders instead?
They're 4mm.
(The bike comes with adaptors which have a conventional eyelet, in case you weren't aware.)
Yep, as above, you can fit PDW with the screw in eyelets.
