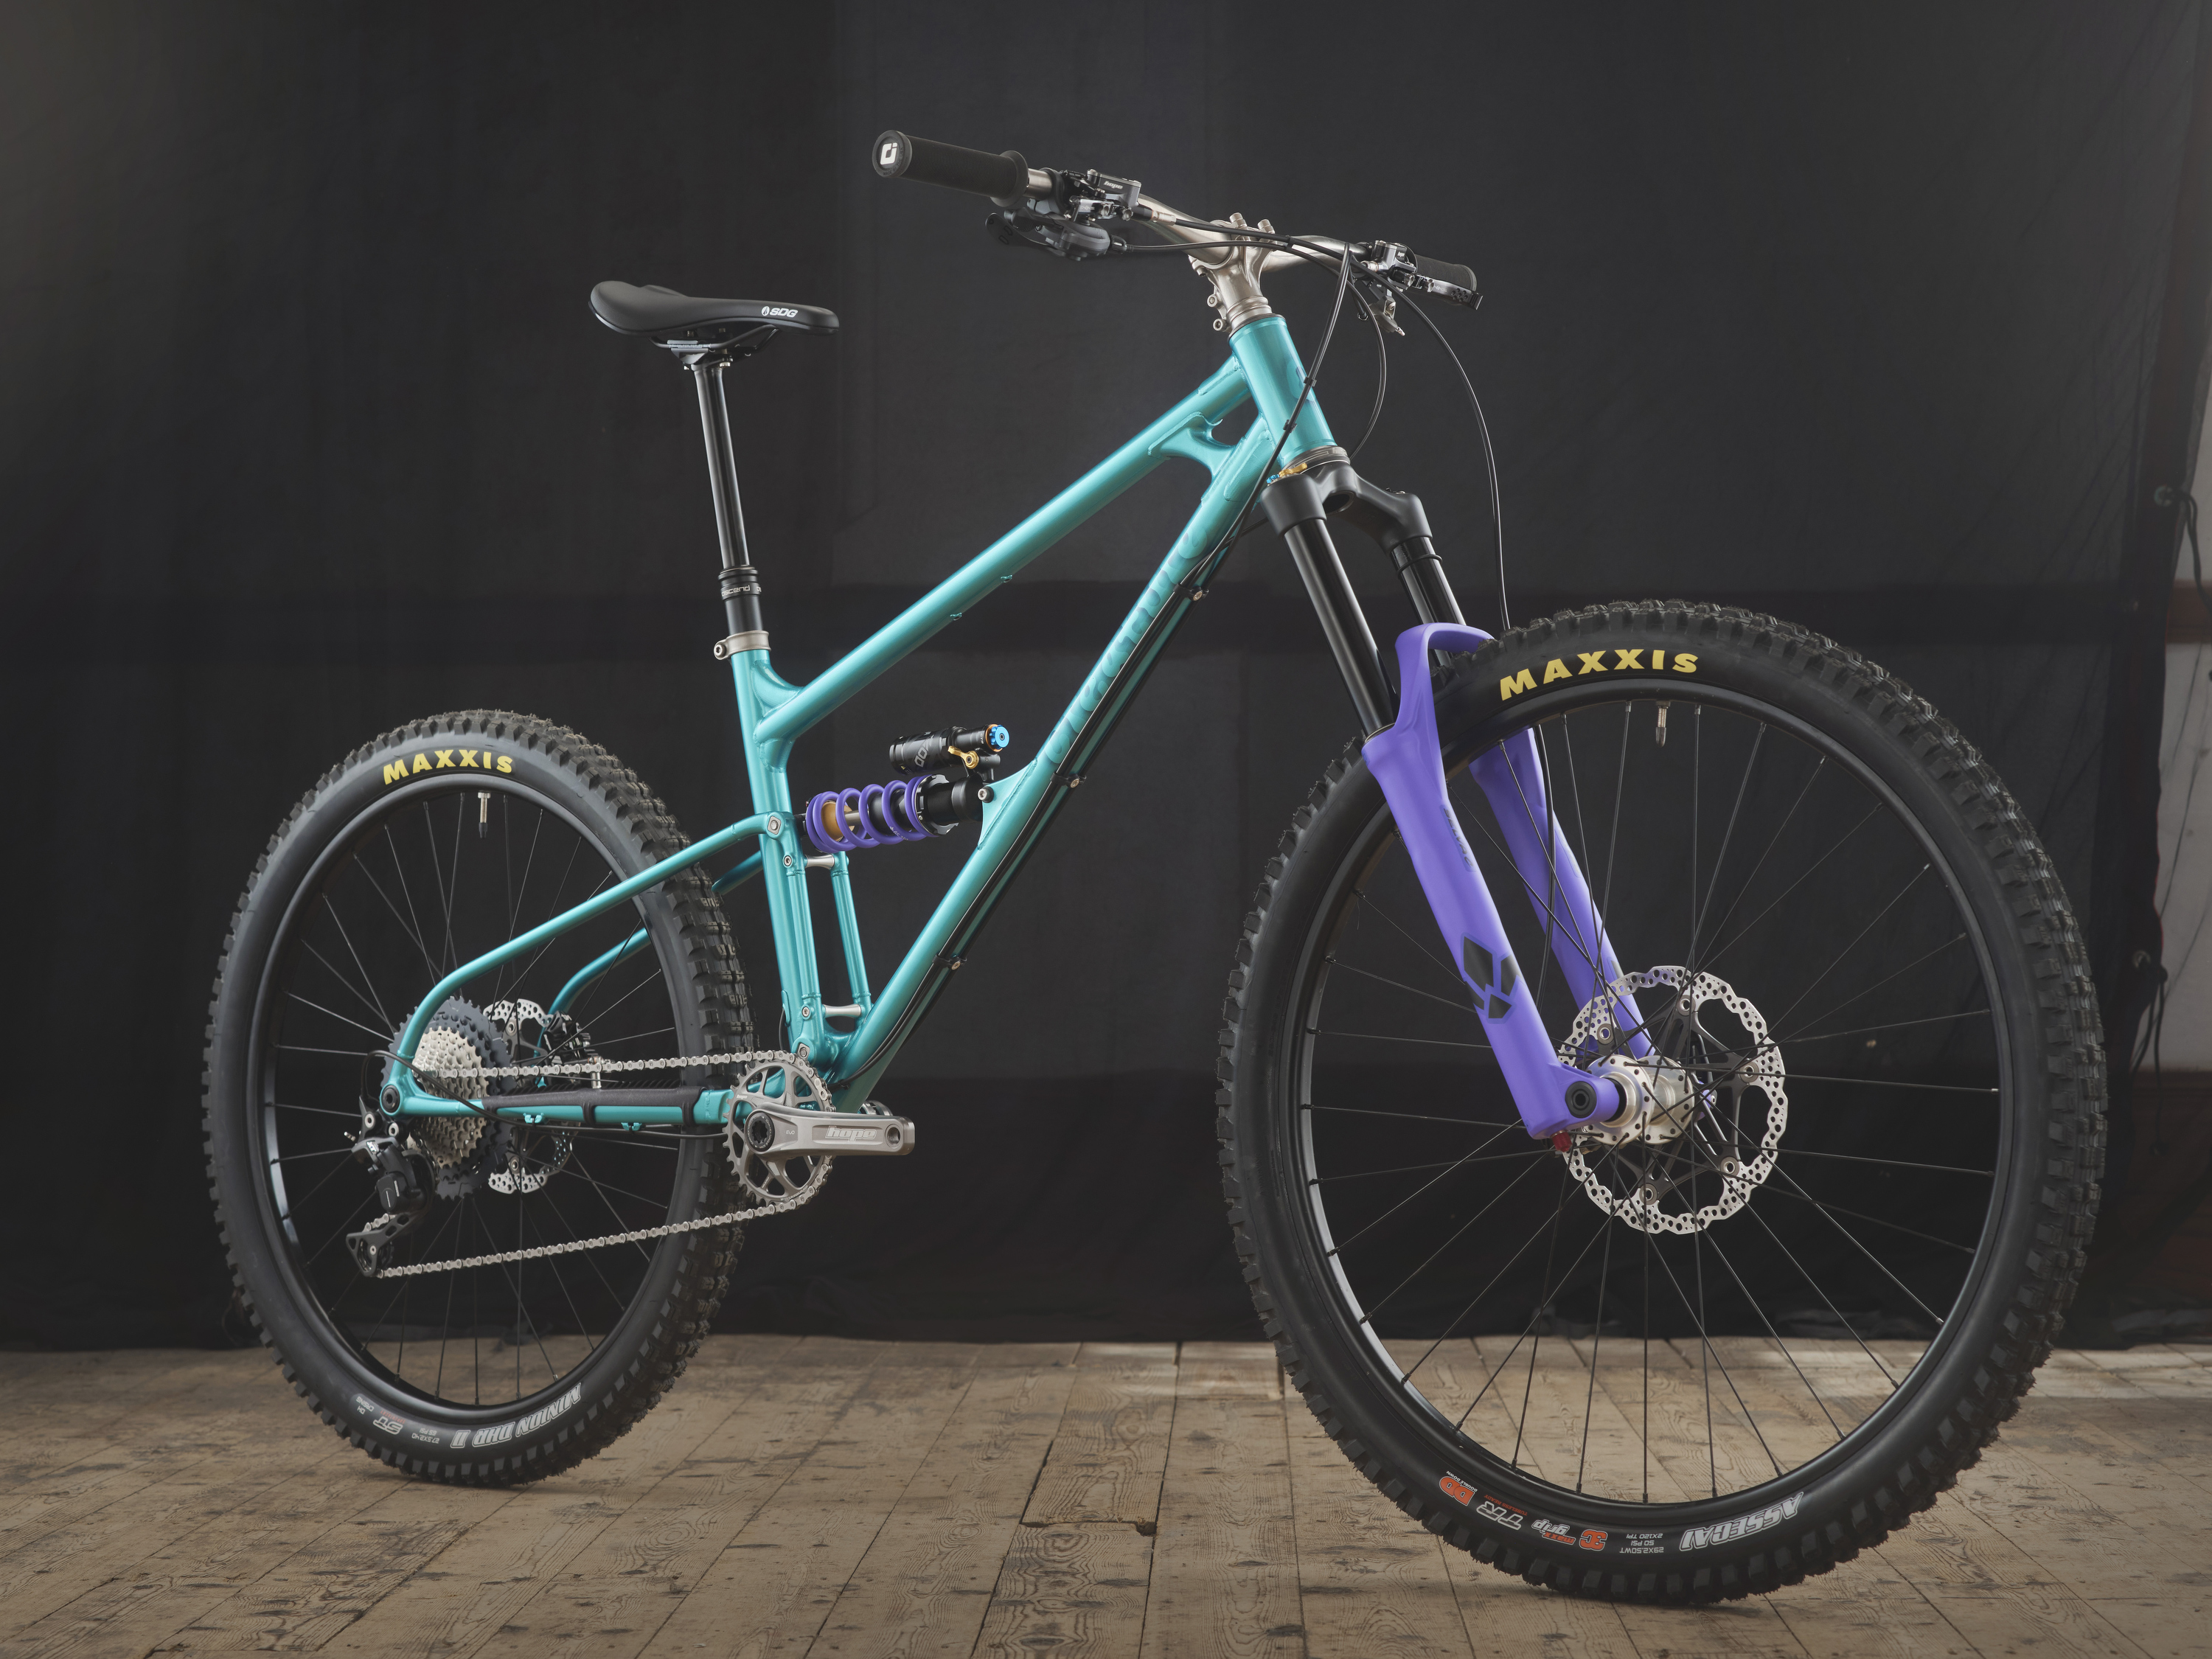
James from Creature Cycles had one of the more eye catching bikes on display at Bespoked Manchester. The pearlescent turquoise paint, the low offset stem, and the organic form of the bike were all likely to grab your attention, but there was plenty more going on once you got into the detail. I asked James to go deep, and talk us through the development of the bike.
[The top frame on the display stand]… was the first sort of full suspension project that I did. It was kind of a proof of concept. The rear end is a Banshee Spitfire V2 from 2014, and I rode that bike for a long time, loved it. It developed a crack in the down tube around the gusset around the bottom bracket, which is sort of a common failure. So I decided to make a replacement out of steel and change the geometry, make it a mullet. It was sort of a testing ground for doing some of the stuff with 3D printing. And having a first stab at full sus. I built two or three hardtails before that, so it was my fourth frame.

Then the yellow one below it is the first prototype of the Galago bike. That was finished about a year ago today, so April 2024. I’ve been riding it for the past year.

Photography by Adam Gasson for Bespoked
The Galago is a steel single pivot full suspension mountain bike. One of the unique things about it and where it gets its name from is the bearings of the main pivot don’t use sealed roller bearings, they use bushings. [Ed’s note: A Galago is a creature also known as a ‘bush baby’].
Most, pretty much all, modern mountain bikes use a sealed cartridge roller bearing. From an engineering point of view, this doesn’t actually make a lot of sense for pivots because they’re very high radial loads, and they’ve got a very small rotation. What that means is you’re only really loading up one or two of the balls inside at any one time. They’re also quite susceptible to wear, even if they’re very well sealed. And what you tend to find when you break a multi-pivot bike apart is you’ll get some pivots that have been completely seized and others are turning freely.

Photography by Adam Gasson for Bespoked
Another issue that I’ve found with conventional bearings is you don’t know when they start to fail. They just seize and you have absolutely no idea [they’re on the way out]. It’s very difficult to tell just from the suspension feel that the bearings have degraded. The difference with bushings is when they start to wear – and they do wear, anyone with an eyeleted shock can attest to that – when they start to wear, they start to move and you can tell. There’s a knock and there’s a bit of a rattle, which granted is annoying, but you know it’s time to change the bushings and out they come.

Photography by Adam Gasson for Bespoked
The tool used to change the bushings is just a little expanding collet-type thing. The screw comes out, the little captive nut drops out, you pull it out. You can change the bushings without taking the wheels off. You just pull the rear swing arm away and hold it with a rag. Stick the tool in, expand the collet, hit it with a hammer, flip it round, and then there’s another tool that just presses the bushings in.
I’ve been experimenting with different bushing materials. We’ve got ones like a metal wrapped bush and then it’s got PTFE on the inside. This is very similar to what you’d find in your forks. Then, an Igus bushing, so that’s just a complete polymer bushing and it’s sort of in a top hat shape. And I’ve got a very similar one in there, which is a different plastic material. They’re very, very good against ingress. They’re very good in harsh conditions. They do wear, but like I said, they’re easy to replace. It’s easy to know when it’s time to replace them.

Photography by Adam Gasson for Bespoked
My view is that the bike industry is kind of doing it wrong! Not everyone. There’s a company in Italy called Ancelotti Cycles, and they use bushings throughout their bicycles. And I had one of those frames, and it was one of the best bikes I’ve ever owned. I thought the bushing solution was pretty good. It had a bit of a squeaking issue, but when they bedded in, it was absolutely beautiful. These don’t seem to squeak at all.
And let’s talk about some of the construction elements on the Galago, because you’ve obviously got some 3-D printing going on. Which bits are 3-D printed?

Photography by Adam Gasson for Bespoked
If we start at the front of the bike, it’s a conventional turned head tube. And then we’ve got these three gusset parts. So you’ve got a top and bottom gusset, and then a printed part that braces the top tube to the down tube. That’s all printed in 316L stainless steel.
You’ve got a couple of braces around the seat tube and top tube interface, again printed. The shock mount’s printed. And this sort of pivot lug which sort of slots into the top tube and down tube is also printed.

Photography by Adam Gasson for Bespoked
On the rear swing arm, you’ve got six parts that are printed. The two dropouts are printed, and then the two parts that connect the shock, and then to the main pivot. It’s all printed 316L stainless steel.

Photography by Adam Gasson for Bespoked
You’ve got like a socket [for the tubes] so it’s a really easy construction. You just cut the tubes. These are just standard. The front triangle is T45 carbon steel tubing. This is a Datakai 29er formed chainstay. And then this is T45, T45, and that’s a Randall seat post. You just cut the tube straight, slot it in, and weld it. Really easy. I’m also looking into brazing it, and looking at other construction methods.

Photography by Adam Gasson for Bespoked
But, essentially you get the parts – these are printed in the Far East. They’re professionally heat treated to improve their elongation. And then I’ve got another 3D printed set of soft jaws that are unique to each part. This allows me to do lots of different customisation to do pretty much any custom geometry without having to retool. You just print a new plastic tool.

Photography by Adam Gasson for Bespoked
The part goes [in the plastic jaws]. This goes on my little mill. And I do all the drilling, reaming, facing, and that. Really simple. I don’t use any CNC machining. It’s all manual machined components.
Unique content like this takes time to create, and would normally be paywalled. But we’d like to support the independent builders and makers behind these bikes, and Bespoked. So you’re getting to read this for free. If you enjoy it, please consider buying an issue of our magazine, and supporting what we do.
What’s going on with this stem?
That is a low offset stem, it’s got a 10 millimetre reach, and it’s got a 60 millimetre stack. It’s just a bit of an experiment really. I was really interested in trying one of these stems. They’ve been around for a little while, Mondraker used them I think with their World Cup team in the early 2000s. So I’ve made this, again that’s printed stainless steel 316L, and then post-machined. It’s just a proof of concept.

Photography by Adam Gasson for Bespoked
The idea behind these stems is to try and bring where your hands are in line perfectly with the steering axis of the fork. How it translates into the feel of the bike is, you feel a lot more stable. You feel like there’s a lot less feedback through the front wheel. So especially on very steep technical terrain – you’re dropping into a steep, rutty corner, and there’s roots or rocks buffeting your front wheel – you don’t feel that feedback as much through the hands. It’s easier to hold the line through really rough terrain. That’s how I would describe it.

Photography by Adam Gasson for Bespoked
There’s lots of technical explanations of what’s going on, but if you can imagine you’ve got a really long stem, you’d be doing a funny motion. This is just a perfect circle that’s concentric around the steering axis. So it makes sense. It’s something that’s done in motorcycle clamps, you’ll see some quite similar to that. I just wanted to try it out. I’ve ridden it on that yellow bike, which has got a slightly shorter reach and a longer head tube. This bike has been designed around that stem, so you’ve got a fairly equivalent reach and geometry position.
What I did find is, having the stem on that bike, which was custom for me with a 475mm reach and a fairly standard stack, really put the weight quite far back. So I find that these stems work really well if you can adjust the geometry of the bike, or have a custom bike, or maybe size up a bike. But for me, putting that on your normal bike is a little bit too much of a geometry change.
You said you started out making something to repair your Banshee effectively. So what was your ride goal with this final one here, what ride quality are you wanting to achieve?
I live in Mid Wales, in the Dfyi Forest. I’ve lived there for two years. The riding there is very steep, very technical, lots of roots and lots of slate. I wanted a bike that was very capable on very steep and aggressive trail riding, and very technical riding. So I wanted a lot of grip, I wanted a really aggressive, slack head angle. So we’ve got a 63 degree head angle, with a 160mm fork. In terms of how I wanted the rest of the bike to feel, I wanted to basically get that wheel sticking on the ground as much as possible, dampen as much vibration as possible, have a comfortable ride that you can ride all day, but is really capable on really steep and technical tracks. It is designed to be kind of a winch and plummet type bike. Not really a technical climber.

Photography by Adam Gasson for Bespoked
It’s a little bit over 100% on the anti-squat, which means you have got a really solid pedalling platform. You’ve got a relatively steep seat angle, 78.5 degrees. This one’s got a slightly higher bottom bracket, and short cranks. It pedals really well. There’s barely any pedal bob at all. You’ve got the lockout on the coil shock there, which makes it literally feel like a hardtail. It absolutely flies up the climbs. And it’s quite light. There’s not much to it. It’s just a single pivot. It’s lighter than most aluminium bikes.


What reach and chainstays have you got on this one?
So the chainstay length is 440mm. The reach on this is 490mm. But again, it’s designed around that stem with only 10mm reach. So it’s sort of equivalent to about a 470mm. So it’s sort of a medium-large kind of size. By today’s standards.
You said you get the 3D-printed parts made in the Far East. Are you designing this and welding it yourself? Which bits do you do?
It’s a mixture, I guess, primarily a designer. So I’ve designed all the CAD. On this particular bike, the front triangle, or most of the front triangle, I should say, was fabricated by Gavin White of Coal Bikes. So I gave him these parts pre-machined. I basically gave him a bag of parts, the printed parts that were already post-machined, and the tubing not cut – and he cut it up and welded it for me. The rear swingarm is all made by me. I’m looking into manufacturing partners to try and do the manufacturing for me. I’m not a really good welder. I’m not a really good fabricator or machinist. I’m primarily a designer, so I’m trying to hand those processes off gradually.
Just to be shallow, I do like the colour of the paint. Who painted it?
It was done by Lee Morgan over in Oswestry. It’s turned out really well. Well done, Lee!
Photography by Adam Gasson for Bespoked
James won the Peer’s Choice Award at Bespoked – voted for by the other exhibitors and builders, so quite the glowing piece of recognition. Well done to James and thanks for chatting to us. Check out the Creature Cycles website for more information.


The bike looks really nice but to me bushing are a problem. My very old Turner Flux has bushings which are no longer available so I only ride it ocaisionally. If it had bearings I might have been able to source some spares. You are probably going to send quite a lot of money for a frame like that, so I would buy a big box of spare bushings with the frame.
Gorgeous. Not generally a fan of 3D printed parts, but they’re so pretty that my grumpiness is minimised.
Hope he makes the bushings work, and hope they are readily available.
Oh my, that’s a really lovely looking bike, that is.
Not 100% convinced on the stem but I’m sure I could learn to live with it.
@Bruce Turner still sells Flux bushing kits
I have tried Turner but my Flux is just post the Horst link ones and pre DW link.
But thanks for the suggestion. 🙂