Remember when you could walk into a bike shop and buy a mountain bike wheel, any wheel, and then put it on your bike and it would fit?
No, me neither.
In fact I can barely remember going into a real bike shop unless it was for emergency brake pads, chains or socks (needs must when your feet go numb midway through a winter ride). If you did try to buy a wheel from a bike shop these days, the chances of them actually having a wheel in stock of the right size, hub width and axle are pretty negligible. Even buying them online is a bit of a nightmare.

Despite the myriad of wheel sizes and hub standards the bike industry has thrust upon us in its never ending mission to provide us with the choice we crave, the main thing to consider when buying a wheel, apart from rim size, is hub width. Putting some of the less mainstream standards aside for one moment (such as Super Boost 157x12mm, 20mm Boost, and the Cannondale Lefty standard), for most current mountain bikes, the hub width is likely to be of the Boost or non-Boost variety.
If like me you have many bikes, some of which are a bit old fashioned, it’s somewhat frustrating knowing you can’t use older non-boost wheels or hubs, especially if you’re as good at breaking the new ones as I am. Not any more though, thanks to a host of Boost converter kits that enterprising engineering firms have produced to allow us to use old wheels on new bikes.
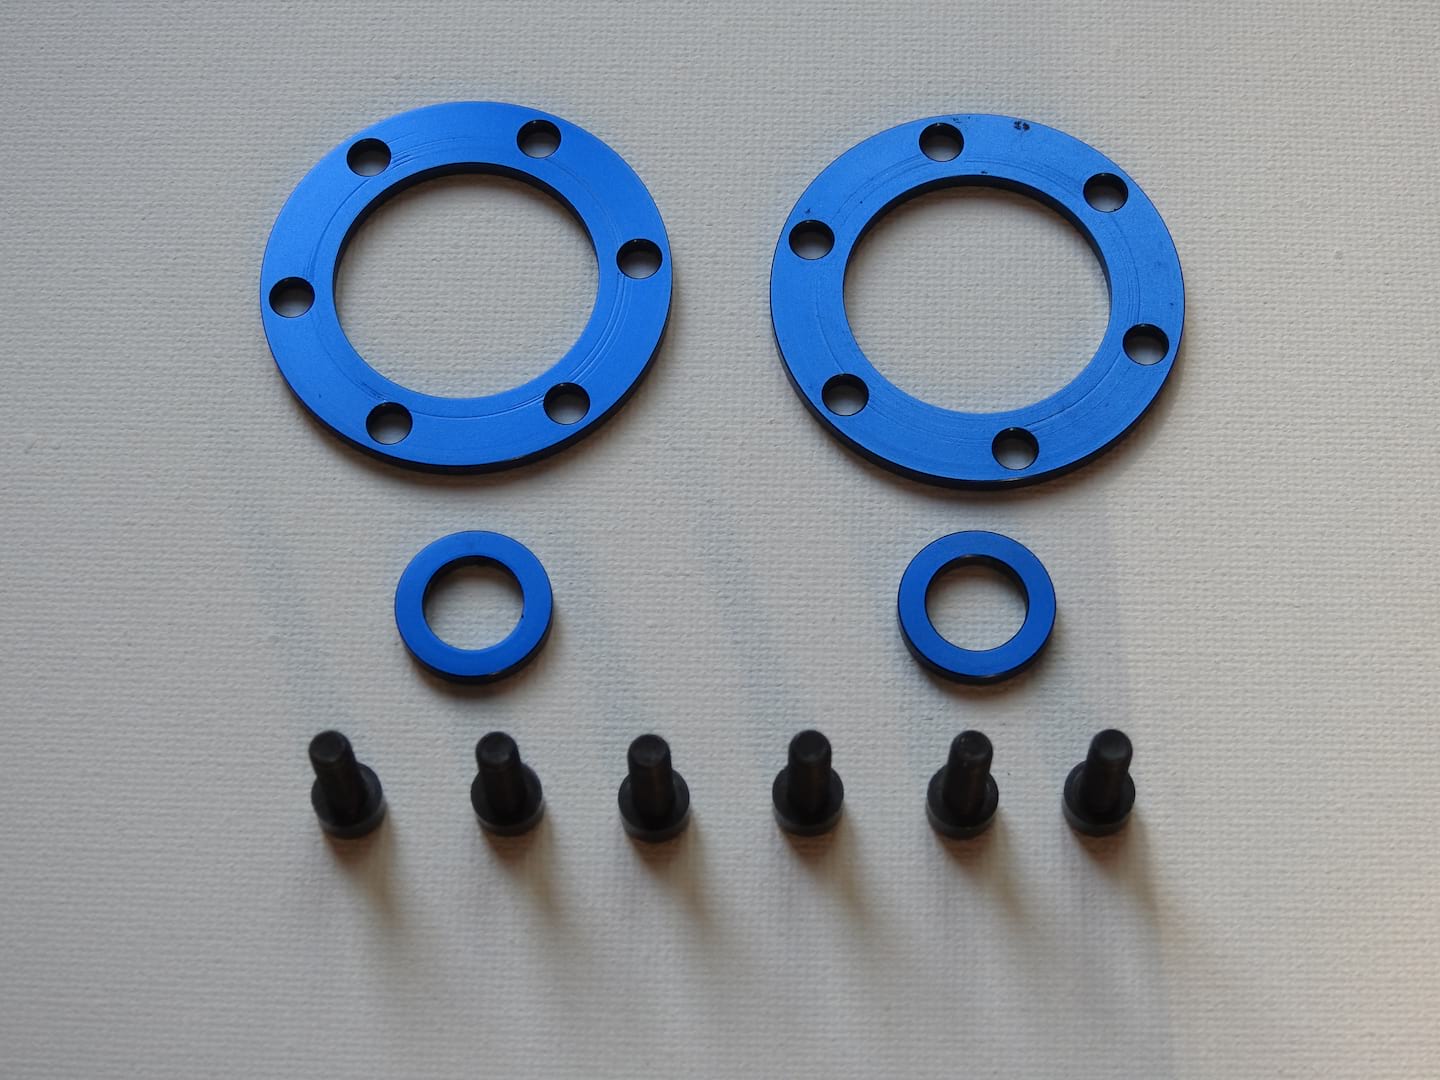
The Velosolo Boost Hub Spacer Kit is a very simple solution to the very simple problem of filling the 10mm (front) or 6mm (rear) gap which boosted forks and frames will have if you try to use wheels with non-boosted hubs.
Retailing at £10.95 (front) and £13.95 (rear), each kit consists of some washers/spacers, and some longer disc bolts. The spacers are CNC machined in the UK from solid lengths of 6082 aluminium alloy and come in a range of highly attractive anodized colours for those of us who are vain enough to have colour-coordinated bikes (guilty as charged!).
They currently only support a 15mm bolt-through axle on the front and a 12mm (142mm width) axle on the rear, and 6-bolt rotors. If you have quick release hubs and/or centrelock rotors, I’m afraid you’ll need to look elsewhere.
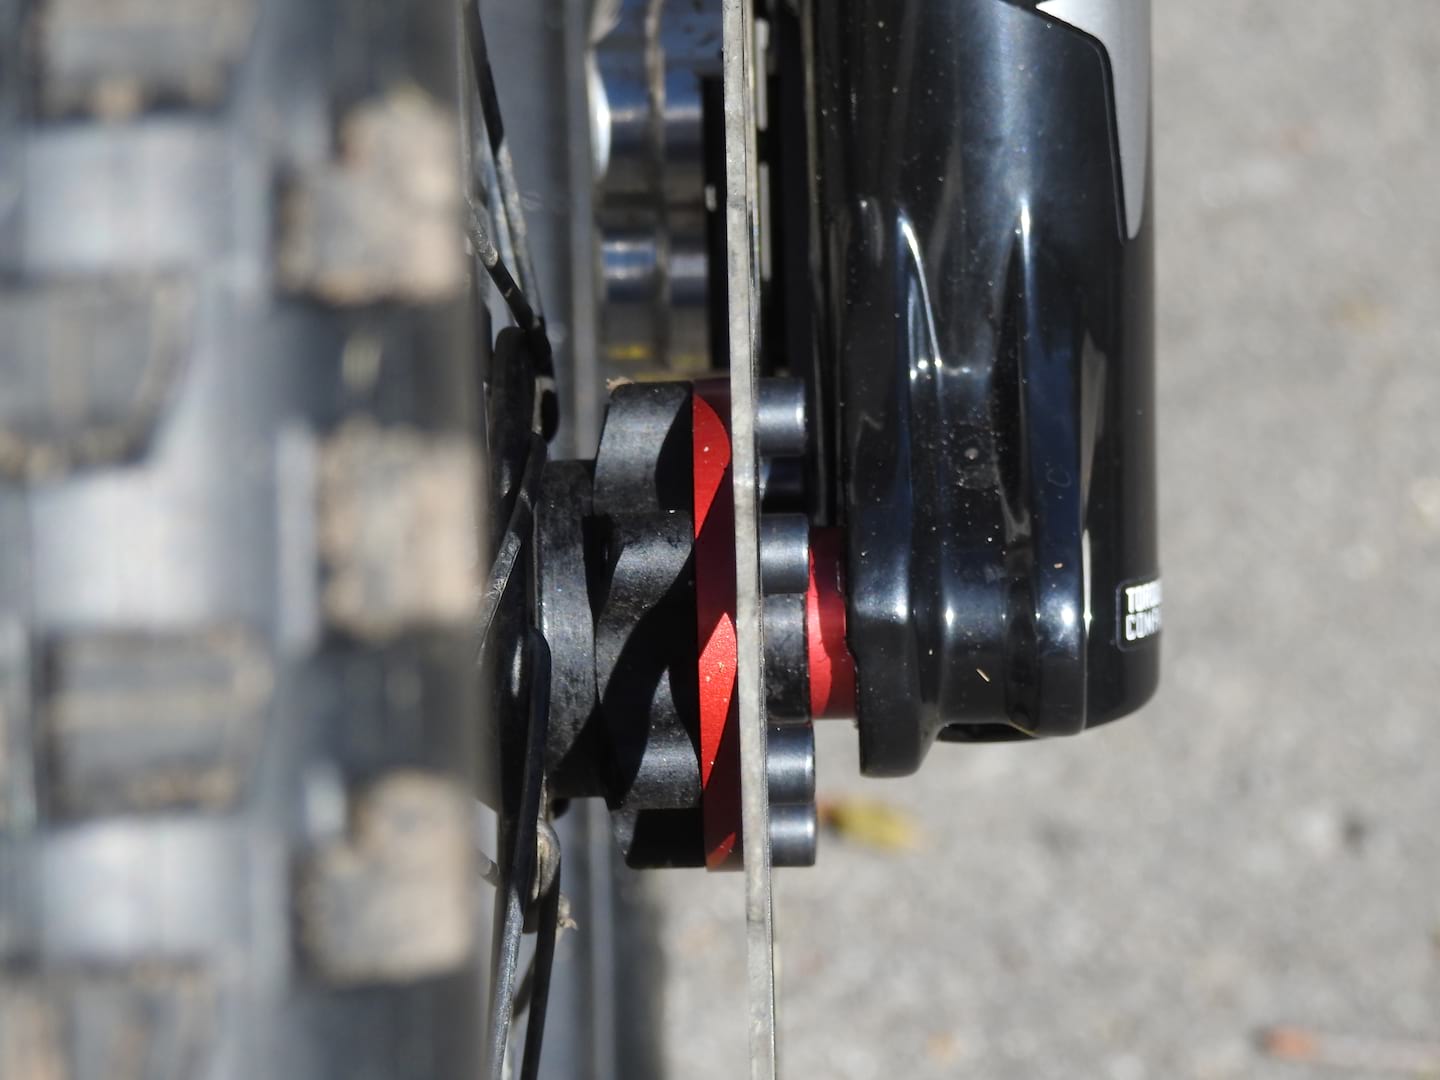
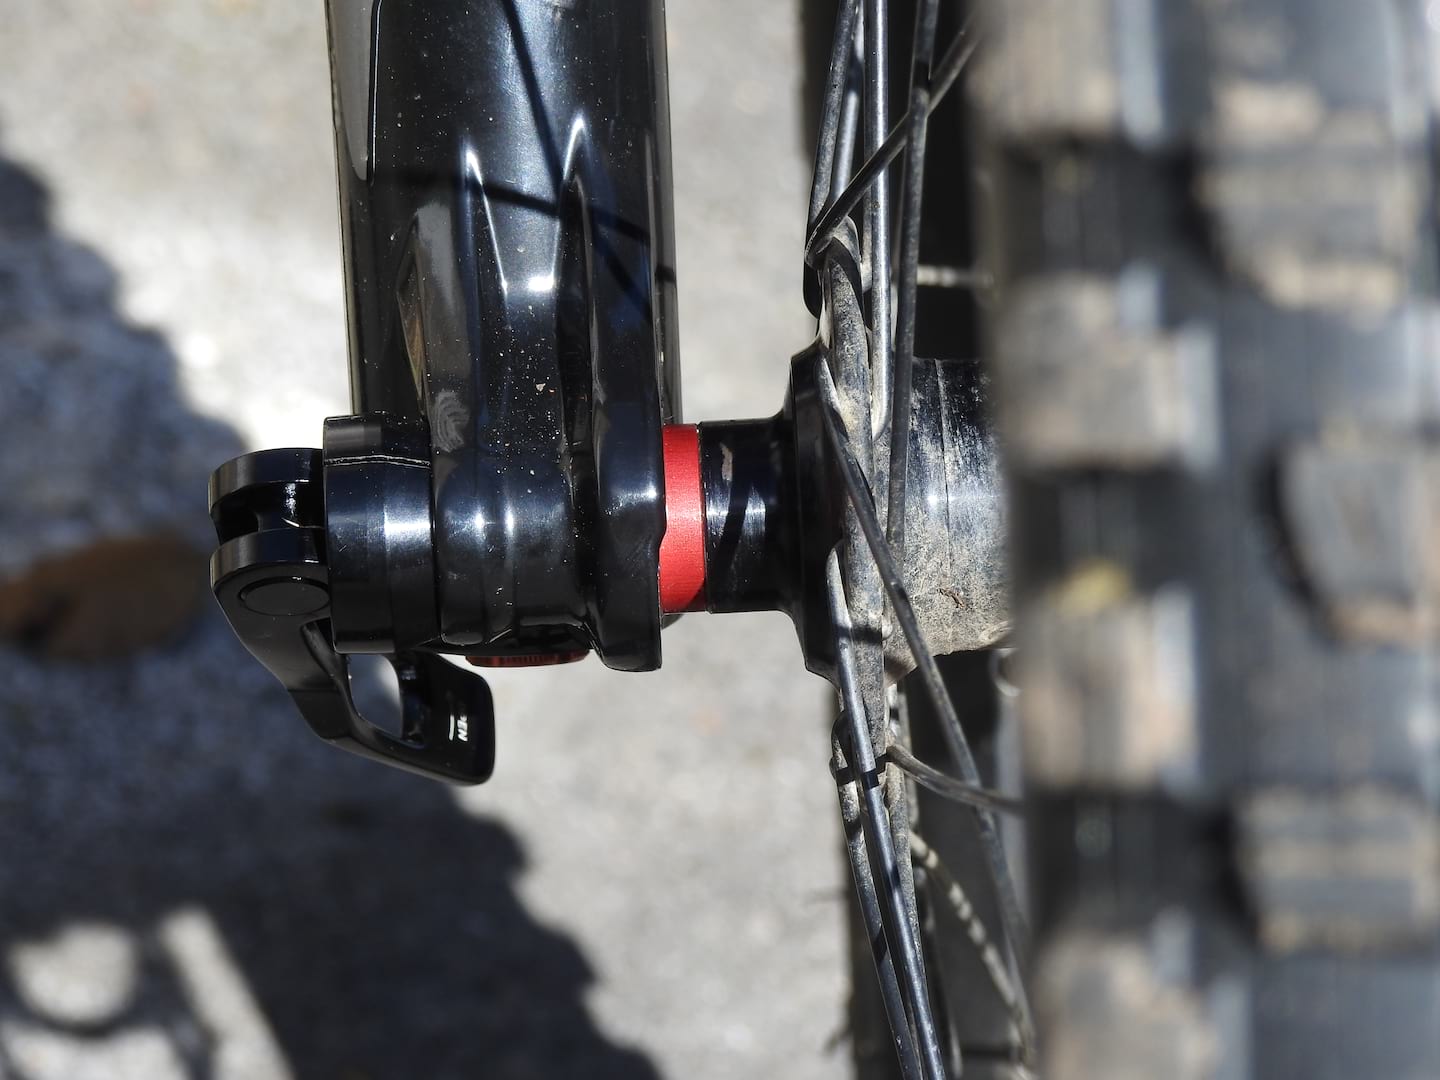
On the front you have two small 5mm spacers that fit either side of the axle, and one larger diameter 5mm spacer that fits behind the brake rotor, which is fixed using the longer hex bolts. This keeps the wheel centred so has no need for any re-dishing.
The rear is a little more complicated, since you can opt for either ‘no dishing’ or ‘re-dishing’ versions. The former, as suggested by the name, allows you to convert the rear wheel without having to re-dish the wheel by way of placing the two 3mm axle spacers either side of the hub and using a single 3mm spacer behind the rotor. The latter option requires you to place the two 3mm spacers on the non-drive side of the wheel and two 3mm spacers behind the rotor.
The less mechanically minded may be wondering why anyone would opt for the re-dishing version, given the hassle this entails in either taking your wheel to a bike shop to be re-dished, or putting it in a wheel jig and spending however long it takes you to move the rim 3mm to the left and then re-truing it (I think a long time in my case). The answer is that the no-dishing version changes the chain line, moving the cassette inwards by 3mm. Depending on your drivetrain configuration, this will have unwanted effects. At the very least it will require some adjustments to the derailleur, and possibly some changes to either the chainring position or bottom bracket spacers. Being lazy I opted not to re-dish the wheel or adjust the derailleur, the end result was losing the granny ring, which meant as well as not having to buy a new wheel, I also got a tiny bit fitter.

Once you’ve worked out how they work and made a decision as to whether you can be bothered to redish your wheel (I bet you don’t!), installing these is very straightforward. It’s a bit fiddly inserting the spacers either side of the axles, especially on the rear, and you’ll need to turn the bike upside down to do so. With a bit of practise though it only adds about 30 seconds to the process of fitting the wheel. If you need to fit a wheel quicker, get a Boost hub. Taking the wheel out is just as easy as before. Unless you’re completely on the ball though, you’ll spend a further 5-minutes searching on your hands and knees for the axle washers when they fall out. If you’re out on the trail and need to take the wheel out, be very careful here, if the washers disappear down a hole, crack or drain then you’ll be walking home.
As far as performance goes, I didn’t notice any flex, creaking, wear or other functional shortcomings – there was no noticeable difference using these spacers compared to Boosted hubs. That’s really all you need to know there.

Overall
These are a superbly functional, simple, and inexpensive piece of kit. There are many spacer kits out on the market now, some of which are specific to different types of hubs by replacing the end caps with larger versions. This kit though is a very simple solution that will work on a wide range of hubs. If you’re looking to avoid the cost of new wheels to fit a new frame, or you want extend the life of some older wheels, this kit should be on your list.

Perfect timing.
I was just trying to get hold of some adaptors for my wheels so just ordered a set of these!
I’ve been running a similar set for a couple or years on the front, I had to order from the states and it wasn’t anywhere near as cheap though!
To stop them falling out I wrapped the spacer and end cap in electrical tape several times, so now I have ‘boostifying’ end caps for a hope front hub.
Oh yes, just the job! Good tip with the electrical tape swanny
Daz, when you say you lost the granny ring, do you mean you couldn’t shift into the lowest sprocket on the cassette?
Ta
Is there any real difference in the quality of the Velo Solo ones seen above to the MTZOOM ones I just bought apart from these here are a couple quid cheaper?
Cba waiting for another 3 months of chivvying along the headless chickens at Hotlines Europe to be met by more incompetence each time I phoned for an update to be fobbed off.
If you ever read this Nick or any of you other sad fs, GET WITH THE PROGRAM ALREADY & SORT IT OUT !
Yours shittily,
Tdog
@LAT Yeah I couldn’t shift to the granny ring. That was only because I didn’t adjust the derailleur though. I thought it might have messed up the indexing but weirdly it would appear the shift in the chainline matches the spacing between rings on the cassette. This worked on both 10 and 11 speed. If you want to avoid any chainline/derailleur issues then go for the redishing option. Or, if you have enough clearance at the chainstays (which you probably should), you could just use them in the redish format but not bother redishing the wheel and accept that the wheel will be slightly out of centre.
@tdog I’ve not used the MTZOOM ones so can’t really comment. There’s not a lot that can go wrong with these though as far as I can see.
Just ordered one of these for the front of my bike as currently having to use a cheap on-one boost hub when I have a very nice hope pro 2 non-boost gathering dust. Good tip about taping the spacers BTW.
@daz – thanks and yes just decided that as long as the bolts are long enough to find thread which they will be and that I pick up the red spacers if/when they fall out upon removing wheel.
All should be good!
The non re-dished way will actually give you a perfect chainline if you are also using non-Boost cranks. To add to the confusion, for most SRAM (and possibly others), Boost and non-Boost cranks are identical except for the dish of the chainring.
As far as I can see, the re-dished way leads to a slightly stronger wheel and moves the whole chainline 3mm outwards, which might be necessary if you also want to run plus size tyres. But if you do want to go the re-dished way and have the right wheels, there are kits like the Wolftooth Boostinator that are much nicer (include a replacement endcap) but they are much more expensive.
Cheers,
Someone who had to deal with this recently
Thanks for the feedback. I was thinking a non-boost crank (the one I already have) would be the solution to the no redish chainline question. Assuming there is the clearance on the frame.
It is good to see more options.
late to the party but this is well worth a read https://www.wolftoothcomponents.com/pages/boost-chainline-and-chainrings, if you have chain clearance your non boost crankset would probably work fine with a boost optional; 49mm chain line (yes Boost).
*optimal; (cant edit)
A large word of warning with regard to this kit.
The bolts that come provided are raised head hex head bolts. If you look at the standard disc rotor bolts that come say with a Shimano kit they are domed headed and low profile.
Depending upon the shape of your fork you can find to your cost that the provided bolts sit too proud and impact on the inside face of your fork legs.
I’ve just found this out to my detriment during assembly and have a nicely marked carbon fork!
I think this is a design oversight on VeloSolo’s part and am waiting to see if they can provide suitable alternative low profile bolts or acknowledge that a change to design is required or warnings need to be displayed.
An update to my last comment is that Velosolo were contacted and have come back to point out that newer kits than the one I had purchased now feature lower profile bolts so the interference issue should now not be present. Thank you to Velosolo.
Good to know about those kits, I’ve ordered one for a Mavic SL rear (the need to re-dish version), since no one seems to make a kit with a proper new Mavic end-cap, sadly.
It’s great to be able to continue to use non boost wheels and actually they end up nicely dished when adapted my preferred way (which involves a small re-dishing).
I’ve done this with both front and rear both Hope and DT using Wolftooth Boostinator kits.
Once done you’d think the hub was made that way.
Wolftooth Boostinator in more expensive, true, but a proper machined end-cap specific to your axle is surely worth it. e.g. https://tinyurl.com/woltoothHR
plus – I hate the idea of loose spacers to get lost trailside and make wheel fitting more fiddly.
REAR:
Got a boost frame and want an old non boost rear wheel to fit, here’s what I think:
If Wolftooth make the Boostinator kit for your wheel (they do for at least DT & Hope) go for it.
What are the advantages of the “need to re-dish” rear kits?
[Just one 6mm axle spacer for disc side and disc is also spaced 6mm, so kit also includes longer bolts, no adjustment to axle spacing on cassette side]:
A rear boost hub is 6mm wider, all that width has been added to the disc side of the hub.
1: Chainline with “need to re-dish” rear kit:
Cassette position stays the same as with a proper boost wheel so Chainline is unchanged, also if you’re running 2 sets of wheels, one set’s adapted and one set’s boost then there’s no need to reset the derailleur when swopping. Nice
2: Wheel dish with “need to re-dish” rear kit:
Since a rear wheel has a very “flat” bracing angle on the drive side spokes, then re-dishing (only about 1.5 nipple turns) is actually improving the “dish” and, therefore, improving wheel strength because the “dish” is improved by 6mm.
IF you want to move one rear wheel between 2 bikes, one bike’s boost one not, then that changes. The spacers with ends / no re-dish version makes that easier for sure.
FRONT:
Got a boost fork and want an old non boost front wheel to fit then these kits are vital.
If Wolftooth make the Boostinator kit for your wheel (DT/Hope) that’s even better IMO, because it has the full endcap and no fiddly spacers to drop off.
A front boost hub is 10mm wider, all that width is added to the non disc side of the hub.
So, what’s the advantage of the “need to re-dish” front version
[just one 10mm longer end-cap (or axle spacer) for the non disc side], no disc spacer :
Better wheel dish with “need to re-dish” front kit:
Since a front non boost wheel has a very “flat” bracing angle on the disc side spokes, it’s actually improving the “dish” and, therefore, improving wheel strength to use a kit that requires re-dishing. Because the dish is improved by 10mm.
Note on front disc position, it ends up the same with either kit:
With a “need to re-dish” front kit fitted (such as Wolftooth), the disc position is unaltered on the hub, it’s in the same position as it always was relative to the calliper, which is also same position the disc on a genuine boost front wheel, the caliper doesn’t need to move.
The “non re-dish” front kits that use a 5mm washer each end of the axle add a 5mm disc spacer to keep it in the same position relative to the calliper too.
IF you want to move one front wheel between 2 bikes, one bike’s boost one not, then that changes. The non re-dish version makes that easier for sure. re-dishing every swop would be a pain.
seems complicated doesn’t it
its not when you do it.
neil
ps
Hope’s rear boost adaptor kits have the advantage of properly made end-caps (in this case for both ends) but, as they are “non re-dish” they lose the advantages of re-dishing,
i.e. re-dishing creates a stronger wheel and add the issue of moving the cassette inwards 3mm, spoiling the chain-line IMO.