I've been working on this for a while. The GoPro [i]seems[/i] to have it all but it has it's limitations. 300 quid for something that can only be an action cam always seemed a bit steep to me.
I took a Sony Cyber-shot DSC-WX5 (50fps 1080 video, mech image stabilised), A micro peli-case, some filters and some straps.
The camera cost less than 120 quid, the case 17 quid.
The housing is a bit bulky for anything other than chest mounting but IMO chest mounting is the only way to go.
Initial tests are superb, the video is clear, stable and very sharp. I've just got to tweak the mount for correct aim as it's hard to get it pointing forwards.
The peli-case can be drilled to allow buttons to be mounted on the outside, I've got one for on/off and another for start/stop.
It's showerproof, shockproof and the camera can come out and be a full-featured 12mp stills camera with all the bells and whistles, all for less than 150 quid. Compare that to a GoPro at 300 plus 90 for the add-on screen...
A SHOT OF THE MODIFIED PELI-CASE (it's a 1010):
[img] 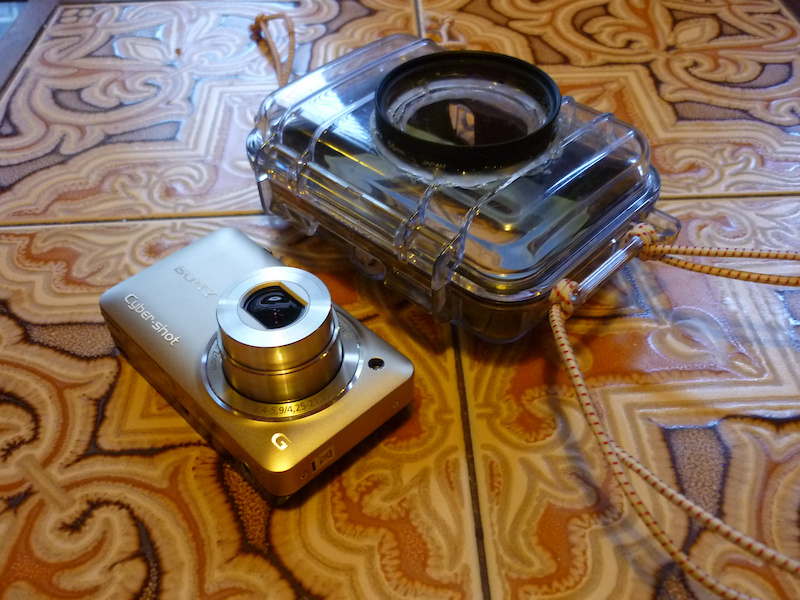 [/img]
I used a couple of old photographic filters to get an optically flat 'window'. Smashed the glass out of one, glued it to the case and screwed the other one in.
This is version one, version two is being modified, more photos when available and some video footage when I get the aiming right.
The next part of the project is to see if a .45 wide angle converter will fit to give a wider viewing angle.
That looks excellent, can you operate the camera when it's inside the case?
EDIT
Just re-read the OP, question answered 😳
The case is a bit big for the camera, there's a lot of space inside although the lens at full extension needs the depth to just clear the back of the filter. About 5mm to spare.
Took me about 30 mins with a glue gun and a drill. The thu-case buttons took some time, they are car number plate screws with little return springs.
Case no.2 has arrived and is being made into the second working prototype. I plan on making a chest mount with a bigger mounting plate for more stability and am toying with the idea of a single-axis 'steadicam' style mount that will allow a certain amount of controlled movement. The gopro 1080 has a 127degree angle of view compared to a typical digital compact 24/25mm equivalent angle of view of 84degrees. This makes aiming the home-made action camera more crucial. The gopro uses the huge wide angle to compensate for aiming imprecision! A small amount of self-aiming will help the home made camera capture a decent view.
Superb.
Keep us posted.
i've been thinking along similar lines. Book mark
have a look [url= http://forums.mtbr.com/showthread.php?t=662938 ]here[/url]...
Here's the first relevant bit of video (loads of footage of handlebars and gloves - deleted!) shot at the weekend.
My own thoughts/criticisms:
1. a bit shaky - still using elastic straps and camera inside box is not secure enough.
2. needs to be a bit wider-angle, 0.45 converter on the way.
3. slight 'halo' caused by reflection of camera in the back of the front window - final version will be blacked out.
4. sound is crap. finished version will have ported stereo sound!
here it is:
My riding chum shot this
on an ipod nano (5th gen) strapped to a piece of hardboard attached to his backpack.
To those offended by the the music just remember he's 63!
I thought the result was remarkable for such a simples setup.
Quite good, video is stable, any chance of a pic of the setup? The trail looks quite smooth, any footage of rougher trails? The trail I was on is quite bumpy. I was trying to test the stability so I deliberately hit as many rocks as I could! I had to discard the footage of me coming down the back of Jacob's ladder into Hayfield as the angle was too low and all you can see is my bars and top tube.
Mk3 is now ready, the wideangle version. Still needs stabilising on a harness to stop it drooping. The wideangle adapter does add a bit of weight but sorts the viewing angle out nicely.
Still got the buttons to do as well.
[img] 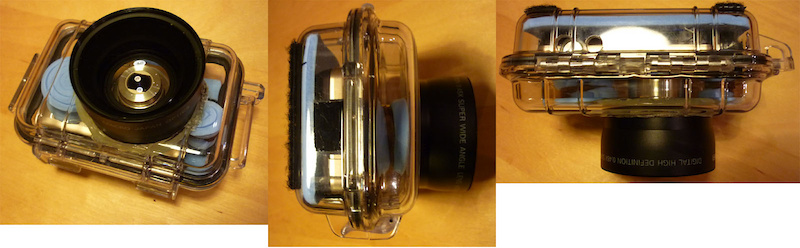 [/img]
Here's a bit of video I shot this afternoon to check the viewing angle:
Total cost when finished will be less than 40 quid. And it's still a 12MP all-singing all-dancing compact when not being an action camera.
You might well be onto something here Deveron [img]  [/img]
I'll have some footage from more gnarr terrain later this week. It's cheaper than a gopro although a lot heavier!
The wideangle converter is removable and the box takes 58mm filters which expands the capabilities of the camera. Try b+w with a red filter - superb landscapes and better than photoshopping it later.
Excellent, the only thing that puts me off GoPro's etc is the cost, I just wouldn't use it enough to justify the out lay.
Any links to the case etc? Got an old compact in the draw doing nothing.
Will be keeping an eye on this one 🙂
Mate, that is SCREEMING SUGRU for internal custom molded absorption mounts...get with it man 😉
It's a Pelicase Micro 1010, about 17 quid inc shipping, have a look on google shopping. Avoid the ipod etc versions as they are more expensive and have different liners.
You will need to buy 3 filters of the chosen size, two of which you will remove the glass from and use 1 as the base filter thread. Once you've got the camera secured in the case, mark the lens centre. Then heat one of the glassless filters up and use it as a melting cutter to make the hole in the case.
The tricky thing was to get the height of the wideangle converter above the compact camera lens. Took a bit of fiddling! I laid the camera on a glass top table and laid underneath it to get the converter close enough to avoid vignetting.
Next, the straps are fairly easy to do, I used a polystyrene wedge to angle the back. The buttons are the last thing, I intend to use some iphone stylus as they have a big squishy rubber button on the end. Numberplate screws are the external buttons. Photos of this bit later, not done it yet!
Case 17 quid
3 filters at 6 quid total
converter was 13 quid
some rubber bungee cord with small carabiners - about 4 quid total
Nice one, I'll have a look, and look forward to some more info/pics.
