Forum menu
[img]  [/img]
mrs T-r would love these to be out the spare room so guess where they are going......sans harness as i cannot get them mounted safely without a cage - and in a truck cab its a PITA to get them through the cab without losing the back window. they have cleaned up well just the drivers side upper bolster needs a patch as you can see.
she also said she wishes id told her these were going in before she picked her wedding dress....
[img]  [/img]
The last bits for the rolling chassis puzzle have arrived along with a box of seals , pistons , gaskets and diff/axel parts.
Busy weekend this weekend.
Is that a blue trailing arm? Why is it bent?
Just fitted mine today and took the anti roll bar off to refurb
And are those spring locators?
Cranked trailing arms. If it wasnt bent my suspension would be limited by the trailing arm angle.
I said at thw start im building a different beast to you 🙂 ,.... Mines a truck cab rtv possibly stretching to ccv motor.
So yeh thats gwyn lewis front towers , turrets , spring locators and bottom spring retainers
Got dropped pin by pin shock mounts for the rear , +5 shocks all round with a 2 inch lift on the softest springs i could get my hands on ( without paying silly money) rear dislocation cones with hooks and full circumferance spring retainers out back. Extended brake lines and a high articulation 45 degree a frame ball joint- standard one tops out at 30 degrees.
[img]  [/img]
Yer grass is in need of some TLC ratty
Come round on your many days off then and sort it out.....
For free of course .....your gold plated public sector pension should be more than enough to cover it 😉
We had leather gaiters on our MOD 90 and after 255,000 miles the swivels were holding their EP nicely - although of course the axle may have been newer since the MOD change parts for fun.
did your mod 90 sit static for 4 years not gettting its swivels coated in nice ep90 a few times a day ...... thats probably had more to do with it than some bits of leather ill be honest as they were perfect when it was parked up - my bad for not mothballing them with grease - although i didnt anticipate 4 years of waiting to build.
Mine had cranked arms, +2 shocks (IIRC), cones, HH RR rear springs (170lb/in).....
[img] 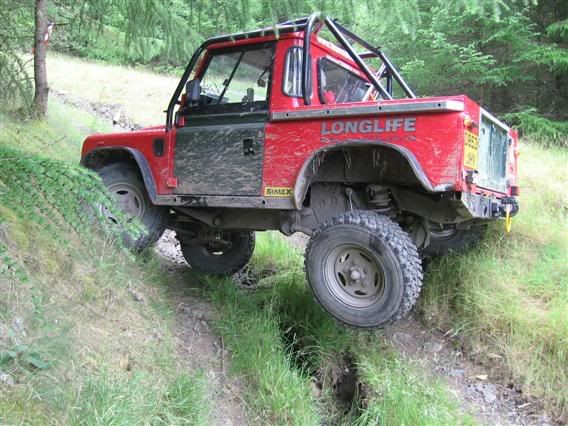 [/img]
you cut your rear arch and spat - any reason ? you dont have particularly aggressive or large tires on - but i like the look.
aiming to poke my straight through single silencer exhaust out just above where you have simex sticker.
I really need to sort out a cage 🙁 postage to where i live i nearly as much as buyign the cage - might wait till its on the road - then go on a road trip have it fitted and drive it back via some lanes in north englandshire.
Arches done by previous owner who ran 35-37" tyres. I bought it pretty stripped out mechanically and rebuilt. Those tyres did look a bit lost in there. Never got round to putting standard spats on as the bodyword was also trimmed back making it tricky. Never got round to painting the doors/tailgate either before I sold it 😕
Exhaust on that one comes out the rear crossmember, you can just make it out on the pic. Kept it nicely tucked up out of the way. Full stainless system with two little boxes. The 4.2 sounded lovely through it. I miss that truck 🙁
Shaun at North Off Road for the cage?
north is a probable source as he is close -but the wrong side for the lanes id like to try 😀
there are a couple of places up here(well the central belt) that will do such as LCS engineering but ive yet to see a price.
as a whole the club im with seem to like whitbred offroad for cages after one of the lads got a thug - its some awesome work of welding art/porn.
Most of the Whitbred stuff I've seen I'd describe are workman like rather than sexy. Nothing wrong with it, solid and functional. Although they no doubt have a number of different people welding them up. They are a long way from you, unless its the mid Wales lanes you fancy, of which there are plenty and some bloody good ones.
Also 'up north' is Dave Billings at Tornado. He does nice work from what I have seen.
One other consideration is tube material. I think both North Off Road and Tornado use CDS for their cages and unless it's changed Whitbred use blue band pipe. Pros and cons to both. But for CCVT where rolls can be routine rather than the exception the ticker walls of blue (or even red) band pipe can take the knocks a bit better than CDS which can dent more easily. Just a thought, which you may have already considered.
i believe you can pay a bit more and spec what you need with north at least.
Im kind of hoping Lenny can accomodate my needs but im a long way off needing a cage.
"I'd describe are workman like rather than sexy"
is exactly how i would describe my Gwyn lewis kit - except the trailing arms a good powder coat hides a multitude of sins .... given mikes thug is dipped thats probably why it looks so good.
[IMG]  [/IMG]
New stainless pistons went in a dream very easy job even the metal outer rings went in not bad. I did practice with an old one i salvaged first though.
[IMG]  [/IMG]
[IMG] 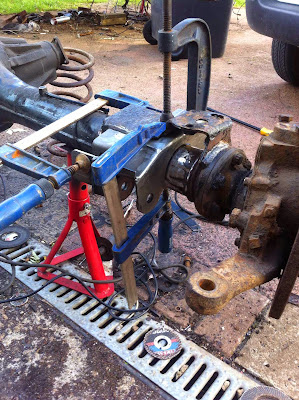 [/IMG]
[IMG]  [/IMG]
[IMG]  [/IMG]
Rough afternoon making headway into front axle. Got it all welded on in the end though.
And my good deed for the day, cut and fitted my neighbours door handles for her.
Now i only have 1 1mm disk left 🙁
Ill also revise my rolling chassis dead line from tomorrow night to ......xmas haha.
Now i only have 1 1mm disk left
Ive got a handful I didnt use...what's postage to the boondocks?
are those new radius arm mounts from yrm? Look tidy. Just as well there's a lot of naive metal on those axles 🙂
More than itll be for me to drive to screwfix in the am and get another 2 boxes of rhodious disks. Did a mad dash to bnq tonight to find not one single cutting disk on the shelf.
I even exhausted my back up reserve 125mm aldi disks....they are terrible. Do not advise using them without a face shield .. They like to explode
Yeah they are yrm mounts they are good but not perfect , i had to modifie the panhard rod position it was at a fairly wacky angle.
yeah, mine are silverline "face shredders" so value for money.,... 😉
have you had a go at filling those swivels with something other than rust yet?
No that will be done at the end, they aint leaking.
Fwiw ive been told not to even try taking them apart if not on the car - good chance mines been in since 87..so will need the full 3 ft breaker and scaff pole.
Cheeky wednesday working from home..... That is manning the mobile/emails on the smart phone.
No one bothered me so we got progress + jobs like this that require hours of continuous grinding i like to do when the neighbours are at work so weekdays are ideal , they are great neighbours and i dont wanna piss them off by grinding all weekend..... Unfortunantly im at a stage in the project that requires lots of grinding. Turns out he used to build track day fiestas in his younger days , has some impressive work photos.
[img] 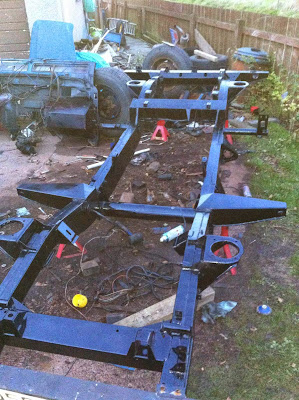 [/img]
Ran a wire wheel over the whole front end after removing steering set up and bulkhead.
Stil not worked out how im getting the front bumper off without trashing it..... Previous owner snapped the bolt heads and welded the remaining studs to the bumper top. Ground this weld off ....expected the bumper to pull off and then be able to retrieve the studs....but now , the bumper has 2 plates and this studs long.
Have cut through one of the studs with the recip saw just struggling a bit with the other as access very tight.
Although i have bought a used tubular winch bumper with an A bar on.
From hear as d.ream once said......things can only get better.....
After all theres no more bits to come off.....well except the gearbox cross member......but knowing how much fun they are to fit it can **** off.
[img] 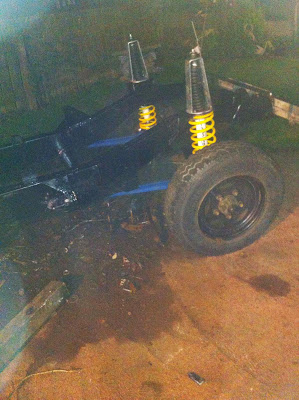 [/img]
[img]  [/img]
the other radius arm bracket came off in about 20 minutes - 40 minutes cleaning up the axel and placing the new one - welded on.
then had to pack up early saturday to go into town and get dinner/see dave gorman at the music hall.
sunday - fitting suspension sans engine is quite hard ---- lots of ratchet straps were used to pull weight into the chassis so i could jack against the radius arms.... still didnt go - found the new brackets face to face were 2 mm under size- and the new bushes were 1mm over size - using verniers.
dismantle - grind down to size and refit.
Front end done.
I nearly treated myself to some spring compressors after much cursing, and that was with a loaded chassis. God knows how you did it with straps!
[img]  [/img]
i have spring compressors - they did not help.
it was the radius arms giving me gyp.
how ever ive since watched a video on youtube....had i dropped the wheels off and rested the diff on some wood- then jacked up one side it would have gone not so bad.
ah. Mine took some wallop and jacking.
Hopefully taking mine next door onto my mates 4 post lift* this afternoon to refit the anti roll bar (new bushes) and top up some lubes.
* has to be when the weather is nice as he has to park his TVR outside if Im using the lift! It is orsum though!
how the other half live 😉
Mrs T-R said once finished we have to stop at 1 land rover project for a while.... i said no problem - if i do anything like this again itwill be after ive built a garage in the back garden - with lift - which is after the kitchen has been done. - so by the time this needs a galvo chassis in 20 years time i should be just about ready to strip it again 😀
spend so much time getting gear out and tidying away every night.
how ever i guess thats better than just leaving tools spread out all over the floor 😀
I have a huge Facom spring compressor should you need one.
I also had a four post ramp in the Spruce Goose Hoose, my shed back in Orkney. A ramp is a game changer, no job however trivial is not a pleasure.
ill bare that in mind mcmoonter.
based on the fact im pretty factually incorrect in my rebuild already ---- do you think i could get away with a marine blue/lime stone paint job instead of the original stratos blue/white ? - the paint job thats on it is pretty tired and the doors/tub cappings/roof need to be renewed/sprayed anyway - as all from different colour vehicles 😀
marine blue is a series colour.
we had a marine blue/limestone hardtop series 2a in the family when i was a kid and i always loved riding in it.....
another paddocks order in today .
HD clutch fork , slave , a 90 fuel tank and bump stops all round, elcheapo steering damper - as i dont think it does owt anyway and a couple of seals id forgotten.
they are expecting my fulcrum in mid november - i dont think that will hold up my mot by much 😀 will fit rear axel with the old one for now
[img] http://www.landrovercentre.com/wp-content/uploads/2012/08/P1110830.jp g" target="_blank">
not a truck cab....but you get the idea.
[img]  [/img]
a series 3 hard top ..but you get the idea ...
both marine blue.
[img]  [/img]
stratos blue 90
wheels will be lime stone also - but are discovery steelies.
Mines going marine blue with limestone... well I say that I mayyyy keep it the colour it is and just repaint the black bits limestone and remove paint from the galvy areas as the paint work is actually pretty good.. but I've got itchy fingers and I want to take it back to its original colour also.
I replaced the steering damper on mine as it was only a couple of quid more than some new rubber bushes for the old one!!! It did come in a blue box, but it seems fine. As you say, it doesn't do a great deal save for stop the steering wheel braking your thumb when the wheels catch in a rut 😉
fancy coloured plakky bumpstops or nice fat black rubber ones?
Yep mines will be in a blue box also.
Just went for standard black rubber, didnt see the point in fancy extended ones at 20 quid a corner , thats why i bought long shocks and dropped mounts, why would i want to limit travel with rubber chocks.
Y'know the more l look at that stratos blue the more im liking it again. That landy makes it look good....mine did not 🙂
That orange stripe down the wall in the pic above reminds me of the scum at landrovers uk , unhappy times
But the colour does look good
I like the old series Marine Blue. My old IIA was that colour. My 300tdi Discovery is too, somewhere under the tree sap and grime.
I resprayed my IIA with some Tractol Synthetic enamel. The stuff they paint JCBs with. It's hard wearing but it lost its glossy shine after a couple of years. I never ever washed or polished it though.
[IMG]  [/IMG]
[IMG]  [/IMG]
Yeah dawncer .... 4 wheels on my wagon , just need a couple o horses to gies a tow.
New rear diff pan fitted and painted , bushes for trailing arms , trailing arms , shocks , springs , spring seats , spring retainers , steering box , fuel tank (inc painting ) all 4 bump stops fitted. Been a very productive day,
[IMG]  [/IMG]
The only other photo i took today. Didnt have the luxury of time , today was my last week day off for about 5 weeks , shopping saturday , cycling sunday morning ....then probably away to turkmenistan for 25 day at somepoint next week or the week after 🙁
Can I join the party? 🙂
here are some pics of my build, before, during and after. Been driving now for over 2 faultless years.
As collected
[img]  [/img]
Mid build
[img]  [/img]
Almost there
[img]  [/img]
First trip tot he Alps
[img]  [/img]
That is lovely Welsh.
I like how I'm not the only one to leave the galvanised bulkhead au naturel 🙂
BTW do you know much about the 30 acres for sale up the road at Capel?
I envy your barn.
Its getting cold out.
Mrs t-r says im not allowed another vehicle based project for a while......
I said thats ok ....my next project will be a double bloody garage so i can work on my vehicle projects in warmth for a change.
What do you want to know about it? I know who is selling it & I know several people who want to buy it if that helps. I also know what it is worth but know it will make silly money way above its' agricultural value. But then they aren't making land any more 🙂
But the one great thing about that 30 acres is that you can see my house from the top of it 🙂
🙂 a mate and I were dribblin' over it in the pub tonight. It's the kind of plot that is part of his future plans but it's about 6m too early. We both love the location.
I guess your spot isn't far away?
Edit : indeed not far then 😀
Trail rat.. believe me, it may have a roof, but that barn was not the warmest place to work in. Gotta be better than a driveway though (been there and feel your pain)
Pic just prior to making my exhaust
[img]  [/img]
BTW was reading your troubles fitting the front springs. You need to get a small scissors jack in between the axle and the chassis and jack away (assuming the front wheel both removed and the car is resting on axle stands under the chassis so the front axle is hanging free). The spring will go in and out with ease
Springs went in no sweat ,i just lifted the chassis with the crane. its getting the front end of the radius arms in thats the ballocks but ive since been informed its best to do that part right at the end when you have the engine in and all weight on as everything will be in neutral and the bushes wont be stressed by the weight like thye would if i tightened them up now and dumped a heap of weight on them
Ah OK. I would just disconnect the radius arms from chassis end (elephants ears), roll axle forward 3 inches, and bolt them up to axle, then refit to chassis.