I know there are a few of you guys on here. Having skinned most of my knuckles, any tips for removing a clutch slave cylinder from a 1967 S11A would be much appreciated. - Its the vertical mounted 1 on a non-synchro box. Workshop manual(s) / internet search etc doesnt throw up any suggestions.
Cheers
Quite a few wobble extension bars if its anything like an lt77 top bolt BUT yhe s2a is entirely different box.
Which workshop manual have you got ?
Are you going from below or via top (floor panels out)?
It's years since I did once but it's dead easy. From memory I removed the the transmission tunnel cowl or footwell, just a couple of screws. Unscrew the hose first loosening it at the bulkhead then the slave. ( the hoses are so cheap it would be worth replacing too) The slave cylinder is secured by a couple of bolts. I recall a sleeve and rod that was held in place with a split pin that goes into into the bell housing. Bleed and you're done.
Ive boeeowed an original workshop manual jobbie (cant remember publisher) and a haynes. Floor and transmission cowl are still in at the moment and I cant see how taking them out will help as the cylinder would still be 'hidden' behind the mounting braket on 1 side and the bell housing on the other. I've got the flexi hose off and 1 of the securing bolts out and can 'see' the other, but its hidden above (when lying underneath) the clutch and gear linkage.
http://www.landyzone.co.uk/lz/f6/how-replace-clutch-slave-cylinder-ease-193550.html
http://forums.lr4x4.com/index.php?showtopic=13350
EDIT perhaps not the most helpful links.
Mcmoonter,
I looked at both of those links before posting on here.
The first thread seems to die a death when its established the cylider is on the drivers side (as mine is).
The second thread is for the horizontally mounted cylinder not the vertical (as mine is)
Ahhh
Sorry Marcus, I never read them through fully. I seem to remember mine was on the drivers side. Though I can't remember if it was vertical or not. I'd still whip the transmission tunnel cowl out to get a better look at things. The trickiiest part was relocating the split pin through the sleeve and rod.
No wories mcmoonter. - 1 last go before the floor comes out !!
On a 2a the slave cylinder is mounted vertically on a bracket which bolts to the back of the bell housing. The slave cylinder pushes a rod which goes through the side of the bell housing. Best bet is to remove the floor and gearbox tunnel. It should be a case of removing the hose from the top of the cylinder, remover the split pin and unscrew the clevis pin. Unbolt the slave cylinder from the bracket and remove. In theory 😉
This is from memory. My S1 doesn't have a slave cylinder, but the actuation rod that goes through the bell housing is the same.
[img] 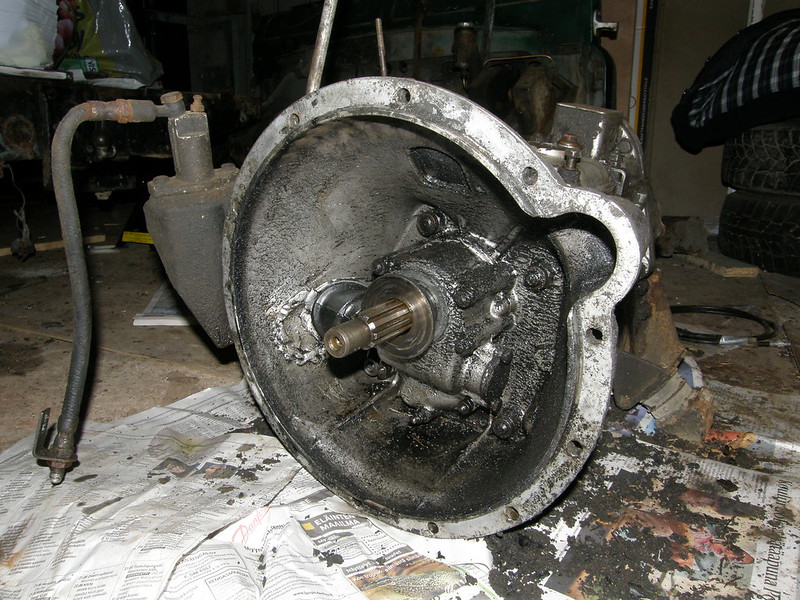 [/img]
Just checked my official land rover maintenance manual but it is for a series 3 and this has the vertical slave cylinder. It does say disconnect hydraulic hose and remove the 2 retaining bolts. Pretty sure it will be the same with a series 2 just different access to the bolts.
My series 2 trailer has a series 3 gearbox so I can't help. most gearbox bell housing jobs are easiest once at least some of the floor / transmission tunnel is removed. I have made my transmission tunnel up out of 2 separate panels to make it a 2 minute job to remove it.
[img]  [/img]
Top find Daniel, that's how I remember it.
Daniel - Please tell me that picture was taken in your living room.....
It's a long time since I did a Series 2 clutch cylinder, but I don't think it's possible without taking the floor and transmission tunnel up.
Once they are out of the way, it's fairly easy to get to.
Thanks for the help guys. Looks like its a floor up job - You can bet thats going to reveal a load more nasties !!
ononeorange - Member
Daniel - Please tell me that picture was taken in your living room.....
Of course it is, that's why there's newspaper down, wouldn't want to make the carpet 😆
floor/tunnel out will make it easier - if nothing more at least you'll get a bit more light, and be able to see it a bit better.
The crux of the problem here is the fact that Landrover built your vehicle as a rolling chassis, complete with powertrain, than built the body onto it. Sadly maintenance envelopes were not at the front of everyones minds!
I was amazed how quickly my tool collection grew when I owned Landrovers.
I've not got a Roll cab full of sockets/spanners!
I was amazed how quickly my tool collection grew when I owned Landrovers.
I've not got a Roll cab full of sockets/spanners!
I seldom had to resort to hammers. There were a surprising number of whitworth nuts and bolts on my IIA. The good thing about them is that everything is accessible, what car nowadays can you remove the floor, seat boxes and transmission tunnel from to remove a gearbox through the passenger door? For an engine swap unbolting the front panel and wings gives near complete access.
Parts are cheap so if you are still keen you could keep one running yourself for years. If only Land Rover had galvanized their chassis and bulkheads most would still be on the roads today.
Marcus, how did you on?
On the basis it's not too late to chip in:
It is easier if you remove the floor panels, and the bulkhead lower centre panel (runs across the top of the bell housing), but possible to do without.
You need a long thin socket 1/2" AF (IIRC) which goes on the the bottom of the two bolts holding the slave to the bracket. These are difficult to get to, as they are enclosed by the bracket and close to the edge. You may have to grind the socket to make it thinner if it won't go on the bolt head. You need to be under the car to get to these bolts.
You will also need an assistant to somehow hold the nuts on top - I could get to the outside nut easily, but the inside nut is very difficult. A bent spanner would be ideal, but I wedged a large screwdriver between the nut and the body of the slave cylinder.
The flex pipe has to be undone from the top joint near the master cylinder and left on the slave cylinder, or just cut it. I would fit a new flex pipe as a matter of course as they usually decay inside, which leads to a soggy clutch action, and debris in the fluid which eventually knackers the new slave!
Leave the pushrod attached to the clutch pivot, and lift the slave cylinder out.
Reassembly is the reverse of removal as they say! However, don't forget to screw the new flex pipe to the slave cylinder before fitting to the car.
drlex - Not too late, as I havent had chance to have a look at it again yet. I picked up a 'new' 1/2 inch socket yesterday as mine was too fat to locate on nut underneath. - As you suggest some modification with the grinder and / or wedging may still be required. Ill let you all know how I get on !
Marcus, half decent 3/8 drive stuff is more than enough for these sorts of jobs. 1/2 drive stuff is pretty clumsy in confined spaces. You can find deals on Facom and Britool stuff on eBay.
Update - Finally got chance to have another look at the old girl and the clutch slave is off !! Floor and bell housing cover had to come out and it was then was a 'relatively' easy job. I still couldnt get a new thinner socket / spanner on the nut and in true landie style had to wedge a screwdriver between a flat on the nut and mounting bracket. I was going to reseal the old slave, but after the hassle, I'm banging a new 1 in so hopefully dont have to touch it for another 20 years.
Good work. It's simply not worth replacing the seals when the whole part is so cheap. As you say it will be good for another twenty years.
Footnote: when my brother worked at Land Rover he took me on a tour of the Defender production line. Before we went inside he turned and warned me that the most frequently-used tools were the big mallet and the pry bar.... he wasn't wrong! Blokes were actually beating those vehicles together, so big were the tolerances.
We always used to joke, that unlike on most production lines, the QA (Quality Assurance) guy at the end of the line just had a hammer, and if he found a dent on a vehicle, he'd just put a matching one in on the other side........... 😉
We can knock em, but Ive just got back from a trip to morocco in my newer defender. There aren't many other vehicles which I would have trusted to take a 150km trip into the desert with my family. - Still managed to boil a couple of shockers though !
