Ok, just dropped my HID bulb (lumi)and so begins the HID to LED conversion (not even finished the mini...80% complete btw well bright for the size...)
Bottom line, I'm gonna use the rear portion of the case to house the 'array' of led's. it's 34mm Dia.
I think I'm after best throw, but...what arrangement/reflectors could I best cram in there??
Cheers,
LT
[url= http://forums.mtbr.com/forumdisplay.php?f=124 ]post here instead ....
[/url]
This one is for the HID lamps
http://www.singletrackworld.com/forum/topic/lumicycle-hid-cutter-led-conversion-tell-me-how
I've got the Cutter-XPGMR11T 35mm triple with the cute narrow optic!
I've got a Halide bulb you can have for £28 posted.
email in profile.
B
Ooops linked the wrong one cheers Kinda.
😀
Love tubs that looks like a nice host for a triple XML light .and H6flex driver
3000 lumens 😆
real nice beam
[IMG]  [/IMG]
I'd stick XP-Gs in there and if you're wanting a tight spot beam pattern, I'd use the Ledil Tina RS optic.
The XM-L produces only a few more lumens than the XP-G.
The main feature of the XM-L is being able to use higher currents, which is where the higher lumen figures come in, as well as the XM-L having a slightly lower forward voltage than the XP-G.
Higher currents are fine for domestic or automotive applications, imo.
but when you're running from a portable battery pack, then ripping high currents out of your battery might not be the way to go.
Horses for courses and all that.
Assuming you've a 7.5v battery, I'd look at 3 XP-G and a Maxflex.
If you get cooling issues, you might want to look into using one of those RC car motor cooling collars.
Someone from here did a very neat job with a couple of those.
Keep us posted on how you get along.
🙂
Afraid I have to disagree a little with you there James
I am have some great results with trialing XMLs with various optics
and yes while I agree on the current drain can be large on full it is also producing good results on lower setting well not good excellent results.
I was assuming the lumi hid was a 14 volt battery so if it is 7 volt job the the triple xml is out .
for your info the current draw from a 15 volt source is
Hi 2150 ma
med 430 ma
lo 130 ma
Medium is a sweet light with the ability to go to hi for jaw dropping bright
I run mine on lo and med 90% of the time but it is real nice to know that there is another level to go to if needed/wanted
Anyway hows things James
I'm definatley gonna stick a triple xml and h6flex in mine soon, then pull the gubins out of the Hid and stick I'm my tesco torch!
Waiting for George to release the lflex so I can stick a single xml in my dinotte to put on my bonce!
Lflex is finished and up for order just not yet up on his site.
he is shipping them out to folks who mailed him asking to be on the list for some before putting them up for general sale .
Cheers for the info, I know he said he didn't do pre orders but must of missed the mailng list thingy!
up for sale now on www.taskled.com
Thanks very much all, some great info just need read through it all....oops, there goes another good assignment grade 🙂
Hey Troutie,
Just so ya know, the mini is looking 'real pretty', like I said I only get a few mins each week to work on it but she's nearly done.
I've incorporated a little plastic jnk box where all 3 leads meet (sockets) with a blue LED 'running lamp'.
I'm running simple SPST switch at the bar (close to shifters) but here's where the SUGRU is gonne feature whereby I'm going to mount a dropped white led just below the surface of a moulded housing to achieve the background 'glow' effect i was seeking. Just want to hit the extra lumens for switch back type action.
Will feed back.
PS: Only 5 weeks of clinical placement remains 🙂
For info, the lumi HID cell is in fact 14.8volts.
I really don't want to over complicate the hid conversion with adding extra resistors....I've had little success with this arrangement so far.
..unless it truly is simple to piece together.
An off-on will do,
cheers 🙂
Good to hear you are making progress with the ikkle light
I will do the Hid conversion for you if you want
always wanted to do one but Lumicycle stopped selling the empty cases
and the hid cases are now like rocking horse poo
Troutie, tripple XML to be found via google?
Cheers
Troutie, do you mean [url= http://forums.mtbr.com/showthread.php?t=673721 ]this [/url]kind of set up (scroll down to pickies)
Trout.
Hi fella, how you doing ?, well I hope 😀
We should e-mail more.
I caught the thread about your website, I hope you've managed to get it all under control.
The last website was pretty swish, I expect that the next one will be as good at least.
I accept your comments, no probs with your observations on the XM-L, as you write, XM-L takes higher currents well and now that my XM-Ls have arrived, I'm seeing some acceptable results.
😀
As you and I have been on the light scene for so long now, you will recall a time when the XR-E was [i]the[/i] LED to use.
I started out using a triple Luxeon star LED set-up producing 240 Lumens !!!!!! and at the time, all of use were going "WOW".
😆
Well, to my mind, the XM-L has a similar die size to the old XR-E and as I've posted in the past, I always had a soft spot for the XR-E because of the results I could obtain using certain collumators as opposed to a reflector.
I've no doubt that with the right collumator, the XM-L will give a nice beam pattern, purely due to its die size.
I always preferred the larger die sizes anyway, but for the draw backs of package space impacting the actual physical size of a light.
However, as I'm sure you will agree, the XP-G is still a worthy and devestatingly effective LED, when used with a useful "[i]optic[/i]"
When you look at a Model 401 at work, its something to see, 1400 lumens, helmet mounted, is quite amusing.
😉
So, LT, you've got some nice options, XM-L's or XP-G's, I think you are going to have a nice replacement, and if you hand the job over to Trout (time constraints) I'm sure you will get a great little light out of it.
🙂
Ah !, 14.8v battery, then thats a no brainer, go the Buck route, rather than the Boost driver route.
If you can get the XM-Ls at a good price, and the driver, then go for it. 😀
I've a few old used MaxFlex, good condition, but the older version with only two output levels rather than the three output levels you get from the latest MaxFlex.
But at £5 posted, they might be of use to someone.
Anyway, I'd still like to see the end result, so keep us posted.
🙂
Its all good !
😉
Luminous- I'm trying to make a LED conversion from my Hope Vision HID. I'm keen to know what components I need- esp the LED board and driver. Would one of your old Maxflexs suit- and if so, what would you suggest as a LED board for a helmet mounted lamp?
Thanks Luminous, once one begins to trawl the threads thing rapidly become confusing. For example I don't really understand the different drivers (how they 'effect' output) however i do understand their function.
Is [url= http://forums.mtbr.com/showthread.php?t=673721 ]this[/url](scroll down to view the pivot mounted unit, nice) the kind of thing you guys have in mind, I personally love the aesthetic of it and would like to follow a similar path.
So, you're saying I should go for the x 3 XML with 'Cute'(?)optic, along with 'Buck' h6flex driver ???? (sum the parts up for me, pls....take the pain away ) 😆
I can't wait to get cracking in it, it'll be summer mine...by the time it's done so you have to wait until October for beam shots....exciting times 🙄 😀
PS: Cree for the XML's??
the Lumi hid can was the weapon of choice of the diyer because it would take the MR11 sized optics and has a load of room inside for a sink and driver plus great heat dissipation.
and about a year before Lumicycle did a led light they stopped selling the hid cases as a spare part .
for a cheapy Cutters are selling the old XRE quad XRE with free narrow optic here
http://www.cutter.com.au/proddetail.php?prod=cut1054&cat=83
and coupled with a Bflex / Buckpuck or similar driver gave a really nice beam .
move on a couple of years and the XPG/E came along and a similar set up can be had
http://www.cutter.com.au/proddetail.php?prod=cut757
and for this year a triple XML with cute narrow optic
http://www.cutter.com.au/proddetail.php?prod=cut1066
coupled with a H6flex from www.taskled.com not cheap but certainly bright .
So Love Tubbs you can go cheap and bright or not so cheap and OMG bright .
or sell me the hid case
Mr love tubs, I need your address.
here you go, I have had a look for my thread on this which I posted just after I did the halogen one and I can't find it for love or money so here it is again.
Step by step guide number 2. Converting a Lumicycle HID into a LED - with piccies
Righto Folks, to follow the thread I started on the Lumicycle halogen conversion. I thought I would do the same with the HID Halogen conversion as people have been asking about it, so here goes.
I used a XPG triple with a narrow lens and a Bflec driver (Approx 1000lumens when run at 1 amp)
[b]JOB 1[/b]
I have had some heatsinks turned especially for the job.
[img]  [/img]
These need a 6mm hole in the centre adding for the LED wires to run through.
[img] 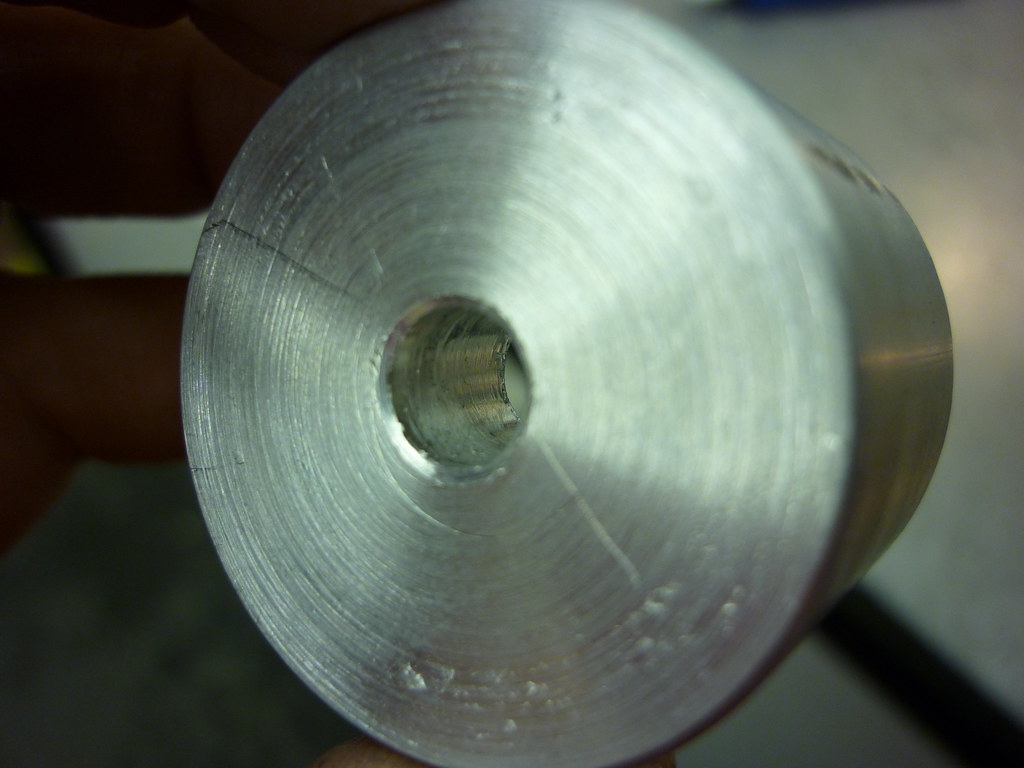 [/img]
and then a small 'notch' filing in it to locate on the screw that holds the mounting bracket in place. The mountain bracket has a spacer under it, remove this so the screw sits into the housing like this.
[img] 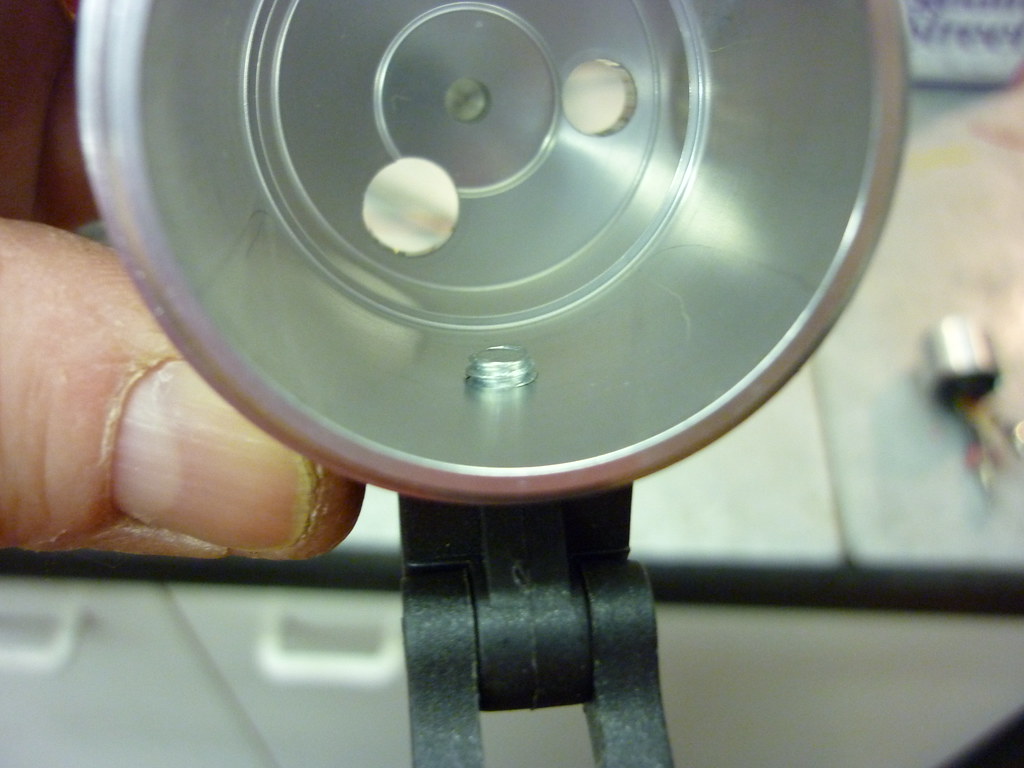 [/img]
[img] 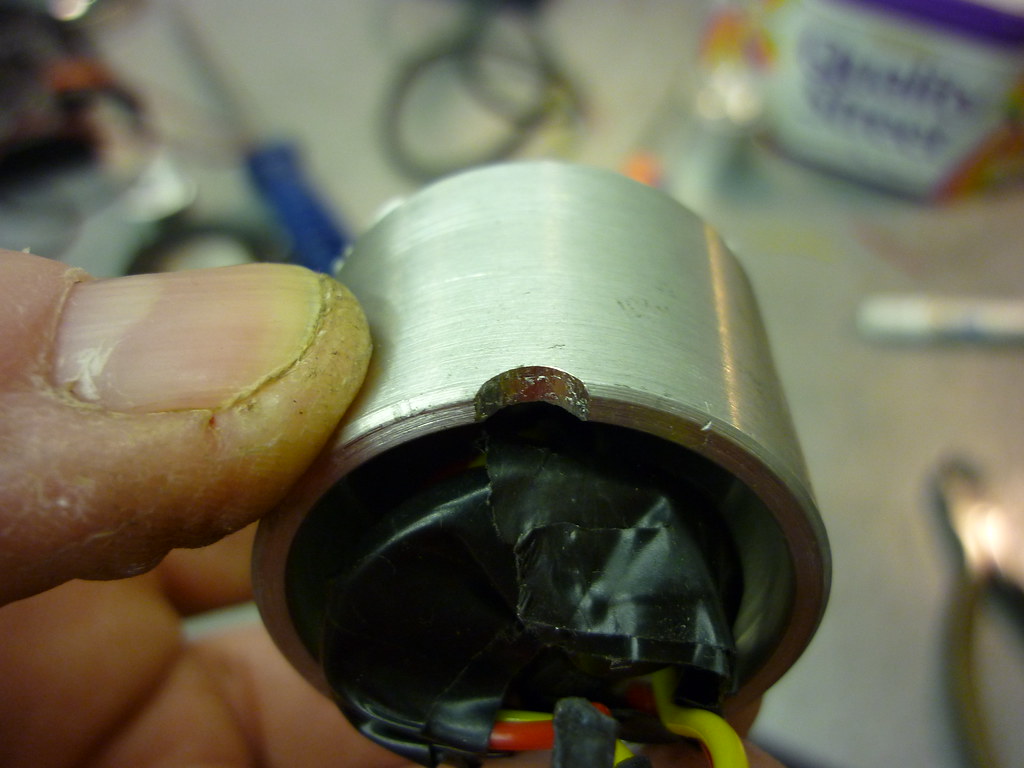 [/img]
It's best to do this by sliding the heatsink into housing adding the LED's and optic and screwing the cover in place. File the notch enough to allow the housing screw cover to just fit ie touch the rear housing.
This completes the heatsink work.
[b]JOB 2[/b]
I have used a Bflex driver this allows you to have 5 settings and it's programmable for Temperature and voltage (ie it will switch down a power level when/if it gets hot)
I used 3 amp wire from Maplins.
Solder all 6 connections on the driver. All 6 wire lengths should be approx 35mm long.
[img] 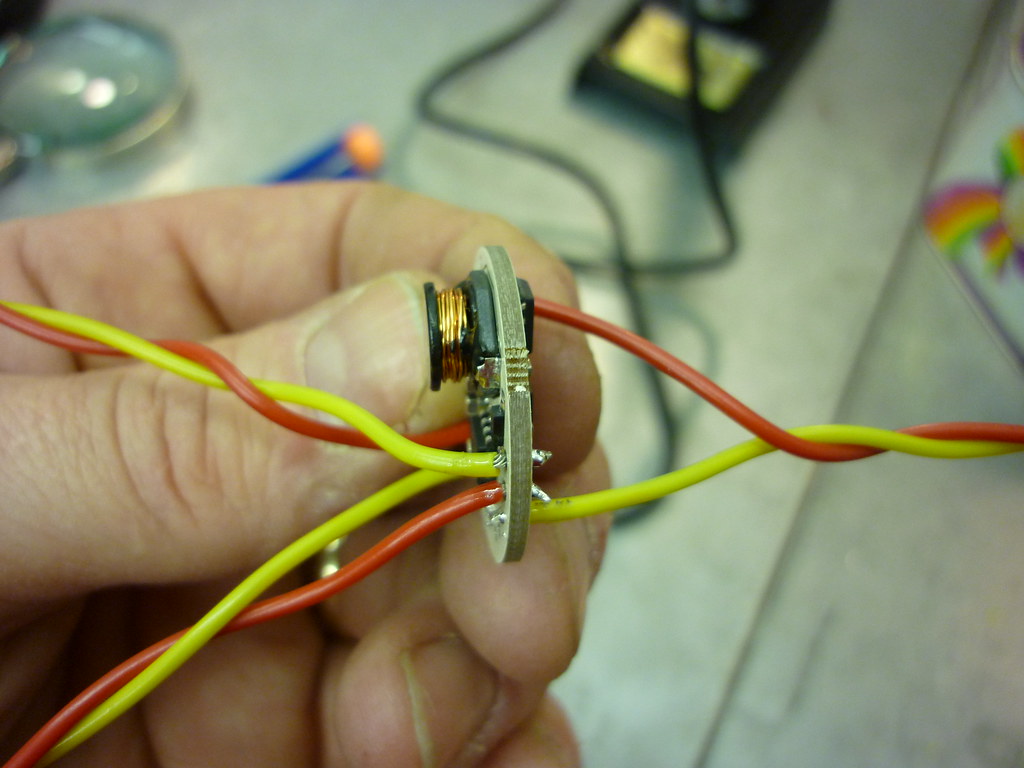 [/img]
[img] 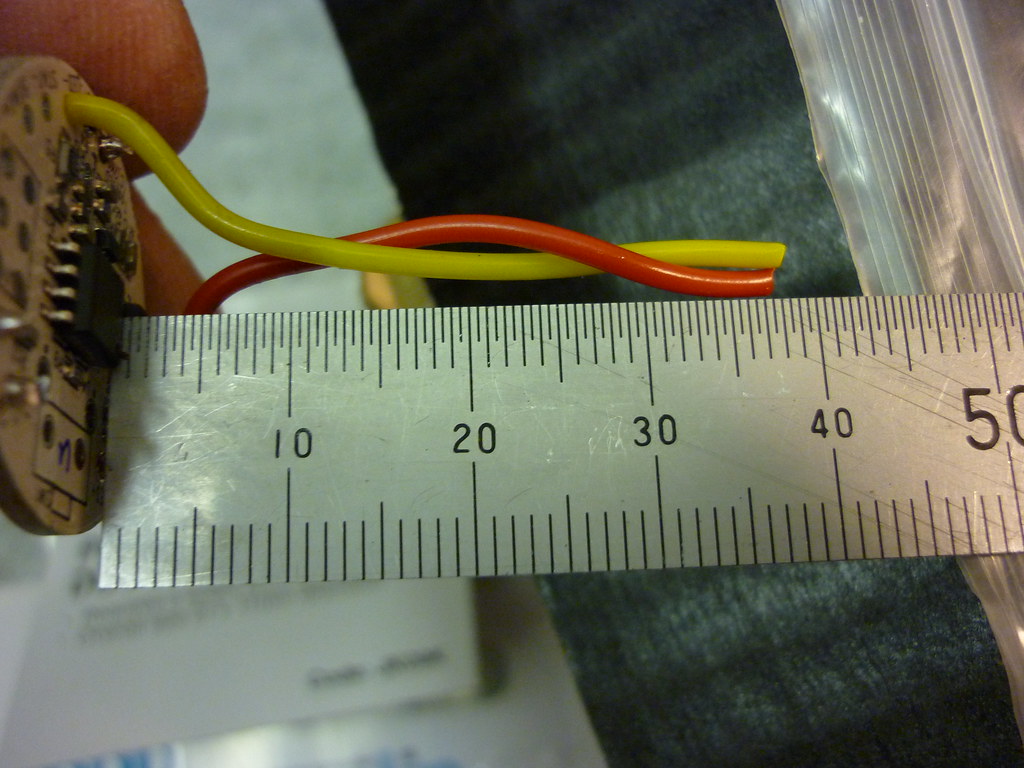 [/img]
[b]JOB 3[/b]
The you will need a new switch it's this one
[img] 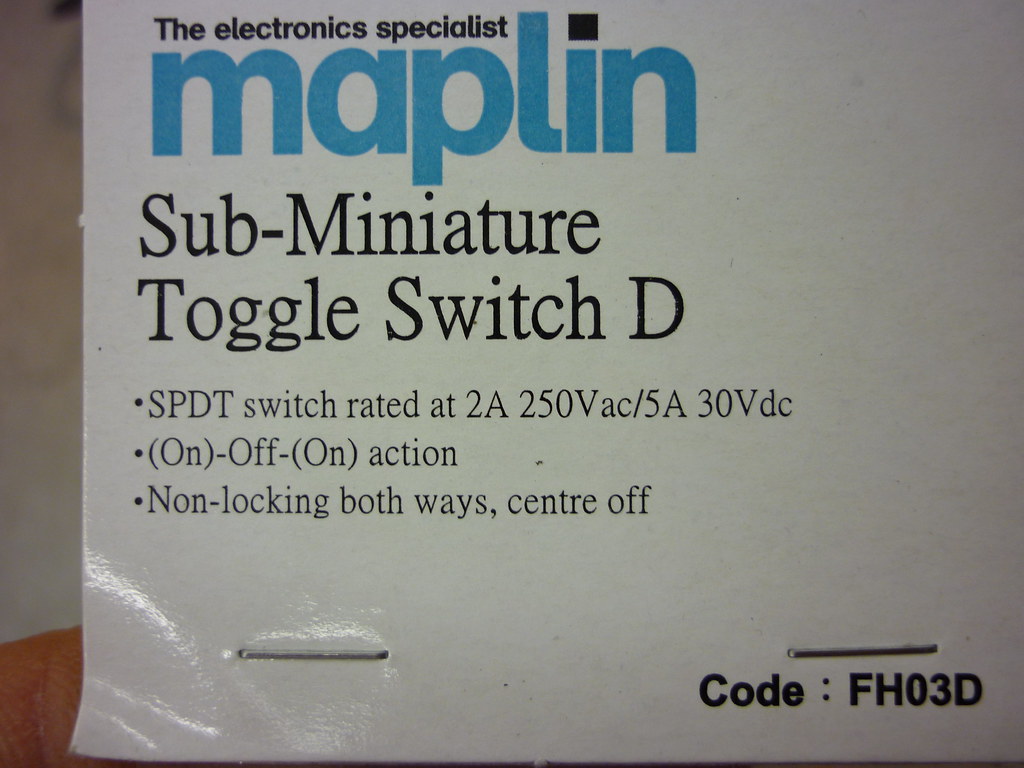 [/img]
The switch is a momentary switch, you only need to wire 1 connection on it though (Ie it only needs to work one way)
Solder according to the piccy, I use 3.5mm heatshrink as a precaution that is also available from Maplins.
[img] 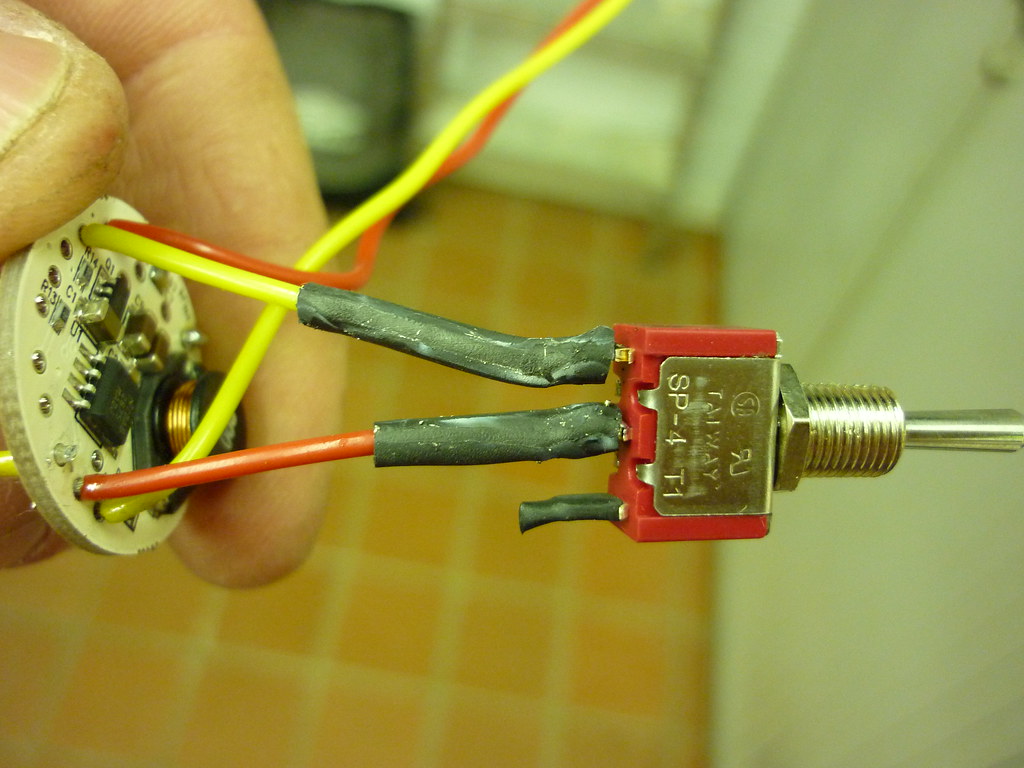 [/img]
[b]JOB 4[/b]
The next thing to do is solder the connection, if you want to us a new one then this is the one for a 2.1 pin, I think the lumi ones are 2.5mm. Maplin have these as well or you can just use your old one from the existing lamp.
[img] 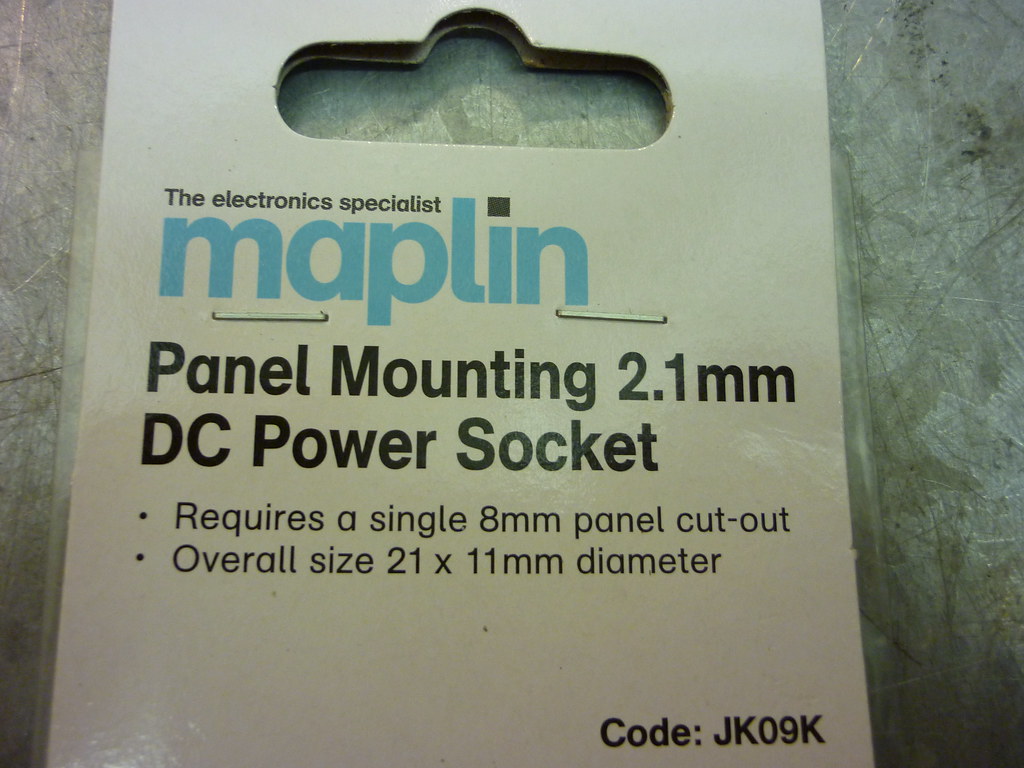 [/img]
I cut of one of the outer connections so ther is less for anything to snag when assembled.
[img]  [/img]
My battery is not a lumi one so is centre positive a [b]limucycle battery is centre negative[/b], remember this when soldering your connnections. Ie for a Lumi battery the neg from the driver will go to the centre pin on the connector.
[img] 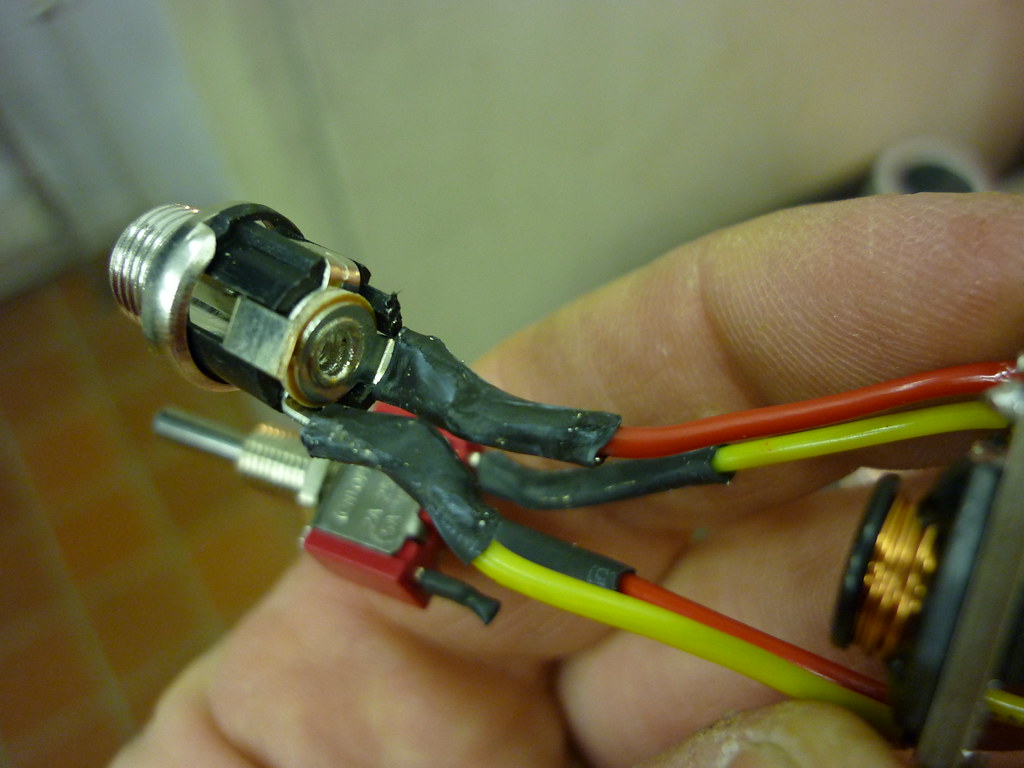 [/img]
[b]JOB 5[/b]
Push the LED's wires through the heatsink and trim to approx 25ish long, ie enough for you to solder the LED board but not to much that you can't fit it inside the heatsink relief. Then solder the LED board to the wires.
[img] 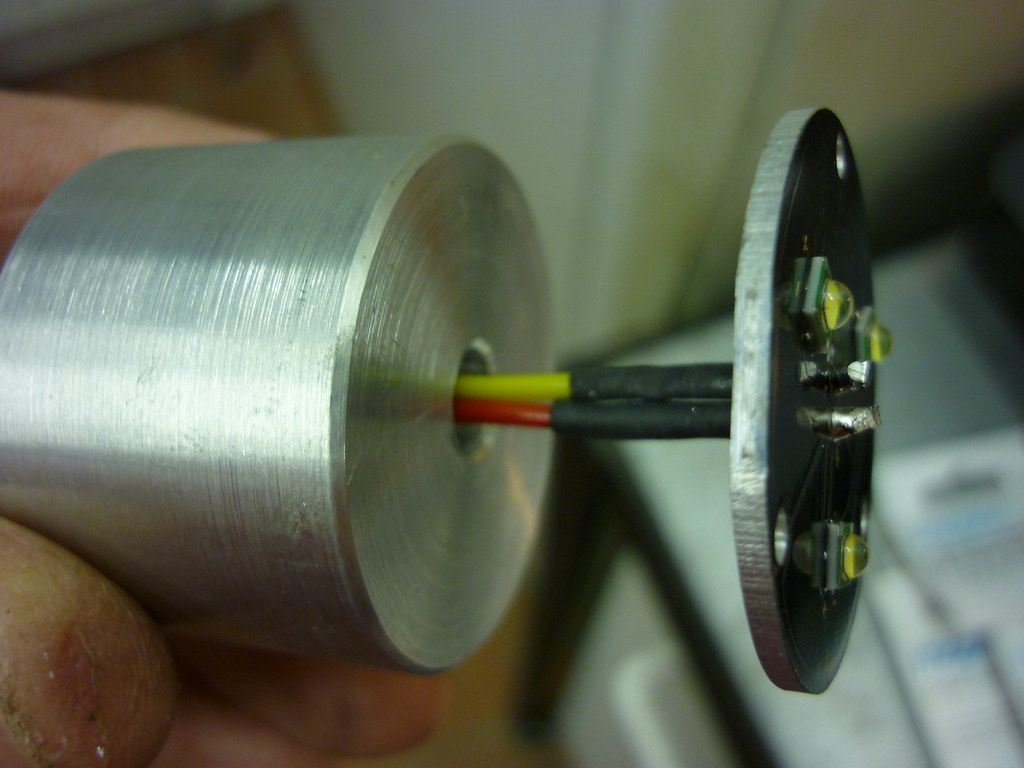 [/img]
[b]JOB 6[/b]
Try a dry assemble before adding any heat transfer compound and make sure everything fits, the relief in the heatsink allows plenty of room for the wires and driver.
[b]JOB 7[/b]
Wrap the driver in insulation tape OR heatshrink. I would have used heatshrink but I did not have the right size. You will need at least 25mm dia. If using insulation tape, wrap the driver with at least 4 lots of it and fold it down on either side of the driver.
[img] 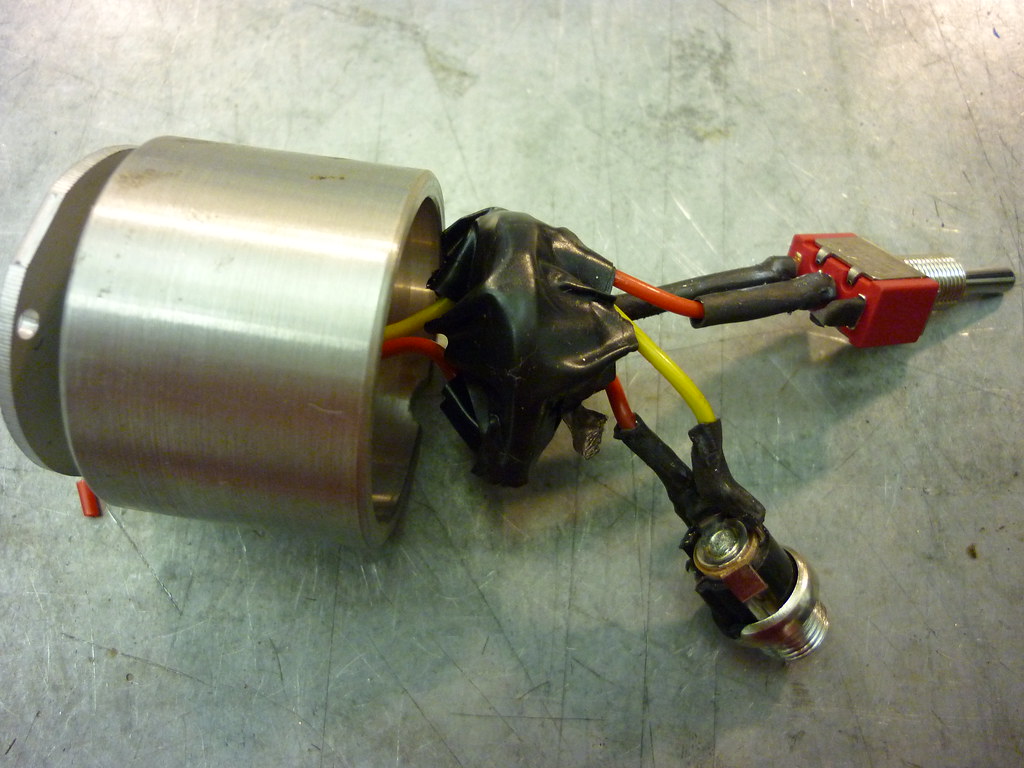 [/img]
[b]JOB 8[/b]
I used non setting heat transfer paste, as this will allow me to upgrade as new LED's are available. Put the heat transfer paste under the LED board and push this onto the heatsink.
[b]JOB 9[/b]
Then put heat transfer paste around the rear of the heatsink and install the lot into the housing. Clean off any excess heat transfer paste and fasten the connector and switch and then screw on the front of the housing or cap
[img] 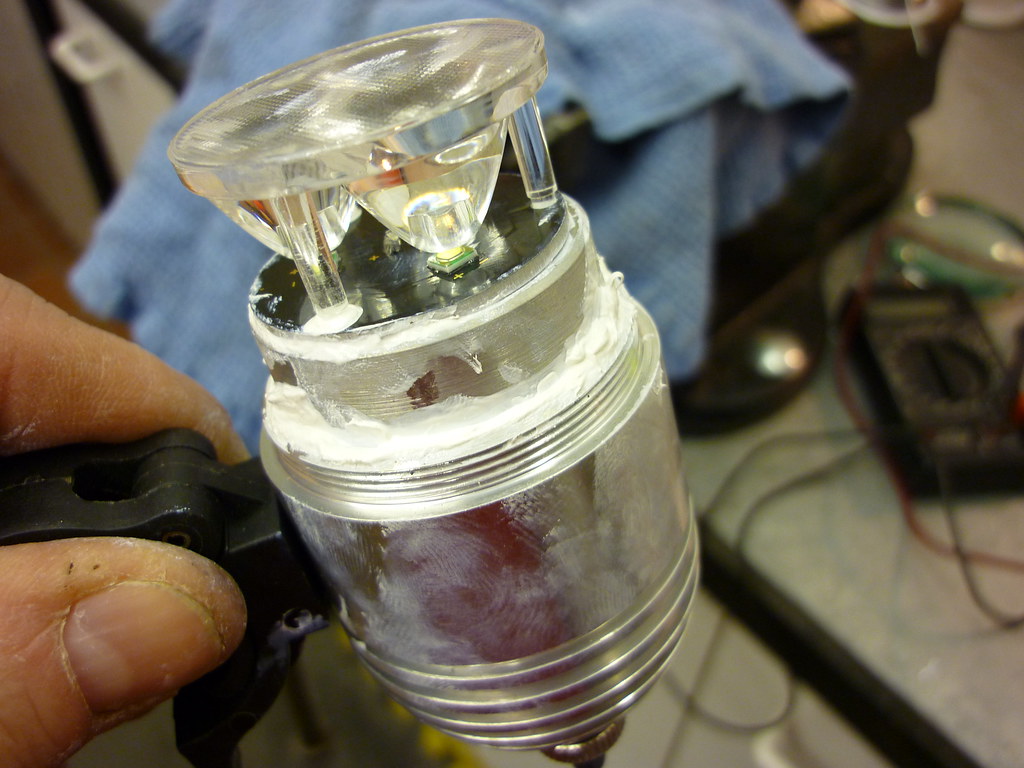 [/img]
[b]JOB 10[/b]
Plug your connector in and switch on and Voila
[img] 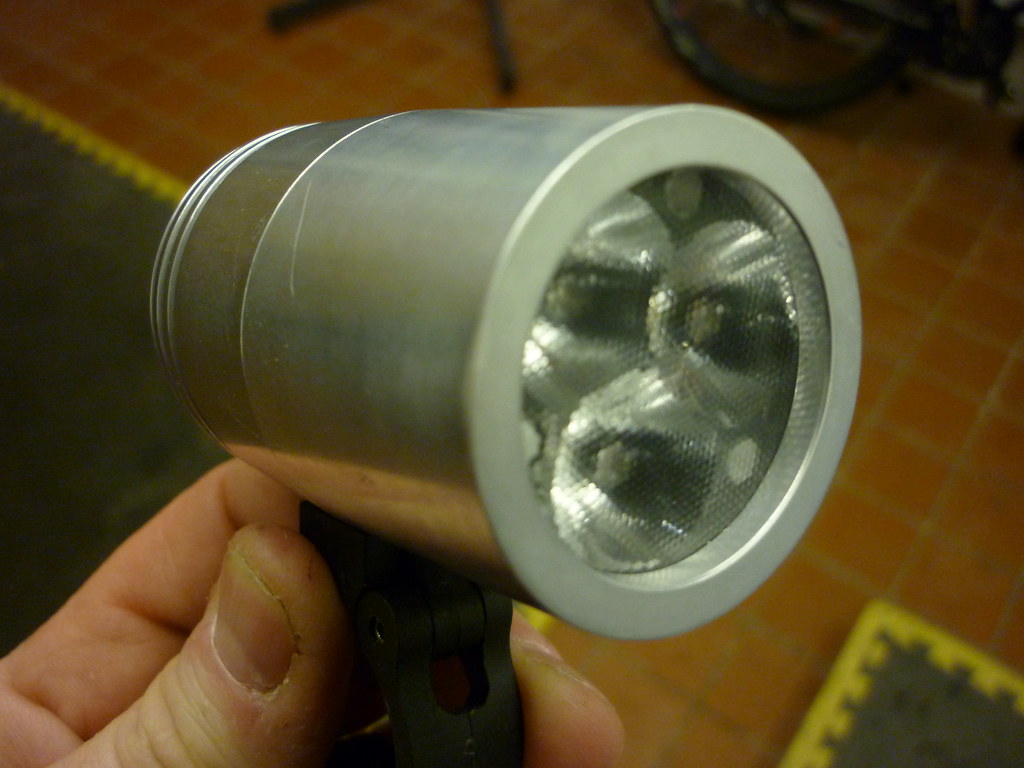 [/img]
[img] 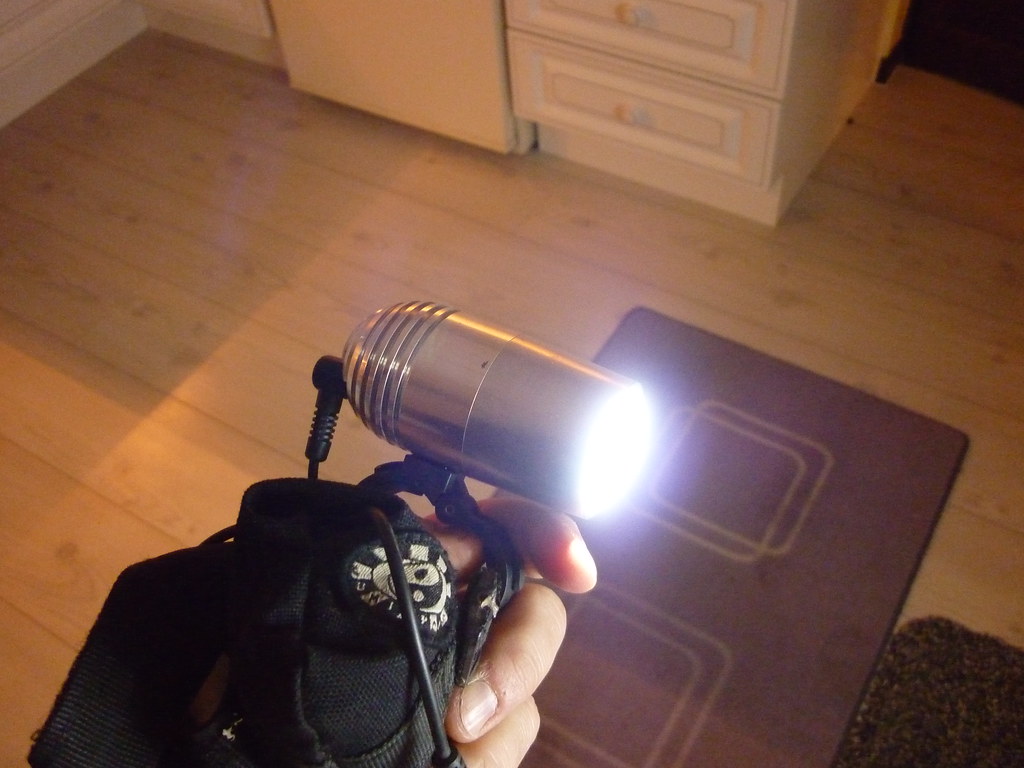 [/img]
[img] 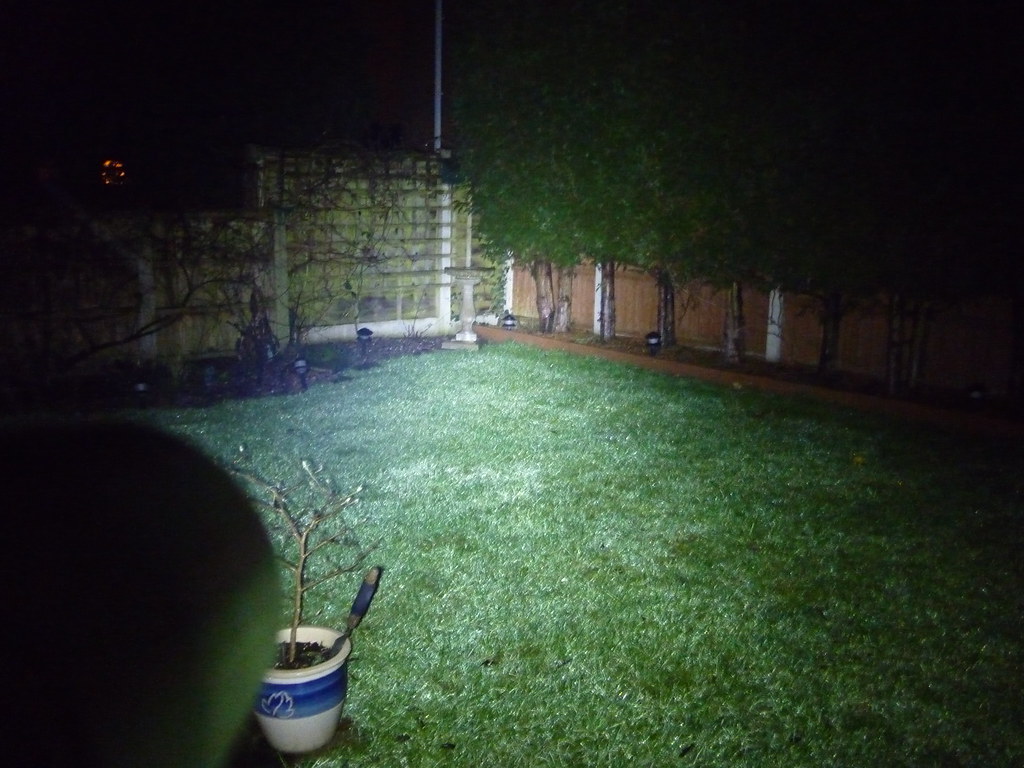 [/img]
[b]JOB 11[/b]
Alter the settings from the default by folowing the instructions for the driver ie set the max current (I use 1 amp) set the temp to 80deg C and then open a well earned beer.
1000lumens (if using a triple XPG LED) and no more hassle about fragile HID bulbs.
any questions mail me it's in the profile.
Happy Soldering
Chuck
LED
http://www.cutter.com.au/proddetail.php?prod=cut937
and choose these from the drop down menus
XPGWHT-L1-0000-00G51 R4 Bin
Cutter - XPGMR11T
OPTIC
http://www.cutter.com.au/proddetail.php?prod=cut904
and choose this from the drop down menus
Cute-3-SS-XP
DRIVER
http://www.dstar-led.com/DIY/diy_drivers.html
TaskLED bFlex driver
I've done loads of these and they are great and reliable. If you want to use either XPG or XRE LED's cutter are selling them off a bit cheaply because of the introduction of the XML I think.
I don't have any heatsinks left but I can get you the dimensions of one if you know anybody who wants one.
I suppose I could see if enough people want a heatsink, if they do i can get another batch machined.
Troutie,
I emailed you last week about a driver for a lupine conversion (7.2v) is the driver from the US the Madflex.
Cheers
p.s. any news on the delivery of the XPG kit?
VR.
That is one mighty informative post for the DIY'er, 10/10 to you for your comprehensive guide.
😀
As for those wondering whether they need a Boost or Buck LED constant currrent driver. I'll try to expand on this.
[b]Buck[/b] drivers require an input Voltage that is [b]higher[/b] than the voltage needed by the LEDs.
So, if you were to use 3 XM-L LEDs (not withstanding the current to be supplied, that comes later), then the [i]forward voltage[/i] would be around 3 volts per LED and therefore, 9 volts in total.
So, in the case of the OP.
Having a [b]14.8v[/b] battery, the [b]input voltage supplied from the battery[/b] is higher than the LED voltage for 3 x XM-L LEDs of [b]9v[/b].
So in this case a [b]Buck[/b] driver is the way to go.
[b]Boost[/b] drivers, as their name may suggest, work in the opposite fashion.
[b]Boost[/b] drivers require that the input voltage supplied from the battery be [b]Lower[/b] than the [i]forward voltage[/i] required by the LEDs.
So in this case, if the OP had a [b]7.5v battery[/b], and they wanted to run 3 x XM-L LEDs with a [i]forward voltage[/i] of [b]9v[/b].
In this situation, we'd select a [b]Boost[/b] driver which will accept an [b]input voltage of 7.5v[/b], but will then supply an [b]output voltage of 9v[/b] to the LEDs, here the driver is [b]Boosting[/b] the input voltage supplied from the [b]7.5v[/b] battery, upto [b]9v[/b] required by the LEDs.
There, I hope that helps someone on the LED driver front.
😀
So, Ambrose, I've just googled images for the Hope HiD and it would appear that you should have enough room in the housing to install a driver and an LED board.
If you're lucky, someone on here, MTBR or CPF may have already carried out and documented their conversion to LED, for this light.
But if starting from scratch, then firstly, learn what voltage your battery is, then have a measure-up of the Hope HiD housing, [i]then[/i] trawl sites like Cutter's to find a suitably sized MCPCB and optic combination, with any number of LEDs already installed on it, that will fit inside your light housing (looks like it will take a triple or possibly a quad LED board and optic), with room to spare for LED driver, switch, and possibly a power connector, but I'm not sure if that particular Hope light just has the cable enter the light housing via a cable grommet ?.
Then sort out a suitable fixing solution for installing the LED board and optic into the Hope housing, as well as for mounting the driver, and you should be there.
i, Measure up the housing.
ii, Find a suitably sized LED board and Optic.
iii, Then depending on your battery voltage, you will require either a Buck, or Boost LED driver, and possibly a new switch.
😉
Just got back to this post, thanks all for being so helpful 😉
In fact, I would go as far to say that this subject has the most supportive experts/hard-core helpers I've ever encountered on a forum.
So, BIG thanks and hugs to you guys (platonically).
[b]Qn[/b]
Local electronic shop has provided really cheap in-line connectors (the inner male pole just snapped off while soldering it up?)and plastic sockets that seem very shallow.
The one's Lumi use are much better, they seem sturdy and more of a 'snug' mate-up 😯 😛
Anyone recommend a supplier?
[b]Laughing at myslef[/b]
Designed a really accurate circuit diagaram, then got excited and ploughed on without checking things (inner child dominating) and consequently toasted the leds 🙄 👿 😛 😀
Do you mean the power socket? I've found this ebay socket: [url= http://cgi.ebay.co.uk/2-5mm-DC-Power-Socket-Panel-Mounting-and-Plug-/120502092175? ]2.5mm DC Power Socket Panel Mounting and Plug[/url] to be excellent for Lumicycle battery packs. It gives a very snug fit.
[img]  [/img] Tip Top post vortex
Thanks 5theElefant,
I didn't explain that very well. My power socket is bang on, no probs and as you say it fits the lumi male pole very well.
No, its the 'in-line' male-female connectos (dual core flex) that I'm using to connect both (separately for servicing)the switch(bar mount) and lamp unit that are poor quality.
Cheers.
The Driver explaination was very clear Luminous, btw. Thanks for bringing it all together. The How-to pickies are a awesome Votex, nice one.
Think I'll go for the XML option (inner child again) when I have the current project nailed.
Forgot to mention just one tiny aspect.
The lumi casing in the pickies above is slightly different to mine. Mine has a slight taper towards the lens end but the switch housing end looks the same. I'm fairly sure I'll have to stick with using the 'arse-end' of the can to fit the 3xcute lens you all mention on account of the diminishing dia. as one proceeds out to the lens end.
That'll mean a much thinner heat sink.........ummmmm???
Great fun though, I love geeking with this stuff 😛
Mine tapers too, no problem fitting a 35mm triple and optic at all!
No problem guys.
It was posted about 2 weeks or so after I did the 'how to' Halogen one.
The halogen one seems to have survived the STW crash of last Christmas, but the HID one doesn't.
Yip, all cans taper to the fwd end and the heatsinks fit spot on.
as Kinda666 says any 35mm optic will fit.
Happy days.
Some very informative information above, I was wondering if you guys can pint me in the right direction. I currently have a Lupine Nightmare (7.2v 9Ah) and a Lupine Passubio (7.2v 6.8 Ah) I am looking to do a conversion or a donor job. I have the kit in the following post on order from Troutie.
http://www.singletrackworld.com/forum/topic/diy-700-lumen-batteries-inside-light
Which consists of 2 XPGs on 20mm stars heat sink, cable etc.
My question is whether I am best continuing to build the light in the above post using either of the batteries above. If so what driver do people recommend for 7.2v 2 LEDs with a forward voltage of 3v means I have more volts than the LEDs require, but I have heard the battery will loose voltage causing the lights to fail . Does this mean I need a boost driver?
The other option would be to use the existing housings from the Lupines. (Nightmare and Passubio use the same light housing). So I could mount 1 / 2/ 3 LEDs in each housing, maybe house the driver in a separate enclosure?
Any help would be greatly appreciated
Andy
[i]My question is whether I am best continuing to build the light in the above post using either of the batteries above. If so what driver do people recommend for 7.2v 2 LEDs with a forward voltage of 3v means I have more volts than the LEDs require, but I have heard the battery will loose voltage causing the lights to fail . Does this mean I need a boost driver?[/i]
ND.
I'm not sure, but doesn't the kit you're ordering from Trout have the driver included ?. If so then you may as well stick to the build spec as the others have mostly done.
I saw that mamoth thread when it started, and I got the impression that BCT drivers were specified for that particular build.
I think they are a Buck driver.
Ref converting the Lupines. I assume they have stopped working ?.
Anyway, there will always be options, but firstly you will need to have a measure-up of the donor housings and see what you can actually fit into them.
If any of you lot can post pics of your donor housings, the old stuff you're wanting to convert, it may be useful.
Alternatively, I think Trout likes to get stuck into new conversions, so asking him to upgrade an old light to LED might be worth considering.
😉
EDIT: NetDonkey. If you can fit a triple into either of your Lupine housings, then combined with a Boost driver like the MaxFlex, you could have a really sweet little light conversion.
A boost driver having to supply around 9v to 3 x LEDs, from 7.2v battery, means that the driver will run very efficiently for most of the run time of the battery.
Netdonkey
just googled the two lights you mentioned.
you have some monster batteries. and I assume the light heads are mr11 halogens. and if made of aluminium
then probably good hosts for a triple or quad xpg and maxflex.
happy to have a go as lumi says
one other thing is I have your stuff packed in my van ready for the po. so if you want to cancel
and put it to a lupine upgrade. then I am fine with that.
Thanks for the replies you guys certainly know your stuff. The reason for converting the lupines is not so much that they are broken but they are neither particularly powerful by modern standards nor do you get a very long battery life from them. (2 - 2.5 hrs on full) I am looking for lights that would last me say 3 - 4 hours on the 6.8 Ah battery and a bit more on the 9 Ah and of course lots of those nice lumens.
It sounds like it is worth exploring the 3 XPG madflex option. As for upgrades \ sourcing bits, how do you prefer to work Troutie? Could you source the XPGs for me or do I need to go to Cutters?
I will drop you a mail about you doing a potential upgrade for me.
Cheers
Andy
yes I have good stock levels of xpgs. and a few of the triple optics plus Maxflex drivers
it would need a heatsink making which is no problem
Hi Troutie,
I've been lurking and building my own lights ever since Rob Dean Hove's epic post.
So my XML-T6 triple mcpcb with the 3xcute-narrow is on order from cutter.....but do you have info when and where i can get a medium beam cute from? I should ask mark at cutter too!
cheers
AL
Ha he has a lot to amswer for that Rob
dont waste your money looking for a medium. stick with the narrow. it will be plenty wide enough
and an awesome light
the one I built for a helmet light drowned out my Lib on the bars its just a huge far reaching wall of lumens.
just lent it to my mates son to use on the uni night rides around leeds so waiting for his feedback .
